PHP & Web Development Blogs

Search Results For: applications
Showing 1 to 5 of 22 blog articles.
23012 views · 2 years ago
Is PHP a dying language

It seems like this question gets asked every year, as for some reason the perception surrounding PHP is that it is a language used by hobbyists, or a dying language - a programming language on its way out.

Before we take a look at "is PHP being used less," let's start with some critical points to consider when choosing a programming language to learn/ invest in.

PHP powers ~80% of the web


The first point is how popular PHP is as a program language. Recently in a podcast a debate around PHP was raised, with the question being is it an "enterprise" language. The argument against PHP is that it is not widely adopted by enterprises for enterprise application development - or apps that are traditionally developed in Java or .Net.

The key here is understanding that every tool has its strengths and weaknesses, and there are times where using a compiled language such as Java is a smarter move than using PHP. As always, you want to choose the right tool for the job, and PHP as a programming language excels for web applications. That's why today it powers nearly 80% of the websites on the internet! I want to repeat that number, nearly 80% of websites on the internet!

In the podcast, after the initial argument that PHP was not an enterprise language, I had one question to ask - "can you name one enterprise that doesn't use PHP?" Despite the misconception that PHP is not an enterprise language, nearly every enterprise utilizes PHP in some fashion (many for their website, blog, or internal tools). While PHP may not power the app they offer as a service (although for many companies it does), it powers just as critical of offerings that help drive success for the company.

PHP made Yahoo, Facebook, and Tumblr possible


It's not just personal blogs running on a WordPress install, or small sites running on Drupal (btw, both of these power high traffic, well known web properties), but PHP actually makes development for the web easier and faster. Because it is not a compiled language and is designed to scale, companies are able launch faster, add new features as they go, and grow to enormous scale.

Some of the sites that started with PHP include Yahoo, Facebook, Tumblr, Digg, Mailchimp, and Wikipedia! But it's not just older platforms that started off and have grown to scale with PHP - Etsy, Slack, Baidu, Box, and Canva also got started with PHP! Read why Slack chose PHP

In fact, according to BuiltWith, PHP powers 53.22% of the top 10k websites!

Programming languages don't just disappear


Understanding the prevalence of PHP today, and how often it is used is critical to understanding the longevity of PHP. Despite the radicalized idea, programming languages (and thus programming jobs) do not just disappear overnight. Today you can still find jobs writing code used in mainframes - such as Fortran or Cobol.

As long as companies have applications that use PHP, they'll need someone who knows PHP to maintain the application. And with PHP actively being developed and maintained (PHP 8 having just been released), and PHP powerhouses like WordPress, Drupal, SugarCRM, and others powering websites and apps around the world, it's a safe bet PHP won't be going anywhere anytime soon.

But with the basics out of the way, let's look at how PHP has faired over the years.

PHP usage over the years


While there is no exact measurement that determines how programming languages are ranked, there are several different rankings we can look at to see how a language has evolved over the years, and where it ranks today.

GitHub's most popular programming languages


Every year GitHub releases a report of the most popular languages being used to create repositories on GitHub.com. While this isn't an exact way to quantify a programming language, it does help us understand what languages developers are using and promoting for their applications. It also helps us see how lively the community itself is.

In 2014, PHP was ranked as the 3rd most popular programming language, being beat out only by JavaScript and Java. With the emergence of Typescript, C# moving open source, and increased usage of Python for AI - PHP did drop - and was the 6th most popular programming language on GitHub for 2020.

PHP on GitHub over the years

PHP's ranking on the Tiobe index


Another index for software popularity is the Tiobe index, which bases their ratings off of the number of search engines for programming languages. This index is heavily relied on by companies when making programming and investment decisions, especially in developer marketing.

Like with GitHub, PHP has also seen a decline in the Tiobe index. Ranked 8th last year for all languages, PHP dropped to 9th place, being outranked by the C languages (C, C#, C++), Java, Visual Basic, Python, JavaScript, and Assembly. However, to put the rankings in contrast, PHP is 9th out of the 274 languages Tiobe tracks, and bests SQL, Ruby, Groovy, Go, and Swift.

You can see the latest Tiobe index (updated monthly) at: https://www.tiobe.com/tiobe-index/

PHP's ranking on BuiltWith


The last model we'll look at is BuiltWith. BuiltWith scans website headers to determine what a website is powered by, and like GitHub and Tiobe provides a ranking of programming language popularity and trends.

Builtwith provides an interesting perspective in that we can see an explosion of sites being built with PHP (nearly tripling from 2013 to 2016) before dropping and normalizing in 2017. From 2017 to present, the number of sites using PHP has remained almost constant.

BuiltWith PHP Usage

This suggests (as with what we've seen with GitHub and Tiobe) that other languages have grown in popularity, such as JavaScript and Node.js. This doesn't mean that PHP is no longer being used or relied or, but rather that there is more competition and that there are other viable options whereas PHP stood alone at times in terms of being the goto language for web development.

Indeed, when we look at how PHP ranks amongst all technologies on BuiltWith, PHP receives the following BuiltWith awards:

• The most popular on the Entire Internet in Frameworks category.

• The most popular in the Top 10k sites in Frameworks category.

• The most popular in the Top 100k sites in Frameworks category.

• The most popular in the Top 1 Million sites in Frameworks category.

Conclusion


PHP's popularity has dropped from its height 10 years ago, however it still remains the most popular programming language powering the web. It's important to remember that every tool has pros and cons, and some of the bad rap PHP gets is when compared to languages designed to accomplish tasks or build programs that PHP was never designed to.

It's also important to remember a lot of early criticism for PHP came from it being a procedural programming language and not encompassing Object Oriented Programming capabilities. These capabilities were added in PHP 4 and with PHP 7 & 8 OOP has become a staple of the PHP language.

PHP is a viable, powerful language used by nearly every enterprise and many businesses large and small. In fact it powers over 50% of the top 10,000 websites on the web! With such large usage, popular tools such as WordPress, and an active community, it is safe to assume that PHP will remain a prominent language for years to come.
15339 views · 5 years ago
Create Alarm and Monitoring on Custom Memory and Disk Metrics for Amazon EC2

Today I am going write a blog on how to Monitor Memory and Disk custom metrics and creating alarm in Ubuntu.

To do this, we can use Amazon CloudWatch, which provides a flexible, scalable and reliable solution for monitoring our server.

Amazon Cloud Watch will allow us to collect the custom metrics from our applications that we will monitor to troubleshoot any issues, spot trends, and configure operational performance. CloudWatch functions display alarms, graphs, custom metrics data and including statistics.

Installing the Scripts


Before we start installing the scripts for monitoring, we should install all the dependent packages need to perform on Ubuntu.

First login to your AWS server, and from our terminal, install below packages

sudo apt-get update
sudo apt-get install unzip
sudo apt-get install libwww-perl libdatetime-perl


Now Install the Monitoring Scripts


Following are the steps to download and then unzip we need to configure the Cloud Watch Monitoring scripts on our server:
1. In the terminal, we need to change our directory and where we want to add our monitoring scripts.
2. Now run the below command and download the source:

curl https://aws-cloudwatch.s3.amazonaws.com/downloads/CloudWatchMonitoringScripts-1.2.2.zip -O

3. Now uncompress the currently downloaded sources using the following commands

unzip CloudWatchMonitoringScripts-1.2.2.zip && \

rm CloudWatchMonitoringScripts-1.2.2.zip && \

cd aws-scripts-mon


The directory will contain Perl scripts, because of the execution of these scripts only report memory run and disk space utilization metrics will run in our Ubuntu server.
Currently, our folder will contain the following files:
mon-get-instance-stats.pl - This Perl file is used to displaying the current utilization statistics reports for our AWS instance on which these file scripts will be executed.
mon-put-instance-data.pl - This Perl script file will be used for collecting the system metrics on our ubuntu server and which will send them to the Amazon Cloud Watch.
awscreds.template - This Perl script file will contain an example for AWS credentials keys and secret access key named with access key ID.
CloudWatchClient.pm - This Perl script file module will be used to simplify by calling Amazon Cloud Watch from using other scripts.
LICENSE.txt – This file contains the license details for Apache 2.0.
NOTICE.txt – This file contains will gives us information about Copyright notice.
4. For performing the Cloud Watch operations, we need to confirm that whether our scripts have corresponding permissions for the actions:

If we are associated with an IAM role with our EC2 Ubuntu instance, we need to verify that which will grant the permissions to perform the below-listed operations:

cloudwatch:GetMetricStatistics

cloudwatch:PutMetricData

ec2:DescribeTags

cloudwatch:ListMetrics


Now we need to copy the ‘awscreds.template’ file into ‘awscreds.conf’ by using the command below and which will update the file with details of the AWS credentials.

cp awscreds.template awscreds.conf

AWSAccessKeyId = my_access_key_id

AWSSecretKey = my_secret_access_key


Now we completed the configuration.

mon-put-instance-data.pl


This Perl script file will collect memory, disk space utilization data and swap the current system details and then it makes handling a remote call to Amazon Cloud Watch to reports details to the collected cloud watch data as a custom metrics.

We can perform a simple test run, by running the below without sending data to Amazon CloudWatch

./mon-put-instance-data.pl --mem-util --verify --verbose


Now we are going to set a cron for scheduling our metrics and we will send them to Amazon CloudWatch
1. Now we need to edit the crontab by using below command:

 crontab -e

2. Now we will update the file using the following query which will disk space utilization and report memory for particular paths to Amazon CloudWatch in every five minutes:

*/5 * * * * ~/STORAGE/cloudwatch/aws-scripts-mon/mon-put-instance-data.pl --mem-util --mem-avail --mem-used --disk-space-util --disk-space-avail --disk-space-used --disk-path=/ --disk-path=/STORAGE --from-cron


If there is an error, the scripts will write an error message in our system log.

Use of Options

--mem-used
The above command will collect the information about used memory and which will send the details of the reports in MBs into the MemoryUsed metrics. This will give us information about the metric counts memory allocated by applications and the OS as used.
--mem-util
The above command will collect the information about memory utilization in percentages and which will send the details of the Memory Utilization metrics and it will count the usage of the memory applications and the OS.
--disk-space-util
The above command will collect the information to collect the current utilized disk space and which will send the reports in percentages to the DiskSpaceUtilization for the metric and for the selected disks.
--mem-avail
The above command will collect the information about the available memory and which will send the reports in MBs to the MemoryAvailable metrics details. This is the metric counts memory allocated by the applications and the OS as used.
--disk-path=PATH
The above command will collect the information and will point out the which disk path to report disk space.
--disk-space-avail
The above command will collect the information about the available disk space and which will send the reports in GBs to the DiskSpaceAvailable metric for the selected disks.
--disk-space-used
The above command will collect the information about the disk space used and which will send the reports in GBs to the DiskSpaceUsed metric for the selected disks.

The PATH can specify to point or any of the files can be located on which are mounted point for the filesystem which needs to be reported.

If we want to points to the multiple disks, then specify both of the disks like below:

--disk-path=/ --disk-path=/home


Setting an Alarm for Custom Metrics


Before we are going to running our Perl Scripts, then we need to create an alarm that will be listed in our default metrics except for the custom metrics. You can see some default metrics are listed in below image:


Once we completed setting the cron, then the custom metrics will be located in Linux System Metrics.

Now we are going to creating the alarm for our custom metrics
1. We need to open the cloudwatch console panel at https://console.aws.amazon.com/cloudwatch/home
2. Now navigate to the navigation panel, we need to click on Alarm and we can Create Alarm.
3. This will open a popup which with the list of the CloudWatch metrics by category.
4. Now click on the Linux System Metrics . This will be listed out with custom metrics you can see in the below pictures


5. Now we need to select metric details and we need to click on the NEXT button. Now we need to navigate to Define Alarm step.


6. Now we need to define an Alarm with required fields

Now we need to enter the Alarm name for identifying them. Then we need to give a description of our alarm.

Next, we need to give the condition with the maximum limit of bytes count or percentage when it notifies the alarm. If the condition satisfies, then the alarm will start trigger.

We need to provide a piece of additional information about for our alarm.

We need to define what are the actions to be taken when our alarm changes it state.

We need to select or create a new topic with emails needed for sending notification about alarm state.
7. Finally, we need to choose the Create Alarm.

So its completed. Now the alarm is created for our selected custom metrics.

Finished!

Now the alarm will be listed out under the selected state in our AWS panel. Now we need to select an alarm from the list seen and we can see the details and history of our alarm.
13119 views · 5 years ago
Working With Thin Controller And Fat Model Concept In Laravel

Models and controllers are one of the most essential programming handlers in the Laravel MVC framework, and both are used vastly for different functional operations. Models in Laravel are created inside the app folder and are mostly used to interact with the database using Eloquent ORM, while the controllers are located inside the directory App/Http/Controllers.

As a programmer, you should have the knowledge how to keep the balance in between the programming usage of Models and controllers. As which one should be more utilized for allowing functional tasks in applications deployed on any PHP MySQL hosting.


What is the Concept of Thin Controller and FAT Models


The concept of the thin controller and fat model is that we do less work in our controllers and more work in our models. Like we use our controllers to validate our data and then pass it to the models. While in models, we define our actual functional logic and main coding operations of the desired application. This code structuring process is also a very basic concept of MVC and also the differentiating factor from the conventional complex programming which we mistakenly ignore sometimes.


Why FAT Controllers Are Bad For Handling Code


Controllers are always meant to be defined short and concise, and it should only be used for receiving requests and return responses to it. Anything else further should be programmed in Models, which is actually made for main functional operations.

Placing functional logic in controllers can be bad for many reasons for your applications deployed on anyhosting for PHP. As it not only makes code structure long but also makes it complex sometimes. Further placing code in Controllers is also not recommended because if same functionality is needed somewhere else in route, then pulling out the whole code from their becomes difficult and so its reusability in the application.

Though Laravel is an MVC framework while developing on laravel, we sometimes ignore this and write mostly all our code including the extending of App\Model and all our functional logic in controller route methods. What we can do here is we can create a sub model of our parent model. For example, our parent model is User then we can create another sub model of username in CustomerModel if you are using the same User model for all types of users. In this model, we will write all the logic related to user type Customer.

So now let's take an example of my existing blog creating comment system with laravel and vuejs. In that article, you can see I have made so much mess in my controller methods. Mostly, I have written all my comments logic in my methods, so to shorten that let's clean them in this article. Inside app folder, I will create a new file with name CommentModel.php. Inside this file, I will write my whole logic for comment functions. This is my basic file:


<?php
namespace App;

use App\Comment;
use App\CommentVote;
use App\CommentSpam;
use App\User;
use Auth;

class CommentModel
{


}

?>


Right now it contains no function but has the reference of all my models which I required for this model. Let's first add a function namedgetallcomments passing$pageId as a parameter inside it. The function will get all the comments for the given page:


public function getAllComments($pageId)
{
$comments = Comment::where('page_id',$pageId)->get();

$commentsData = [];


foreach ($comments as $key) {
$user = User::find($key->users_id);
$name = $user->name;
$replies = $this->replies($key->id);
$photo = $user->first()->photo_url;
$reply = 0;
$vote = 0;
$voteStatus = 0;
$spam = 0;
if(Auth::user()){
$voteByUser = CommentVote::where('comment_id',$key->id)->where('user_id',Auth::user()->id)->first();
$spamComment = CommentSpam::where('comment_id',$key->id)->where('user_id',Auth::user()->id)->first();


if($voteByUser){
$vote = 1;
$voteStatus = $voteByUser->vote;
}

if($spamComment){
$spam = 1;
}
}


if(sizeof($replies) > 0){
$reply = 1;
}

if(!$spam){
array_push($commentsData,[
"name" => $name,
"photo_url" => (string)$photo,
"commentid" => $key->id,
"comment" => $key->comment,
"votes" => $key->votes,
"reply" => $reply,
"votedByUser" =>$vote,
"vote" =>$voteStatus,
"spam" => $spam,
"replies" => $replies,
"date" => $key->created_at->toDateTimeString()
]);
}


}
$collection = collect($commentsData);
return $collection->sortBy('votes');
}


Now I will create another function namedreplies which takes$commentId as a parameter. The function is more or less programmed in the same manner as the upper function get all comments.


protected function replies($commentId)
{
$comments = Comment::where('reply_id',$commentId)->get();
$replies = [];


foreach ($comments as $key) {
$user = User::find($key->users_id);
$name = $user->name;
$photo = $user->first()->photo_url;

$vote = 0;
$voteStatus = 0;
$spam = 0;


if(Auth::user()){
$voteByUser = CommentVote::where('comment_id',$key->id)->where('user_id',Auth::user()->id)->first();
$spamComment = CommentSpam::where('comment_id',$key->id)->where('user_id',Auth::user()->id)->first();

if($voteByUser){
$vote = 1;
$voteStatus = $voteByUser->vote;
}

if($spamComment){
$spam = 1;
}
}
if(!$spam){


array_push($replies,[
"name" => $name,
"photo_url" => $photo,
"commentid" => $key->id,
"comment" => $key->comment,
"votes" => $key->votes,
"votedByUser" => $vote,
"vote" => $voteStatus,
"spam" => $spam,
"date" => $key->created_at->toDateTimeString()
]);
}


}


$collection = collect($replies);
return $collection->sortBy('votes');
}


Now lets create a functioncreate comment which passes$array as a parameter in it:


public function createComment($arary)
{
$comment = Comment::create($array);


if($comment)
return [ "status" => "true","commentId" => $comment->id ];
else
return [ "status" => "false" ];
}


Similarly, Now I will create all the function for comment in myCommentModel, so that all the functions gets accumulated in one model.


<?php
namespace App;

use App\Comment;
use App\CommentSpam;
use App\CommentVote;
use App\User;
use Auth;

class CommentModel
{
public function getAllComments($pageId)
{
$comments = Comment::where('page_id', $pageId)->get();

$commentsData = [];

foreach ($comments as $key) {
$user = User::find($key->users_id);
$name = $user->name;
$replies = $this->replies($key->id);
$photo = $user->first()->photo_url;
$reply = 0;
$vote = 0;
$voteStatus = 0;
$spam = 0;
if (Auth::user()) {
$voteByUser = CommentVote::where('comment_id', $key->id)->where('user_id', Auth::user()->id)->first();
$spamComment = CommentSpam::where('comment_id', $key->id)->where('user_id', Auth::user()->id)->first();

if ($voteByUser) {
$vote = 1;
$voteStatus = $voteByUser->vote;
}

if ($spamComment) {
$spam = 1;
}
}

if (sizeof($replies) > 0) {
$reply = 1;
}

if (!$spam) {
array_push($commentsData, [
"name" => $name,
"photo_url" => (string) $photo,
"commentid" => $key->id,
"comment" => $key->comment,
"votes" => $key->votes,
"reply" => $reply,
"votedByUser" => $vote,
"vote" => $voteStatus,
"spam" => $spam,
"replies" => $replies,
"date" => $key->created_at->toDateTimeString(),
]);
}

}
$collection = collect($commentsData);
return $collection->sortBy('votes');
}

protected function replies($commentId)
{
$comments = Comment::where('reply_id', $commentId)->get();
$replies = [];

foreach ($comments as $key) {
$user = User::find($key->users_id);
$name = $user->name;
$photo = $user->first()->photo_url;

$vote = 0;
$voteStatus = 0;
$spam = 0;

if (Auth::user()) {
$voteByUser = CommentVote::where('comment_id', $key->id)->where('user_id', Auth::user()->id)->first();
$spamComment = CommentSpam::where('comment_id', $key->id)->where('user_id', Auth::user()->id)->first();

if ($voteByUser) {
$vote = 1;
$voteStatus = $voteByUser->vote;
}

if ($spamComment) {
$spam = 1;
}
}
if (!$spam) {

array_push($replies, [
"name" => $name,
"photo_url" => $photo,
"commentid" => $key->id,
"comment" => $key->comment,
"votes" => $key->votes,
"votedByUser" => $vote,
"vote" => $voteStatus,
"spam" => $spam,
"date" => $key->created_at->toDateTimeString(),
]);
}

}

$collection = collect($replies);
return $collection->sortBy('votes');
}

public function createComment($arary)
{
$comment = Comment::create($array);

if ($comment) {
return ["status" => "true", "commentId" => $comment->id];
} else {
return ["status" => "false"];
}

}

public function voteComment($commentId, $array)
{
$comments = Comment::find($commentId);
$data = [
"comment_id" => $commentId,
'vote' => $array->vote,
'user_id' => $array->users_id,
];

if ($array->vote == "up") {
$comment = $comments->first();
$vote = $comment->votes;
$vote++;
$comments->votes = $vote;
$comments->save();
}

if ($array->vote == "down") {
$comment = $comments->first();
$vote = $comment->votes;
$vote--;
$comments->votes = $vote;
$comments->save();
}

if (CommentVote::create($data)) {
return true;
}

}

public function spamComment($commentId, $array)
{
$comments = Comment::find($commentId);

$comment = $comments->first();
$spam = $comment->spam;
$spam++;
$comments->spam = $spam;
$comments->save();

$data = [
"comment_id" => $commentId,
'user_id' => $array->users_id,
];

if (CommentSpam::create($data)) {
return true;
}

}
}
?>


Now we have all our required methods inCommentModel. So now let's clean upCommentController which is currently bit complex and lengthy in code structure. As right nowCommentController look like this:


<?php

namespace App\Http\Controllers;

use Illuminate\Http\Request;
use App\Http\Requests;
use App\Comment;
use App\CommentVote;
use App\CommentSpam;
use App\User;
use Auth;

class CommentController extends Controller
{


public function index($pageId)
{
$comments = Comment::where('page_id',$pageId)->get();

$commentsData = [];


foreach ($comments as $key) {
$user = User::find($key->users_id);
$name = $user->name;
$replies = $this->replies($key->id);
$photo = $user->first()->photo_url;
$reply = 0;
$vote = 0;
$voteStatus = 0;
$spam = 0;
if(Auth::user()){
$voteByUser = CommentVote::where('comment_id',$key->id)->where('user_id',Auth::user()->id)->first();
$spamComment = CommentSpam::where('comment_id',$key->id)->where('user_id',Auth::user()->id)->first();


if($voteByUser){
$vote = 1;
$voteStatus = $voteByUser->vote;
}

if($spamComment){
$spam = 1;
}
}


if(sizeof($replies) > 0){
$reply = 1;
}

if(!$spam){
array_push($commentsData,[
"name" => $name,
"photo_url" => (string)$photo,
"commentid" => $key->id,
"comment" => $key->comment,
"votes" => $key->votes,
"reply" => $reply,
"votedByUser" =>$vote,
"vote" =>$voteStatus,
"spam" => $spam,
"replies" => $replies,
"date" => $key->created_at->toDateTimeString()
]);
}


}
$collection = collect($commentsData);
return $collection->sortBy('votes');
}

protected function replies($commentId)
{
$comments = Comment::where('reply_id',$commentId)->get();
$replies = [];


foreach ($comments as $key) {
$user = User::find($key->users_id);
$name = $user->name;
$photo = $user->first()->photo_url;

$vote = 0;
$voteStatus = 0;
$spam = 0;


if(Auth::user()){
$voteByUser = CommentVote::where('comment_id',$key->id)->where('user_id',Auth::user()->id)->first();
$spamComment = CommentSpam::where('comment_id',$key->id)->where('user_id',Auth::user()->id)->first();

if($voteByUser){
$vote = 1;
$voteStatus = $voteByUser->vote;
}

if($spamComment){
$spam = 1;
}
}
if(!$spam){


array_push($replies,[
"name" => $name,
"photo_url" => $photo,
"commentid" => $key->id,
"comment" => $key->comment,
"votes" => $key->votes,
"votedByUser" => $vote,
"vote" => $voteStatus,
"spam" => $spam,
"date" => $key->created_at->toDateTimeString()
]);
}


}


$collection = collect($replies);
return $collection->sortBy('votes');
}


public function store(Request $request)
{
$this->validate($request, [
'comment' => 'required',
'reply_id' => 'filled',
'page_id' => 'filled',
'users_id' => 'required',
]);
$comment = Comment::create($request->all());
if($comment)
return [ "status" => "true","commentId" => $comment->id ];
}


public function update(Request $request, $commentId,$type)
{
if($type == "vote"){


$this->validate($request, [
'vote' => 'required',
'users_id' => 'required',
]);

$comments = Comment::find($commentId);
$data = [
"comment_id" => $commentId,
'vote' => $request->vote,
'user_id' => $request->users_id,
];

if($request->vote == "up"){
$comment = $comments->first();
$vote = $comment->votes;
$vote++;
$comments->votes = $vote;
$comments->save();
}

if($request->vote == "down"){
$comment = $comments->first();
$vote = $comment->votes;
$vote--;
$comments->votes = $vote;
$comments->save();
}

if(CommentVote::create($data))
return "true";
}

if($type == "spam"){


$this->validate($request, [
'users_id' => 'required',
]);

$comments = Comment::find($commentId);


$comment = $comments->first();
$spam = $comment->spam;
$spam++;
$comments->spam = $spam;
$comments->save();

$data = [
"comment_id" => $commentId,
'user_id' => $request->users_id,
];

if(CommentSpam::create($data))
return "true";
}
}


public function destroy($id)
{
}
}?>


After cleaning up the controller it will look much simpler and easy to understand like this:


<?php

namespace App\Http\Controllers;

use App\CommentModel;
use Illuminate\Http\Request;

class CommentController extends Controller
{

private $commentModel = null;
private function __construct()
{
$this->commentModel = new CommentModel();
}


public function index($pageId)
{
return $this->commentModel->getAllComments($pageId);
}


public function store(Request $request)
{
$this->validate($request, [
'comment' => 'required',
'reply_id' => 'filled',
'page_id' => 'filled',
'users_id' => 'required',
]);
return $this->commentModel->createComment($request->all());
}


public function update(Request $request, $commentId, $type)
{
if ($type == "vote") {

$this->validate($request, [
'vote' => 'required',
'users_id' => 'required',
]);

return $this->commentModel->voteComment($commentId, $request->all());
}

if ($type == "spam") {

$this->validate($request, [
'users_id' => 'required',
]);

return $this->commentModel->spamComment($commentId, $request->all());
}
}

}
?>


Wrap Up!


So Isn't it looking much cleaner and simpler to understand now? This is what actually a thin controller and fat model looks like. We have all our logic related to Comment system programmed in ourCommentModel and our controller is now just used to transfer data from the user to our model and returning the response which is coming from our model.

So this is how the structuring of the thin controller and fat model is made. Give your thoughts in the comments below.
12890 views · 4 years ago
Why Cloudways is the Perfect Managed Hosting for PHP Applications

The following is a sponsored blogpost by Cloudways


Developing an application is not the sole thing you should bank on. You must strive to find the best hosting solution to deploy that application also. The application’s speed is dependent on the hosting provider, that is why I always advise you to go for the best hosting solution to get the ultimate app performance.

Now a days, it is a big challenge to choose any web hosting, as each hosting has its own pros and cons which you must know, before considering it finally for the deployment. I don’t recommend shared hosting for PHP/Laravel based applications, because you always get lot of server hassles like downtime, hacking, 500 errors, lousy support and other problems that are part and parcel of shared hosting.

For PHP applications, you must focus on more technical aspects like caching, configs, databases, etc. because these are essential performance points for any vanilla or framework-based PHP application. Additionally, if the app focuses on user engagement (for instance, ecommerce store), the hosting solution should be robust enough to handle spikes in traffic.

Here, I would like to introduce Cloudways PHP server hosting to you which provides easy, developer and designer friendly managed hosting platform. With Cloudways, you don't need to focus on PHP hosting, but must focus on building your application. You can easily launch cloud servers on five providers including DigitalOcean, Linode, Vultr, AWS and GCE.


Cloudways ThunderStack


Being a developer, you must be familiar with the concept of stack - an arrangement of technologies that form the underlying hosting solution.

To provide a blazing fast speed and a glitch-free performance, Cloudways has built a PHP stack, known as ThunderStack. This stack consists of technologies that offer maximum uptime and page load speed to all PHP applications. Check out the following visual representation of ThunderStack and the constituent technologies:


alt_text


As you can see, ThunderStack comprises of a mix of static and dynamic caches with two web servers, Nginx and Apache. This combination ensures the ultimate experience for the users and visitors of your application.


Frameworks and CMS


The strength and popularity of PHP lies in the variety of frameworks and CMS it offers to the developers. Realizing this diversity, Cloudways offers a hassle-free installation of major PHP frameworks including Symfony, Laravel, CakePHP, Zend, and Codeigniter. Similarly, popular CMS such as WordPress, Bolt, Craft, October, Couch, and Coaster CMS - you can install these with the 1-click option. The best part is that if you have a framework or CMS that is not on the list, you can easily install it through Composer.


1-Click PHP Server & Application Installation


Setting up a stack on an unmanaged VPS could take an entire day!

When you opt for Cloudways managed cloud hosting, the entire process of setting up the server, installation of core PHP files and then the setup of the required framework is over in a matter of minutes.

Just sign up at Cloudways, choose your desired cloud provider, and select the PHP stack application.


alt_text


As you can see, your LAMP stack is ready for business in minutes.

Many PHP applications fail because essential services are either turned off or not set up properly. Cloudways offers a centralized location where you can view and set the status of all essential services such as:


* Apache
* Elasticsearch
* Memcached
* MySQL
* PHP-FPM
* Nginx
* New Relic
* Redis
* Varnish


alt_text


Similarly, you can manage SMTP add-ons without any fuss.


Staging Environment


With Cloudways, you can test your web applications for possible bugs and errors before taking it live.

Using the staging feature, developers can first deploy their web sites on test domains where they can analyze the applications performance and potential problems. This helps site administrators to fix those issues timely and view the application performance in real-time.

A default sub domain comes pre-installed with the newly launched application, making it easy for the administrators to test the applications on those testing subdomains. Overall, it's a great feature which helps developers know about the possible errors that may arise during the live deployment.

alt_text

Pre-Installed Composer & Git


PHP development requires working with external libraries and packages. Suppose you are working with Laravel and you need to install an external package. Since Composer has become the standard way of installing packages, it comes preinstalled on the Cloudways platform. Just launch the application and start using Composer in your project.

Similarly, if you are familiar with Git and maintain your project on GitHub or BitBucket, you don’t need to worry about Git installation. Git also comes pre-configured on Cloudways. You can start running commands right after application launch.


Cloudways MySQL Manager


When you work with databases in PHP, you need a database manager. On the Cloudways platform, you will get a custom-built MySQL manager, in which you can perform all the tasks of a typical DB manager.

alt_text


However, if you wish to install and use another database manager like PHPMyAdmin, you can install it by following this simple guide on installing PHPMyadmin.


Server & Application Level SSH


If you use Linux, you typically use SSH for accessing the server(s) and individual applications. A third-party developer requires application and server level access as per the requirements of the client. Cloudways offers SSH access to fit the requirements of the client and users.

alt_text


PHP-FPM, Varnish & Cron Settings


Cloudways provides custom UI panel to set and maintain PHP-FPM and Varnish settings. Although the default configuration is already in place, you can easily change all the settings to suit your own, particular development related requirements. In Varnish settings, you can define URL that you want to exclude from caching. You can also set permissions in this panel.

alt_text


Cron job is a very commonly used component of PHP application development process. On Cloudways platform, you can easily set up Cron jobs in just a few clicks. Just declare the PHP script URL and the time when the script will run.

alt_text


Cloudways API & Personal Assistant Bot


Cloudways provides an internal API that offers all important aspects of the server and application management. Through Cloudways API, you can easily develop, integrate, automate, and manage your servers and web apps on Cloudways Platform using the RESTful API. Check out some of the use cases developed using Cloudways API. You just need your API key and email for authentication of the HTTP calls on API Playground and custom applications.

alt_text


Cloudways employs a smart assistant named CloudwaysBot to notify all users about server and application level issues. CloudwaysBot sends the notifications on pre-approved channels including email, Slack and popular task management tools such as Asana and Trello.


Run Your APIs on PHP Stack


Do you have your own API which you want to run on the PHP stack? No problem, because you can do that, too with Cloudways! You can also use REST API like Slim, Silex, Lumen, and others. You can use APIs to speed up performance and require fast servers with lots of resources. So, if you think that your API response time is getting slower due to the large number of requests, you can easily scale your server(s) with a click to address the situation.


Team Collaboration


When you work on a large number of applications with multiple developers, you need to assign them on any specific application. Cloudways provides an awesome feature of team collaboration through which you can assign developers to specific application and give access to them. You can use this tool to assign one developer to multiple applications. Through team feature, you can connect the team together and work on single platform. Access can be of different type; i.e. billing, support and console. You can either give the full access or a limited one by selecting the features in Team tab.

alt_text


Final Words


Managed cloud hosting ensures that you are not bothered by any hosting or server related issues. For practical purposes, this means that developers can concentrate on writing awesome code without worrying about underlying infrastructure and hosting related issues. Do sign up and check out Cloudways for the best and the most cost-effective cloud hosting solution for your next PHP project!
9699 views · 3 years ago


Welcome back!, if you’re new please be sure to read Part 1 here.


This tutorial will focus primarily on Security and will touch on how to plan functionality.

Planning out an application and seeing progress regularly is a good strategy as you are most likely to complete your tasks in a timely fashion with this approach.

Ready?, ok let’s jump into it!

DISCLAIMER


We highly recommend that you follow these tutorials on a localhost testing server like Uniserver. Read through Part 1 here to look at our recommendations. These tutorials follow a phased approach and it is highly recommended that you do not make snippets of code live prior to completing this tutorial series.


Where we left off – the serious stuff.


In the previous tutorial we saved variables to the database.

It’s important to note that further steps are needed to ensure that data transactions to / from the database are secure.

A great first step is to ensure that all POST data (data transmitted after a user clicks a form’s submit button) is sanitized.

What we’re trying to prevent


One of the most common exploits is SQL Injection, an attack most commonly used to insert SQL into db queries. POST data that’s not sanitized leaves a huge security hole for malicious exploits. In some cases SQL injection can be leveraged to rage an all out assault on a server’s operating system.

A few examples of a basic version of what this might look like can be seen below.


OUTCOME


This might delete your database table


OUTCOME


This might provide access to the entire user table and the password protected area/dashboard.


***Please note that there are various types of SQL injection techniques and I will delve into this during the course of this series.***


So what exactly is sanitization and what does it do?


When sanitizing POST data, we are essentially looking for any special characters that are often used in SQL injection attacks.

In many ways, this tiny piece of code is the unsung superhero of many database driven applications.

Let’s secure that POST data!


Navigate to your backend folder and open index.php

Locate the following line of code:

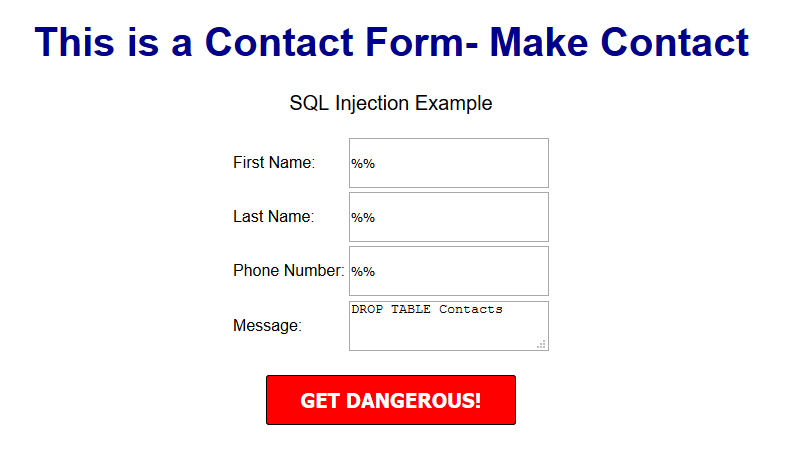
$sql = "INSERT INTO content(title,content,author)VALUES ('".$_POST["title"]."', '".$_POST["content"]."', '".$_POST["author"]."')";


Ok, let’s get to work.

Based on what I mentioned a few moments ago, it’s clear that our SQL statement is vulnerable so we need to sanitize the POST data pronto!

The method I will focus on first is $mysqli->real_escape_string. This will escape any special characters found in the POST data.

Add the following just above your $sql.

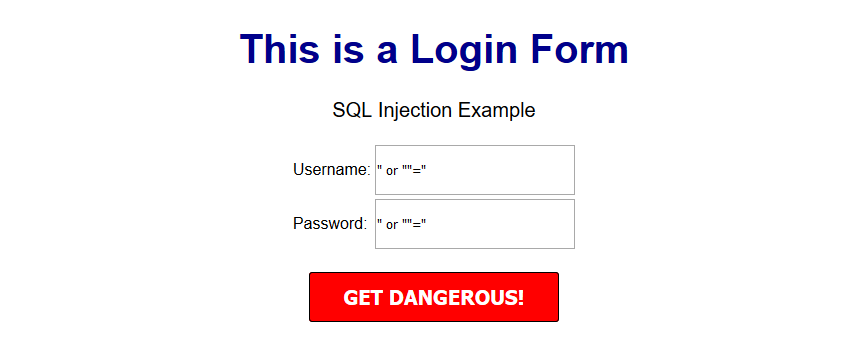
$title = $letsconnect -> real_escape_string($_POST['title']);

$content = $letsconnect -> real_escape_string($_POST['content']);

$author = $letsconnect -> real_escape_string($_POST['author']);


Did you notice the use of $letsconnect? This was used because of our db connection defined in conn.php.

Our new query will look like this:

$sql = "INSERT INTO content (title,content,author) VALUES ('".$title."', '".$content."', '".$author."')";


Go ahead and replace the old $sql.

Phew!, we can breathe easy now.

Next, let’s lighten things up a bit by focusing on functionality and aesthetics.


A phased approach is the best way to tackle projects of any size.

I tend to jot this down on paper before creating a more legible professional spec!.

Typically the phased approach lends itself to logical progression.

For example, over the next several days I will go over the following:

* Account Access
* The login process
* The registration process
* The password recovery process
* Frontend
* The look and feel
* Menus
* Sidebars
*Main Content
*Footer
* Backend
* Content Management
* Add/Edit/Delete
* Security

This will give us a good springboard to delve into more complex functionality.

The aesthetic I have in mind will be barebones at first with clean CSS practices (this will make life a whole lot easier when we have to make changes down the line!).

Challenge :


Plan out your own CMS, think about the user interface and design choices you’d like to implement, and create a phased approach.

Conclusion


I hope this tutorial encouraged you to think about security and understand one of the most common exploits. During the course of this series, you will receive the tools necessary to beef up security while maintaining your sanity!

Next up


CodeWithMe – Let’s go templating.

SPONSORS

The Ultimate Managed Hosting Platform