PHP & Web Development Blogs

Search Results For: build
Showing 11 to 15 of 24 blog articles.
5941 views · 3 years ago


At Nomad PHP our goal is to empower developers in building a habit of continuous learning - and that means we have a habit of continuous improvement ourselves. Here are just some of the things we've done this year (with much more coming down the road)!

Website Redesign


We've refreshed the look and feel of Nomad PHP to better emphasize the goal of Nomad PHP - to help developers build a habit of continuous learning and grow their careers. This includes numerous usability enhancements as well as a focus on our new book library, blogs, and certification in addition to virtual meetups, workshops, conferences, and on-demand videos.

Free Meetups


As technology has advanced, more and more meetups and usergroups are able to stream their local usergroup meetings.

As our goal has always been to make technology accessible, we are proud to provide free streaming technology for local user groups, and share local user group meetings on our live virtual meetup schedule.

Student and Professional subscribers will continue to have access to our monthly conference level Pro Talks, hands on virtual workshops, and live conference streams in addition to streams by local user groups.

You can find a list of all upcoming talks (free and Pro) on our Live Meetings Page, or add your user group stream here.

Free Subscriber Tier


As our mission has evolved from being the meetup for developers without a meetup group to building an inclusive community of PHP developers where you can network, grow your skills, and share your knowledge with others - we are excited to announce our new Free Tier.

With a free Nomad PHP account you can:

* Stream free meetups

* Watch ad-supported videos in SD

* Read PHP blogs and write your own

* Network with other PHP developers

Create your free developer account to get started.

New Student Tier


To provide the best value, we've also restructured our plans to provide professional online meetings, workshops, and conference streaming to our Student Tier. This will allow students and new developers the chance to learn from the best speakers and top practioners and obtain entry level certifications at the best price possible.

However, with the addition of PHP Books and Magazines, and in order to provide the best value while keeping the Student plan affordable, new Student subscribers will not have access to the PHP Book and Magazine Library, or advanced certifications. These will now require a professional plan.

Student plans start at $12.95/mo

PHP Books and Magazines


We're excited to announce that we have expanded our PHP library. In addition to the ability to read the latest issues of php[architect] magazine, Professional subscribers now have access to read PHP and web development books online.

We're excited to announce the availability of Chris Hartjes' bookThe Grumpy Programmer's Guide to Testing PHP Applications, as well as several titles from Notes for Professionals, andUndisturbed REST: a Guide to Designing the Perfect API.

More titles including exclusive titles will be made available for online reading soon.

You can view our entire PHP Library here.

Blog Updates


We've received a lot of feedback on the blog writing process, and have upgraded several aspects of our blogging software. This includes the ability to save drafts prior to publishing, and the ability to upload, edit, and crop images and videos. We've also added some bug fixes for editing and writing code.

We're also excited to share that members with Student and Professional plans can now have their ownVLOG (video blog) with the ability to screencast/ record video from your webcam within the blog.

To see the most recent blog posts, or write your own, visit the Nomad PHP Blogs.

Certification Updates


We've updated our certifications for better usability and readability. We've also reworked some of the code samples and questions in our Level 1 PHP Certification exam.

You can find our available exams, test your skills, and obtain your Nomad PHP certification here.

Team Management


Our new team manager allows you to easily add or remove team members with your Nomad PHP team subscription. You'll also find real time metrics on how your team is using Nomad PHP, who on your team is investing in their growth and streaming meetups, watching videos, reading books, and earning certifications, and the overall content value consumed by your team.

The Team Manager is available to new teams, and will be made available to existing team managers over the next several weeks.

2020 Roadmap


There's still plenty of more great things coming in 2020. Here are the items at the top of our list:

* Mobile app for offline viewing

* Desktop app for offline viewing

* Nomad PHP member only books

* PHP Level 2 Certification

* Interactive tutorials

* Better video support in blogs

* Ability to schedule blog posts

* Meeting software for local usergroups

* Improved plan management for subscribers
Of course, what's most important to us is what's most important to you. Leave what you want to see on Nomad PHP in the comments below and if we're able to we'll get it added to our roadmap!
11055 views · 3 years ago


It took me quite some time to settle on my first blog post in this series and I found myself thinking about the most requested functionality in my career – The good ‘ol Custom CMS – typically geared towards clients that want a straight forward, secure solution that can be expanded upon in a modular format and that’s their IP.

This will be our starting point. A blank slate to build something epic with clean code and even cleaner design. And in the spirit of building from scratch, I will refrain from using classes or a framework. The main reasoning behind this is to truly get everyone acquainted with and excited about PHP development.

Join me as I transform rudimentary code into something extraordinary that can be morphed into just about any Content, PHP, and MySQL driven project. So without further ado, let’s jump into it!

The bare necessities


If you’re just getting started with development, there’s a nifty bite sized server called UniformServer that will be your best friend throughout your coding career. PHPMyAdmin (an awesome visual db management tool) comes built in so if you’re looking for a work right out of the box solution, this is it.

Alternatively, you can opt for XAMPP or use an alternative server of your choice.

Now here’s where the exciting stuff begins, mapping things out.


I don’t see this done/encouraged often enough. Feel free to grab a piece of paper to logically map out your steps or produce a rough draft of where you’d like this project to go.

In this tutorial, I would like to achieve the following:


DB, DB, Set up your DB.


This requires a bit of planning but let’s start of with the basic structure we need to see this through.

We are going to need a user table and a content table and are a few ways to tackle this.

If you’re using the PHPMyAdmin tool you can create your database, add user permissions (Click on Permissions after creating your database), and create a table with ease.


If you’re like me and prefer to look at good ‘ol SQL then writing an SQL statement is the preferred approach.


CREATE TABLE <code>mydbname</code>.<code>content</code> ( <code>ID</code> INT(11) NOT NULL AUTO_INCREMENT , <code>title</code> VARCHAR(100) NOT NULL , <code>content</code> LONGTEXT NOT NULL , <code>author</code> VARCHAR(50) NOT NULL , PRIMARY KEY (<code>ID</code>)) ENGINE = MyISAM COMMENT = 'content table';

Understanding the SQL statement

In a nutshell we are creating a table with important fields. Namely:

####

ID | Title | Content | Author

#######

The ID field is our unique identifier.Now we can move on to the file structure.

Everything has a place in the file structure game


You can use a structure that speaks to your coding style / memory.

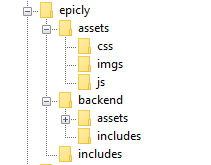
I tend to use the following:


Choose a name for your CMS, which should be placed at the webroot of your localhost/server.

Replicate the folder structure as per the above example.

Next, we’re going to create a basic connection file.


You can create a conn.php file in your root/includes folder.

The connection file will provide crucial information to connect to the database.

Type the following into your conn.php file, remember to include your own database credentials.


<?php

$letsconnect = new mysqli("localhost","dbuser","dbpass","dbname");

?>


Let’s go to the homepage (index.php)


Create a file called index.php at the root of your CMS folder.

I will be adding comments in my code to help you understand what each line does.

Comments are a useful tool for developers to add important notes private to their code.

We need to pull information from the database so it’s imperative that we include our connection file.


<?php

include('includes/conn.php');

if ($letsconnect -> connect_errno) { echo "Error " . $letsconnect -> connect_error;

}else{

$getmydata=$letsconnect -> query("SELECT * FROM content");

foreach($getmydata as $mydata){ echo "Title: "; echo $mydata['title']; echo "<br/>"; echo "Content: "; echo $mydata['content']; echo "<br/>"; echo "Author: "; echo $mydata['author']; echo "<br/>"; echo "<br/>";

}

}

$letsconnect -> close();

?>


Let’s get a (very) basic backend up and running


Create a file called index.php in your backend folder.

We need to create a basic form to capture our data.

Let’s code some HTML!


<html>

<head><title>Backend - Capture Content</title></head>

<body>

<form action="<?php $_SERVER[‘PHP_SELF’];?>" method="post">

<input type="text" name="title" placeholder="Content Title here" required/>

<textarea name="content">Content Here</textarea>

<input type="text" name="author" placeholder="Author" required/>

<input type="submit" value="Save My Data" name="savedata"/>

</form>

</body>

</html>


Next, we need to process the form data.


Type the following just above the
<form> 
tag.


<?php

if(isset($_POST['savedata'])){

include('../includes/conn.php');

if ($letsconnect->connect_error) {

die("Your Connection failed: " . $letsconnect->connect_error);

}else{

$sql = "INSERT INTO content(title,content,author)VALUES ('".$_POST["title"]."', '".$_POST["content"]."', '".$_POST["author"]."')";

if (mysqli_query($letsconnect, $sql)) {

echo "Your data was saved successfully!";

} else { echo "Error: " . $sql . "" . mysqli_error($letsconnect);

} $letsconnect->close();

}

}

?>


Note, this is a basic MySQL query to insert data. However, before using this in production it's important to add proper escaping and security to prevent SQL injections. This will be covered in the next article.


Congrats you made it to the end of tutorial 1!


Test out your creation, modify your content, and play around.

Go to your sitename/index.php to see your frontend after capturing data via sitename/backend/index.php

Next Up:


codewithme Now With Security, Functionality, and Aesthetics in mind.


Conclusion


Coding doesn’t have to be daunting and it’s my aim to divide a complex system into bitesized tutorials so you can truly use the knowledge you’ve acquired in your own projects.
7018 views · 3 years ago
Ideas to help your PHP dev team grow their skills

Your biggest asset is also your biggest risk... your developers

Your business thrives because of the incredible work and innovation of your developers. With simple keystrokes your developers can completely transform your business, add new features, and drive new sales.

But those same keystrokes can take down production, create security back doors, and put your business at risk. That's why it's more important than ever for your team members to be up to speed with the latest technology, especially around performance and security.

Of course, some things are easier said than done - after all everyone is super busy these days. So how can you help keep your team members learning, and putting your business first in the process?

Conference Parties


There's nothing better than attending a PHP or programming conference in person - the chance to meet speakers face to face, to network, the knowledge, and the hallway track. However, many companies aren't able to afford multiple (or even one) conference for their developers - especially ones that require airfare and hotel.

However, that doesn't mean you shouldn't still participate in these conferences. The good news is that roughly once a quarter Nomad PHP streams talks from a conference right to your computer. This means that your team members can all participate in a multi-day conference from the comfort of your office (or their home) - and you can provide this for your team for less than the cost of a single conference ticket!

Make the conference party even more special by providing lunch during the lunch break, bringing in party gifts, having give-aways during the conference, and planning activities during longer breaks for your team.

Since many conferences take place on Friday, not only are you providing invaluable training and an incredible work benefit, but ending the week on a super positive note that your team members will appreciate (and your risk assessment teams will greatly appreciate as new security practices and compliance practices are put into place).

Monthly Lunch and Learns


Every month Nomad PHP offers live virtual talks by the industry's top experts. With talks at 11am Pacific, and 6pm Pacific it's a perfect time to grab a conference room and order a couple pizzas for lunch (or if Eastern, grab some snacks and maybe a beer) and play the monthly meeting on the large screen.

Your team members will have the opportunity to take notes, discuss with each other, and perhaps most importantly ask the speaker real-world questions that directly impact your business, providing tangible solutions to the problems they are facing.

And since every Nomad PHP Pro meeting is recorded, your team members can refer back to the video at any time, watching sections relevant to them or digging in for more information.

Developer Book Club


Encourage your team members to share what they're learning with others, and help build each other up. Not only are you helping grow skills and ensure your team is following the latest best practices, but you're also fostering a mentor-mentality within your team - where each team member feels invested in the growth of other members.

With Nomad PHP you receive a new issue of [php[architect]](/books) each month and have several additional books available to read on demand - providing the latest updates and an invaluable resource to help your book club get started.

Developer Movie Nights


Sometimes we all just want to get away, grab some popcorn, and watch a movie. Similar to lunch and learns, give your developers a night or two where they can get together and watch one of the 250+ training videos available on Nomad PHP. You can even make it a movie marathon!

Whether it's pizza, popcorn, sodas, beers - your team members will have the chance to kick back, relax a bit, build team camaraderie, and learn valuable skills to help your business succeed. Essentially, turning a training day into a fun team-bonding activity.

Learning Path Challenges


Every company has challenges, and areas they need their team members to master. Whether it's DevOps and containerization, security, performance, management, modernization, or soft skills - work with your team to determine what skills will help them succeed and work with your team members to put together video learning paths.

Your team members can watch through these videos on-demand, go back and replay to refresh their knowledge, and work their way towards mastery in the subjects that will help your company succeed.

Certification


Show that you are invested in your developers by helping them earn Professional Certification. These certifications demonstrate that your team members have a fundamental grasp of the technology they are working with and understand when and how to use this technology.

With free certification exams included with Nomad PHP - you no longer have to worry about failed exams or expensive test credits. Your team members can take the exams at their own pace, discover the areas they need to improve, and take the exam again when they are ready. After all, shouldn't the goal of certification be to help your developers learn these skills and prove their expertise?

You can go even further with certifications by having a special company award, framing their certificate, or calling out newly certified developers at team meetings or all-hands.

Learning Incentives/ Rewards


Of course there are even more ways you can help your developers learn new skills, grow their careers, and build loyalty within your company. With Nomad PHP there are numerous ways for your team members to grow their skills, and numerous ways you can reward/ incentivize them - from rewards for the most active learner, to setting goals for learning new skills, to obtaining certifications, to attending streams, to watching videos on-demand. All of these are included with our Professional Nomad PHP Team subscriptions.

Want to learn more about getting a Nomad Team Subscription for your developers? Give us a call (844) CODE-PHP

Have more ideas on how to help your developers grow their skills or help employers make education more accessible? Please leave your ideas in the comments below!
12875 views · 4 years ago
Why Cloudways is the Perfect Managed Hosting for PHP Applications

The following is a sponsored blogpost by Cloudways


Developing an application is not the sole thing you should bank on. You must strive to find the best hosting solution to deploy that application also. The application’s speed is dependent on the hosting provider, that is why I always advise you to go for the best hosting solution to get the ultimate app performance.

Now a days, it is a big challenge to choose any web hosting, as each hosting has its own pros and cons which you must know, before considering it finally for the deployment. I don’t recommend shared hosting for PHP/Laravel based applications, because you always get lot of server hassles like downtime, hacking, 500 errors, lousy support and other problems that are part and parcel of shared hosting.

For PHP applications, you must focus on more technical aspects like caching, configs, databases, etc. because these are essential performance points for any vanilla or framework-based PHP application. Additionally, if the app focuses on user engagement (for instance, ecommerce store), the hosting solution should be robust enough to handle spikes in traffic.

Here, I would like to introduce Cloudways PHP server hosting to you which provides easy, developer and designer friendly managed hosting platform. With Cloudways, you don't need to focus on PHP hosting, but must focus on building your application. You can easily launch cloud servers on five providers including DigitalOcean, Linode, Vultr, AWS and GCE.


Cloudways ThunderStack


Being a developer, you must be familiar with the concept of stack - an arrangement of technologies that form the underlying hosting solution.

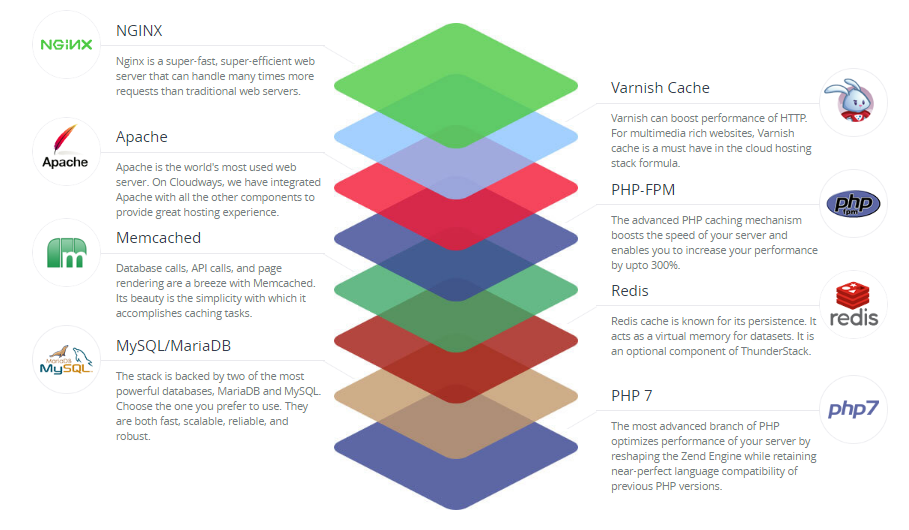
To provide a blazing fast speed and a glitch-free performance, Cloudways has built a PHP stack, known as ThunderStack. This stack consists of technologies that offer maximum uptime and page load speed to all PHP applications. Check out the following visual representation of ThunderStack and the constituent technologies:


alt_text


As you can see, ThunderStack comprises of a mix of static and dynamic caches with two web servers, Nginx and Apache. This combination ensures the ultimate experience for the users and visitors of your application.


Frameworks and CMS


The strength and popularity of PHP lies in the variety of frameworks and CMS it offers to the developers. Realizing this diversity, Cloudways offers a hassle-free installation of major PHP frameworks including Symfony, Laravel, CakePHP, Zend, and Codeigniter. Similarly, popular CMS such as WordPress, Bolt, Craft, October, Couch, and Coaster CMS - you can install these with the 1-click option. The best part is that if you have a framework or CMS that is not on the list, you can easily install it through Composer.


1-Click PHP Server & Application Installation


Setting up a stack on an unmanaged VPS could take an entire day!

When you opt for Cloudways managed cloud hosting, the entire process of setting up the server, installation of core PHP files and then the setup of the required framework is over in a matter of minutes.

Just sign up at Cloudways, choose your desired cloud provider, and select the PHP stack application.


alt_text


As you can see, your LAMP stack is ready for business in minutes.

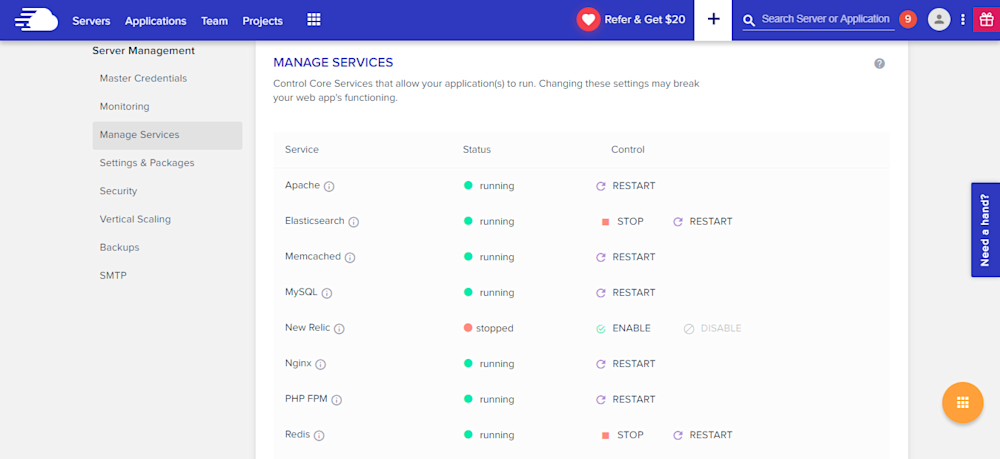
Many PHP applications fail because essential services are either turned off or not set up properly. Cloudways offers a centralized location where you can view and set the status of all essential services such as:


* Apache
* Elasticsearch
* Memcached
* MySQL
* PHP-FPM
* Nginx
* New Relic
* Redis
* Varnish


alt_text


Similarly, you can manage SMTP add-ons without any fuss.


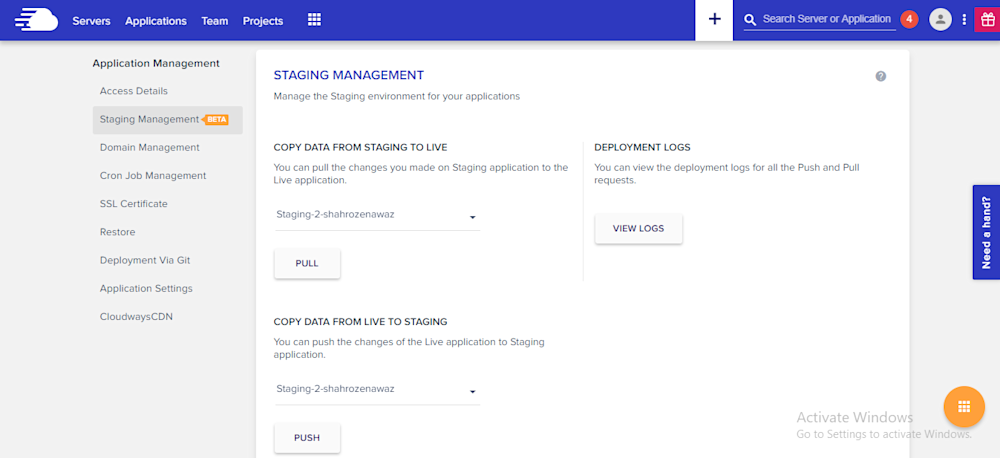
Staging Environment


With Cloudways, you can test your web applications for possible bugs and errors before taking it live.

Using the staging feature, developers can first deploy their web sites on test domains where they can analyze the applications performance and potential problems. This helps site administrators to fix those issues timely and view the application performance in real-time.

A default sub domain comes pre-installed with the newly launched application, making it easy for the administrators to test the applications on those testing subdomains. Overall, it's a great feature which helps developers know about the possible errors that may arise during the live deployment.

alt_text

Pre-Installed Composer & Git


PHP development requires working with external libraries and packages. Suppose you are working with Laravel and you need to install an external package. Since Composer has become the standard way of installing packages, it comes preinstalled on the Cloudways platform. Just launch the application and start using Composer in your project.

Similarly, if you are familiar with Git and maintain your project on GitHub or BitBucket, you don’t need to worry about Git installation. Git also comes pre-configured on Cloudways. You can start running commands right after application launch.


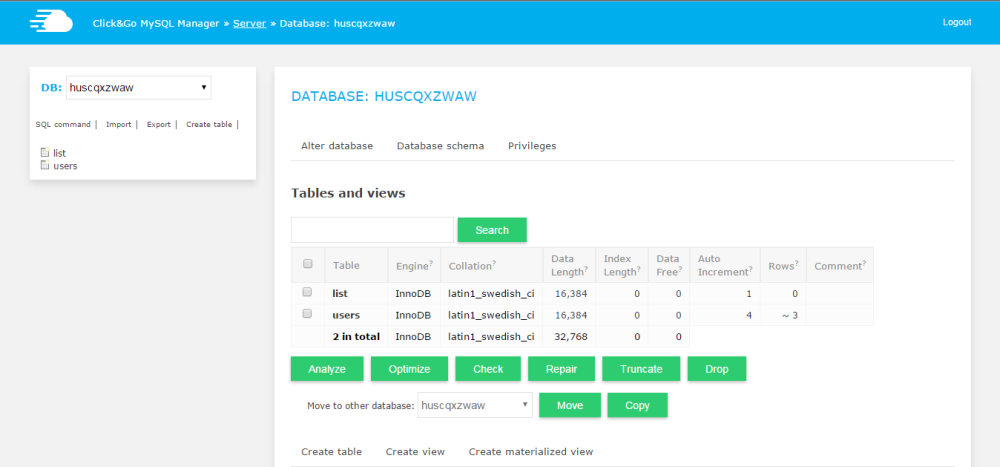
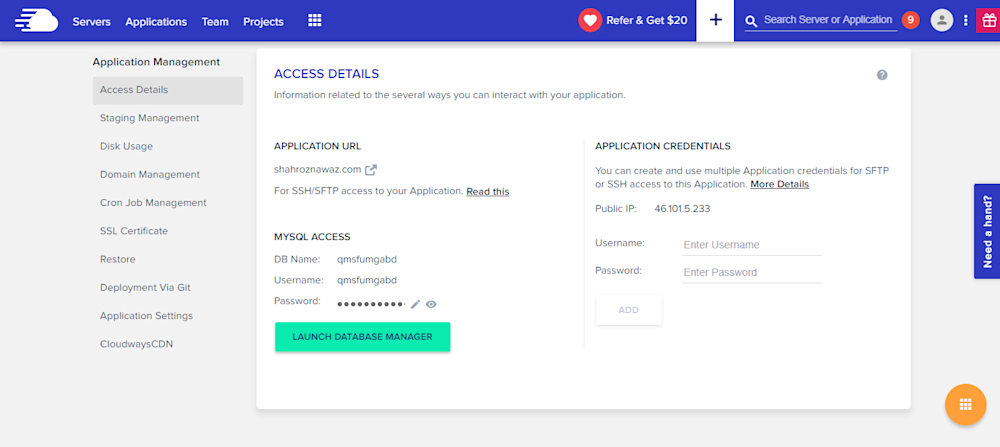
Cloudways MySQL Manager


When you work with databases in PHP, you need a database manager. On the Cloudways platform, you will get a custom-built MySQL manager, in which you can perform all the tasks of a typical DB manager.

alt_text


However, if you wish to install and use another database manager like PHPMyAdmin, you can install it by following this simple guide on installing PHPMyadmin.


Server & Application Level SSH


If you use Linux, you typically use SSH for accessing the server(s) and individual applications. A third-party developer requires application and server level access as per the requirements of the client. Cloudways offers SSH access to fit the requirements of the client and users.

alt_text


PHP-FPM, Varnish & Cron Settings


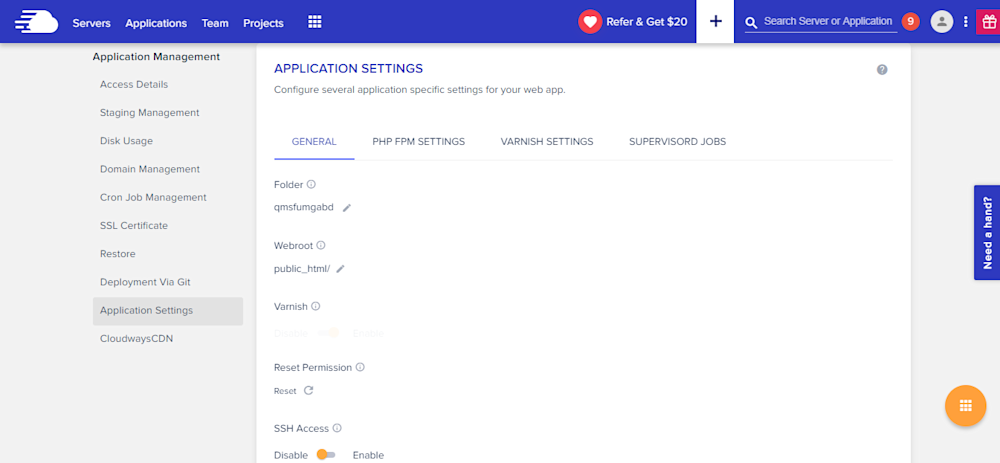
Cloudways provides custom UI panel to set and maintain PHP-FPM and Varnish settings. Although the default configuration is already in place, you can easily change all the settings to suit your own, particular development related requirements. In Varnish settings, you can define URL that you want to exclude from caching. You can also set permissions in this panel.

alt_text


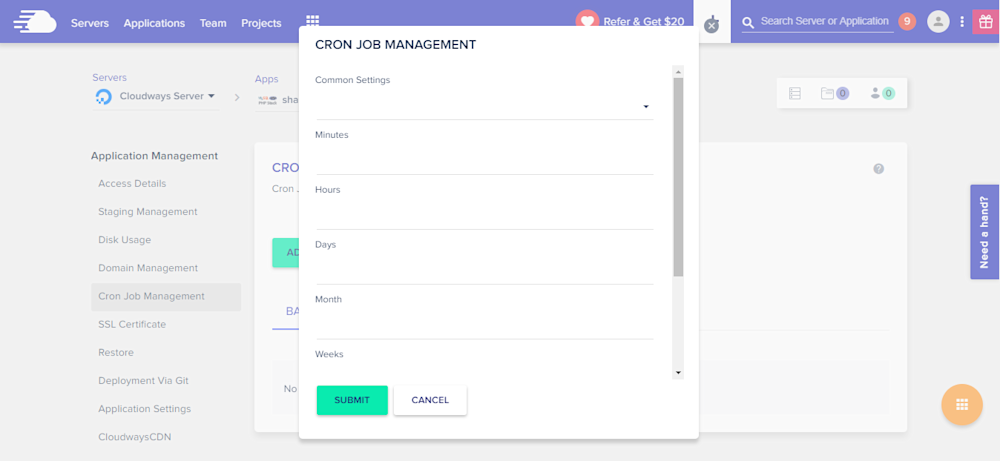
Cron job is a very commonly used component of PHP application development process. On Cloudways platform, you can easily set up Cron jobs in just a few clicks. Just declare the PHP script URL and the time when the script will run.

alt_text


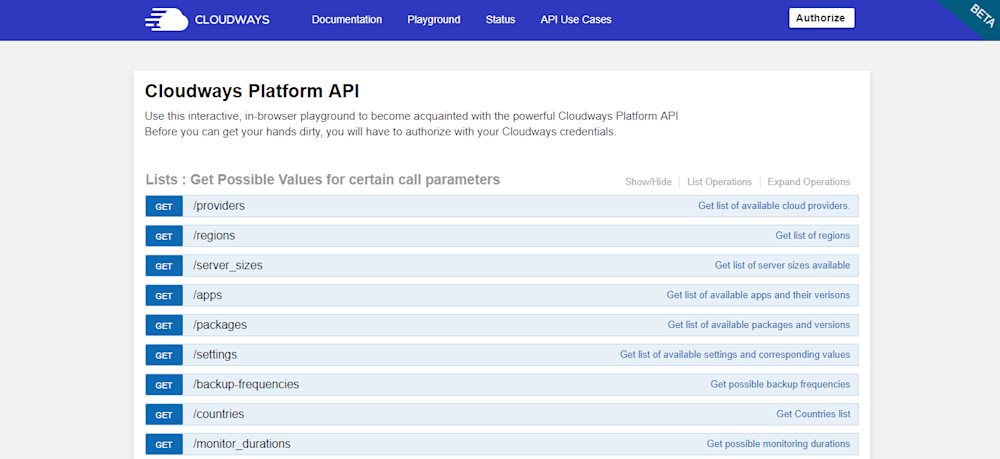
Cloudways API & Personal Assistant Bot


Cloudways provides an internal API that offers all important aspects of the server and application management. Through Cloudways API, you can easily develop, integrate, automate, and manage your servers and web apps on Cloudways Platform using the RESTful API. Check out some of the use cases developed using Cloudways API. You just need your API key and email for authentication of the HTTP calls on API Playground and custom applications.

alt_text


Cloudways employs a smart assistant named CloudwaysBot to notify all users about server and application level issues. CloudwaysBot sends the notifications on pre-approved channels including email, Slack and popular task management tools such as Asana and Trello.


Run Your APIs on PHP Stack


Do you have your own API which you want to run on the PHP stack? No problem, because you can do that, too with Cloudways! You can also use REST API like Slim, Silex, Lumen, and others. You can use APIs to speed up performance and require fast servers with lots of resources. So, if you think that your API response time is getting slower due to the large number of requests, you can easily scale your server(s) with a click to address the situation.


Team Collaboration


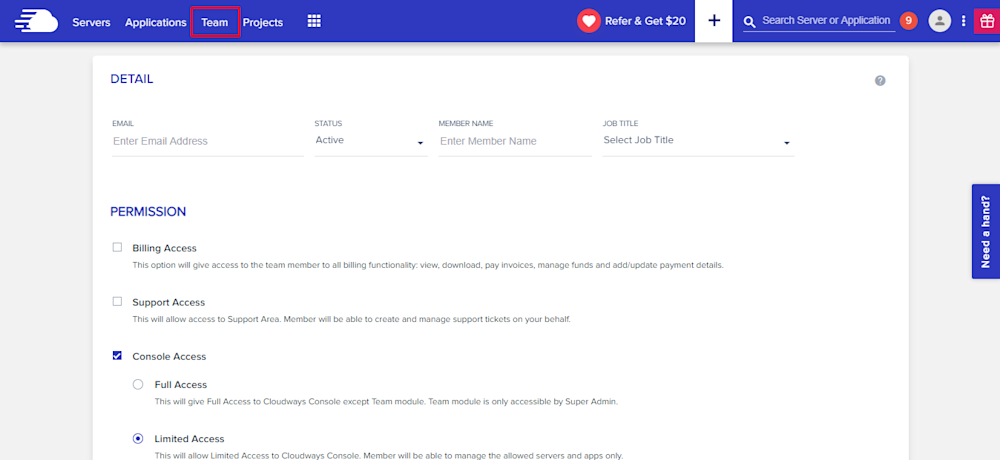
When you work on a large number of applications with multiple developers, you need to assign them on any specific application. Cloudways provides an awesome feature of team collaboration through which you can assign developers to specific application and give access to them. You can use this tool to assign one developer to multiple applications. Through team feature, you can connect the team together and work on single platform. Access can be of different type; i.e. billing, support and console. You can either give the full access or a limited one by selecting the features in Team tab.

alt_text


Final Words


Managed cloud hosting ensures that you are not bothered by any hosting or server related issues. For practical purposes, this means that developers can concentrate on writing awesome code without worrying about underlying infrastructure and hosting related issues. Do sign up and check out Cloudways for the best and the most cost-effective cloud hosting solution for your next PHP project!
26149 views · 4 years ago
Introduction to Gitlab CI for PHP developers
As a developer, you've probably at least heard something about CI - Continuous integration. And if you haven't - you better fix it ASAP, because that's something awesome to have on your skill list and can get extremely helpful in your everyday work. This post will focus on CI for PHP devs, and specifically, on CI implementation from Gitlab. I will suppose you know the basics of Git, PHP, PHPUnit, Docker and unix shell. Intended audience - intermediate PHP devs.
Adding something to your workflow must serve a purpose. In this case the goal is to automate routine tasks and achieve better quality control. Even a basic PHP project IMO needs the following:
* linter) checks (cannot merge changes that are invalid on the syntax level)
* Code style checks
* Unit and integration tests
All of those can be just run eventually, of course. But I prefer an automated CI approach even in my personal projects because it leads to a higher level of discipline, you simply can't avoid following a set of rules that you've developed. Also, it reduces a risk of releasing a bug or regression, thus improving quality.
Gitlab is as generous as giving you their CI for free, even for your private repos. At this point it is starting to look as advertising, therefore a quick comparison table for Gitlab, Github, Bitbucket. AFAIK, Github does not have a built-in solution, instead it is easily integrated with third parties, of which Travis CI seems to be the most popular - I will therefore mention Travis here.

Public repositories (OSS projects). All 3 providers have a free offer for the open-source community!


| Provider | Limits |
|---|---|
| Gitlab | 2,000 CI pipeline minutes per group per month, shared runners |
| Travis | Apparently unlimited |
| Bitbucket| 50 min/month, max 5 users, File storage <= 1Gb/month |

Private repositories


| Provider | Price | Limits |
|---|---|---|
| Gitlab | Free | 2,000 CI pipeline minutes per group per month, shared runners |
| Travis | $69/month | Unlimited builds, 1 job at a time |
| Bitbucket| Free | 50 min/month, max 5 users, File storage <= 1Gb/month |

Getting started

I made a small project based on Laravel framework and called it "ci-showcase". I work in Linux environment, and the commands I use in the examples, are for linux shell. They should be pretty much the same on Mac and nearly the same on Windows though.
composer create-project laravel/laravel ci-showcase

Next, I went to gitlab website and created a new public project: https://gitlab.com/crocodile2u/ci-showcase. Cloned the repo and copied all files and folders from the newly created project - the the new git repo. In the root folder, I placed a .gitignore file:
.idea
vendor
.env

Then the .env file:
APP_ENV=development

Then I generated the application encryption key: php artisan key:generate, and then I wanted to verify that the primary setup works as expected: ./vendor/bin/phpunit, which produced the output OK (2 tests, 2 assertions). Nice, time to commit this: git commit &amp;&amp; git push

At this point, we don't yet have any CI, let's do something about it!

Adding .gitlab-ci.yml

Everyone going to implement CI with Gitlab, is strongly encouraged to bookmark this page: https://docs.gitlab.com/ee/ci/README.html. I will simply provide a short introduction course here plus a bit of boilerplate code to get you started easier.
First QA check that we're going to add is PHP syntax check. PHP has a built-in linter, which you can invoke like this: php -l my-file.php. This is what we're going to use. Because the php -l command doesn't support multiple files as arguments, I've written a small wrapper shell script and saved it to ci/linter.sh:
#!/bin/sh
files=<code>sh ci/get-changed-php-files.sh | xargs</code>last_status=0
status=0
# Loop through changed PHP files and run php -l on each
for f in "$files" ; do message=<code>php -l $f</code> last_status="$?" if [ "$last_status" -ne "0" ]; then # Anything fails -> the whole thing fails echo "PHP Linter is not happy about $f: $message" status="$last_status" fi
done
if [ "$status" -ne "0" ]; then echo "PHP syntax validation failed!"
fi
exit $status

Most of the time, you don't actually want to check each and every PHP file that you have. Instead, it's better to check only those files that have been changed. The Gitlab pipeline runs on every push to the repository, and there is a way to know which PHP files have been changed. Here's a simple script, meet ci/get-changed-php-files.sh:
#!/bin/sh
# What's happening here?
#
# 1. We get names and statuses of files that differ in current branch from their state in origin/master.
# These come in form (multiline)
# 2. The output from git diff is filtered by unix grep utility, we only need files with names ending in .php
# 3. One more filter: filter *out* (grep -v) all lines starting with R or D.
# D means "deleted", R means "renamed"
# 4. The filtered status-name list is passed on to awk command, which is instructed to take only the 2nd part
# of every line, thus just the filename
git diff --name-status origin/master | grep '\.php$' | grep -v "^[RD]" | awk '{ print }'

These scripts can easily be tested in your local environment ( at least if you have a Linux machine, that is ;-) ).
Now, as we have our first check, we'll finally create our .gitlab-ci.yml. This is where your pipeline is declared using YAML notation:
# we're using this beautiful tool for our pipeline: https://github.com/jakzal/phpqa
image: jakzal/phpqa:alpine
# For this sample pipeline, we'll only have 1 stage, in real-world you would like to also add at least "deploy"
stages: - QA
linter:
stage: QA
# this is the main part: what is actually executed
script: - sh ci/get-changed-php-files.sh | xargs sh ci/linter.sh

The first line is image: jakzal/phpqa:alpine and it's telling Gitlab that we want to run our pipeline using a PHP-QA utility by jakzal. It is a docker image containing PHP and a huge variety of QA-tools. We declare one stage - QA, and this stage by now has just a single job named linter. Every job can have it's own docker image, but we don't need that for the purpose of this tutorial. Our project reaches Step 2. Once I had pushed these changes, I immediately went to the project's CI/CD page. Aaaand.... the pipeline was already running! I clicked on the linter job and saw the following happy green output:
Running with gitlab-runner 11.9.0-rc2 (227934c0) on docker-auto-scale ed2dce3a
Using Docker executor with image jakzal/phpqa:alpine ...
Pulling docker image jakzal/phpqa:alpine ...
Using docker image sha256:12bab06185e59387a4bf9f6054e0de9e0d5394ef6400718332c272be8956218f for jakzal/phpqa:alpine ...
Running on runner-ed2dce3a-project-11318734-concurrent-0 via runner-ed2dce3a-srm-1552606379-07370f92...
Initialized empty Git repository in /builds/crocodile2u/ci-showcase/.git/
Fetching changes...
Created fresh repository.
From https://gitlab.com/crocodile2u/ci-showcase * [new branch] master -> origin/master * [new branch] step-1 -> origin/step-1 * [new branch] step-2 -> origin/step-2
Checking out 1651a4e3 as step-2...
Skipping Git submodules setup
$ sh ci/get-changed-php-files.sh | xargs sh ci/linter.sh
Job succeeded

It means that our pipeline was successfully created and run!

PHP Code Sniffer.

PHP Code Sniffer is a tool for keeping app of your PHP files in one uniform code style. It has a hell of customizations and settings, but here we will only perform simple check for compatibilty with PSR-2 standard. A good practice is to create a configuration XML file in your project. I will put it in the root folder. Code sniffer can use a few file names, of which I prefer phpcs.xml:
<?xml version="1.0"?>
/resources

I also will append another section to .gitlab-ci.yml:
code-style:	stage: QA	script:	# Variable $files will contain the list of PHP files that have changes	- files=<code>sh ci/get-changed-php-files.sh</code> # If this list is not empty, we execute the phpcs command on all of them - if [ ! -z "$files" ]; then echo $files | xargs phpcs; fi

Again, we check only those PHP files that differ from master branch, and pass their names to phpcs utility. That's it, Step 3 is finished! If you go to see the pipeline now, you will notice that linter and code-style jobs run in parallel.

Adding PHPUnit

Unit and integration tests are essential for a successful and maintaiable modern software project. In PHP world, PHPUnit is de facto standard for these purposes. The PHPQA docker image already has PHPUnit, but that's not enough. Our project is based on Laravel, which means it depends on a bunch of third-party libraries, Laravel itself being one of them. Those are installed into vendor folder with composer. You might have noticed that our .gitignore file has vendor folder as one of it entries, which means that it is not managed by the Version Control System. Some prefer their dependencies to be part of their Git repository, I prefer to have only the composer.json declarations in Git. Makes the repo much much smaller than the other way round, also makes it easy to avoid bloating your production builds with libraries only needed for development.
Composer is also included into PHPQA docker image, and we can enrich our .gitlab-ci.yml:
test:	stage: QA	cache:	key: dependencies-including-dev	paths: - vendor/	script:	- composer install	- ./vendor/bin/phpunit

PHPUnit requires some configuration, but in the very beginning we used composer create-project to create our project boilerplate.laravel/laravel package has a lot of things included in it, and phpunit.xml is also one of them. All I had to do was to add another line to it:
xml

APP_KEY enironment variable is essential for Laravel to run, so I generated a key with php artisan key:generate.
git commit & git push, and we have all three jobs on theQA stage!

Checking that our checks work

In this branch I intentionally added changes that should fail all three job in our pipeline, take a look at git diff. And we have this out from the pipeline stages:Linter:
$ ci/linter.sh
PHP Linter is not happy about app/User.php:
Parse error: syntax error, unexpected 'syntax' (T_STRING), expecting function (T_FUNCTION) or const (T_CONST) in app/User.php on line 11
Errors parsing app/User.php
PHP syntax validation failed!
ERROR: Job failed: exit code 255

**Code-style**:
$ if [ ! -z "$files" ]; then echo $files | xargs phpcs; fi
FILE: ...ilds/crocodile2u/ci-showcase/app/Http/Controllers/Controller.php
----------------------------------------------------------------------
FOUND 0 ERRORS AND 1 WARNING AFFECTING 1 LINE
---------------------------------------------------------------------- 13 | WARNING | Line exceeds 120 characters; contains 129 characters
----------------------------------------------------------------------
Time: 39ms; Memory: 6MB
ERROR: Job failed: exit code 123

**test**:
$ ./vendor/bin/phpunit
PHPUnit 7.5.6 by Sebastian Bergmann and contributors.
F. 2 / 2 (100%)
Time: 102 ms, Memory: 14.00 MB
There was 1 failure:
1) Tests\Unit\ExampleTest::testBasicTest
This test is now failing
Failed asserting that false is true.
/builds/crocodile2u/ci-showcase/tests/Unit/ExampleTest.php:17
FAILURES!
Tests: 2, Assertions: 2, Failures: 1.
ERROR: Job failed: exit code 1

Congratulations, our pipeline is running, and we now have much less chance of messing up the result of our work.

Conclusion

Now you know how to set up a basic QA pipeline for your PHP project. There's still a lot to learn. Pipeline is a powerful tool. For instance, it can make deployments to different environments for you. Or it can build docker images, store artifacts and more! Sounds cool? Then spend 5 minutes of your time and leave a comment, you can also tell me if there is a pipeline topic you would like to be covered in next posts.

SPONSORS