
Learn from your fellow PHP developers with our PHP blogs, or help share the knowledge you've gained by writing your own.
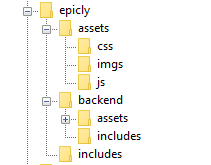
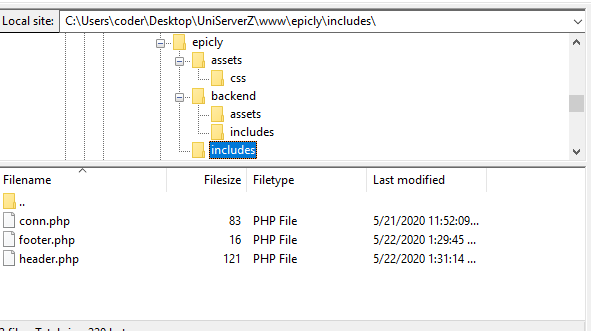
<html>
<head>
<title>My Awesome CMS – Page Title</title>
</head>
<body>
</body>
</html>
</head> tag. <link href=”../assets/css/style.css” type=”text/css” rel=”stylesheet”/>
<?php tag. <div id="myfirstid"></div>
<div class="myfirstclass"></div>
<div class="myfirstclass"></div>
<div class="myfirstclass"></div>
<div class="myfirstclass"></div>
<div class="myfirstclass"></div>
#myfirstid{
Background:lightblue;
Font-family:Arial;
Font-size:44px;
Font-weight: Bold;
}
.myfirstclass{
Font-size:15px;
Color: darkblue;
}
include(‘includes/header.php’);
<divs> we used for practice earlier, we have something better in store! include(‘includes/footer.php’);
foreach($getmydata as $mydata){ echo "Title: "; echo $mydata['title']; echo "<br/>"; echo "Content: "; echo $mydata['content']; echo "<br/>"; echo "Author: "; echo $mydata['author']; echo "<br/>"; echo "<br/>";
?>

<div id=”myfirstid”>
<?php
foreach($getmydata as $mydata){
echo "<div class=”myfirstclass”>Title: ";
echo $mydata['title'];
echo "<br/>";
echo "Content: ";
echo $mydata['content'];
echo "<br/>";
echo "Author: ";
echo $mydata['author'];
echo "</div><br/><br/>";
}?>
</div>
<?php
<?php
include('includes/header.php');
include('includes/conn.php');

if ($letsconnect -> connect_errno) { echo "Error " . $letsconnect -> connect_error;

}else{

$getmydata=$letsconnect -> query("SELECT * FROM content");

?>
<div id="myfirstid">
<?php
foreach($getmydata as $mydata){
echo "<div class=”myfirstclass”>Title: ";
echo $mydata['title'];
echo "<br/>";
echo "Content: ";
echo $mydata['content'];
echo "<br/>";
echo "Author: ";
echo $mydata['author'];
echo "</div><br/><br/>";
}
?>
</div>
<?php
}

$letsconnect -> close();
include('includes/footer.php');
?>

CREATE TABLE <code>mydbname</code>.<code>content</code> ( <code>ID</code> INT(11) NOT NULL AUTO_INCREMENT , <code>title</code> VARCHAR(100) NOT NULL , <code>content</code> LONGTEXT NOT NULL , <code>author</code> VARCHAR(50) NOT NULL , PRIMARY KEY (<code>ID</code>)) ENGINE = MyISAM COMMENT = 'content table';
conn.php file in your root/includes folder.conn.php file, remember to include your own database credentials.
<?php

$letsconnect = new mysqli("localhost","dbuser","dbpass","dbname");

?>
index.php at the root of your CMS folder.
<?php

include('includes/conn.php');

if ($letsconnect -> connect_errno) { echo "Error " . $letsconnect -> connect_error;

}else{

$getmydata=$letsconnect -> query("SELECT * FROM content");

foreach($getmydata as $mydata){	echo "Title: ";	echo $mydata['title'];	echo "<br/>";	echo "Content: ";	echo $mydata['content'];	echo "<br/>";	echo "Author: ";	echo $mydata['author'];	echo "<br/>";	echo "<br/>";

}

}

$letsconnect -> close();

?>
index.php in your backend folder.
<html>

<head><title>Backend - Capture Content</title></head>

<body>

<form action="<?php $_SERVER[‘PHP_SELF’];?>" method="post">

<input type="text" name="title" placeholder="Content Title here" required/>

<textarea name="content">Content Here</textarea>

<input type="text" name="author" placeholder="Author" required/>

<input type="submit" value="Save My Data" name="savedata"/>

</form>

</body>

</html>
<form>
<?php

if(isset($_POST['savedata'])){

include('../includes/conn.php');

if ($letsconnect->connect_error) {

die("Your Connection failed: " . $letsconnect->connect_error);

}else{

$sql = "INSERT INTO content(title,content,author)VALUES ('".$_POST["title"]."', '".$_POST["content"]."', '".$_POST["author"]."')";

if (mysqli_query($letsconnect, $sql)) {

echo "Your data was saved successfully!";

} else { echo "Error: " . $sql . "" . mysqli_error($letsconnect);

} $letsconnect->close();

}

}

?>
Note, this is a basic MySQL query to insert data. However, before using this in production it's important to add proper escaping and security to prevent SQL injections. This will be covered in the next article.

;extension=sockets
extension=sockets
server.php file$host = 'localhost';
$port = '9000';
$null = NULL; function send_message($msg)
{
global $clients;
foreach($clients as $changed_socket)
{
@socket_write($changed_socket,$msg,strlen($msg));
}
return true;
}
function unmask($text) {
$length = ord($text[1]) & 127;
if($length == 126) {
$masks = substr($text, 4, 4);
$data = substr($text, 8);
}
elseif($length == 127) {
$masks = substr($text, 10, 4);
$data = substr($text, 14);
}
else {
$masks = substr($text, 2, 4);
$data = substr($text, 6);
}
$text = "";
for ($i = 0; $i < strlen($data); ++$i) {
$text .= $data[$i] ^ $masks[$i%4];
}
return $text;
}
function mask($text)
{
$b1 = 0x80 | (0x1 & 0x0f);
$length = strlen($text);
if($length <= 125)
$header = pack('CC', $b1, $length);
elseif($length > 125 && $length < 65536)
$header = pack('CCn', $b1, 126, $length);
elseif($length >= 65536)
$header = pack('CCNN', $b1, 127, $length);
return $header.$text;
}
function perform_handshaking($receved_header,$client_conn, $host, $port)
{
$headers = array();
$lines = preg_split("/
/", $receved_header);
foreach($lines as $line)
{
$line = chop($line);
if(preg_match('/\A(\S+): (.*)\z/', $line, $matches))
{
$headers[$matches[1]] = $matches[2];
}
}
$secKey = $headers['Sec-WebSocket-Key'];
$secAccept = base64_encode(pack('H*', sha1($secKey . '258EAFA5-E914-47DA-95CA-C5AB0DC85B11')));
$upgrade = "HTTP/1.1 101 Web Socket Protocol Handshake
" .
"Upgrade: websocket
" .
"Connection: Upgrade
" .
"WebSocket-Origin: $host
" .
"WebSocket-Location: ws://$host:$port/php-ws/chat-daemon.php
".
"Sec-WebSocket-Accept:$secAccept
";
socket_write($client_conn,$upgrade,strlen($upgrade));
}
$socket = socket_create(AF_INET, SOCK_STREAM, SOL_TCP);
socket_set_option($socket, SOL_SOCKET, SO_REUSEADDR, 1);
socket_bind($socket, 0, $port);
socket_listen($socket);
$clients = array($socket);
while (true) {
$changed = $clients;
socket_select($changed, $null, $null, 0, 10);

if (in_array($socket, $changed)) {
$socket_new = socket_accept($socket);	$clients[] = $socket_new;
$header = socket_read($socket_new, 1024);	perform_handshaking($header, $socket_new, $host, $port);
socket_getpeername($socket_new, $ip);	$response = mask(json_encode(array('type'=>'system', 'message'=>$ip.' connected')));	send_message($response);
$found_socket = array_search($socket, $changed);
unset($changed[$found_socket]);
}

foreach ($changed as $changed_socket) {

while(socket_recv($changed_socket, $buf, 1024, 0) >= 1)
{
$received_text = unmask($buf);	$tst_msg = json_decode($received_text, true);	$user_name = $tst_msg['name'];	$user_message = $tst_msg['message'];	$user_color = $tst_msg['color'];
$response_text = mask(json_encode(array('type'=>'usermsg', 'name'=>$user_name, 'message'=>$user_message, 'color'=>$user_color)));
send_message($response_text);	break 2;	}

$buf = @socket_read($changed_socket, 1024, PHP_NORMAL_READ);
if ($buf === false) {	$found_socket = array_search($changed_socket, $clients);
socket_getpeername($changed_socket, $ip);
unset($clients[$found_socket]);

$response = mask(json_encode(array('type'=>'system', 'message'=>$ip.' disconnected')));
send_message($response);
}
}
}
socket_close($socket);
$host = 'localhost';
$port = '9000';
$subfolder = "php_ws/";
$colors = array('#007AFF','#FF7000','#FF7000','#15E25F','#CFC700','#CFC700','#CF1100','#CF00BE','#F00');
$color_pick = array_rand($colors);
<!DOCTYPE html>
<html>
<head>
<meta name="viewport" content="width=device-width, initial-scale=1">
</head>
<body>
<div class="chat-wrapper">
<div id="message-box"></div>
<div class="user-panel">
<input type="text" name="name" id="name" placeholder="Your Name" maxlength="15" />
<input type="text" name="message" id="message" placeholder="Type your message here..." maxlength="100" />
<button id="send-message">Send</button>
</div>
</div>
</body>
</html>
<style type="text/css">
.chat-wrapper {
font: bold 11px/normal 'lucida grande', tahoma, verdana, arial, sans-serif;
 background: #00a6bb;
 padding: 20px;
 margin: 20px auto;
 box-shadow: 2px 2px 2px 0px #00000017;
max-width:700px;
min-width:500px;
}
#message-box {
 width: 97%;
 display: inline-block;
 height: 300px;
 background: #fff;
 box-shadow: inset 0px 0px 2px #00000017;
 overflow: auto;
 padding: 10px;
}
.user-panel{
 margin-top: 10px;
}
input[type=text]{
 border: none;
 padding: 5px 5px;
 box-shadow: 2px 2px 2px #0000001c;
}
input[type=text]#name{
 width:20%;
}
input[type=text]#message{
 width:60%;
}
button#send-message {
 border: none;
 padding: 5px 15px;
 background: #11e0fb;
 box-shadow: 2px 2px 2px #0000001c;
}
</style>
<script src="https://ajax.googleapis.com/ajax/libs/jquery/3.3.1/jquery.min.js"></script>
<script language="javascript" type="text/javascript">
var msgBox = $('#message-box');
var wsUri = "ws://".$host.":".$port."/php-ws/server.php";
websocket = new WebSocket(wsUri);

websocket.onopen = function(ev) {	msgBox.append('<div class="system_msg" style="color:#bbbbbb">Welcome to my "Chat box"!</div>');	}
websocket.onmessage = function(ev) {
var response	= JSON.parse(ev.data);
var res_type	= response.type;	var user_message	= response.message;	var user_name	= response.name;	var user_color	= response.color;	switch(res_type){
case 'usermsg':
msgBox.append('<div><span class="user_name" style="color:' + user_color + '">' + user_name + '</span> : <span class="user_message">' + user_message + '</span></div>');
break;
case 'system':
msgBox.append('<div style="color:#bbbbbb">' + user_message + '</div>');
break;
}
msgBox[0].scrollTop = msgBox[0].scrollHeight;	};

websocket.onerror	= function(ev){ msgBox.append('<div class="system_error">Error Occurred - ' + ev.data + '</div>'); };
websocket.onclose	= function(ev){ msgBox.append('<div class="system_msg">Connection Closed</div>'); };
$('#send-message').click(function(){
send_message();
});

$( "#message" ).on( "keydown", function( event ) {
 if(event.which==13){
 send_message();
 }
});

function send_message(){
var message_input = $('#message');	var name_input = $('#name');
if(message_input.val() == ""){	alert("Enter your Name please!");
return;
}
if(message_input.val() == ""){	alert("Enter Some message Please!");
return;
}
var msg = {
message: message_input.val(),
name: name_input.val(),
color : '<?php echo $colors[$color_pick]; ?>'
};
websocket.send(JSON.stringify(msg));
message_input.val('');	}
</script>
php -q c:\xampp\htdocs\php-ws\server.php

composer require firebase/php-jwt require_once('vendor/autoload.php');
use \Firebase\JWT\JWT; private {
$payload = array(
'iss' => $_SERVER['HOST_NAME'],
'exp' => time()+600, 'uId' => $UiD
);
try{
$jwt = JWT::encode($payload, $this->Secret_Key,'HS256'); $res=array("status"=>true,"Token"=>$jwt);
}catch (UnexpectedValueException $e) {
$res=array("status"=>false,"Error"=>$e->getMessage());
}
return $res;
}
$return['status']=1;
$return['_data_']=$UserData[0];
$return['message']='User Logged in Successfully.';

 $jwt=$obj->generateToken($UserData[0]['id']);
 if($jwt['status']==true)
 {
 $return['JWT']=$jwt['Token'];
 }
 else{
 unset($return['_data_']);
 $return['status']=0;
 $return['message']='Error:'.$jwt['Error'];
 }

UserBlogs public function Authenticate($JWT,$Curret_User_id)
{
try {
$decoded = JWT::decode($JWT,$this->Secret_Key, array('HS256'));
$payload = json_decode(json_encode($decoded),true);
if($payload['uId'] == $Curret_User_id) {
$res=array("status"=>true);
}else{
$res=array("status"=>false,"Error"=>"Invalid Token or Token Exipred, So Please login Again!");
}
}catch (UnexpectedValueException $e) {
$res=array("status"=>false,"Error"=>$e->getMessage());
}
return $res;
}
UserBlogsUserBlogs if(isset($_POST['Uid']))
{
$resp=$obj->Authenticate($_POST['JWT'],$_POST['Uid']);
if($resp['status']==false)
{
$return['status']=0;
$return['message']='Error:'.$resp['Error'];
}
else{
$blogs=$obj->get_all_blogs($_POST['Uid']);
if(count($blogs)>0)
{
$return['status']=1;
$return['_data_']=$blogs;
$return['message']='Success.';
}
else
{
$return['status']=0;
$return['message']='Error:Invalid UserId!';
}
}
}
else
{
$return['status']=0;
$return['message']='Error:User Id not provided!';
}


<?php
header("Content-Type: application/json; charset=UTF-8");
require_once('vendor/autoload.php');
use \Firebase\JWT\JWT;
class DBClass {
private $host = "localhost";
private $username = "root";
private $password = ""; private $database = "news";
public $connection;
private $Secret_Key="*$%43MVKJTKMN$#";
public function connect(){
$this->connection = null;
try{
$this->connection = new PDO("mysql:host=" . $this->host . ";dbname=" . $this->database, $this->username, $this->password);
$this->connection->exec("set names utf8");
}catch(PDOException $exception){
echo "Error: " . $exception->getMessage();
}
return $this->connection;
}
public function login($email,$password){
if($this->connection==null)
{
$this->connect();
}
$query = "SELECT id,name,email,createdAt,updatedAt from users where email= ? and password= ?";
$stmt = $this->connection->prepare($query);
$stmt->execute(array($email,md5($password)));
$ret= $stmt->fetchAll(PDO::FETCH_ASSOC);
return $ret;
}
public function get_all_blogs($Uid){
if($this->connection==null)
{
$this->connect();
}
$query = "SELECT b.*,u.id as Uid,u.email as Uemail,u.name as Uname from blogs b join users u on u.id=b.user_id where b.user_id= ?";
$stmt = $this->connection->prepare($query);
$stmt->execute(array($Uid));
$ret= $stmt->fetchAll(PDO::FETCH_ASSOC);
return $ret;
}
public function response($array)
{
echo json_encode($array);
exit;
}
public function generateToken($UiD)
{
$payload = array(
'iss' => $_SERVER['HOST_NAME'],
'exp' => time()+600, 'uId' => $UiD
);
try{
$jwt = JWT::encode($payload, $this->Secret_Key,'HS256'); $res=array("status"=>true,"Token"=>$jwt);
}catch (UnexpectedValueException $e) {
$res=array("status"=>false,"Error"=>$e->getMessage());
}
return $res;
}
public function Authenticate($JWT,$Current_User_id)
{
try {
$decoded = JWT::decode($JWT,$this->Secret_Key, array('HS256'));
$payload = json_decode(json_encode($decoded),true);
if($payload['uId'] == $Current_User_id) {
$res=array("status"=>true);
}else{
$res=array("status"=>false,"Error"=>"Invalid Token or Token Exipred, So Please login Again!");
}
}catch (UnexpectedValueException $e) {
$res=array("status"=>false,"Error"=>$e->getMessage());
}
return $res;
}
}
$return=array();
$obj = new DBClass();
if(isset($_GET['action']) && $_GET['action']!='')
{
if($_GET['action']=="login")
{
if(isset($_POST['email']) && isset($_POST['password']))
{
$UserData=$obj->login($_POST['email'],$_POST['password']);
if(count($UserData)>0)
{
$return['status']=1;
$return['_data_']=$UserData[0];
$return['message']='User Logged in Successfully.';
$jwt=$obj->generateToken($UserData[0]['id']);
if($jwt['status']==true)
{
$return['JWT']=$jwt['Token'];
}
else{
unset($return['_data_']);
$return['status']=0;
$return['message']='Error:'.$jwt['Error'];
}
}
else
{
$return['status']=0;
$return['message']='Error:Invalid Email or Password!';
}
}
else
{
$return['status']=0;
$return['message']='Error:Email or Password not provided!';
}
}
elseif($_GET['action']=="UserBlogs")
{
 if(isset($_POST['Uid']))
 {

 $resp=$obj->Authenticate($_POST['JWT'],$_POST['Uid']);
 if($resp['status']==false)
 {
 $return['status']=0;
 $return['message']='Error:'.$resp['Error'];
 }
 else{
 $blogs=$obj->get_all_blogs($_POST['Uid']);
 if(count($blogs)>0)
 {
 $return['status']=1;
 $return['_data_']=$blogs;
 $return['message']='Success.';
 }
 else
 {
 $return['status']=0;
 $return['message']='Error:Invalid UserId!';
 }
 }
 }
 else
 {
 $return['status']=0;
 $return['message']='Error:User Id not provided!';
 }
}
}
else
{
$return['status']=0;
$return['message']='Error:Action not provided!';
}
$obj->response($return);
$obj->connection=null;
?>

CREATE TABLE IF NOT EXISTS <code>subscribers</code> (
 <code>id</code> int(11) NOT NULL,
 <code>name</code> varchar(255) NOT NULL,
 <code>email</code> varchar(255) NOT NULL,
 <code>createdAt</code> timestamp NOT NULL DEFAULT CURRENT_TIMESTAMP
) ENGINE=InnoDB DEFAULT CHARSET=latin1;

ALTER TABLE <code>subscribers</code> ADD PRIMARY KEY (<code>id</code>);

ALTER TABLE <code>subscribers</code> MODIFY <code>id</code> int(11) NOT NULL AUTO_INCREMENT;


CREATE TABLE IF NOT EXISTS <code>notifications</code> (
 <code>id</code> int(11) NOT NULL,
 <code>to_user</code> int(11) NOT NULL,
 <code>title</code> varchar(255) NOT NULL,
 <code>body</code> varchar(255) NOT NULL,
 <code>url</code> varchar(255) NOT NULL,
 <code>is_sent</code> int(11) NOT NULL DEFAULT '0',
 <code>createdAt</code> timestamp NOT NULL DEFAULT CURRENT_TIMESTAMP
) ENGINE=InnoDB DEFAULT CHARSET=latin1;

ALTER TABLE <code>notifications</code> ADD PRIMARY KEY (<code>id</code>);

ALTER TABLE <code>notifications</code> MODIFY <code>id</code> int(11) NOT NULL AUTO_INCREMENT;
<?php
session_start();
$servername = "localhost";
$username = "root";
$password = "";
$dbname = "web_notifications";

$conn = new mysqli($servername, $username, $password, $dbname);
if ($conn->connect_error) {
 die("Connection failed: " . $conn->connect_error);
}
?>
function WriteCookie(key,content) {
 var now = new Date();
 now.setMonth( now.getMonth() + 1 );
 document.cookie = key+"=" + escape(content) + ";";
 document.cookie = "expires=" + now.toUTCString() + ";"
}

function ReadCookie(key) {
 var allcookies = document.cookie;
 cookiearray = allcookies.split(';');
 var CookieData=Array();
 for(var i=0; i<cookiearray.length; i++) {
 k = cookiearray[i].split('=')[0];
 v = cookiearray[i].split('=')[1];
 CookieData[k]=v;
 }
 return CookieData[key];
}
<?php require 'db_connect.php';

$sql = "SELECT id,title,body,url FROM notifications where to_user='".@$_GET['user_id']."' and is_sent='0' ";
$result = $conn->query($sql);

$data=array();
if ($result->num_rows > 0) {
 while($row = $result->fetch_assoc()) {
 $data[]=$row;

 $upd = "update notifications set is_sent='1' where id='".$row['id']."' ";
 $conn->query($upd);

 }
}

if(count($data)>0)
{
 $response=array("status"=>1,"notification"=>$data);
}
else
{
 $response=array("status"=>0,"error"=>"No new notification!");
}

echo json_encode($response);

$conn->close();
?>
<?php require 'db_connect.php'; ?>
<!DOCTYPE html>
<html>
<head>
 <title>Web Push Notification Demo</title>
 <script src="./cookies.js" type="text/javascript"></script>
 <link href="
<script src="
<script src="
<link rel="stylesheet" href="https://use.fontawesome.com/releases/v5.1.0/css/all.css" integrity="sha384-lKuwvrZot6UHsBSfcMvOkWwlCMgc0TaWr+30HWe3a4ltaBwTZhyTEggF5tJv8tbt" crossorigin="anonymous">
<?php
if(isset($_POST['subscribe_form']))
{
 $_SESSION['is_login']=0;
 $username=$conn->real_escape_string($_POST['username']);
 $useremail=$conn->real_escape_string($_POST['useremail']);


 $sql = "INSERT INTO subscribers set name='".$username."',email='".$useremail."' ";
 if ($conn->query($sql) === TRUE) {
 $_SESSION['is_login']=1;
 $_SESSION['Uid']= $conn->insert_id;
 $_SESSION['Uname']= $username;
 ?>
 <script type="text/javascript">
 WriteCookie("Uid","<?php echo $_SESSION['Uid']; ?>");
 </script>
 <?php
 $msg="<p style='color:green'>You have subscribe for push notification succesfully :)</p>";
 } else {
 $msg="<p style='color:red'>Error in subscribing for notifications</p>";
 }


}

?>
<div class="container">
<?php
if(isset($msg) && $msg!='')
{
 ?>
 <br>
 <div class="alert alert-info">
 <?php echo $msg; ?>
 </div>
 <?php
}

if(isset($_SESSION['is_login']) && $_SESSION['is_login']==1)
{
 ?>
 <h2>Welcome <?php echo $_SESSION['Uname']; ?></h2>
 <script type="text/javascript">

setInterval(function(){
 check_notification();
}, 10000);

function check_notification()
{
 var Uid=ReadCookie("Uid");
 if(Uid!==undefined)
 {
 $.ajax({url: "fetch_notifications.php?user_id="+Uid, success: function(result){
 var response=JSON.parse(result);
 if(response.status==1)
 {

 response=response.notifications;
 for (var i = response.length - 1; i >= 0; i--) {
 var url = response[i]['url'];
 var noti = new Notification(response[i]['title'], {
 icon: 'logo.png', body: response[i]['body'],
 });
 noti.onclick = function () {
 window.open(url);
 noti.close();
 };

 };

 }
 else{
 console.log(response.error);

 }

 }

 });
 }
}


 </script>
 <?php
}
else
{
 ?>
 <h2 class="text-center">Subscribe for Notifications</h2>
 <div class="row justify-content-center">
 <div class="col-12 col-md-8 col-lg-6 pb-5">

 <div class="card border-primary rounded-0">
 <div class="card-header p-0">
 <div class="bg-info text-white text-center py-2">
 <h3><i class="fa fa-envelope"></i> Information</h3>
 <p class="m-0">provide your information</p>
 </div>
 </div>
 <div class="card-body p-3">
 <form method="post">
 <!--Body-->
 <div class="form-group">
 <div class="input-group mb-2">
 <div class="input-group-prepend">
 <div class="input-group-text"><i class="fa fa-user text-info"></i></div>
 </div>
 <input type="text" class="form-control" id="username" name="username" placeholder="Input Your Name Here" required>
 </div>
 </div>
 <div class="form-group">
 <div class="input-group mb-2">
 <div class="input-group-prepend">
 <div class="input-group-text"><i class="fa fa-envelope text-info"></i></div>
 </div>
 <input type="text" class="form-control" id="useremail" name="useremail" pattern="[^@\s]+@[^@\s]+\.[^@\s]+" title="Invalid email address" placeholder="[email protected]" required>
 </div>
 </div>

 <div class="text-center">
 <input type="submit" value="Subscribe" name="subscribe_form" class="btn btn-info btn-block rounded-0 py-2">
 </div>
 </form>
 </div>

 </div>


 </div>
 </div>
<?php }?>
</div>


</head>
<body>

</body>
</html>
<?php
$conn->close();
?>

CREATE TABLE IF NOT EXISTS <code>admin</code> (
 <code>id</code> int(11) NOT NULL,
 <code>username</code> varchar(255) NOT NULL,
 <code>password</code> varchar(255) NOT NULL,
 <code>createdAt</code> timestamp NOT NULL DEFAULT CURRENT_TIMESTAMP
) ENGINE=InnoDB DEFAULT CHARSET=latin1;

ALTER TABLE <code>admin</code> ADD PRIMARY KEY (<code>id</code>);

ALTER TABLE <code>admin</code> MODIFY <code>id</code> int(11) NOT NULL AUTO_INCREMENT;

INSERT INTO <code>web_notifications</code>.<code>admin</code> (<code>id</code>, <code>username</code>, <code>password</code>, <code>createdAt</code>) VALUES (NULL, 'admin', MD5('123456'), CURRENT_TIMESTAMP);
<?php require 'db_connect.php'; ?>
<!DOCTYPE html>
<html>
<head>
 <title>ADMIN PAGE</title>
 <link href="
<script src="
<script src="
<link rel="stylesheet" href="https://use.fontawesome.com/releases/v5.1.0/css/all.css" integrity="sha384-lKuwvrZot6UHsBSfcMvOkWwlCMgc0TaWr+30HWe3a4ltaBwTZhyTEggF5tJv8tbt" crossorigin="anonymous">
<?php
if(isset($_POST['login']))
{
 $_SESSION['admin_login']=0;
 $username=$conn->real_escape_string($_POST['username']);
 $password=$conn->real_escape_string($_POST['password']);
 $sql = "SELECT * FROM admin where username='".$username."' and password='".md5($password)."' ";
 $result = $conn->query($sql);
 if ($result->num_rows > 0) {
 $_SESSION['admin_login']=1;
 $msg="<p style='color:green'>Admin Logged-in Successfully :)</p>";
 }
 else {
 $msg="<p style='color:red'>INVALID CREDENTIALS FOR ADMIN</p>";
 }


}
if(isset($_POST['add_notification']))
{
 $title=$conn->real_escape_string($_POST['title']);
 $body=$conn->real_escape_string($_POST['body']);
 $url=$conn->real_escape_string($_POST['url']);
 $users=$_POST['users'];

 foreach ($users as $user_id) {
 $ins = "insert into notifications set to_user='".$user_id."' , title='".$title."', url='".$url."', body='".$body."' ";
 $conn->query($ins);
 }
 $msg="<p style='color:green'>Notification(s) added to subscribers account.</p>";

}

?>
<div class="container">
<?php
if(isset($msg) && $msg!='')
{
 ?>
 <br>
 <div class="alert alert-info">
 <?php echo $msg; ?>
 </div>
 <?php
}

if(isset($_SESSION['admin_login']) && $_SESSION['admin_login']==1)
{
 ?>
 <h2>Welcome Admin, Send notification to Subscriber(s)</h2>

<form method="post">


<div class="form-group">
 <label for="sel1">Select Subscriber(s):</label>
 <select multiple="multiple" required="required" class="form-control" id="users" name="users[]">
 <?php
$sql = "SELECT id,name FROM subscribers";
$result = $conn->query($sql);

$data=array();
if ($result->num_rows > 0) {
 while($row = $result->fetch_assoc()) {
 echo "<option value='".$row['id']."'>".$row['name']."</option>";
 }
}
?>
 </select>
</div>

 <div class="form-group">
 <label for="email">Title</label>
 <input type="text" required class="form-control" placeholder="notification title here" name="title" id="title">
 </div>

 <div class="form-group">
 <label for="email">Message</label>
 <textarea required class="form-control" placeholder="notification message here" name="body" id="body"></textarea>
 </div>

 <div class="form-group">
 <label for="email">Url</label>
 <input type="url" required class="form-control" placeholder="notification landing/click url here" name="url" id="url">
 </div>

 <input type="submit" class="btn btn-primary btn-block" name="add_notification" value="Submit" />

</form>


 <?php
}
else
{
 ?>
 <h2 class="text-center">ADMINISTRATOR</h2>
 <div class="row justify-content-center">
 <div class="col-12 col-md-8 col-lg-6 pb-5">

 <div class="card border-primary rounded-0">
 <div class="card-header p-0">
 <div class="bg-info text-white text-center py-2">
 <h3><i class="fa fa-envelope"></i> LOGIN</h3>
 <p class="m-0">provide admin login credentials</p>
 </div>
 </div>
 <div class="card-body p-3">
 <form method="post">
 <!--Body-->
 <div class="form-group">
 <div class="input-group mb-2">
 <div class="input-group-prepend">
 <div class="input-group-text"><i class="fa fa-user text-info"></i></div>
 </div>
 <input type="text" class="form-control" id="username" name="username" placeholder="Input username here" required>
 </div>
 </div>
 <div class="form-group">
 <div class="input-group mb-2">
 <div class="input-group-prepend">
 <div class="input-group-text"><i class="fa fa-key text-info"></i></div>
 </div>
 <input type="password" class="form-control" id="password" name="password" placeholder="your password here" required>
 </div>
 </div>

 <div class="text-center">
 <input type="submit" value="Login" name="login" class="btn btn-info btn-block rounded-0 py-2">
 </div>
 </form>
 </div>

 </div>


 </div>
 </div>
<?php }?>
</div>


</head>
<body>

</body>
</html>
<?php
$conn->close();
?>


 mike
mike crocodile2u
 harikrishnanr
 calevans
 dmamontov
 tanja
tanja damnjan
 ahmedkhan
