PHP & Web Development Blogs

Search Results For: good
Showing 1 to 5 of 19 blog articles.
17870 views · 5 years ago
Creating a Virus with PHP

In his talk, “Writing Viruses for Fun, Not Profit,”Ben Dechrai (after making the viewer take a pledge to only use this knowledge for good and not evil) walks through how many viruses operate, and just how easy it is to build your own self-replicating virus in PHP.

The danger of many of these viruses according to Ben is that the most dangerous viruses often escape detection by not looking like a virus. Instead they encrypt their code to hide their true intent, while also constantly adapting and evolving.

Perhaps even more dangerously, they act like they’re benign and don’t actually do anything - often times laying dormant until called upon by the malicious actor.

Creating the Virus

What’s scary is just how simple it was for Ben to create such a virus, one that mutated ever so slightly as it infected every other file on the server. Opening up unlimited possibilities from scraping customer data, to DDOS attacks, to simply hijacking your domain.


But those attacks are just the start as Ben demonstrated how easy it is to write new files, delete files, 
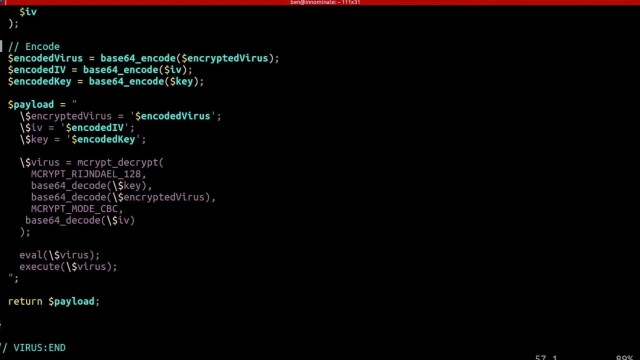
eval() and execute foreign code - which could even be extended to accessing the underlying server itself if shell_exec() is enabled.

To add to the problem, Ben shares how challenging it can be to identify malicious code on your server as many of these attacks are far more sophisticated than the the virus he created in a matter of minutes - hiding themselves and often appearing as if they are part of the original source code.

Deploying the Virus

To drive his point home, Ben demonstrates how even seemingly secure systems can be vulnerable - as all it takes is one tiny misstep within your application.

He highlights this by building what should be a secure photo gallery - one that checks the extension and mime-type of the image - and even stores it outside of the public directory. He goes even farther by adding additional sanity checks with a PHP script that then renders the image.

After walking through the code and it’s security features, he then downloads a simple image from the internet. Opening his editor he quickly injects the virus (written in PHP) into the image and uploads it, passing all of the server checks.

Surely, since it passed these checks the system is secure, right? Ben loads the gallery to proudly show off the image - which is just that… an image, with nothing special or out of the ordinary.
Except that when he opens the image gallery files, each has been infected with the malicious code.

The culprit that allowed for Ben to hijack an entire system and execute foreign code, create new files, and even hijack the entire site? When displaying the image the file was included using PHP’s include() function, instead of pulling in the data using file_get_contents() and echoing it out.

Such a simple mistake provided Ben, if he was a malicious hacker, complete access to all of the files on the system.

Protecting Yourself

Security always exists in layers - and this could have been prevented by including a few more layers, such as using an open source library to rewrite the image, reviewing the image source before pulling it in, or again not giving it executable access by using the PHP include() function.

But what’s terrifying is how simple it is to hijack a site, how easy it is to get access to your system and private data, and how easy it is to overlook security vulnerabilities - especially with open source tooling and those that take plugins.

As Ben explains, sometimes the core code itself is really secure, but then you get two different plugins that when used together accidentally create a security vulnerability. That by itself is one of the most challenging as you can audit each plugin individually, and still not know you’re opening up your system to malicious actors.

This is why it's not just important to stay up to date on the latest security measures and best practices, but to be constantly thinking like a hacker and testing your code for vulnerabilities.

Learn More

You can watch thefull video to learn more how viruses operate, how to quickly build your own PHP virus (but you must promise to use it for good), and what to watch for in order to protect yourself, your customers, and your architecture.
24595 views · 4 years ago
PHP CHAT WITH SOCKETS

Hey Friends,

I am sharing a very interesting blog on how to create a chat system in php without using ajax. As we all know ajax based chat system in php is not a good solution
because itincreases the server load and redundant xhr calls on our server.

Instead, I am going to use sockets for incoming messages from and send messages to another user. So lets try them out using the following steps:


Step 1: Cross check in php.ini that sockets extension is enabled


;extension=sockets
extension=sockets


Step 2: Create server.php file


This file will handle the incoming and outgoing messages on sockets, Add following variables in top of the file:

$host = 'localhost';
$port = '9000';
$null = NULL; 


Step 3: After it add helper methods


The following code for handshake with new incoming connections and encrypt and decrypt messages incoming and outgoing over sockets:

function send_message($msg)
{
global $clients;
foreach($clients as $changed_socket)
{
@socket_write($changed_socket,$msg,strlen($msg));
}
return true;
}
function unmask($text) {
$length = ord($text[1]) & 127;
if($length == 126) {
$masks = substr($text, 4, 4);
$data = substr($text, 8);
}
elseif($length == 127) {
$masks = substr($text, 10, 4);
$data = substr($text, 14);
}
else {
$masks = substr($text, 2, 4);
$data = substr($text, 6);
}
$text = "";
for ($i = 0; $i < strlen($data); ++$i) {
$text .= $data[$i] ^ $masks[$i%4];
}
return $text;
}
function mask($text)
{
$b1 = 0x80 | (0x1 & 0x0f);
$length = strlen($text);

if($length <= 125)
$header = pack('CC', $b1, $length);
elseif($length > 125 && $length < 65536)
$header = pack('CCn', $b1, 126, $length);
elseif($length >= 65536)
$header = pack('CCNN', $b1, 127, $length);
return $header.$text;
}
function perform_handshaking($receved_header,$client_conn, $host, $port)
{
$headers = array();
$lines = preg_split("/

/", $receved_header);
foreach($lines as $line)
{
$line = chop($line);
if(preg_match('/\A(\S+): (.*)\z/', $line, $matches))
{
$headers[$matches[1]] = $matches[2];
}
}
$secKey = $headers['Sec-WebSocket-Key'];
$secAccept = base64_encode(pack('H*', sha1($secKey . '258EAFA5-E914-47DA-95CA-C5AB0DC85B11')));
$upgrade = "HTTP/1.1 101 Web Socket Protocol Handshake

" .
"Upgrade: websocket

" .
"Connection: Upgrade

" .
"WebSocket-Origin: $host

" .
"WebSocket-Location: ws://$host:$port/php-ws/chat-daemon.php

".
"Sec-WebSocket-Accept:$secAccept


";
socket_write($client_conn,$upgrade,strlen($upgrade));
}


Step 4: Now add following code to create bind and listen tcp/ip sockets:


$socket = socket_create(AF_INET, SOCK_STREAM, SOL_TCP);
socket_set_option($socket, SOL_SOCKET, SO_REUSEADDR, 1);
socket_bind($socket, 0, $port);
socket_listen($socket);
$clients = array($socket);


Ok now a endless loop that will use for handeling incominga nd send messages:

while (true) {
$changed = $clients;
socket_select($changed, $null, $null, 0, 10);

if (in_array($socket, $changed)) {
$socket_new = socket_accept($socket); $clients[] = $socket_new;
$header = socket_read($socket_new, 1024); perform_handshaking($header, $socket_new, $host, $port);
socket_getpeername($socket_new, $ip); $response = mask(json_encode(array('type'=>'system', 'message'=>$ip.' connected'))); send_message($response);
$found_socket = array_search($socket, $changed);
unset($changed[$found_socket]);
}

foreach ($changed as $changed_socket) {

while(socket_recv($changed_socket, $buf, 1024, 0) >= 1)
{
$received_text = unmask($buf); $tst_msg = json_decode($received_text, true); $user_name = $tst_msg['name']; $user_message = $tst_msg['message']; $user_color = $tst_msg['color'];
$response_text = mask(json_encode(array('type'=>'usermsg', 'name'=>$user_name, 'message'=>$user_message, 'color'=>$user_color)));
send_message($response_text); break 2; }

$buf = @socket_read($changed_socket, 1024, PHP_NORMAL_READ);
if ($buf === false) { $found_socket = array_search($changed_socket, $clients);
socket_getpeername($changed_socket, $ip);
unset($clients[$found_socket]);

$response = mask(json_encode(array('type'=>'system', 'message'=>$ip.' disconnected')));
send_message($response);
}
}
}
socket_close($socket);


So you are ready with server side socket program, Now its time to move on front side where we will implement w3c provided client side Web Socket Apis,

Step 5: create a file named index.php for frontend usage with following initial code


$host = 'localhost';
$port = '9000';
$subfolder = "php_ws/";
$colors = array('#007AFF','#FF7000','#FF7000','#15E25F','#CFC700','#CFC700','#CF1100','#CF00BE','#F00');
$color_pick = array_rand($colors);
<!DOCTYPE html>
<html>
<head>
<meta name="viewport" content="width=device-width, initial-scale=1">
</head>
<body>
<div class="chat-wrapper">
<div id="message-box"></div>
<div class="user-panel">
<input type="text" name="name" id="name" placeholder="Your Name" maxlength="15" />
<input type="text" name="message" id="message" placeholder="Type your message here..." maxlength="100" />
<button id="send-message">Send</button>
</div>
</div>
</body>
</html>


Now add some basic styling in the head section using following code:

<style type="text/css">
.chat-wrapper {
font: bold 11px/normal 'lucida grande', tahoma, verdana, arial, sans-serif;
background: #00a6bb;
padding: 20px;
margin: 20px auto;
box-shadow: 2px 2px 2px 0px #00000017;
max-width:700px;
min-width:500px;
}
#message-box {
width: 97%;
display: inline-block;
height: 300px;
background: #fff;
box-shadow: inset 0px 0px 2px #00000017;
overflow: auto;
padding: 10px;
}
.user-panel{
margin-top: 10px;
}
input[type=text]{
border: none;
padding: 5px 5px;
box-shadow: 2px 2px 2px #0000001c;
}
input[type=text]#name{
width:20%;
}
input[type=text]#message{
width:60%;
}
button#send-message {
border: none;
padding: 5px 15px;
background: #11e0fb;
box-shadow: 2px 2px 2px #0000001c;
}
</style>


Ok Style is all set now need to add a jquery script and create web socket object and handle all events on it as following code need to add before closing of bosy tag:

<script src="https://ajax.googleapis.com/ajax/libs/jquery/3.3.1/jquery.min.js"></script>
<script language="javascript" type="text/javascript">
var msgBox = $('#message-box');
var wsUri = "ws://".$host.":".$port."/php-ws/server.php";
websocket = new WebSocket(wsUri);

websocket.onopen = function(ev) { msgBox.append('<div class="system_msg" style="color:#bbbbbb">Welcome to my "Chat box"!</div>'); }
websocket.onmessage = function(ev) {
var response = JSON.parse(ev.data);
var res_type = response.type; var user_message = response.message; var user_name = response.name; var user_color = response.color; switch(res_type){
case 'usermsg':
msgBox.append('<div><span class="user_name" style="color:' + user_color + '">' + user_name + '</span> : <span class="user_message">' + user_message + '</span></div>');
break;
case 'system':
msgBox.append('<div style="color:#bbbbbb">' + user_message + '</div>');
break;
}
msgBox[0].scrollTop = msgBox[0].scrollHeight; };

websocket.onerror = function(ev){ msgBox.append('<div class="system_error">Error Occurred - ' + ev.data + '</div>'); };
websocket.onclose = function(ev){ msgBox.append('<div class="system_msg">Connection Closed</div>'); };
$('#send-message').click(function(){
send_message();
});

$( "#message" ).on( "keydown", function( event ) {
if(event.which==13){
send_message();
}
});

function send_message(){
var message_input = $('#message'); var name_input = $('#name');
if(message_input.val() == ""){ alert("Enter your Name please!");
return;
}
if(message_input.val() == ""){ alert("Enter Some message Please!");
return;
}
var msg = {
message: message_input.val(),
name: name_input.val(),
color : '<?php echo $colors[$color_pick]; ?>'
};
websocket.send(JSON.stringify(msg));
message_input.val(''); }
</script>


Ok All set, Now need to run the server.php file using following php-cli utility,make sure you have php cli utility installed in your system:

php -q c:\xampp\htdocs\php-ws\server.php


Now you may access the front index.php file via the browser url like following and see a chatbox and connection status, you may use the same url or different browser to check the chat system is working or not.
9022 views · 4 years ago
When PHP Frameworks Suck

INTRO

If you are working as a PHP software developer, there is an extremely high chance that all of your application, you’re currently working on, using frameworks of any kind.
PHP community developers of all levels worship frameworks since there are big historical and practical reasons for that.

Historical reasons

Since early PHP versions, developers were disreputable because not everybody considered PHP as a programming language, similar to JavaScript a couple of years ago. While strong type language existed decades ago, PHP continues to be soft type since now, only in version 7 basic types were introduced. There is also a matter of the fact that you can script in PHP without using a single object.

But that opened a space for frameworks to step in and introduce themselves as a tool or standard which will shape projects, give them right and order, introduce structure and rules.
And finally, they did. Frameworks are good examples of nice structures, using all available new features PHP offers with every version, enforcing some good practice, etc.

Practical reasons

The framework offers a lot of common problems already solved. They offer a nice ecosystem for other developers to contribute and plug their components. There is a lot of online resources for learning and stay updated about any particular framework. Also, what every framework community tries very hard, is to make setup and usage easy.

WHEN PHP FRAMEWORKS SUCKS

I recently had the opportunity to give a talk on a conference and one meetup about why PHP framework sometimes sucks. Sometimes things we see in framework tutorials does not seem to be very much aligned with some object-oriented standards we are striving to enforce, and with basic clean code guidelines. On the other hand, there is nothing wrong with using a framework, if you use it right.

This article is the first "pilot" article in this series. In every new blog in this series, we will go more in-depth about every specific topic I covered during my presentation.
I'm very excited to share this knowledge, as I saw many developers suffer from bonded-to-framework disease.

https://twitter.com/damnjan/status/1058306144458956800

I won’t spend much time here on any particular framework discussion. This series will be just a guide on how to unbind yourself from frameworks and use them as a tool, instead of being independent.

**Here is the link to the presentation slides.**
5505 views · 2 years ago
Create your first PHP app

PHP is an incredibly powerful programming languaage, one that powers roughly 80% of the web! But it's also one of the easier languages to learn as you can see your changes in real time, without having to compile or wait for the code to repackage your app or website.

Defining a PHP script


To get started, create a file called "myfirstpage.php." You can actually call it anything you'd like, but the important part here is the extension: .php. This tells the server to treat this page as a PHP script.

Now let's go ahead and create a basic HTML page:


<html>

<head>

<title>Hello</title>

</head>

<body>

Hello

</body>

</html>


Go ahead and save your page and upload it to any host that supports PHP. Now visit your page and you should see a page that outputs "Hello."

Echo content


Now let's add some PHP code to our script. To signal the server to render PHP code we first open with the <?php tag, then we write our PHP code, and finally close it with the ?> tag. This is important as if we were creating an XML file and forgot to escape the opening XML tag which also has a question mark, we would run into a fatal error.

Now let's write some PHP code that tells the server to echo specific output. To echo or print the content on the page we can use the echo statement in our PHP code by placing the text we want to echo in single quotes and then end the command with a semi colon. Let's echo out "there!":


<html>

<head>

<title>Hello</title>

</head>

<body>

Hello <?php echo 'there!'; ?>

</body>

</html>


Now upload your script and test it on your webhost. You should now see "Hello there!" on your screen. Now this isn't as exciting since we could do the same thing in HTML without PHP, so let's create dynamic content based on the URL string.

Using $_GET

PHP allows you to interact with your visitors and handle incoming data. This means that you can use either the URL (querystring) or forms to retrieve user input. There are additional ways to access data as well, but we will not be covering those in this introduction.

In your browser, add the following to the end of your url: ?name=yourname


The full URL should now look like myfirstpage.php?name=yourname

You'll notice when you visit this page nothing happens - so let's change that! To access the value of name in the querystring, we can use $_GET['name'] like so:


<html>

<head>

<title>Hello</title>

</head>

<body>

Hello <?php echo $_GET['name']; ?>

</body>

</html>


You'll notice that unlike the text "there!" that the GET is not in quotes - this is because this is a variable and by not placing it in quotes we're telling PHP to render this as a variable and not as text. If we leave the single quotes, instead of saying "Hello yourname" it would say "Hello $_GET['name']."

Using logic and defining variables


Along with getting user input, you can also create conditions to determine what content should be output. For example, we can determine whether or not to say "Good morning" or "Good evening" depending on the time, along with your name using the querystring.

To do this, we'll be using if, elseif, and else along with the PHP date() function. You can learn more about how to use different date formats to output the date here, but we'll be using the date() function to get back the hour of the day (based on the server's time) between 0 (midnight) and 23 (11pm). We'll then use greater than (>) to determine what to assign to our $time variable which we'll output with the user's name.


<html>

<head>

<title>Hello</title>

</head>

<body>

<?php

if(date("G") > 18) {

$time = 'evening';

} elseif (date("G") > 12) {

$time = 'afternoon';

} else {

$time = 'morning';

}

echo 'Good '.$time.' '.$_GET['name'];

?>

</body>

</html>


Now upload your script again to the web server and refresh the page. Depending on the time of the server you should see either Good morning, Good afternoon, or Good evening followed by your name.

If you get an error, or the page is blank, make sure you have closed all of your quotes and have a semicolon after your statements/ commands. Missing a quote or semicolon is one of the most common causes of PHP errors.

You may also receive an error if the timezone has not been set on your server. To resolve this (or change the timezone/ output of the script) try adding this line as the first line following the opening PHP bracket (<?php):


date_default_timezone_set('America/Los_Angeles');


With that you have created your first PHP script and have already taken advantage of many of the fundamentals used in every PHP program. While there is more to learn you are well on your way, and have a great start on defining variables, using user input, and taking advantage of PHP's built in functions.


Want more? Go even further with our Beginning PHP video training course!
11924 views · 5 years ago
Five Composer Tips Every PHP Developer Should Know

Composer is the way that that PHP developers manage libraries and their dependencies. Previously, developers mainly stuck to existing frameworks. If you were a Symfony developer, you used Symfony and libraries built around it. You didn’t dare cross the line to Zend Framework. These days however, developers focus less on frameworks, and more on the libraries they need to build the project they are working on. This decoupling of projects from frameworks is largely possible because of Composer and the ecosystem that has built up around it.

Like PHP, Composer is easy to get started in, but complex enough to take time and practice to master. The Composer manual does a great job of getting you up and running quickly, but some of the commands are involved enough so that many developers miss some of their power because they simply don’t understand.

I’ve picked out five commands that every user of Composer should master. In each section I give you a little insight into the command, how it is used, when it is used and why this one is important.

1: Require

Sample:

$ composer require monolog/monolog


Require is the most common command that most developers will use when using Composer. In addition to the vendor/package, you can also specify a version number to load along with modifiers. For instance, if you want version 1.18.0 of monolog specifically and never want the update command to update this, you would use this command.

$ composer require monolog/monolog:1.18.0


This command will not grab the current version of monolog (currently 1.18.2) but will instead install the specific version 1.18.0.

If you always want the most recent version of monolog greater than 1.8.0 you can use the > modifier as shown in this command.

$ composer require monolog/monolog:>1.18.0


If you want the latest in patch in your current version but don’t want any minor updates that may introduce new features, you can specify that using the tilde.

$ composer require monolog/monolog:~1.18.0


The command above will install the latest version of monolog v1.18. Updates will never update beyond the latest 1.18 version.

If you want to stay current on your major version but never want to go above it you can indicate that with the caret.

$ composer require monolog/monolog:^1.18.0


The command above will install the latest version of monolog 1. Updates continue to update beyond 1.18, but will never update to version 2.

There are other options and flags for require, you can find the complete documentation of the command here.

2: Install a package globally

The most common use of Composer is to install and manage a library within a given project. There are however, times when you want to install a given library globally so that all of your projects can use it without you having to specifically require it in each project. Composer is up to the challenge with a modifier to the require command we discussed above, global. The most common use of this is when you are using Composer to manage packages like PHPUnit.

$ composer global require "phpunit/phpunit:^5.3.*"


The command above would install PHPUnit globally. It would also allow it to be updated throughout the 5.0.0 version because we specified ~5.3.* as the version number. You should be careful in installing packages globally. As long as you do not need different versions for different projects you are ok. However, should you start a project and want to use PHPUnit 6.0.0 (when it releases) but PHPUnit 6 breaks backwards compatibility with the PHPUnit 5.* version, you would have trouble. Either you would have to stay with PHPUnit 5 for your new project, or you would have to test all your projects to make sure that your Unit Tests work after upgrading to PHPUnit 6.

Globally installed projects are something to be thought through carefully. When in doubt, install the project locally.

3: Update a single library with Composer

One of the great powers of Composer is that developers can now easily keep their dependencies up-to-date. Not only that, as we discussed in tip #1, each developer can define exactly what “up-to-date” means for them. With this simple command, Composer will check all of your dependencies in a project and download/install the latest applicable versions.

$ composer update


What about those times when you know that a new version of a specific package has released and you want it, but nothing else updated. Composer has you covered here too.

$ composer update monolog/monolog


This command will ignore everything else, and only update the monolog package and it’s dependencies.

It’s great that you can update everything, but there are times when you know that updating one or more of your packages is going to break things in a way that you aren’t ready to deal with. Composer allows you the freedom to cherry-pick the packages that you want to update, and leave the rest for a later time.

4: Don’t install dev dependencies

In a lot of projects I am working on, I want to make sure that the libraries I download and install are working before I start working with them. To this end, many packages will include things like Unit Tests and documentation. This way I can run the unit Tests on my own to validate the package first. This is all fine and good, except when I don’t want them. There are times when I know the package well enough, or have used it enough, to not have to bother with any of that.

Many packages create a distribution package that does not contain tests or docs. (The League of Extraordinary Packages does this by default on all their packages.) If you specify the --prefer-dist flag, Composer will look for a distribution file and use it instead of pulling directly from github. Of course if you want want to make sure you get the full source and all the artifacts, you can use the --prefer-src flag.

5: Optimize your autoload

Regardless of whether you --prefer-dist or --prefer-source, when your package is incorporated into your project with require, it just adds it to the end of your autoloader. This isn’t always the best solution. Therefore Composer gives us the option to optimize the autoloader with the --optimize switch. Optimizing your autoloader converts your entire autoloader into classmaps. Instead of the autoloader having to use file_exists() to locate a file, Composer creates an array of file locations for each class. This can speed up your application by as much as 30%.

$ composer dump-autoload --optimize


The command above can be issued at any time to optimize your autoloader. It’s a good idea to execute this before moving your application into production.

$ composer require monolog/monolog:~1.18.0 -o


You can also use the optimize flag with the require command. Doing this every time you require a new package will keep your autoloader up-to-date. That having said, it’s still a good idea to get in the habit of using the first command as a safety net when you roll to production, just to make sure.

BONUS: Commit your composer.lock

After you have installed your first package with composer, you now have two files in the root of your project, composer.json and composer.lock. Of the two, composer.lock is the most important one. It contains detailed information about every package and version installed. When you issue a composer install in a directory with a composer.lock file, composer will install the exact same packages and versions. Therefore, by pulling a git repo on a production server will replicate the exact same packages in production that were installed in development. Of course the corollary of this is that you never want to commit your vendor/ directory. Since you can recreate it exactly, there is no need to store all of that code in your repo.

It is recommended that also commit your composer.json. When you check out your repo into production and do an install, composer will use the composer.lock instead of the composer.json when present. This means that your production environment is setup exactly like your development environment.

SPONSORS