PHP & Web Development Blogs

Search Results For: leverage
Showing 1 to 4 of 4 blog articles.
9696 views · 3 years ago


Welcome back!, if you’re new please be sure to read Part 1 here.


This tutorial will focus primarily on Security and will touch on how to plan functionality.

Planning out an application and seeing progress regularly is a good strategy as you are most likely to complete your tasks in a timely fashion with this approach.

Ready?, ok let’s jump into it!

DISCLAIMER


We highly recommend that you follow these tutorials on a localhost testing server like Uniserver. Read through Part 1 here to look at our recommendations. These tutorials follow a phased approach and it is highly recommended that you do not make snippets of code live prior to completing this tutorial series.
Where we left off – the serious stuff.


In the previous tutorial we saved variables to the database.

It’s important to note that further steps are needed to ensure that data transactions to / from the database are secure.

A great first step is to ensure that all POST data (data transmitted after a user clicks a form’s submit button) is sanitized.

What we’re trying to prevent


One of the most common exploits is SQL Injection, an attack most commonly used to insert SQL into db queries. POST data that’s not sanitized leaves a huge security hole for malicious exploits. In some cases SQL injection can be leveraged to rage an all out assault on a server’s operating system.

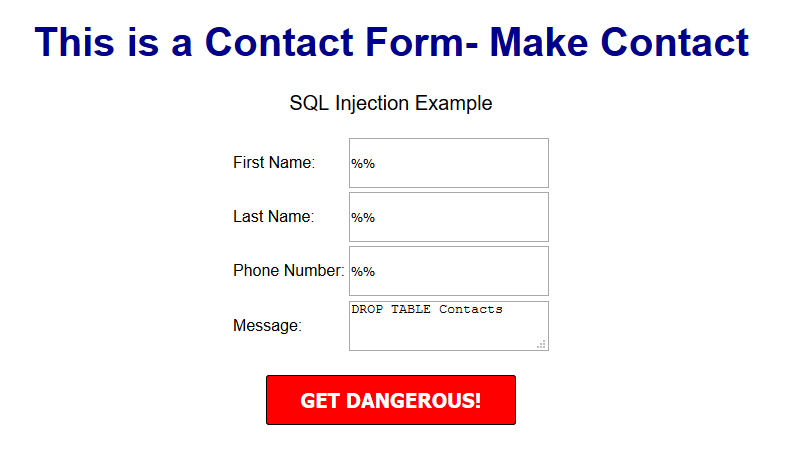
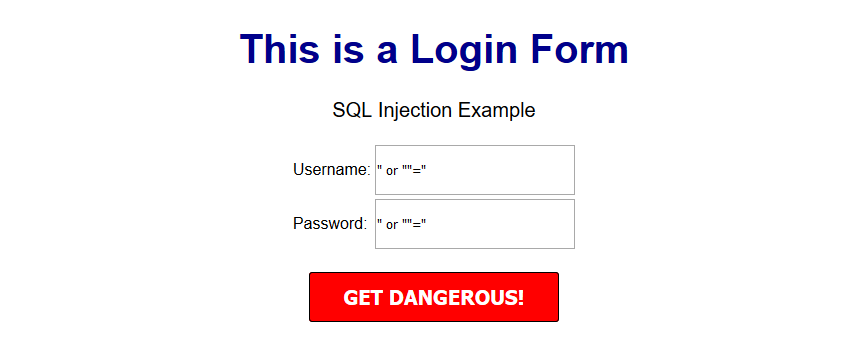
A few examples of a basic version of what this might look like can be seen below.


OUTCOME


This might delete your database table


OUTCOME


This might provide access to the entire user table and the password protected area/dashboard.


***Please note that there are various types of SQL injection techniques and I will delve into this during the course of this series.***


So what exactly is sanitization and what does it do?


When sanitizing POST data, we are essentially looking for any special characters that are often used in SQL injection attacks.

In many ways, this tiny piece of code is the unsung superhero of many database driven applications.

Let’s secure that POST data!


Navigate to your backend folder and open index.php

Locate the following line of code:

$sql = "INSERT INTO content(title,content,author)VALUES ('".$_POST["title"]."', '".$_POST["content"]."', '".$_POST["author"]."')";


Ok, let’s get to work.

Based on what I mentioned a few moments ago, it’s clear that our SQL statement is vulnerable so we need to sanitize the POST data pronto!

The method I will focus on first is $mysqli->real_escape_string. This will escape any special characters found in the POST data.

Add the following just above your $sql.

$title = $letsconnect -> real_escape_string($_POST['title']);

$content = $letsconnect -> real_escape_string($_POST['content']);

$author = $letsconnect -> real_escape_string($_POST['author']);


Did you notice the use of $letsconnect? This was used because of our db connection defined in conn.php.

Our new query will look like this:

$sql = "INSERT INTO content (title,content,author) VALUES ('".$title."', '".$content."', '".$author."')";


Go ahead and replace the old $sql.

Phew!, we can breathe easy now.

Next, let’s lighten things up a bit by focusing on functionality and aesthetics.


A phased approach is the best way to tackle projects of any size.

I tend to jot this down on paper before creating a more legible professional spec!.

Typically the phased approach lends itself to logical progression.

For example, over the next several days I will go over the following:

* Account Access
* The login process
* The registration process
* The password recovery process
* Frontend
* The look and feel
* Menus
* Sidebars
*Main Content
*Footer
* Backend
* Content Management
* Add/Edit/Delete
* Security

This will give us a good springboard to delve into more complex functionality.

The aesthetic I have in mind will be barebones at first with clean CSS practices (this will make life a whole lot easier when we have to make changes down the line!).

Challenge :


Plan out your own CMS, think about the user interface and design choices you’d like to implement, and create a phased approach.

Conclusion


I hope this tutorial encouraged you to think about security and understand one of the most common exploits. During the course of this series, you will receive the tools necessary to beef up security while maintaining your sanity!

Next up


CodeWithMe – Let’s go templating.
5301 views · 3 years ago
Top 12 PHP Libraries to Leverage Your Web App Development


PHP, by all means, is an immensely powerful language!


We may fall short of words, but there won't come any end to its qualities. The endless functionalities and possibilities of this server-side scripting language have managed to get it a strong and supportive community of PHP programmers on a global level. At present, PHP powers more than half on websites and applications on the internet.


Do you know what makes PHP so praiseworthy?


It is the simplicity, easy programming structure, and developer-friendly web functionalities that are to be credited to turn PHP into one of the top programming languages. You can create highly interactive and dynamic websites and applications with desired results by making use of PHP.


However, coding often could be a tough and tedious task to accomplish. As a solution to this, you get built-in PHP libraries that optimize the process of coding for maximum productivity.


But what are these libraries?


That's exactly what you will find out as you move ahead in this article, a list of top 12 PHP libraries capable of leading the development process in an intended manner.


So, without waiting any further, let's move ahead to learn about PHP libraries in-depth.


PChart


PChart is a PHP library assisting with the generation of text data in the form of something more appealing to the eyes and known as visual charts.


You can use this library to represent data as bar charts, pie charts, and many more different formats. The PHP script here utilizes SQL queries to put data in the impressive charts or graphs form.


Mink


Another well-known in the list of PHP libraries is Mink. It allows you to keep an eye on if a proper interaction is happening between your web apps and the browser. Eliminating the API differences between the two types of browser emulators, Mink offers an authentic testing environment for you. It also supports PHPUnit, Behat, and Symfony2.


Monolog


Monolog is a PHP logging library that helps you with saving logs to the specified locations by sending them to set files, sockets, inboxes, databases, or other web services. The use of the PSR-3 interface permits to type-hint logs in counter to your libraries that maintain optimum interoperability.


Hoa


This modular, extensible, and structured set of PHP libraries we know as Hoa establishes a link between the research and the industry.


It recommends essential paradigms, mechanisms, and algorithms for building the reliability of a site. Many PHP developers in different parts of the world use Hoa for ideal PHP development.


Guzzle


Guzzle is an HTTP client library for PHP that enables you to send HTTP requests to combine with web services.


It offers a simple interface that makes the development of query strings, POST requests, HTTP cookies, and many other attributes possible. You can also use Guzzle to send synchronous and asynchronous requests from the similar interface.


Ratchet


If your need is to develop real-time, two-directional apps between clients and servers over WebSockets, Ratchet is the PHP library you need to do it effectively.


Creating event-driven apps with Ratchet is a rapid, simple, and easy job to do!


Geocoder


Geocoder is a library to create applications that are very well geo-aware.


With Geocoder, there is an abstraction layer that helps with geocoding manipulations.


It is further split into two parts, known as HttpAdapter and Provider.


ImageWorkshop


ImageWorkshop is an open-source PHP library letting you work over the manipulation of images with layers. You can crop, resize, add watermarks, create thumbnails, and so much more. You can also enhance the images on the sites.


PhpThumb


phpThumb is the library specialized at handling the work associated with creating thumbnails with minimal coding. Accepting every image source type and image formats, it makes you do a lot ranging from rotating or cropping to watermarking or defining the image quality.


Parody


This simple library we know as Parody is used to copy classes and objects. It also provides results for method calls, acquiring properties, instantiating objects, and more. Sequential method chaining is used by Parody to produce defining class structures.


Imagine


This object-oriented PHP library is meant for working with images along with manipulating them. The often adopted operations such as resizing, cropping, and applying filters happen instantly and relatively well with Imagine.


With Imagine, you get a color class that forms the RGB values of any given color. Draw shapes like arc, ellipse, line, etc. with the features available.


PhpFastCache


PhpFastCache is an open-source PHP library that makes caching feasible. Coming as a single-file, it can be integrated within a matter of minutes.


Caching methods supported by PhpFastCache involve apc, memcache, memcached, wincache, pdo, and mpdo.


The Bottom Line


It's not about what extra difference these libraries make; it's about what significant individual contributions these libraries make for a final desired PHP app or website.


A PHP programmer, too, agrees with these libraries' benefits.


It's your time now to try and believe!
1671 views · 9 months ago


Introduction


MongoDB, a popular NoSQL database, provides flexibility and scalability for modern web applications. In this guide, we will explore how to use MongoDB with PHP, a widely used scripting language. We'll cover the necessary steps to establish a connection, perform CRUD operations, and leverage the power of MongoDB in your PHP projects.

Prerequisites


Before diving into MongoDB integration, ensure you have the following:
   
. MongoDB installed and running on your machine.
   
. PHP installed on your machine, preferably version 7 or above.
   
. Composer, a dependency management tool for PHP.

Step 1: Installing the MongoDB PHP Driver


The first step is to install the MongoDB PHP driver, which enables PHP to communicate with MongoDB. We can use Composer to handle the installation process efficiently. Open your terminal or command prompt and navigate to your project directory. Then run the following command:


composer require mongodb/mongodb


This command installs the MongoDB PHP driver along with its dependencies. Composer will create a vendor directory containing the required files.

Step 2: Establishing a Connection


To connect to MongoDB from PHP, we need to create a new instance of the MongoDB client class. Open your code editor and create a new PHP file, for example, connect.php. Add the following code:


<?php

require 'vendor/autoload.php';

use MongoDB\Client;

$client = new Client("mongodb://localhost:27017");

?>


In this code, we require the Composer-generated autoloader and import the Client class. We then create a new instance of the Client class, specifying the MongoDB server's connection URL. Adjust the URL if your MongoDB server is running on a different host or port.

Step 3: Performing CRUD Operations


Now that we have established a connection, let's explore how to perform basic CRUD operations using MongoDB with PHP.

Creating Documents


To insert a new document into a MongoDB collection, use the insertOne() method. Here's an example:

<?php
$collection = $client->test->users;

$newUser = [
'name' => 'John',
'email' => '[email protected]',
'age' => 25
];

$insertResult = $collection->insertOne($newUser);
echo "Inserted document ID: " . $insertResult->getInsertedId();
?>


In this code, we select the users collection within the test database. We create a new document as an associative array and then use the insertOne() method to insert it into the collection. Finally, we retrieve and display the ID of the inserted document using the getInsertedId() method.

Reading Documents


To retrieve documents from a MongoDB collection, use the find() method. Here's an example:

<?php
$collection = $client->test->users;

$documents = $collection->find();

foreach ($documents as $document) {
echo $document['name'] . ': ' . $document['email'] . "\n";
}
?>


In this code, we retrieve all the documents from the users collection. We iterate over the result using a foreach loop and access specific fields, such as the name and email, to display their values.

Updating Documents


To update documents in a MongoDB collection, use the updateOne() method. Here's an example:

<?php
$collection = $client->test->users;

$updateResult = $collection->updateOne(
['name' => 'John'],
['$set' => ['age' => 30]]
);

echo "Modified " . $updateResult->getModifiedCount() . " document(s).";
?>


In this code, we update the age field of the document with the name 'John' using the $set operator. The updateOne() method updates the first matching document. We then retrieve the number of modified documents using the getModifiedCount() method.

Deleting Documents


To remove documents from a MongoDB collection, use the deleteOne() method. Here's an example:

<?php
$collection = $client->test->users;

$deleteResult = $collection->deleteOne(['name' => 'John']);
echo "Deleted " . $deleteResult->getDeletedCount() . " document(s).";
?>


In this code, we delete the document with the name 'John'. The deleteOne() method removes the first matching document, and we retrieve the number of deleted documents using the getDeletedCount() method.

Conclusion


Congratulations! You have learned the basics of using MongoDB with PHP. By establishing a connection, performing CRUD operations, and leveraging the power of MongoDB, you can build powerful and scalable web applications. Remember to refer to the MongoDB PHP documentation for additional features and advanced usage.
56 views · 4 days ago


In today's dynamic and fast-paced world of web development, ensuring the reliability, performance, and scalability of applications is paramount. Monitoring and observability tools play a crucial role in achieving these goals by providing insights into application metrics, performance trends, and system health. Prometheus, a popular open-source monitoring and alerting toolkit, offers robust capabilities for monitoring infrastructure and application metrics. In this article, we'll explore how to leverage Prometheus with PHP to monitor, analyze, and troubleshoot PHP-based applications effectively.

Understanding Prometheus:


Prometheus is an open-source monitoring and alerting system originally developed by SoundCloud. It is designed for reliability, scalability, and extensibility, making it suitable for monitoring complex, distributed systems. Key features of Prometheus include:

Time Series Data: Prometheus collects time-series data, allowing developers to track metrics such as CPU usage, memory consumption, request latency, and HTTP response codes over time.

PromQL: Prometheus Query Language (PromQL) enables users to query and aggregate metrics, create custom dashboards, and set up alerting rules based on specific conditions.

Scalability and Reliability: Prometheus is designed to be highly scalable and reliable, supporting a distributed architecture with multiple replicas and federated setups for global monitoring.

Integrating Prometheus with PHP:


To integrate Prometheus with PHP applications, developers can utilize client libraries and instrumentation libraries that facilitate metric collection and exposition. The following steps outline the process of integrating Prometheus with PHP:

Choose a Prometheus Client Library: Select a Prometheus client library for PHP that suits your needs. Popular options include prometheus/client_php and php-prometheus/client.

Instrument Your PHP Code: Instrument your PHP application code to collect relevant metrics. This involves adding instrumentation code to track metrics such as request duration, memory usage, database queries, and custom business metrics.

Exposing Metrics: Expose the collected metrics in a format compatible with Prometheus. This typically involves exposing an HTTP endpoint (e.g., /metrics) where Prometheus can scrape the metrics using the Prometheus exposition format.

Configure Prometheus Server: Configure the Prometheus server to scrape metrics from the PHP application's endpoint. Update the Prometheus configuration file (prometheus.yml) to include the target endpoint and define any additional scraping parameters.

Example Integration:


Let's illustrate how to integrate Prometheus with a PHP application using the prometheus/client_php library:

require 'vendor/autoload.php';

use Prometheus\CollectorRegistry;
use Prometheus\Storage\APC;
use Prometheus\RenderTextFormat;

$registry = new CollectorRegistry(new APC());

$requestDuration = $registry->registerCounter('php_requests_total', 'Total number of PHP requests');

$requestDuration->inc();

$renderer = new RenderTextFormat();
echo $renderer->render($registry->getMetricFamilySamples());


In this example, we register a custom metric (php_requests_total) to track the total number of PHP requests. We then increment this metric for each request and expose the metrics endpoint using the Prometheus exposition format.

Benefits of Using Prometheus with PHP:


Real-time Monitoring: Prometheus provides real-time monitoring capabilities, allowing developers to monitor application metrics and diagnose issues promptly.

Scalability: Prometheus scales horizontally, making it suitable for monitoring large-scale deployments and distributed systems.

Alerting: Prometheus supports alerting based on predefined rules, enabling proactive monitoring and alerting for potential issues or anomalies.

Integration: Prometheus integrates seamlessly with various programming languages, platforms, and frameworks, including PHP, enabling comprehensive monitoring across the entire technology stack.

Conclusion:


Prometheus offers powerful capabilities for monitoring and observability, making it a valuable tool for developers and DevOps teams tasked with ensuring the reliability and performance of PHP applications. By integrating Prometheus with PHP using client libraries and instrumentation, developers can gain valuable insights into application metrics, troubleshoot issues effectively, and proactively respond to performance anomalies. Embracing Prometheus as part of your monitoring strategy empowers organizations to build resilient, scalable, and high-performing PHP applications in today's dynamic digital landscape.

    SPONSORS

    The Ultimate Managed Hosting Platform