PHP & Web Development Blogs

Search Results For: multiple
Showing 11 to 15 of 16 blog articles.
8768 views · 3 years ago


Welcome back! If you’re new to this series have a look at Part 1 here


Today’s focus is on templating, the aesthetic that will make or break your web application.

Having a clean design with well defined CSS that’s responsive and user friendly goes a long way.

Developers often stick to their lane but delving into templating will bode in your favor, you can indeed
create a functional and launch-worthy application all on your own!

Let’s jump into it!

Structured structure


Everything you tackle should be found with ease down the line. Therefore careful planning is fundamental to the success and sustainability of your project. You’ll also find that clearly defining your work lends itself to more productivity overall as you spend less that explaining your work during a handover / looking for a specific piece of code or resource. You’ll probably end up spending more time on actual work.
Finding your own unique pattern with file structure and CSS identifiers will also work in your favor as something unique to your process will most likely be easier to remember and form a tactile relationship with.

Our project’s current structure looks like this:


>If you need to backtrack, Part 1 is a great place to start!

In part 1, we created our index.php which displays info from our database.

Let’s take this a step further and create a header and a footer for our index.php

Create a file called header.php and save this to your includes folder.

Next, create a file called footer.php and save this to your includes folder.

Your file structure should now look like this.


A header above all the rest


The header file will be a file we reuse throughout your web application. This file will contain important information that’s vital to the functionality and aesthetic of your website.
The type of info you’ll expect to see in a header.php file:
Script includes
Such as JQuery and important libraries
CSS includes
CSS files loaded from internal or external sources
Meta information
Contains important information that’s readable by search engines.
The basic structure of the beginning of your app, including your menu, and your logo.
For now, how header is going to have a basic layout.

Let’s get our HTML on!

<html>
<head>
<title>My Awesome CMS – Page Title</title>
</head>
<body>


A footer that sets the bar

Create a file called footer.php and save it to your includes folder (yourcms/includes/footer.php).

Add this code to your new file.

</body>
</html>


Next, let’s focus on the gravy… The CSS


CSS, when written beautifully, can truly set you apart.

You can tell your web application to load various styles to specific elements by defining unique identifiers.
Styles that are only used once are denoted with a # (a CSS “ID”) whereas styles that are reused multiple times are denoted with a . (a CSS “class”)

The best way to delve into the realm of CSS is to learn by experience.

Let’s create!


First, we need to create and load our CSS file. Remember our nifty new pal header.php? This created a convenient way to load our CSS file!

Add the following code to your header.php just above the </head> tag.

<link href=”../assets/css/style.css” type=”text/css” rel=”stylesheet”/> 


The ../ in the link to our stylesheet means we have to leave the current directory (the directory that header.php is in) and look for the assets/css/ directories.

Go ahead and create the css folder under your assets folder.

Next we’re going to create some simple CSS to test things out.

It’s time to add some style!


We are going to create two divs.
A div is a divider / section in HTML.
Add this to your index.php (located in your CMS’ root folder) above the <?php tag.

<div id="myfirstid"></div>
<div class="myfirstclass"></div>


Then, create a CSS file

Add this:

#myfirstid{
Background:lightblue;
Font-family:Arial;
Font-size:44px;
Font-weight: Bold;
}
.myfirstclass{
Font-size:15px;
Color: darkblue;
}


Save your newly created CSS to assets/css/ as style.css.

Pulling it all together, let’s see what we can do!


Let’s apply what we just learned to our index.php. But first, we should add our header.php and footer.php files.

Including everyone


Add this to the top of your index.php file:

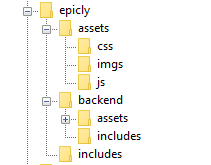
include(‘includes/header.php’);


Remove the <divs> we used for practice earlier, we have something better in store!

Add this to the bottom of your index.php:

include(‘includes/footer.php’);


Next, let’s modify our code so we can add some style to the data we retrieve from our database.

Modify the following line:
foreach($getmydata as $mydata){ echo "Title: "; echo $mydata['title']; echo "<br/>"; echo "Content: "; echo $mydata['content']; echo "<br/>"; echo "Author: "; echo $mydata['author']; echo "<br/>"; echo "<br/>";


as follows:
?>

<div id=”myfirstid”>
<?php
foreach($getmydata as $mydata){
echo "<div class=”myfirstclass”>Title: ";
echo $mydata['title'];
echo "<br/>";
echo "Content: ";
echo $mydata['content'];
echo "<br/>";
echo "Author: ";
echo $mydata['author'];
echo "</div><br/><br/>";
}?>
</div>
<?php


Your full index.php should now look like this:

<?php
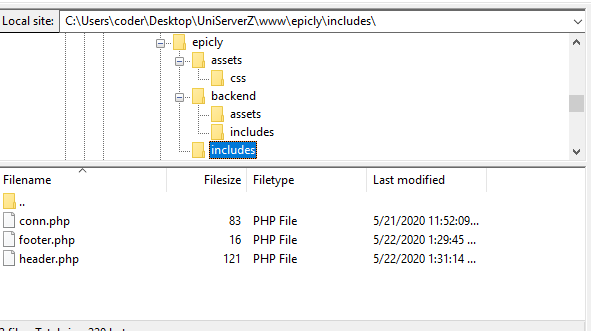
include('includes/header.php');
include('includes/conn.php');

if ($letsconnect -> connect_errno) { echo "Error " . $letsconnect -> connect_error;

}else{

$getmydata=$letsconnect -> query("SELECT * FROM content");

?>
<div id="myfirstid">
<?php
foreach($getmydata as $mydata){
echo "<div class=”myfirstclass”>Title: ";
echo $mydata['title'];
echo "<br/>";
echo "Content: ";
echo $mydata['content'];
echo "<br/>";
echo "Author: ";
echo $mydata['author'];
echo "</div><br/><br/>";
}
?>
</div>
<?php
}

$letsconnect -> close();
include('includes/footer.php');
?>


Go ahead, test it out!

There’s a lot to unpack and I will break things down a little more during our next tutorial!

Challenge


Study the final index.php and try to form a few theories about why closing a php tag is necessary before adding raw html.

Next Up: #CodeWithMe Part 4: Building A Good Base

8382 views · 3 years ago
Laravel Eloquent Relationship Part 2

As you all know, Laravel Eloquent Relationships are powerful and easy methods introduced by Laravel for helping developers to reduce the complexity when connecting with multiple tables. While connecting with multiple tables, this method is very easy for developers for creating the application

Here you can see the next three methods of the eloquent relationships:
   
. Has Many Through Relationship
    . One to Many Polymorphic
    . Many to many Polymorphic

HAS MANY THROUGH ELOQUENT RELATIONSHIP

Has many through is a little bit complicated while understanding. I will provide a shortcut method to provide access data of another mode relationship. We will create a user table, post table, and country table and they will be interconnected with each other.

Here we will see Many through relationship will use hasManyThrough() for the relation


Create Migrations


Users table

 Schema::create('users', function (Blueprint $table) {

$table->increments('id');

$table->string('name');

$table->string('email')->unique();

$table->string('password');

$table->integer('country_id')->unsigned();

$table->rememberToken();

$table->timestamps();

$table->foreign('country_id')->references('id')->on('countries')

->onDelete('cascade');

});


Posts table

Schema::create('posts', function (Blueprint $table) {

$table->increments('id');

$table->string("name");

$table->integer('user_id')->unsigned();

$table->timestamps();

$table->foreign('user_id')->references('id')->on('users')

->onDelete('cascade');

});


Countries table

Schema::create('countries', function (Blueprint $table) {

$table->increments('id');

$table->string('name');

$table->timestamps();

});


Create Models


Country Model

<?php


namespace App;

use Illuminate\Database\Eloquent\Model;


class Country extends Model

{

public function posts(){

return $this->hasManyThrough(

Post::class,

User::class,

'country_id',
'user_id',
'id',
'id'
);

}

}


Now we can retrieve records by

$country = Country::find(1); 

dd($country->posts);


ONE TO MANY POLYMORPHIC RELATIONSHIP

One to many polymorphic relationships used one model belongs to another model on a single file. For example, we will have tweets and blogs, both having the comment system. So we need to add the comments. Then we can manage both in a single table


Here we will use sync with a pivot table, create records, get all data, delete, update, and everything related to one too many relationships.

Now I will show one too many polymorphic will use morphMany() and morphTo() for relation.


Create Migrations

Posts table

Schema::create('posts', function (Blueprint $table) {

$table->increments('id');

$table->string("name");

$table->timestamps();

});

Videos Table

Schema::create('videos', function (Blueprint $table) {

$table->increments('id');

$table->string("name");

$table->timestamps();

});

Comments Table

Schema::create('comments', function (Blueprint $table) {

$table->increments('id');

$table->string("body");

$table->integer('commentable_id');

$table->string("commentable_type");

$table->timestamps();

});


Create Models

Post Model

<?php

namespace App;

use Illuminate\Database\Eloquent\Model;


class Post extends Model

{


public function comments(){

return $this->morphMany(Comment::class, 'commentable');

}

}

Video Model

<?php

namespace App;

use Illuminate\Database\Eloquent\Model;


class Video extends Model{


public function comments(){

return $this->morphMany(Comment::class, 'commentable');

}

}

Comment Model

<?php

namespace App;

use Illuminate\Database\Eloquent\Model;

class Comment extends Model{


public function commentable(){

return $this->morphTo();

}

}


Create Records


$post = Post::find(1); 

$comment = new Comment;

$comment->body = "Hi Harikrishnan";

$post->comments()->save($comment);


$video = Video::find(1);

$comment = new Comment;

$comment->body = "Hi Harikrishnan";

$video->comments()->save($comment);


Now we can retrieve records


$post = Post::find(1); 

dd($post->comments);


$video = Video::find(1);

dd($video->comments);


MANY TO MANY POLYMORPHIC RELATIONSHIPS

Many to many polymorphic is also a little bit complicated like above. If we have a tweet, video and tag table, we need to connect each table like every tweet and video will have multiple persons to tag. And for each and every tag there will be multiple tweet or videos.

Here we can understand the creating of many to many polymorphic relationships, with a foreign key schema of one to many relationships, use sync with a pivot table, create records, attach records, get all records, delete, update, where condition and etc..


Here morphToMany() and morphedByMany() will be used for many to many polymorphic relationships

Creating Migrations

Posts Table

Schema::create('posts', function (Blueprint $table) {

$table->increments('id');

$table->string("name");

$table->timestamps();

});

Videos Table

Schema::create('videos', function (Blueprint $table) {

$table->increments('id');

$table->string("name");

$table->timestamps();

});

Tags table

Schema::create('tags', function (Blueprint $table) {

$table->increments('id');

$table->string("name");

$table->timestamps();

});

Taggables table

Schema::create('taggables', function (Blueprint $table) {

$table->integer("tag_id");

$table->integer("taggable_id");

$table->string("taggable_type");

});


Creating ModelsPost Model


<?php

namespace App;

use Illuminate\Database\Eloquent\Model;

class Post extends Model

{


public function tags(){

return $this->morphToMany(Tag::class, 'taggable');

}

}


Video Model

<?php

namespace App;

use Illuminate\Database\Eloquent\Model;

class Video extends Model

{


public function tags(){

return $this->morphToMany(Tag::class, 'taggable');

}

}

Tag Model

<?php

namespace App;

use Illuminate\Database\Eloquent\Model;

class Tag extends Model

{


public function posts(){

return $this->morphedByMany(Post::class, 'taggable');

}


public function videos(){

return $this->morphedByMany(Video::class, 'taggable');

}

}

Creating Records

$post = Post::find(1); 
$tag = new Tag;
$tag->name = "Hi Harikrishnan";
$post->tags()->save($tag);


$video = Video::find(1);
$tag = new Tag;
$tag->name = "Vishnu";
$video->tags()->save($tag);


$post = Post::find(1);
$tag1 = new Tag;
$tag1->name = "Kerala Blasters";
$tag2 = new Tag;
$tag2->name = "Manajapadda";
$post->tags()->saveMany([$tag1, $tag2]);


$video = Video::find(1);
$tag1 = new Tag;
$tag1->name = "Kerala Blasters";
$tag2 = new Tag;
$tag2->name = "Manajappada";
$video->tags()->saveMany([$tag1, $tag2]);


$post = Post::find(1);
$tag1 = Tag::find(3);
$tag2 = Tag::find(4);
$post->tags()->attach([$tag1->id, $tag2->id]);


$video = Video::find(1);
$tag1 = Tag::find(3);
$tag2 = Tag::find(4);
$video->tags()->attach([$tag1->id, $tag2->id]);


$post = Post::find(1);
$tag1 = Tag::find(3);
$tag2 = Tag::find(4);
$post->tags()->sync([$tag1->id, $tag2->id]);


$video = Video::find(1);
$tag1 = Tag::find(3);
$tag2 = Tag::find(4);
$video->tags()->sync([$tag1->id, $tag2->id]);


Now we can retrieve records

$post = Post::find(1); 
dd($post->tags);


$video = Video::find(1);
dd($video->tags)


$tag = Tag::find(1);
dd($tag->posts);


$tag = Tag::find(1);
dd($tag->videos);


Hence we completed all the relationships. In the above blog how has many through relationship, one to many polymorphic relationships and many to many polymorphic are working. This feature is introduced from Laravel 5.0 onwards and till the current version. Without the model, we can’t able to do this relationship. If we are using an eloquent relationship it will be very useful while developing an application.
7741 views · 5 years ago
Standalone PHP Class for Managing Session Based Multiple Cart

Hi Guys,

I am sharing you a standalone class for managing a session based cart system. In this class I have provided multiple methods for adding, updating and deleting the products. and By using this class you may manage multiple cart objects with different data only you need to pass a different key in constructor of that class.

Let me share you the How can we use that Class:


Include The cart class


require 'PhpKart.class.php';


Create a Cart Object initializing the Cart base key name, by using different keys we can manage multiple cart data in a same project , like main cart or wishlist


$obj1 = new PhpKart("MainCart");


Here Maincart is the keyname in which $obj1 insert/modify/delete the data


Adding any product inside cart


$obj1->add_to_cart($product_id=123,$quantity=2,$product_information=array("product_name"=>"Tomato","Price"=>20));


Where parameter1 is product, id,parameter 2 is quantity, and Parameter 3 is product information Array


Now If we want to update the quantity in product_id=123 with quantity 5 then use following:


$obj1->add_to_cart($product_id=123,$quantity=5);


Here we did not pass the information array again because no matter you pass or not if the product information is already added in the cart then if won't be affected So no ned to pass this, only pass product id and its Quantity


If we want to add another product:


$obj1->add_to_cart($product_id=145,$quantity=3,$product_information=array("product_name"=>"Potato","Price"=>30));


Now we have a case what if our product is already having some quantity and we want to increase into it or decrease into it, Then to retrieve the already added product information, using AlreadyExists method by passing product id,it will return array if it exists and it will return boolean false if not exists:


$already_exists=$obj1->AlreadyExists($product_id=145); 
if($already_exists !== false )
{
print_r($already_exists);
}


If we want to remove any product from cart:


$obj1->remove_from_cart($product_id=145);


If we want to get all products from the current cart


print_r( $obj1->getAllItems() );


It will return you an array with all the items exist in the current cart


Getting all item's count inside the current cart


echo $obj1->getTotalItems(); 


If we want to get calculate total amount in the current cart


echo $obj1->getCartTotalAmount($priceKeyName='Price')


Note: In the above snippet we need to provide teh same key name which we have used for product price in project information array at the time of adding items in cart array, and need to take the same key name in all the products inserting in Same Cart


If we want to clear/reset the current cart then use following:


$obj1->clear_cart(); 


Now if we want to save some other user interested items separately which use likes but don't want to buy now so that items can be Add into wishlist So we need to create new object with different cart ket name and that list will be manage separately using it's object. Like Following:


Create new Object by passing different Key

$obj2=new PhpKart("MyWishlist"); 


Add a new item to $obj2 object containing the items user want to add in his/her wishlist


$obj2->add_to_cart($product_id=159,$quantity=8,$product_information=array("product_name"=>"Baby Toy","Price"=>100));


Show the total cart Amount


echo $obj2->getCartTotalAmount("Price"); 


Full Source Code


Following is the full code for that cart managing Class . Just create a file named PhpKart.class.php and add following code in it:

<?php 
if(!session_id()){
@session_start();
}


class PhpKart{

private $cart_key;

public function __construct($CartkeyName)
{
$this->cart_key=$CartkeyName;
}
public function add_to_cart($product_id,$quantity='1',$product_information=array())
{
$_SESSION[$this->cart_key][$product_id]['product_id']=$product_id;
$_SESSION[$this->cart_key][$product_id]['quantity']=$quantity;
if(!isset($_SESSION[$this->cart_key][$product_id]['product_information']) && !empty($product_information)){
$_SESSION[$this->cart_key][$product_id]['product_information']=$product_information;
}
}
public function remove_from_cart($product_id)
{
unset($_SESSION[$this->cart_key][$product_id]);
}
public function clear_cart()
{
unset($_SESSION[$this->cart_key]);
}
public function getTotalItems()
{
return count($_SESSION[$this->cart_key]);
}
public function getCartTotalAmount($price_key_name)
{
$total=0;
foreach($_SESSION[$this->cart_key] as $row)
{
$total += ($row['product_information'][$price_key_name]*$row['quantity']);
}

return $total;
}
public function AlreadyExists($product_id)
{
if (isset($_SESSION[$this->cart_key][$product_id]))
{
return $_SESSION[$this->cart_key][$product_id];
}
else
{
return false;
}
}
public function getAllItems()
{
return $_SESSION[$this->cart_key];
}


}

?>

7016 views · 3 years ago
Ideas to help your PHP dev team grow their skills

Your biggest asset is also your biggest risk... your developers


Your business thrives because of the incredible work and innovation of your developers. With simple keystrokes your developers can completely transform your business, add new features, and drive new sales.

But those same keystrokes can take down production, create security back doors, and put your business at risk. That's why it's more important than ever for your team members to be up to speed with the latest technology, especially around performance and security.

Of course, some things are easier said than done - after all everyone is super busy these days. So how can you help keep your team members learning, and putting your business first in the process?

Conference Parties


There's nothing better than attending a PHP or programming conference in person - the chance to meet speakers face to face, to network, the knowledge, and the hallway track. However, many companies aren't able to afford multiple (or even one) conference for their developers - especially ones that require airfare and hotel.

However, that doesn't mean you shouldn't still participate in these conferences. The good news is that roughly once a quarter Nomad PHP streams talks from a conference right to your computer. This means that your team members can all participate in a multi-day conference from the comfort of your office (or their home) - and you can provide this for your team for less than the cost of a single conference ticket!

Make the conference party even more special by providing lunch during the lunch break, bringing in party gifts, having give-aways during the conference, and planning activities during longer breaks for your team.

Since many conferences take place on Friday, not only are you providing invaluable training and an incredible work benefit, but ending the week on a super positive note that your team members will appreciate (and your risk assessment teams will greatly appreciate as new security practices and compliance practices are put into place).

Monthly Lunch and Learns


Every month Nomad PHP offers live virtual talks by the industry's top experts. With talks at 11am Pacific, and 6pm Pacific it's a perfect time to grab a conference room and order a couple pizzas for lunch (or if Eastern, grab some snacks and maybe a beer) and play the monthly meeting on the large screen.

Your team members will have the opportunity to take notes, discuss with each other, and perhaps most importantly ask the speaker real-world questions that directly impact your business, providing tangible solutions to the problems they are facing.

And since every Nomad PHP Pro meeting is recorded, your team members can refer back to the video at any time, watching sections relevant to them or digging in for more information.

Developer Book Club


Encourage your team members to share what they're learning with others, and help build each other up. Not only are you helping grow skills and ensure your team is following the latest best practices, but you're also fostering a mentor-mentality within your team - where each team member feels invested in the growth of other members.

With Nomad PHP you receive a new issue of [php[architect]](/books) each month and have several additional books available to read on demand - providing the latest updates and an invaluable resource to help your book club get started.

Developer Movie Nights


Sometimes we all just want to get away, grab some popcorn, and watch a movie. Similar to lunch and learns, give your developers a night or two where they can get together and watch one of the 250+ training videos available on Nomad PHP. You can even make it a movie marathon!

Whether it's pizza, popcorn, sodas, beers - your team members will have the chance to kick back, relax a bit, build team camaraderie, and learn valuable skills to help your business succeed. Essentially, turning a training day into a fun team-bonding activity.

Learning Path Challenges


Every company has challenges, and areas they need their team members to master. Whether it's DevOps and containerization, security, performance, management, modernization, or soft skills - work with your team to determine what skills will help them succeed and work with your team members to put together video learning paths.

Your team members can watch through these videos on-demand, go back and replay to refresh their knowledge, and work their way towards mastery in the subjects that will help your company succeed.

Certification


Show that you are invested in your developers by helping them earn Professional Certification. These certifications demonstrate that your team members have a fundamental grasp of the technology they are working with and understand when and how to use this technology.

With free certification exams included with Nomad PHP - you no longer have to worry about failed exams or expensive test credits. Your team members can take the exams at their own pace, discover the areas they need to improve, and take the exam again when they are ready. After all, shouldn't the goal of certification be to help your developers learn these skills and prove their expertise?

You can go even further with certifications by having a special company award, framing their certificate, or calling out newly certified developers at team meetings or all-hands.

Learning Incentives/ Rewards


Of course there are even more ways you can help your developers learn new skills, grow their careers, and build loyalty within your company. With Nomad PHP there are numerous ways for your team members to grow their skills, and numerous ways you can reward/ incentivize them - from rewards for the most active learner, to setting goals for learning new skills, to obtaining certifications, to attending streams, to watching videos on-demand. All of these are included with our Professional Nomad PHP Team subscriptions.

Want to learn more about getting a Nomad Team Subscription for your developers? Give us a call (844) CODE-PHP

Have more ideas on how to help your developers grow their skills or help employers make education more accessible? Please leave your ideas in the comments below!
6743 views · 2 years ago
10 SEO Best Practices for Web Developers

You've built an amazing website, but how do you make sure people can find your site via search engines? In this article we cover 10 best practices to make sure your article not only stands out, but ranks well with search engines.

1. Take time to research keywords


To determine the best keywords for your site, you'll need to do some keyword research. This usually consists of combing through your competitors' sites for the keywords that are driving them the most traffic. There are several ways you can get started with keyword research. One recommended way is to create a spreadsheet with your competitors' sites listed and add keywords that you can copy and paste your competitors' keywords into Google's Keyword Tool and Google Webmaster Tools Keyword Analyzer tool. Analyze your competition's site's website titles to find out what keywords they are using tools such as Ahrefs, Moz, SpyFu, or SEMrush to find out what keywords others are using on your competitor's site.

2. Focus on your Title tag


This is the headline for every article. It needs to be bold and attention grabbing so it can catch the eye of potential users. Pick it somewhere around 60-90 characters to make sure it is displayed properly in search engines as well as readable in the browser tab. As you write your title, focus on the unique keywords your readers are likely to search for. Also make sure that the keywords you select are relevant to your page. Another good practice is to make the title tag and your header (h1) the same.

3. Carefully craft your H1, H2, H3 tags


Careful usage of header tags helps search engines identify keywords within your page. To get the best results from your header tags, use H1, H2, and H3 in order with keywords in your H2 and H3 headers that support your H1 tag. Remember, your H1 tag should mimic your title tag, whereas the H2 and H3 can expand and add additional context. You can also utilize multiple H2 and H3 tags, however be sure that these headers are supporting the H1 tag and relevant to the content on your page. Using irrelevant header keywords can actually work to your disadvantage.

4. Avoid loading content with JavaScript


Despite it's popularity, JavaScript is not yet well supported by search engines and can mask important content. Progressive Web Apps in particular can suffer as key content is loaded after the page is spidered, or in the case of many search engines that do not yet index JavaScript not loaded at all. This is also the case for many social media sites, meaning that content loaded dynamically is not evaluated or pulled in, resulting in the default skeleton of your site being what shows up in search engines and in link previews.

5. Carefully name images


In the past search engines would evaluate your images based on their alt tag, however as more and more developers loaded irrelevant keywords into this hidden image text search engines instead added more emphasis to the actual name of the image itself. This means using generic image names such as 1.jpg can actually hurt your site ranking as search engines might be looking for seokeywords.jpg. Now, just because you're carefully naming your images with relevant keywords describing the image doesn't mean you should ignore the alt tag. Be sure to continue to include alt tags for older search engines, in the case the image doesn't load, and for accessibility (ie screen readers).

6. Work to improve your page load time


It’s not a secret that faster sites rank higher in search engines. Most search engines use the PageSpeed Index from Google to determine the speed of websites. One thing Google looks at is how fast images are loading. For this reason, we recommend taking a look at how long it takes for the first image to load on your site or even take advantage of lazy loading for non-critical images. You want images to be loading within 30 seconds at the absolute latest, before the user can actually click on the page. You also need to make sure that if you're using multiple images that they load as one group. Next, take a look at how long it takes to load a webpage. Are pages taking longer than three seconds to load on your site? You want to have pages that load fast for users, but your code and templates can easily be causing this to happen.

7. Optimize text throughout your page


Beyond your title tag, headers, and images it's important to work keywords into your standard content, while also working to avoid overloading keywords. To help prevent overloading and increase search engine rankings across multiple keywords you can use alternative phrases. In the case of "PHP training" an alternative phrase might be "PHP tutorials" or "PHP course." This both helps support the primary keyword, while also allowing the page to rank for these keywords as well. Remember to use the tools referenced above to find the keywords that are right for your site, and then work them in to natural sentences without forcing keywords or becoming overly repetitive. Also keep in mind, just as important as the content and keywords on the page are to search engines, how users engage with that content is also critical. If your page experience's high bounce rates or low engagement with the content, it is likely to be deprioritized by search engines, meaning a page highly optimized for search engines but not humans may enjoy a higher ranking, but only for a short time before it is heavily penalized.

8. Build your Domain and Page Authority


Domain and Page Authority are determined not just by the number of back-links (or sites linking to your domain or page), but also the quality of the sites and pages linking to you. One practice that has made obtaining a better DA or PA harder has been purchasing or acquiring bulk back-links. Note this practice is actually against Google's TOS and may result in your entire site being banned from their search results! Because of this practice, it's important to focus on high quality sites and work to get back-links naturally either through partnerships or syndicated content (such as blog posts). You can also check your DA here or using one of the many tools referenced above.

9. Take advantage of social media


Speaking of back-links, social media can be a powerful tool for increasing page visibility while also improving your search engine rankings! Remember, most social sites do not support or read JavaScript, so ensure your content is available on the page. If you do have a progressive web app with JavaScript loading your content, look into using Headless Chrome to render a JavaScript free version of your site for specific bots (note - the content MUST be the same content a user would see or your site may be blocked). There are also numerous tools to allow you to build the content via JavaScript on the server backend before passing it to your readers. To help get even more exposure, consider adding social share links or tools like AddThis.

10. Good SEO takes time


The truth is that there really aren't any special secrets or ingredients to ranking well in search engines (well not that Google has publicly shared). Instead it's about properly formatting your page, making sure it's readable to search engines, and providing content that your readers will engage with. As you provide more valuable content, and more people like and link to your content - your site's Domain Authority will gradually increase, giving your site and pages more powerful - resulting in a higher ranking.

SPONSORS