PHP & Web Development Blogs

Search Results For: multiple
Showing 6 to 10 of 20 blog articles.
6081 views · 3 years ago
Web Sockets in PHP

In his talk Websockets in PHP, John Fransler walks us through the use of WebSockets in PHP.

While discussing bi-directional real-time application development, John notes that PHP is often not invited to the table due to its lack of native support. Of all the possible attempts to bring in PHP on this stage of real-time development, Ratchet, a PHP WebSocket library, comes closest. "Ratchet is a loosely coupled PHP library providing developers with tools to create real-time, bi-directional applications between clients and servers over WebSockets."* Ahem!

Today's dynamic world


In today's dynamic content world of the internet, it is required to serve real-time bi-directional messages between clients and servers. WebSockets are simple, full-duplex, and persistent. They work over Http and are a standard today.

WebSockets have compatibility with 96.5% of clients globally
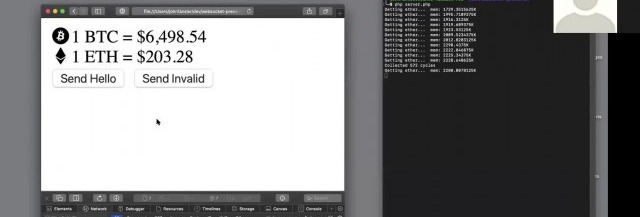
There's a very high chance your client has the necessary plumbing to access your content via WebSockets. WebSockets gives the ability to have real-time data on to your clients without the need for polling.

To understand WebSockets, John takes an example of a Javascript client and Ratchet Server. Javascript has everything built in to allow access to a socket. For example, you can use the send method on a WebSocket variable to send a message to the server, or if you want to respond to a message from the server, you use the OnConnection method.

While on the Server, John uses Ratchet, which is built on React PHP. A server script is then configured and set up to run and listen on a port for incoming HTTP requests. For messages, JSON is used, and to find public methods, a router is set up. He then goes on to instantiate the server-side script in Ratchet.

There are four functions of a Ratchets message component interface that are used in this example:

OnOpen gets called when a new connection is made.

OnClose gets called when a client quits. It's essential to keep an eye on memory management, and essential to keep tidying up as you move through the code.

OnError gets called when there is an exception faced by the user.

OnMessage gives the text of the JSON message, which is being exchanged with the client.

For Initialization, Jason continues to walk through the example. He shows how one can loop through the clients, both inside the server and outside the server. Outside the server, it’s a feature of React PHP. On database access, and with traditional standard synchronous MySQL in PHP, what usually happens is that it forces the code to wait for the query to return a result and do nothing — Fortunately, with Asynchronous MySQLi, that is not the case.

John gets into the details explaining Variables, References & Pointers. He also gives a demo where a central site has updated information on the Bitcoin and ether prices. A client terminal reflects the last values. Now the client doesn't have to poll the server for new values. When there is a change in the Bitcoin or ether values, the server pushes down the client's update. No polling helps with a lot of overheads and gets closer to real-time.

Using Supervisord


For Long-running applications - Jason recommends running a supervisord, use proxy to expose the port, and add a site certificate. Supervisord keeps an eye out for the server running the service; it can be used to restart the service and log any service issues. Recommended proxies are AWS load balancer, Nginx, and HA Proxy. For scalability, use multiple smaller WebSocket servers and a smaller number of clients per server used and load balancing. If one has to support a chat feature to allow clients to talk to each other in near real-time, it is recommended to use Redis. The Redis server proxies the messages between the server nodes.

The talk concludes with John summarizing best practices on error handling and takes QnA on various aspects of WebSockets such as handling load balancers and asynchronous calls to MSQLi.

The presentation for this video, along with the code, is hosted at John Curt's GitHub. More info about John's current areas of interest can be found on John's Blog.

Watch the video now


Related videos
7025 views · 3 years ago
Ideas to help your PHP dev team grow their skills

Your biggest asset is also your biggest risk... your developers


Your business thrives because of the incredible work and innovation of your developers. With simple keystrokes your developers can completely transform your business, add new features, and drive new sales.

But those same keystrokes can take down production, create security back doors, and put your business at risk. That's why it's more important than ever for your team members to be up to speed with the latest technology, especially around performance and security.

Of course, some things are easier said than done - after all everyone is super busy these days. So how can you help keep your team members learning, and putting your business first in the process?

Conference Parties


There's nothing better than attending a PHP or programming conference in person - the chance to meet speakers face to face, to network, the knowledge, and the hallway track. However, many companies aren't able to afford multiple (or even one) conference for their developers - especially ones that require airfare and hotel.

However, that doesn't mean you shouldn't still participate in these conferences. The good news is that roughly once a quarter Nomad PHP streams talks from a conference right to your computer. This means that your team members can all participate in a multi-day conference from the comfort of your office (or their home) - and you can provide this for your team for less than the cost of a single conference ticket!

Make the conference party even more special by providing lunch during the lunch break, bringing in party gifts, having give-aways during the conference, and planning activities during longer breaks for your team.

Since many conferences take place on Friday, not only are you providing invaluable training and an incredible work benefit, but ending the week on a super positive note that your team members will appreciate (and your risk assessment teams will greatly appreciate as new security practices and compliance practices are put into place).

Monthly Lunch and Learns


Every month Nomad PHP offers live virtual talks by the industry's top experts. With talks at 11am Pacific, and 6pm Pacific it's a perfect time to grab a conference room and order a couple pizzas for lunch (or if Eastern, grab some snacks and maybe a beer) and play the monthly meeting on the large screen.

Your team members will have the opportunity to take notes, discuss with each other, and perhaps most importantly ask the speaker real-world questions that directly impact your business, providing tangible solutions to the problems they are facing.

And since every Nomad PHP Pro meeting is recorded, your team members can refer back to the video at any time, watching sections relevant to them or digging in for more information.

Developer Book Club


Encourage your team members to share what they're learning with others, and help build each other up. Not only are you helping grow skills and ensure your team is following the latest best practices, but you're also fostering a mentor-mentality within your team - where each team member feels invested in the growth of other members.

With Nomad PHP you receive a new issue of [php[architect]](/books) each month and have several additional books available to read on demand - providing the latest updates and an invaluable resource to help your book club get started.

Developer Movie Nights


Sometimes we all just want to get away, grab some popcorn, and watch a movie. Similar to lunch and learns, give your developers a night or two where they can get together and watch one of the 250+ training videos available on Nomad PHP. You can even make it a movie marathon!

Whether it's pizza, popcorn, sodas, beers - your team members will have the chance to kick back, relax a bit, build team camaraderie, and learn valuable skills to help your business succeed. Essentially, turning a training day into a fun team-bonding activity.

Learning Path Challenges


Every company has challenges, and areas they need their team members to master. Whether it's DevOps and containerization, security, performance, management, modernization, or soft skills - work with your team to determine what skills will help them succeed and work with your team members to put together video learning paths.

Your team members can watch through these videos on-demand, go back and replay to refresh their knowledge, and work their way towards mastery in the subjects that will help your company succeed.

Certification


Show that you are invested in your developers by helping them earn Professional Certification. These certifications demonstrate that your team members have a fundamental grasp of the technology they are working with and understand when and how to use this technology.

With free certification exams included with Nomad PHP - you no longer have to worry about failed exams or expensive test credits. Your team members can take the exams at their own pace, discover the areas they need to improve, and take the exam again when they are ready. After all, shouldn't the goal of certification be to help your developers learn these skills and prove their expertise?

You can go even further with certifications by having a special company award, framing their certificate, or calling out newly certified developers at team meetings or all-hands.

Learning Incentives/ Rewards


Of course there are even more ways you can help your developers learn new skills, grow their careers, and build loyalty within your company. With Nomad PHP there are numerous ways for your team members to grow their skills, and numerous ways you can reward/ incentivize them - from rewards for the most active learner, to setting goals for learning new skills, to obtaining certifications, to attending streams, to watching videos on-demand. All of these are included with our Professional Nomad PHP Team subscriptions.

Want to learn more about getting a Nomad Team Subscription for your developers? Give us a call (844) CODE-PHP

Have more ideas on how to help your developers grow their skills or help employers make education more accessible? Please leave your ideas in the comments below!
8392 views · 3 years ago
Laravel Eloquent Relationship Part 2

As you all know, Laravel Eloquent Relationships are powerful and easy methods introduced by Laravel for helping developers to reduce the complexity when connecting with multiple tables. While connecting with multiple tables, this method is very easy for developers for creating the application

Here you can see the next three methods of the eloquent relationships:
   
. Has Many Through Relationship
    . One to Many Polymorphic
    . Many to many Polymorphic

HAS MANY THROUGH ELOQUENT RELATIONSHIP

Has many through is a little bit complicated while understanding. I will provide a shortcut method to provide access data of another mode relationship. We will create a user table, post table, and country table and they will be interconnected with each other.

Here we will see Many through relationship will use hasManyThrough() for the relation


Create Migrations


Users table

 Schema::create('users', function (Blueprint $table) {

$table->increments('id');

$table->string('name');

$table->string('email')->unique();

$table->string('password');

$table->integer('country_id')->unsigned();

$table->rememberToken();

$table->timestamps();

$table->foreign('country_id')->references('id')->on('countries')

->onDelete('cascade');

});


Posts table

Schema::create('posts', function (Blueprint $table) {

$table->increments('id');

$table->string("name");

$table->integer('user_id')->unsigned();

$table->timestamps();

$table->foreign('user_id')->references('id')->on('users')

->onDelete('cascade');

});


Countries table

Schema::create('countries', function (Blueprint $table) {

$table->increments('id');

$table->string('name');

$table->timestamps();

});


Create Models


Country Model

<?php


namespace App;

use Illuminate\Database\Eloquent\Model;


class Country extends Model

{

public function posts(){

return $this->hasManyThrough(

Post::class,

User::class,

'country_id',
'user_id',
'id',
'id'
);

}

}


Now we can retrieve records by

$country = Country::find(1); 

dd($country->posts);


ONE TO MANY POLYMORPHIC RELATIONSHIP

One to many polymorphic relationships used one model belongs to another model on a single file. For example, we will have tweets and blogs, both having the comment system. So we need to add the comments. Then we can manage both in a single table


Here we will use sync with a pivot table, create records, get all data, delete, update, and everything related to one too many relationships.

Now I will show one too many polymorphic will use morphMany() and morphTo() for relation.


Create Migrations

Posts table

Schema::create('posts', function (Blueprint $table) {

$table->increments('id');

$table->string("name");

$table->timestamps();

});

Videos Table

Schema::create('videos', function (Blueprint $table) {

$table->increments('id');

$table->string("name");

$table->timestamps();

});

Comments Table

Schema::create('comments', function (Blueprint $table) {

$table->increments('id');

$table->string("body");

$table->integer('commentable_id');

$table->string("commentable_type");

$table->timestamps();

});


Create Models

Post Model

<?php

namespace App;

use Illuminate\Database\Eloquent\Model;


class Post extends Model

{


public function comments(){

return $this->morphMany(Comment::class, 'commentable');

}

}

Video Model

<?php

namespace App;

use Illuminate\Database\Eloquent\Model;


class Video extends Model{


public function comments(){

return $this->morphMany(Comment::class, 'commentable');

}

}

Comment Model

<?php

namespace App;

use Illuminate\Database\Eloquent\Model;

class Comment extends Model{


public function commentable(){

return $this->morphTo();

}

}


Create Records


$post = Post::find(1); 

$comment = new Comment;

$comment->body = "Hi Harikrishnan";

$post->comments()->save($comment);


$video = Video::find(1);

$comment = new Comment;

$comment->body = "Hi Harikrishnan";

$video->comments()->save($comment);


Now we can retrieve records


$post = Post::find(1); 

dd($post->comments);


$video = Video::find(1);

dd($video->comments);


MANY TO MANY POLYMORPHIC RELATIONSHIPS

Many to many polymorphic is also a little bit complicated like above. If we have a tweet, video and tag table, we need to connect each table like every tweet and video will have multiple persons to tag. And for each and every tag there will be multiple tweet or videos.

Here we can understand the creating of many to many polymorphic relationships, with a foreign key schema of one to many relationships, use sync with a pivot table, create records, attach records, get all records, delete, update, where condition and etc..


Here morphToMany() and morphedByMany() will be used for many to many polymorphic relationships

Creating Migrations

Posts Table

Schema::create('posts', function (Blueprint $table) {

$table->increments('id');

$table->string("name");

$table->timestamps();

});

Videos Table

Schema::create('videos', function (Blueprint $table) {

$table->increments('id');

$table->string("name");

$table->timestamps();

});

Tags table

Schema::create('tags', function (Blueprint $table) {

$table->increments('id');

$table->string("name");

$table->timestamps();

});

Taggables table

Schema::create('taggables', function (Blueprint $table) {

$table->integer("tag_id");

$table->integer("taggable_id");

$table->string("taggable_type");

});


Creating ModelsPost Model


<?php

namespace App;

use Illuminate\Database\Eloquent\Model;

class Post extends Model

{


public function tags(){

return $this->morphToMany(Tag::class, 'taggable');

}

}


Video Model

<?php

namespace App;

use Illuminate\Database\Eloquent\Model;

class Video extends Model

{


public function tags(){

return $this->morphToMany(Tag::class, 'taggable');

}

}

Tag Model

<?php

namespace App;

use Illuminate\Database\Eloquent\Model;

class Tag extends Model

{


public function posts(){

return $this->morphedByMany(Post::class, 'taggable');

}


public function videos(){

return $this->morphedByMany(Video::class, 'taggable');

}

}

Creating Records

$post = Post::find(1); 
$tag = new Tag;
$tag->name = "Hi Harikrishnan";
$post->tags()->save($tag);


$video = Video::find(1);
$tag = new Tag;
$tag->name = "Vishnu";
$video->tags()->save($tag);


$post = Post::find(1);
$tag1 = new Tag;
$tag1->name = "Kerala Blasters";
$tag2 = new Tag;
$tag2->name = "Manajapadda";
$post->tags()->saveMany([$tag1, $tag2]);


$video = Video::find(1);
$tag1 = new Tag;
$tag1->name = "Kerala Blasters";
$tag2 = new Tag;
$tag2->name = "Manajappada";
$video->tags()->saveMany([$tag1, $tag2]);


$post = Post::find(1);
$tag1 = Tag::find(3);
$tag2 = Tag::find(4);
$post->tags()->attach([$tag1->id, $tag2->id]);


$video = Video::find(1);
$tag1 = Tag::find(3);
$tag2 = Tag::find(4);
$video->tags()->attach([$tag1->id, $tag2->id]);


$post = Post::find(1);
$tag1 = Tag::find(3);
$tag2 = Tag::find(4);
$post->tags()->sync([$tag1->id, $tag2->id]);


$video = Video::find(1);
$tag1 = Tag::find(3);
$tag2 = Tag::find(4);
$video->tags()->sync([$tag1->id, $tag2->id]);


Now we can retrieve records

$post = Post::find(1); 
dd($post->tags);


$video = Video::find(1);
dd($video->tags)


$tag = Tag::find(1);
dd($tag->posts);


$tag = Tag::find(1);
dd($tag->videos);


Hence we completed all the relationships. In the above blog how has many through relationship, one to many polymorphic relationships and many to many polymorphic are working. This feature is introduced from Laravel 5.0 onwards and till the current version. Without the model, we can’t able to do this relationship. If we are using an eloquent relationship it will be very useful while developing an application.
8777 views · 3 years ago


Welcome back! If you’re new to this series have a look at Part 1 here


Today’s focus is on templating, the aesthetic that will make or break your web application.

Having a clean design with well defined CSS that’s responsive and user friendly goes a long way.

Developers often stick to their lane but delving into templating will bode in your favor, you can indeed
create a functional and launch-worthy application all on your own!

Let’s jump into it!

Structured structure


Everything you tackle should be found with ease down the line. Therefore careful planning is fundamental to the success and sustainability of your project. You’ll also find that clearly defining your work lends itself to more productivity overall as you spend less that explaining your work during a handover / looking for a specific piece of code or resource. You’ll probably end up spending more time on actual work.
Finding your own unique pattern with file structure and CSS identifiers will also work in your favor as something unique to your process will most likely be easier to remember and form a tactile relationship with.

Our project’s current structure looks like this:


>If you need to backtrack, Part 1 is a great place to start!

In part 1, we created our index.php which displays info from our database.

Let’s take this a step further and create a header and a footer for our index.php

Create a file called header.php and save this to your includes folder.

Next, create a file called footer.php and save this to your includes folder.

Your file structure should now look like this.


A header above all the rest


The header file will be a file we reuse throughout your web application. This file will contain important information that’s vital to the functionality and aesthetic of your website.
The type of info you’ll expect to see in a header.php file:
Script includes
Such as JQuery and important libraries
CSS includes
CSS files loaded from internal or external sources
Meta information
Contains important information that’s readable by search engines.
The basic structure of the beginning of your app, including your menu, and your logo.
For now, how header is going to have a basic layout.

Let’s get our HTML on!

<html>
<head>
<title>My Awesome CMS – Page Title</title>
</head>
<body>


A footer that sets the bar

Create a file called footer.php and save it to your includes folder (yourcms/includes/footer.php).

Add this code to your new file.

</body>
</html>


Next, let’s focus on the gravy… The CSS


CSS, when written beautifully, can truly set you apart.

You can tell your web application to load various styles to specific elements by defining unique identifiers.
Styles that are only used once are denoted with a # (a CSS “ID”) whereas styles that are reused multiple times are denoted with a . (a CSS “class”)

The best way to delve into the realm of CSS is to learn by experience.

Let’s create!


First, we need to create and load our CSS file. Remember our nifty new pal header.php? This created a convenient way to load our CSS file!

Add the following code to your header.php just above the </head> tag.

<link href=”../assets/css/style.css” type=”text/css” rel=”stylesheet”/> 


The ../ in the link to our stylesheet means we have to leave the current directory (the directory that header.php is in) and look for the assets/css/ directories.

Go ahead and create the css folder under your assets folder.

Next we’re going to create some simple CSS to test things out.

It’s time to add some style!


We are going to create two divs.
A div is a divider / section in HTML.
Add this to your index.php (located in your CMS’ root folder) above the <?php tag.

<div id="myfirstid"></div>
<div class="myfirstclass"></div>


Then, create a CSS file

Add this:

#myfirstid{
Background:lightblue;
Font-family:Arial;
Font-size:44px;
Font-weight: Bold;
}
.myfirstclass{
Font-size:15px;
Color: darkblue;
}


Save your newly created CSS to assets/css/ as style.css.

Pulling it all together, let’s see what we can do!


Let’s apply what we just learned to our index.php. But first, we should add our header.php and footer.php files.

Including everyone


Add this to the top of your index.php file:

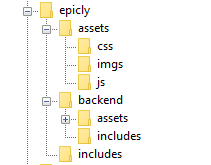
include(‘includes/header.php’);


Remove the <divs> we used for practice earlier, we have something better in store!

Add this to the bottom of your index.php:

include(‘includes/footer.php’);


Next, let’s modify our code so we can add some style to the data we retrieve from our database.

Modify the following line:
foreach($getmydata as $mydata){ echo "Title: "; echo $mydata['title']; echo "<br/>"; echo "Content: "; echo $mydata['content']; echo "<br/>"; echo "Author: "; echo $mydata['author']; echo "<br/>"; echo "<br/>";


as follows:
?>

<div id=”myfirstid”>
<?php
foreach($getmydata as $mydata){
echo "<div class=”myfirstclass”>Title: ";
echo $mydata['title'];
echo "<br/>";
echo "Content: ";
echo $mydata['content'];
echo "<br/>";
echo "Author: ";
echo $mydata['author'];
echo "</div><br/><br/>";
}?>
</div>
<?php


Your full index.php should now look like this:

<?php
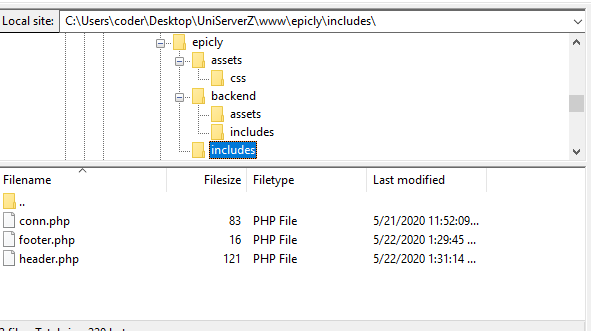
include('includes/header.php');
include('includes/conn.php');

if ($letsconnect -> connect_errno) { echo "Error " . $letsconnect -> connect_error;

}else{

$getmydata=$letsconnect -> query("SELECT * FROM content");

?>
<div id="myfirstid">
<?php
foreach($getmydata as $mydata){
echo "<div class=”myfirstclass”>Title: ";
echo $mydata['title'];
echo "<br/>";
echo "Content: ";
echo $mydata['content'];
echo "<br/>";
echo "Author: ";
echo $mydata['author'];
echo "</div><br/><br/>";
}
?>
</div>
<?php
}

$letsconnect -> close();
include('includes/footer.php');
?>


Go ahead, test it out!

There’s a lot to unpack and I will break things down a little more during our next tutorial!

Challenge


Study the final index.php and try to form a few theories about why closing a php tag is necessary before adding raw html.

Next Up: #CodeWithMe Part 4: Building A Good Base

12889 views · 4 years ago
Why Cloudways is the Perfect Managed Hosting for PHP Applications

The following is a sponsored blogpost by Cloudways


Developing an application is not the sole thing you should bank on. You must strive to find the best hosting solution to deploy that application also. The application’s speed is dependent on the hosting provider, that is why I always advise you to go for the best hosting solution to get the ultimate app performance.

Now a days, it is a big challenge to choose any web hosting, as each hosting has its own pros and cons which you must know, before considering it finally for the deployment. I don’t recommend shared hosting for PHP/Laravel based applications, because you always get lot of server hassles like downtime, hacking, 500 errors, lousy support and other problems that are part and parcel of shared hosting.

For PHP applications, you must focus on more technical aspects like caching, configs, databases, etc. because these are essential performance points for any vanilla or framework-based PHP application. Additionally, if the app focuses on user engagement (for instance, ecommerce store), the hosting solution should be robust enough to handle spikes in traffic.

Here, I would like to introduce Cloudways PHP server hosting to you which provides easy, developer and designer friendly managed hosting platform. With Cloudways, you don't need to focus on PHP hosting, but must focus on building your application. You can easily launch cloud servers on five providers including DigitalOcean, Linode, Vultr, AWS and GCE.


Cloudways ThunderStack


Being a developer, you must be familiar with the concept of stack - an arrangement of technologies that form the underlying hosting solution.

To provide a blazing fast speed and a glitch-free performance, Cloudways has built a PHP stack, known as ThunderStack. This stack consists of technologies that offer maximum uptime and page load speed to all PHP applications. Check out the following visual representation of ThunderStack and the constituent technologies:


alt_text


As you can see, ThunderStack comprises of a mix of static and dynamic caches with two web servers, Nginx and Apache. This combination ensures the ultimate experience for the users and visitors of your application.


Frameworks and CMS


The strength and popularity of PHP lies in the variety of frameworks and CMS it offers to the developers. Realizing this diversity, Cloudways offers a hassle-free installation of major PHP frameworks including Symfony, Laravel, CakePHP, Zend, and Codeigniter. Similarly, popular CMS such as WordPress, Bolt, Craft, October, Couch, and Coaster CMS - you can install these with the 1-click option. The best part is that if you have a framework or CMS that is not on the list, you can easily install it through Composer.


1-Click PHP Server & Application Installation


Setting up a stack on an unmanaged VPS could take an entire day!

When you opt for Cloudways managed cloud hosting, the entire process of setting up the server, installation of core PHP files and then the setup of the required framework is over in a matter of minutes.

Just sign up at Cloudways, choose your desired cloud provider, and select the PHP stack application.


alt_text


As you can see, your LAMP stack is ready for business in minutes.

Many PHP applications fail because essential services are either turned off or not set up properly. Cloudways offers a centralized location where you can view and set the status of all essential services such as:


* Apache
* Elasticsearch
* Memcached
* MySQL
* PHP-FPM
* Nginx
* New Relic
* Redis
* Varnish


alt_text


Similarly, you can manage SMTP add-ons without any fuss.


Staging Environment


With Cloudways, you can test your web applications for possible bugs and errors before taking it live.

Using the staging feature, developers can first deploy their web sites on test domains where they can analyze the applications performance and potential problems. This helps site administrators to fix those issues timely and view the application performance in real-time.

A default sub domain comes pre-installed with the newly launched application, making it easy for the administrators to test the applications on those testing subdomains. Overall, it's a great feature which helps developers know about the possible errors that may arise during the live deployment.

alt_text

Pre-Installed Composer & Git


PHP development requires working with external libraries and packages. Suppose you are working with Laravel and you need to install an external package. Since Composer has become the standard way of installing packages, it comes preinstalled on the Cloudways platform. Just launch the application and start using Composer in your project.

Similarly, if you are familiar with Git and maintain your project on GitHub or BitBucket, you don’t need to worry about Git installation. Git also comes pre-configured on Cloudways. You can start running commands right after application launch.


Cloudways MySQL Manager


When you work with databases in PHP, you need a database manager. On the Cloudways platform, you will get a custom-built MySQL manager, in which you can perform all the tasks of a typical DB manager.

alt_text


However, if you wish to install and use another database manager like PHPMyAdmin, you can install it by following this simple guide on installing PHPMyadmin.


Server & Application Level SSH


If you use Linux, you typically use SSH for accessing the server(s) and individual applications. A third-party developer requires application and server level access as per the requirements of the client. Cloudways offers SSH access to fit the requirements of the client and users.

alt_text


PHP-FPM, Varnish & Cron Settings


Cloudways provides custom UI panel to set and maintain PHP-FPM and Varnish settings. Although the default configuration is already in place, you can easily change all the settings to suit your own, particular development related requirements. In Varnish settings, you can define URL that you want to exclude from caching. You can also set permissions in this panel.

alt_text


Cron job is a very commonly used component of PHP application development process. On Cloudways platform, you can easily set up Cron jobs in just a few clicks. Just declare the PHP script URL and the time when the script will run.

alt_text


Cloudways API & Personal Assistant Bot


Cloudways provides an internal API that offers all important aspects of the server and application management. Through Cloudways API, you can easily develop, integrate, automate, and manage your servers and web apps on Cloudways Platform using the RESTful API. Check out some of the use cases developed using Cloudways API. You just need your API key and email for authentication of the HTTP calls on API Playground and custom applications.

alt_text


Cloudways employs a smart assistant named CloudwaysBot to notify all users about server and application level issues. CloudwaysBot sends the notifications on pre-approved channels including email, Slack and popular task management tools such as Asana and Trello.


Run Your APIs on PHP Stack


Do you have your own API which you want to run on the PHP stack? No problem, because you can do that, too with Cloudways! You can also use REST API like Slim, Silex, Lumen, and others. You can use APIs to speed up performance and require fast servers with lots of resources. So, if you think that your API response time is getting slower due to the large number of requests, you can easily scale your server(s) with a click to address the situation.


Team Collaboration


When you work on a large number of applications with multiple developers, you need to assign them on any specific application. Cloudways provides an awesome feature of team collaboration through which you can assign developers to specific application and give access to them. You can use this tool to assign one developer to multiple applications. Through team feature, you can connect the team together and work on single platform. Access can be of different type; i.e. billing, support and console. You can either give the full access or a limited one by selecting the features in Team tab.

alt_text


Final Words


Managed cloud hosting ensures that you are not bothered by any hosting or server related issues. For practical purposes, this means that developers can concentrate on writing awesome code without worrying about underlying infrastructure and hosting related issues. Do sign up and check out Cloudways for the best and the most cost-effective cloud hosting solution for your next PHP project!

SPONSORS