PHP & Web Development Blogs

Search Results For: system
Showing 11 to 15 of 33 blog articles.
4407 views · 3 years ago


People that visit your website face an invisible threat each time they log on. Small businesses are especially vulnerable to digital data breaches, and that can change the way your customers feel about you. But, although you cannot stop hackers from trying, there are things you can do as a business owner to make your website a safer experience for everyone. Keep reading for tips.

Mature digitally.


You may be ahead of the times when it comes to products and services, but, chances are, your website hasn't fully kept up. It's time to learn all you can about the internet and digital security. If you are already somewhat tech savvy, a PHP Security Course from Nomad PHP can help you better understand everything from cryptography to website error messages.

Adapting to today's digital environment means transforming your website to quickly and easily identify threats via machine learning and network monitoring. And, as Upwork explains, digital maturity not only keeps your website safe, but adopting this mindset can also increase your efficiency and accuracy by reducing human errors.

Understand the threats.


It is not enough to simply keep up with your website, you also have to understand the types of threats that are out there. You're likely familiar with ransomware and phishing, but, it's also a good idea to know how a website can get hacked. Your site's content management system and vulnerabilities within your operating system are all weak points that hackers can easily identify.

Insist on security measures.


When customers log into your website, they input their credentials. Each time they do so, you can best protect their information by keeping your systems up to date. You'll also want to ensure that your site is hosted on a secure service and that you have an SSL certificate installed.

If you are not already, have your IT department or managed IT services perform regular website security checks. PhoenixNAP, an IT services provider, notes that those websites working via WordPress should also be safely outfitted with the most recent security plug-ins.

Eliminate spam.


If your website allows for comments that are not manually approved, anyone on the internet can post. This leaves it open for hackers and other unscrupulous individuals to comment with spam and malicious links that your customers may inadvertently click on. While many of these simply exist as a way for the commenter to drive traffic to another website, others are designed to draw your readers' attention, gain their trust, and access their personal information.

Prioritize passwords.


Your customers' passwords are the keys by which they open the door to your website. Unfortunately, many people do not treat them with as much care as they do the keys they use in the non-digital world.

It's true, passwords can be a pain, but you are not doing yourself or your customers any favors by allowing simple one-word passcodes to access your site. Instead, design your site to require a strong password. How-To Geek asserts that this will have a minimum of 12 characters and include a combination of upper and lower case letters, symbols, and numbers.

While you will likely rely on your IT experts to secure your website, the truth is that it is ultimately up to you to ensure this is done. So even if you are not a digital mastermind, knowing all you can about web security can help you be a better business owner. Your customers will be safer, and a secure website is just one way to strengthen your business's online presence and keep up with today's -- and tomorrow's -- technology.
4292 views · 3 years ago
Using AI for Weather Forecasting

Technology is constantly changing the way we interact, research, and react. One such way artificial intelligence is impacting our daily lives, and we may not even realize it is in weather forecasting.


The forecast we usually have been receiving in our phones and in older times primarily in newspapers, was based on data collected via satellites, radar system and weather balloons. In recent times there has been the addition of IoT based sensors as well. However, with the advent of Artificial Intelligence (AI) finding its way in numerous areas, AI has taken a role in improving the accuracy of weather as well.

The Dataset expansion

A significantly enormous set of data is available - from the weather satellites in space, to the private and government owned weather stations which are gaining real-time data. IBM for instance has more the 0.25 million weather stations that help IBM collect real-time data. Additionally, as we are in the age of Internet of Things (IOT), each small device to big device- cellphones, solar panels and vehicles everything has become or is yet to become yet another data source. Companies like GE have installed IOT street lights, which help in monitoring air quality and humidity. These are some of the few sources which help us in collecting the vast amount of data necessary for building on the AI technology, in future these sources and the amount of available data would grow exponentially.

Google and Weather forecast

Using the AI technology Google is able to develop a weather forecast tool, it has been trained to predict rainfalls accurately as much as six hours before. The underlying technology on which this prediction is build upon is U-Net convolutional neural network which is originally used in biomedical research. It works by taking satellite images as input and uses AI technology to transform these images into high resolution images. The only off-set is this is not real-time prediction and the delay due to complex calculations results in using six-hour old data and hence can only predict six-hours before.

IBM and its efforts in weather prediction

The quest for IBM to venture into weather forecasting began with IBM acquiring The Weather Company. IBM plans on using the large amount of weather data available coupled with IBM Watson and the cloud platform to enhance weather forecasting. In 2019 IBM developed Global High-Resolution Atmospheric Forecasting System (GRAF) in order to forecast weather conditions 12 hours prior to a greater degree of accuracy. The radius encompassed by the GRAF is also more narrowed down up to 3 kilometers as opposed to generally being 10-15 kilometers. Another of its marvel is that it gives accurate predictions down to each hour and not just daily.

Artificial Intelligence and Panasonic

Panasonic is the company behind TAMDAR, the weather sensor installed on commercial airplanes. With this advantage of extensive amount of data from in-flight sensors as well as publicly available data Panasonic developed Global 4D Weather. Proving to their claim of being the most advanced global forecasting platform globally they were able to timely predict Hurricane Irma in its early days.

Uses of Weather Forecasting


Sales

Everyday life decisions are affected by weather, it makes us choose in the way we travel, things we eat and things we buy to wear. The rise in temperature may increase sales of chilled drinks, if the company is fully aware of the forecast it would be able to manage productions as per demand. AI can help brands in maximizing sales based on weather forecasts and in minimizing waste.

Natural Disasters

The Panasonic Global 4D weather predicting Hurricane Irma is just another example where timely prediction can save millions of lives in face of situations like floods and Hurricanes. Companies like IBM combine weather forecasting data with utilities distribution network, which enables them to narrow down areas with likely outages. This enables utilities to place their workforce timely so the repair process catering to damage repairs post disasters is shortened. This in turn brings huge benefits to the overall economy.

Agriculture

The weather and agriculture have the most obvious correlation, each process in farming from sowing to reaping all depends on the weather. As farmers cultivate on huge farming lands, accurate information about each part of the land can help farmers in improving their crops and yield by manifolds. Weather conditions can lead to almost 90 percent of crop losses, 25 percent of these losses can be avoided using accurate AI prediction models to forecast weather and in turn improve the yield.

Transportation

Sea travel has always been eventful, timely prediction of storms by using machine learning techniques and hyper-local data allows companies to plan shipments accordingly and avoid severe weather conditions that usually result in delays. Tools like IBM’s Operations Dashboard for Ground Transportation equips in enhancing productivity based on weather predictions.

Another of the implementation of AI in transportation industry corelating to weather is fuel consumption. For instance, using weather prediction models to reduce airplane fuel consumption during its ascent.

To conclude Artificial Intelligence has a key role to play in weather forecasting, weather direct or indirectly impacts each sector in the economy. As the amount of information available to improve predictions increases exponentially it gives a chance to AI to improve accuracy even further. As we continue narrowing down weather conditions precise to time and location the benefits of such advancements across all industries are innumerable.

8391 views · 3 years ago
Laravel Eloquent Relationship Part 2

As you all know, Laravel Eloquent Relationships are powerful and easy methods introduced by Laravel for helping developers to reduce the complexity when connecting with multiple tables. While connecting with multiple tables, this method is very easy for developers for creating the application

Here you can see the next three methods of the eloquent relationships:
   
. Has Many Through Relationship
    . One to Many Polymorphic
    . Many to many Polymorphic

HAS MANY THROUGH ELOQUENT RELATIONSHIP

Has many through is a little bit complicated while understanding. I will provide a shortcut method to provide access data of another mode relationship. We will create a user table, post table, and country table and they will be interconnected with each other.

Here we will see Many through relationship will use hasManyThrough() for the relation


Create Migrations


Users table

 Schema::create('users', function (Blueprint $table) {

$table->increments('id');

$table->string('name');

$table->string('email')->unique();

$table->string('password');

$table->integer('country_id')->unsigned();

$table->rememberToken();

$table->timestamps();

$table->foreign('country_id')->references('id')->on('countries')

->onDelete('cascade');

});


Posts table

Schema::create('posts', function (Blueprint $table) {

$table->increments('id');

$table->string("name");

$table->integer('user_id')->unsigned();

$table->timestamps();

$table->foreign('user_id')->references('id')->on('users')

->onDelete('cascade');

});


Countries table

Schema::create('countries', function (Blueprint $table) {

$table->increments('id');

$table->string('name');

$table->timestamps();

});


Create Models


Country Model

<?php


namespace App;

use Illuminate\Database\Eloquent\Model;


class Country extends Model

{

public function posts(){

return $this->hasManyThrough(

Post::class,

User::class,

'country_id',
'user_id',
'id',
'id'
);

}

}


Now we can retrieve records by

$country = Country::find(1); 

dd($country->posts);


ONE TO MANY POLYMORPHIC RELATIONSHIP

One to many polymorphic relationships used one model belongs to another model on a single file. For example, we will have tweets and blogs, both having the comment system. So we need to add the comments. Then we can manage both in a single table


Here we will use sync with a pivot table, create records, get all data, delete, update, and everything related to one too many relationships.

Now I will show one too many polymorphic will use morphMany() and morphTo() for relation.


Create Migrations

Posts table

Schema::create('posts', function (Blueprint $table) {

$table->increments('id');

$table->string("name");

$table->timestamps();

});

Videos Table

Schema::create('videos', function (Blueprint $table) {

$table->increments('id');

$table->string("name");

$table->timestamps();

});

Comments Table

Schema::create('comments', function (Blueprint $table) {

$table->increments('id');

$table->string("body");

$table->integer('commentable_id');

$table->string("commentable_type");

$table->timestamps();

});


Create Models

Post Model

<?php

namespace App;

use Illuminate\Database\Eloquent\Model;


class Post extends Model

{


public function comments(){

return $this->morphMany(Comment::class, 'commentable');

}

}

Video Model

<?php

namespace App;

use Illuminate\Database\Eloquent\Model;


class Video extends Model{


public function comments(){

return $this->morphMany(Comment::class, 'commentable');

}

}

Comment Model

<?php

namespace App;

use Illuminate\Database\Eloquent\Model;

class Comment extends Model{


public function commentable(){

return $this->morphTo();

}

}


Create Records


$post = Post::find(1); 

$comment = new Comment;

$comment->body = "Hi Harikrishnan";

$post->comments()->save($comment);


$video = Video::find(1);

$comment = new Comment;

$comment->body = "Hi Harikrishnan";

$video->comments()->save($comment);


Now we can retrieve records


$post = Post::find(1); 

dd($post->comments);


$video = Video::find(1);

dd($video->comments);


MANY TO MANY POLYMORPHIC RELATIONSHIPS

Many to many polymorphic is also a little bit complicated like above. If we have a tweet, video and tag table, we need to connect each table like every tweet and video will have multiple persons to tag. And for each and every tag there will be multiple tweet or videos.

Here we can understand the creating of many to many polymorphic relationships, with a foreign key schema of one to many relationships, use sync with a pivot table, create records, attach records, get all records, delete, update, where condition and etc..


Here morphToMany() and morphedByMany() will be used for many to many polymorphic relationships

Creating Migrations

Posts Table

Schema::create('posts', function (Blueprint $table) {

$table->increments('id');

$table->string("name");

$table->timestamps();

});

Videos Table

Schema::create('videos', function (Blueprint $table) {

$table->increments('id');

$table->string("name");

$table->timestamps();

});

Tags table

Schema::create('tags', function (Blueprint $table) {

$table->increments('id');

$table->string("name");

$table->timestamps();

});

Taggables table

Schema::create('taggables', function (Blueprint $table) {

$table->integer("tag_id");

$table->integer("taggable_id");

$table->string("taggable_type");

});


Creating ModelsPost Model


<?php

namespace App;

use Illuminate\Database\Eloquent\Model;

class Post extends Model

{


public function tags(){

return $this->morphToMany(Tag::class, 'taggable');

}

}


Video Model

<?php

namespace App;

use Illuminate\Database\Eloquent\Model;

class Video extends Model

{


public function tags(){

return $this->morphToMany(Tag::class, 'taggable');

}

}

Tag Model

<?php

namespace App;

use Illuminate\Database\Eloquent\Model;

class Tag extends Model

{


public function posts(){

return $this->morphedByMany(Post::class, 'taggable');

}


public function videos(){

return $this->morphedByMany(Video::class, 'taggable');

}

}

Creating Records

$post = Post::find(1); 
$tag = new Tag;
$tag->name = "Hi Harikrishnan";
$post->tags()->save($tag);


$video = Video::find(1);
$tag = new Tag;
$tag->name = "Vishnu";
$video->tags()->save($tag);


$post = Post::find(1);
$tag1 = new Tag;
$tag1->name = "Kerala Blasters";
$tag2 = new Tag;
$tag2->name = "Manajapadda";
$post->tags()->saveMany([$tag1, $tag2]);


$video = Video::find(1);
$tag1 = new Tag;
$tag1->name = "Kerala Blasters";
$tag2 = new Tag;
$tag2->name = "Manajappada";
$video->tags()->saveMany([$tag1, $tag2]);


$post = Post::find(1);
$tag1 = Tag::find(3);
$tag2 = Tag::find(4);
$post->tags()->attach([$tag1->id, $tag2->id]);


$video = Video::find(1);
$tag1 = Tag::find(3);
$tag2 = Tag::find(4);
$video->tags()->attach([$tag1->id, $tag2->id]);


$post = Post::find(1);
$tag1 = Tag::find(3);
$tag2 = Tag::find(4);
$post->tags()->sync([$tag1->id, $tag2->id]);


$video = Video::find(1);
$tag1 = Tag::find(3);
$tag2 = Tag::find(4);
$video->tags()->sync([$tag1->id, $tag2->id]);


Now we can retrieve records

$post = Post::find(1); 
dd($post->tags);


$video = Video::find(1);
dd($video->tags)


$tag = Tag::find(1);
dd($tag->posts);


$tag = Tag::find(1);
dd($tag->videos);


Hence we completed all the relationships. In the above blog how has many through relationship, one to many polymorphic relationships and many to many polymorphic are working. This feature is introduced from Laravel 5.0 onwards and till the current version. Without the model, we can’t able to do this relationship. If we are using an eloquent relationship it will be very useful while developing an application.
9695 views · 3 years ago


Welcome back!, if you’re new please be sure to read Part 1 here.


This tutorial will focus primarily on Security and will touch on how to plan functionality.

Planning out an application and seeing progress regularly is a good strategy as you are most likely to complete your tasks in a timely fashion with this approach.

Ready?, ok let’s jump into it!

DISCLAIMER


We highly recommend that you follow these tutorials on a localhost testing server like Uniserver. Read through Part 1 here to look at our recommendations. These tutorials follow a phased approach and it is highly recommended that you do not make snippets of code live prior to completing this tutorial series.


Where we left off – the serious stuff.


In the previous tutorial we saved variables to the database.

It’s important to note that further steps are needed to ensure that data transactions to / from the database are secure.

A great first step is to ensure that all POST data (data transmitted after a user clicks a form’s submit button) is sanitized.

What we’re trying to prevent


One of the most common exploits is SQL Injection, an attack most commonly used to insert SQL into db queries. POST data that’s not sanitized leaves a huge security hole for malicious exploits. In some cases SQL injection can be leveraged to rage an all out assault on a server’s operating system.

A few examples of a basic version of what this might look like can be seen below.


OUTCOME


This might delete your database table


OUTCOME


This might provide access to the entire user table and the password protected area/dashboard.


***Please note that there are various types of SQL injection techniques and I will delve into this during the course of this series.***


So what exactly is sanitization and what does it do?


When sanitizing POST data, we are essentially looking for any special characters that are often used in SQL injection attacks.

In many ways, this tiny piece of code is the unsung superhero of many database driven applications.

Let’s secure that POST data!


Navigate to your backend folder and open index.php

Locate the following line of code:

$sql = "INSERT INTO content(title,content,author)VALUES ('".$_POST["title"]."', '".$_POST["content"]."', '".$_POST["author"]."')";


Ok, let’s get to work.

Based on what I mentioned a few moments ago, it’s clear that our SQL statement is vulnerable so we need to sanitize the POST data pronto!

The method I will focus on first is $mysqli->real_escape_string. This will escape any special characters found in the POST data.

Add the following just above your $sql.

$title = $letsconnect -> real_escape_string($_POST['title']);

$content = $letsconnect -> real_escape_string($_POST['content']);

$author = $letsconnect -> real_escape_string($_POST['author']);


Did you notice the use of $letsconnect? This was used because of our db connection defined in conn.php.

Our new query will look like this:

$sql = "INSERT INTO content (title,content,author) VALUES ('".$title."', '".$content."', '".$author."')";


Go ahead and replace the old $sql.

Phew!, we can breathe easy now.

Next, let’s lighten things up a bit by focusing on functionality and aesthetics.


A phased approach is the best way to tackle projects of any size.

I tend to jot this down on paper before creating a more legible professional spec!.

Typically the phased approach lends itself to logical progression.

For example, over the next several days I will go over the following:

* Account Access
* The login process
* The registration process
* The password recovery process
* Frontend
* The look and feel
* Menus
* Sidebars
*Main Content
*Footer
* Backend
* Content Management
* Add/Edit/Delete
* Security

This will give us a good springboard to delve into more complex functionality.

The aesthetic I have in mind will be barebones at first with clean CSS practices (this will make life a whole lot easier when we have to make changes down the line!).

Challenge :


Plan out your own CMS, think about the user interface and design choices you’d like to implement, and create a phased approach.

Conclusion


I hope this tutorial encouraged you to think about security and understand one of the most common exploits. During the course of this series, you will receive the tools necessary to beef up security while maintaining your sanity!

Next up


CodeWithMe – Let’s go templating.
11061 views · 3 years ago


It took me quite some time to settle on my first blog post in this series and I found myself thinking about the most requested functionality in my career – The good ‘ol Custom CMS – typically geared towards clients that want a straight forward, secure solution that can be expanded upon in a modular format and that’s their IP.

This will be our starting point. A blank slate to build something epic with clean code and even cleaner design. And in the spirit of building from scratch, I will refrain from using classes or a framework. The main reasoning behind this is to truly get everyone acquainted with and excited about PHP development.

Join me as I transform rudimentary code into something extraordinary that can be morphed into just about any Content, PHP, and MySQL driven project. So without further ado, let’s jump into it!

The bare necessities


If you’re just getting started with development, there’s a nifty bite sized server called UniformServer that will be your best friend throughout your coding career. PHPMyAdmin (an awesome visual db management tool) comes built in so if you’re looking for a work right out of the box solution, this is it.

Alternatively, you can opt for XAMPP or use an alternative server of your choice.

Now here’s where the exciting stuff begins, mapping things out.


I don’t see this done/encouraged often enough. Feel free to grab a piece of paper to logically map out your steps or produce a rough draft of where you’d like this project to go.

In this tutorial, I would like to achieve the following:


DB, DB, Set up your DB.


This requires a bit of planning but let’s start of with the basic structure we need to see this through.

We are going to need a user table and a content table and are a few ways to tackle this.

If you’re using the PHPMyAdmin tool you can create your database, add user permissions (Click on Permissions after creating your database), and create a table with ease.


If you’re like me and prefer to look at good ‘ol SQL then writing an SQL statement is the preferred approach.


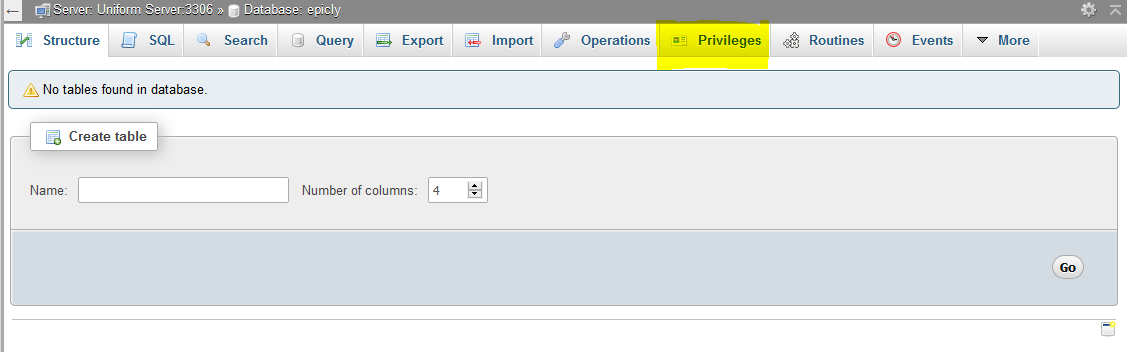
CREATE TABLE <code>mydbname</code>.<code>content</code> ( <code>ID</code> INT(11) NOT NULL AUTO_INCREMENT , <code>title</code> VARCHAR(100) NOT NULL , <code>content</code> LONGTEXT NOT NULL , <code>author</code> VARCHAR(50) NOT NULL , PRIMARY KEY (<code>ID</code>)) ENGINE = MyISAM COMMENT = 'content table';


Understanding the SQL statement

In a nutshell we are creating a table with important fields. Namely:

####

ID | Title | Content | Author

#######

The ID field is our unique identifier.Now we can move on to the file structure.

Everything has a place in the file structure game


You can use a structure that speaks to your coding style / memory.

I tend to use the following:


Choose a name for your CMS, which should be placed at the webroot of your localhost/server.

Replicate the folder structure as per the above example.

Next, we’re going to create a basic connection file.


You can create a 
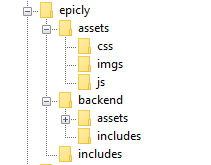
conn.php file in your root/includes folder.

The connection file will provide crucial information to connect to the database.

Type the following into your conn.php file, remember to include your own database credentials.


<?php

$letsconnect = new mysqli("localhost","dbuser","dbpass","dbname");

?>


Let’s go to the homepage (index.php)


Create a file called index.php at the root of your CMS folder.

I will be adding comments in my code to help you understand what each line does.

Comments are a useful tool for developers to add important notes private to their code.

We need to pull information from the database so it’s imperative that we include our connection file.


<?php

include('includes/conn.php');

if ($letsconnect -> connect_errno) { echo "Error " . $letsconnect -> connect_error;

}else{

$getmydata=$letsconnect -> query("SELECT * FROM content");

foreach($getmydata as $mydata){ echo "Title: "; echo $mydata['title']; echo "<br/>"; echo "Content: "; echo $mydata['content']; echo "<br/>"; echo "Author: "; echo $mydata['author']; echo "<br/>"; echo "<br/>";

}

}

$letsconnect -> close();

?>


Let’s get a (very) basic backend up and running


Create a file called index.php in your backend folder.

We need to create a basic form to capture our data.

Let’s code some HTML!


<html>

<head><title>Backend - Capture Content</title></head>

<body>

<form action="<?php $_SERVER[‘PHP_SELF’];?>" method="post">

<input type="text" name="title" placeholder="Content Title here" required/>

<textarea name="content">Content Here</textarea>

<input type="text" name="author" placeholder="Author" required/>

<input type="submit" value="Save My Data" name="savedata"/>

</form>

</body>

</html>


Next, we need to process the form data.


Type the following just above the
<form> 
tag.


<?php

if(isset($_POST['savedata'])){

include('../includes/conn.php');

if ($letsconnect->connect_error) {

die("Your Connection failed: " . $letsconnect->connect_error);

}else{

$sql = "INSERT INTO content(title,content,author)VALUES ('".$_POST["title"]."', '".$_POST["content"]."', '".$_POST["author"]."')";

if (mysqli_query($letsconnect, $sql)) {

echo "Your data was saved successfully!";

} else { echo "Error: " . $sql . "" . mysqli_error($letsconnect);

} $letsconnect->close();

}

}

?>


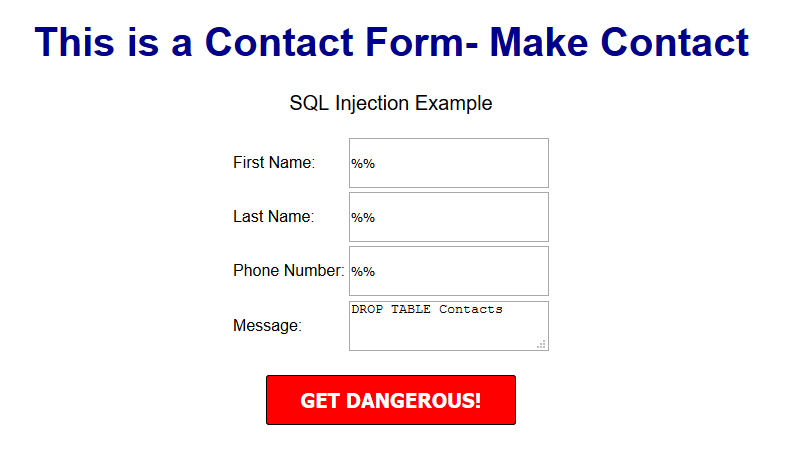
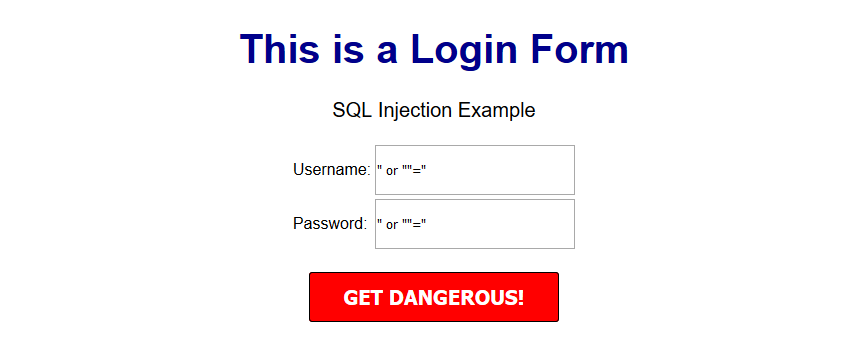
Note, this is a basic MySQL query to insert data. However, before using this in production it's important to add proper escaping and security to prevent SQL injections. This will be covered in the next article.


Congrats you made it to the end of tutorial 1!


Test out your creation, modify your content, and play around.

Go to your sitename/index.php to see your frontend after capturing data via sitename/backend/index.php

Next Up:


codewithme Now With Security, Functionality, and Aesthetics in mind.


Conclusion


Coding doesn’t have to be daunting and it’s my aim to divide a complex system into bitesized tutorials so you can truly use the knowledge you’ve acquired in your own projects.

SPONSORS