Welcome back!, if you’re new please be sure to read Part 1 here.
This tutorial will focus primarily on Security and will touch on how to plan functionality.
Planning out an application and seeing progress regularly is a good strategy as you are most likely to complete your tasks in a timely fashion with this approach.
Ready?, ok let’s jump into it!
DISCLAIMER
We highly recommend that you follow these tutorials on a localhost testing server like Uniserver. Read through Part 1 here to look at our recommendations. These tutorials follow a phased approach and it is highly recommended that you do not make snippets of code live prior to completing this tutorial series.
Where we left off – the serious stuff.
In the previous tutorial we saved variables to the database.
It’s important to note that further steps are needed to ensure that data transactions to / from the database are secure.
A great first step is to ensure that all POST data (data transmitted after a user clicks a form’s submit button) is sanitized.
What we’re trying to prevent
One of the most common exploits is SQL Injection, an attack most commonly used to insert SQL into db queries. POST data that’s not sanitized leaves a huge security hole for malicious exploits. In some cases SQL injection can be leveraged to rage an all out assault on a server’s operating system.
A few examples of a basic version of what this might look like can be seen below.
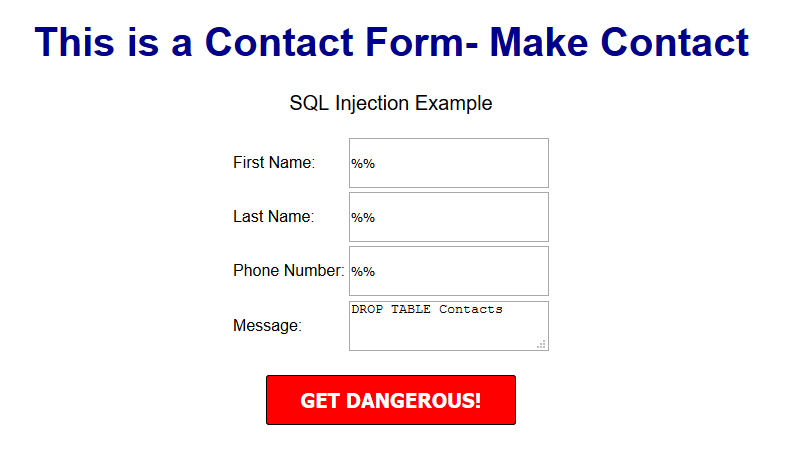
OUTCOME
This might delete your database table
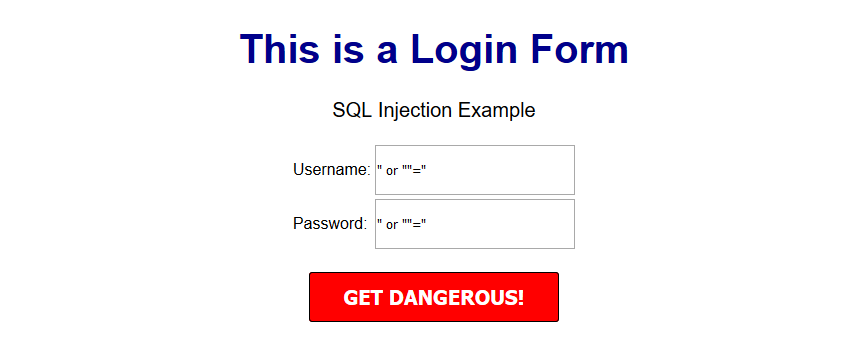
OUTCOME
This might provide access to the entire user table and the password protected area/dashboard.
***Please note that there are various types of SQL injection techniques and I will delve into this during the course of this series.***
So what exactly is sanitization and what does it do?
When sanitizing POST data, we are essentially looking for any special characters that are often used in SQL injection attacks.
In many ways, this tiny piece of code is the unsung superhero of many database driven applications.
Let’s secure that POST data!
Navigate to your backend folder and open index.php
Locate the following line of code:
$sql = "INSERT INTO content(title,content,author)VALUES ('".$_POST["title"]."', '".$_POST["content"]."', '".$_POST["author"]."')";
Ok, let’s get to work.
Based on what I mentioned a few moments ago, it’s clear that our SQL statement is vulnerable so we need to sanitize the POST data pronto!
The method I will focus on first is $mysqli->real_escape_string. This will escape any special characters found in the POST data.
Add the following just above your $sql.
$title = $letsconnect -> real_escape_string($_POST['title']);

$content = $letsconnect -> real_escape_string($_POST['content']);

$author = $letsconnect -> real_escape_string($_POST['author']);
Did you notice the use of
$letsconnect? This was used because of our db connection defined in conn.php.
Our new query will look like this:
$sql = "INSERT INTO content (title,content,author) VALUES ('".$title."', '".$content."', '".$author."')";
Go ahead and replace the old
$sql.
Phew!, we can breathe easy now.
Next, let’s lighten things up a bit by focusing on functionality and aesthetics.
A phased approach is the best way to tackle projects of any size.
I tend to jot this down on paper before creating a more legible professional spec!.
Typically the phased approach lends itself to logical progression.
For example, over the next several days I will go over the following:
* Account Access
* The login process
* The registration process
* The password recovery process
* Frontend
* The look and feel
* Menus
* Sidebars
*Main Content
*Footer
* Backend
* Content Management
* Add/Edit/Delete
* Security
This will give us a good springboard to delve into more complex functionality.
The aesthetic I have in mind will be barebones at first with clean CSS practices (this will make life a whole lot easier when we have to make changes down the line!).
Challenge :
Plan out your own CMS, think about the user interface and design choices you’d like to implement, and create a phased approach.
Conclusion
I hope this tutorial encouraged you to think about security and understand one of the most common exploits. During the course of this series, you will receive the tools necessary to beef up security while maintaining your sanity!
Next up
CodeWithMe – Let’s go templating.


