Welcome back! If you’re new to this series have a look at Part 1 here
Today’s focus is on templating, the aesthetic that will make or break your web application.
Having a clean design with well defined CSS that’s responsive and user friendly goes a long way.
Developers often stick to their lane but delving into templating will bode in your favor, you can indeed
create a functional and launch-worthy application all on your own!
Let’s jump into it!
Structured structure
Everything you tackle should be found with ease down the line. Therefore careful planning is fundamental to the success and sustainability of your project. You’ll also find that clearly defining your work lends itself to more productivity overall as you spend less that explaining your work during a handover / looking for a specific piece of code or resource. You’ll probably end up spending more time on actual work.
Finding your own unique pattern with file structure and CSS identifiers will also work in your favor as something unique to your process will most likely be easier to remember and form a tactile relationship with.
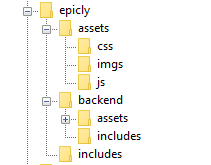
Our project’s current structure looks like this:

>If you need to backtrack,
Part 1 is a great place to start!
In part 1, we created our index.php which displays info from our database.
Let’s take this a step further and create a header and a footer for our index.php
Create a file called header.php and save this to your includes folder.
Next, create a file called footer.php and save this to your includes folder.
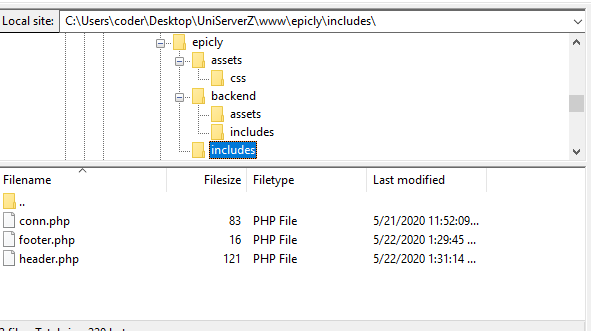
Your file structure should now look like this.

A header above all the rest
The header file will be a file we reuse throughout your web application. This file will contain important information that’s vital to the functionality and aesthetic of your website.
The type of info you’ll expect to see in a header.php file:
Script includes
Such as JQuery and important libraries
CSS includes
CSS files loaded from internal or external sources
Meta information
Contains important information that’s readable by search engines.
The basic structure of the beginning of your app, including your menu, and your logo.
For now, how header is going to have a basic layout.
Let’s get our HTML on!
<html>
<head>
<title>My Awesome CMS – Page Title</title>
</head>
<body>
A footer that sets the bar
Create a file called footer.php and save it to your includes folder (yourcms/includes/footer.php).
Add this code to your new file.
</body>
</html>
Next, let’s focus on the gravy… The CSS
CSS, when written beautifully, can truly set you apart.
You can tell your web application to load various styles to specific elements by defining unique identifiers.
Styles that are only used once are denoted with a # (a CSS “ID”) whereas styles that are reused multiple times are denoted with a . (a CSS “class”)
The best way to delve into the realm of CSS is to learn by experience.
Let’s create!
First, we need to create and load our CSS file. Remember our nifty new pal header.php? This created a convenient way to load our CSS file!
Add the following code to your header.php just above the
</head> tag.
<link href=”../assets/css/style.css” type=”text/css” rel=”stylesheet”/>
The ../ in the link to our stylesheet means we have to leave the current directory (the directory that header.php is in) and look for the assets/css/ directories.
Go ahead and create the css folder under your assets folder.
Next we’re going to create some simple CSS to test things out.
It’s time to add some style!
We are going to create two divs.
A div is a divider / section in HTML.
Add this to your index.php (located in your CMS’ root folder) above the
<?php tag.
<div id="myfirstid"></div>
<div class="myfirstclass"></div>
<div class="myfirstclass"></div>
<div class="myfirstclass"></div>
<div class="myfirstclass"></div>
<div class="myfirstclass"></div>
Then, create a CSS file
Add this:
#myfirstid{
Background:lightblue;
Font-family:Arial;
Font-size:44px;
Font-weight: Bold;
}
.myfirstclass{
Font-size:15px;
Color: darkblue;
}
Save your newly created CSS to assets/css/ as style.css.
Pulling it all together, let’s see what we can do!
Let’s apply what we just learned to our index.php. But first, we should add our header.php and footer.php files.
Including everyone
Add this to the top of your index.php file:
include(‘includes/header.php’);
Remove the
<divs> we used for practice earlier, we have something better in store!
Add this to the bottom of your index.php:
include(‘includes/footer.php’);
Next, let’s modify our code so we can add some style to the data we retrieve from our database.
Modify the following line:
foreach($getmydata as $mydata){ echo "Title: "; echo $mydata['title']; echo "<br/>"; echo "Content: "; echo $mydata['content']; echo "<br/>"; echo "Author: "; echo $mydata['author']; echo "<br/>"; echo "<br/>";
as follows:
?>

<div id=”myfirstid”>
<?php
foreach($getmydata as $mydata){
echo "<div class=”myfirstclass”>Title: ";
echo $mydata['title'];
echo "<br/>";
echo "Content: ";
echo $mydata['content'];
echo "<br/>";
echo "Author: ";
echo $mydata['author'];
echo "</div><br/><br/>";
}?>
</div>
<?php
Your full index.php should now look like this:
<?php
include('includes/header.php');
include('includes/conn.php');

if ($letsconnect -> connect_errno) { echo "Error " . $letsconnect -> connect_error;

}else{

$getmydata=$letsconnect -> query("SELECT * FROM content");

?>
<div id="myfirstid">
<?php
foreach($getmydata as $mydata){
echo "<div class=”myfirstclass”>Title: ";
echo $mydata['title'];
echo "<br/>";
echo "Content: ";
echo $mydata['content'];
echo "<br/>";
echo "Author: ";
echo $mydata['author'];
echo "</div><br/><br/>";
}
?>
</div>
<?php
}

$letsconnect -> close();
include('includes/footer.php');
?>
Go ahead, test it out!
There’s a lot to unpack and I will break things down a little more during our next tutorial!
Challenge
Study the final index.php and try to form a few theories about why closing a php tag is necessary before adding raw html.
Next Up: #CodeWithMe Part 4: Building A Good Base


