PHP & Web Development Blogs

Search Results For: build
Showing 11 to 15 of 33 blog articles.
11095 views · 4 years ago


It took me quite some time to settle on my first blog post in this series and I found myself thinking about the most requested functionality in my career – The good ‘ol Custom CMS – typically geared towards clients that want a straight forward, secure solution that can be expanded upon in a modular format and that’s their IP.

This will be our starting point. A blank slate to build something epic with clean code and even cleaner design. And in the spirit of building from scratch, I will refrain from using classes or a framework. The main reasoning behind this is to truly get everyone acquainted with and excited about PHP development.

Join me as I transform rudimentary code into something extraordinary that can be morphed into just about any Content, PHP, and MySQL driven project. So without further ado, let’s jump into it!

The bare necessities


If you’re just getting started with development, there’s a nifty bite sized server called UniformServer that will be your best friend throughout your coding career. PHPMyAdmin (an awesome visual db management tool) comes built in so if you’re looking for a work right out of the box solution, this is it.

Alternatively, you can opt for XAMPP or use an alternative server of your choice.

Now here’s where the exciting stuff begins, mapping things out.


I don’t see this done/encouraged often enough. Feel free to grab a piece of paper to logically map out your steps or produce a rough draft of where you’d like this project to go.

In this tutorial, I would like to achieve the following:


DB, DB, Set up your DB.


This requires a bit of planning but let’s start of with the basic structure we need to see this through.

We are going to need a user table and a content table and are a few ways to tackle this.

If you’re using the PHPMyAdmin tool you can create your database, add user permissions (Click on Permissions after creating your database), and create a table with ease.


If you’re like me and prefer to look at good ‘ol SQL then writing an SQL statement is the preferred approach.


CREATE TABLE <code>mydbname</code>.<code>content</code> ( <code>ID</code> INT(11) NOT NULL AUTO_INCREMENT , <code>title</code> VARCHAR(100) NOT NULL , <code>content</code> LONGTEXT NOT NULL , <code>author</code> VARCHAR(50) NOT NULL , PRIMARY KEY (<code>ID</code>)) ENGINE = MyISAM COMMENT = 'content table';


Understanding the SQL statement

In a nutshell we are creating a table with important fields. Namely:

####

ID | Title | Content | Author

#######

The ID field is our unique identifier.Now we can move on to the file structure.

Everything has a place in the file structure game


You can use a structure that speaks to your coding style / memory.

I tend to use the following:


Choose a name for your CMS, which should be placed at the webroot of your localhost/server.

Replicate the folder structure as per the above example.

Next, we’re going to create a basic connection file.


You can create a 
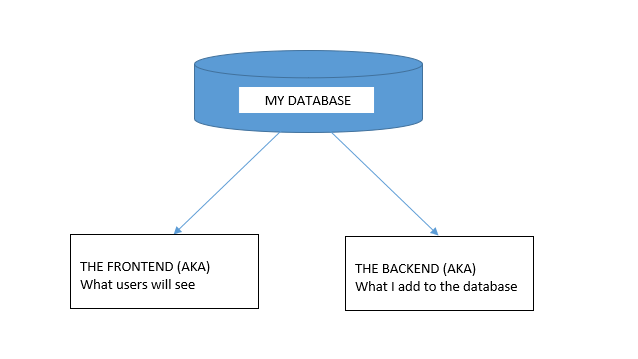
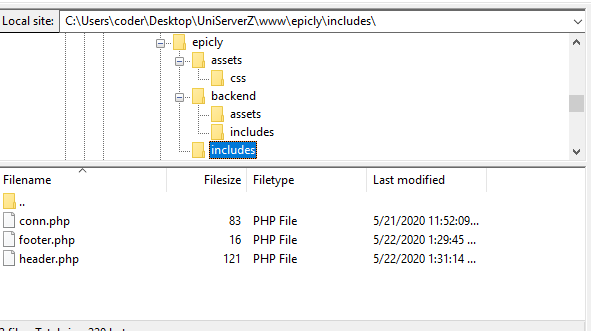
conn.php file in your root/includes folder.

The connection file will provide crucial information to connect to the database.

Type the following into your conn.php file, remember to include your own database credentials.


<?php

$letsconnect = new mysqli("localhost","dbuser","dbpass","dbname");

?>


Let’s go to the homepage (index.php)


Create a file called index.php at the root of your CMS folder.

I will be adding comments in my code to help you understand what each line does.

Comments are a useful tool for developers to add important notes private to their code.

We need to pull information from the database so it’s imperative that we include our connection file.


<?php

include('includes/conn.php');

if ($letsconnect -> connect_errno) { echo "Error " . $letsconnect -> connect_error;

}else{

$getmydata=$letsconnect -> query("SELECT * FROM content");

foreach($getmydata as $mydata){ echo "Title: "; echo $mydata['title']; echo "<br/>"; echo "Content: "; echo $mydata['content']; echo "<br/>"; echo "Author: "; echo $mydata['author']; echo "<br/>"; echo "<br/>";

}

}

$letsconnect -> close();

?>


Let’s get a (very) basic backend up and running


Create a file called index.php in your backend folder.

We need to create a basic form to capture our data.

Let’s code some HTML!


<html>

<head><title>Backend - Capture Content</title></head>

<body>

<form action="<?php $_SERVER[‘PHP_SELF’];?>" method="post">

<input type="text" name="title" placeholder="Content Title here" required/>

<textarea name="content">Content Here</textarea>

<input type="text" name="author" placeholder="Author" required/>

<input type="submit" value="Save My Data" name="savedata"/>

</form>

</body>

</html>


Next, we need to process the form data.


Type the following just above the
<form> 
tag.


<?php

if(isset($_POST['savedata'])){

include('../includes/conn.php');

if ($letsconnect->connect_error) {

die("Your Connection failed: " . $letsconnect->connect_error);

}else{

$sql = "INSERT INTO content(title,content,author)VALUES ('".$_POST["title"]."', '".$_POST["content"]."', '".$_POST["author"]."')";

if (mysqli_query($letsconnect, $sql)) {

echo "Your data was saved successfully!";

} else { echo "Error: " . $sql . "" . mysqli_error($letsconnect);

} $letsconnect->close();

}

}

?>


Note, this is a basic MySQL query to insert data. However, before using this in production it's important to add proper escaping and security to prevent SQL injections. This will be covered in the next article.


Congrats you made it to the end of tutorial 1!


Test out your creation, modify your content, and play around.

Go to your sitename/index.php to see your frontend after capturing data via sitename/backend/index.php

Next Up:


codewithme Now With Security, Functionality, and Aesthetics in mind.


Conclusion


Coding doesn’t have to be daunting and it’s my aim to divide a complex system into bitesized tutorials so you can truly use the knowledge you’ve acquired in your own projects.
9666 views · 5 years ago
Conferences are always looking for speakers - it can be hard to keep track of them all and the requirements they have. I wanted to put together this quick guide to make it easy for you to apply. Make sure to apply because as Wayne Gretzky said “You miss 100% of the shots you don’t take”!!!

phpDay 2019

First we have phpDay 2019 which will take place on May 10 & 11 at Hotel San Marco in Verona, Italy. Some facts about this call for papers:
*Submission deadline: February 4, 2019
*Submit via: https://cfp.phpday.it/
* For more info on the conference: https://2019.phpday.it/
* Twitter: (@phpday)
* Speaker package includes: Full conference pass (jsDay + phpDay), speaker dinner the first night, lunch, reception and activities included in regular conference.
* For speakers remote to the Area: A refund of up to €200 for travel costs (or €500 from US or extra-EU), 2 complimentary hotel nights (+1 hotel night for speakers presenting multiple talks or US/extra-EU) and Taxi fare from/to the airport.
*In Submission: make sure your talk title and abstract define the exact topic you want to talk about and what you hope people will learn from the session.
*Talk Ideas: APIs (REST, SOAP, etc.), Architectures, Continuous Delivery, Databases, Development, Devops, Frameworks, Internals, PHP 7.x / PHP 8, Security, Testing and UI/UX.

ScotlandPHP

Next we have ScotlandPHP which will take place on November 8 & 9 at Edinburgh International Conference Centre in Edinburgh, Scotland.
*Submission deadline: April 22, 2019
*Submit via: https://cfs.scotlandphp.co.uk/
* For more info on the conference: https://conference.scotlandphp.co.uk/
* Twitter: (@scotlandphp)
* Speaker package: Full conference pass, lunch, receptions and activities included in regular conference.
* For speakers remote to the Area: Complimentary airfare/travel, 2 complimentary hotel nights and we'll pick you up and drop you off to/from the airport so you don't have to worry about it.
* Speakers will be provided with a projector, a wireless lapel microphone and a screen for their presentation (size depends on the room). Speakers should bring any equipment they need to connect to projectors (VGA). It is also suggested that you reduce your dependency on the in-house internet connection as possible. We will however provide HDMI and Mini Display Port connections for all speakers on request. If you need something different or your selected talk needs audio equipment just let us know. We'll work it out.
* Looking for talks and workshops (November 8th).
*Talk Ideas: Virtualization and environments, Javascript, Alternate PHP run-times, PHP internals, Development principles, Security, Mobile-first design, Testing (unit, functional, etc.), Version control, User Experience/Usability, Building APIs (REST, SOAP, whatever), Continuous Integration, Framework-related topics, and Professional development.

Global diversity CFP day

In 2019 there will be numerous workshops hosted around the globe encouraging and advising newbie speakers to put together your very first talk proposal and share your own individual perspective on any subject of interest to people in tech.
* Twitter: (@gdcfpday)
*Save the Date: March 2, 2019
*Register here: https://www.globaldiversitycfpday.com/?utm_source=scotphp

CoderCruise

Then there is CoderCruise which will take place on August 19-23. It's a cruise that takes off from Port Canaveral, Florida and goes to the Bahamas.
* Twitter: (@codercruise)
*Submission deadline: March 3, 2019
*Submit via: https://www.papercall.io/codercruise-2019
* For more info on the conference: https://www.codercruise.com/
* This is a polyglot conference so looking for speakers on a wide variety of languages (PHP, JavaScript, Java, Python, etc.) and on various tech topics.

PHP Conference Asia 2019

There is also PHP Conference Asia 2019, which will take place on June 24-25 at Microsot Singapore.
*Submission deadline: March 8, 2019
*Submit via: https://cfp.phpconf.asia/
* For more info on the conference: https://2019.phpconf.asia/
* Twitter: (@PHPConfAsia)
* Speaker package includes: Speaker package: Full conference pass, lunch, receptions and activities included in regular conference. We'll pick you up and drop you off to/from the airport so you don't have to worry about it. Speakers' dinner on the first evening of the conference (24th June 2019). Transport to and from the conference venue will be included
* For speakers remote to the Area: 2 complimentary hotel nights and
we can consider providing grants to partially cover the air-fare for speakers who might have financial difficulties. This is on a case-by-case basis.
* Speakers will be provided with a projector, a wireless hand-held microphone and a screen for their presentation. Speakers should prepare their slides in 4x3 aspect ratio. Speakers should bring any equipment they need to connect to projectors (HDMI). It is also suggested that you reduce your dependency on the in-house internet connection as possible.
*In Submission: Make sure your talk title and abstract define the exact topic you want to talk about and what you hope people will learn from the session.
*Talk Ideas: Virtualization and environments, Javascript, Alternate PHP run-times, PHP internals, Development principles, Security, Mobile-first design, Testing (unit, functional, etc.), Version control, User Experience/Usability, Building APIs (REST, SOAP, whatever), Continuous Integration, Framework-related topics, and Professional development.

Cascadia PHP

Another conference to apply to is Cascadia PHP, which will take place on September 19-21 at University Place Hotel & Conference Center in Portland, Oregon.
*Submission deadline: April 15, 2019
*Submit via: https://cfp.cascadiaphp.com/
* For more info on the conference: https://www.cascadiaphp.com/venue
* Twitter: (@CascadiaPHP)
* Speaker package includes: Speaker package: Full conference pass, lunch, receptions and activities included in regular conference. For speakers remote to the Area: Complimentary airfare/travel, 2 complimentary hotel nights and we'll pick you up and drop you off to/from the airport so you don't have to worry about it.
Speakers will be provided with a projector, a wireless lapel microphone and a screen for their presentation (size depends on the room). Speakers should bring any equipment they need to connect to projectors (VGA). It is also suggested that you reduce your dependency on the in-house internet connection as possible.
*In Submission: make sure your talk title and abstract define the exact topic you want to talk about and what you hope people will learn from the session.
*Talk Ideas: PHP internals, Version control, Framework-related topics, Building APIs (REST, SOAP, whatever), Mobile-first design, Professional development, Testing (unit, functional, etc.), Alternate PHP run-times, Development principles, Continuous Integration, Getting involved in the PHP community, User Experience/Usability, Technology at large, Security, Connecting to Different APIs, Development Tools, Virtualization and environments, Javascript, Modern hosting practices, Language Features, Databases, Refactoring legacy applications, Running/contributing to open source projects, AI and AR, and User Groups.

Nomad PHP

Last but not least - this is an ongoing call for papers. This is perfect if you want to present from the comfort of your office, home or really wherever you are. It’s via RingCentral meetings and will be live and recorded. This is for none other than Nomad PHP.
* Twitter: (@nomadphp)
* Deadline: Anytime :D
* Talk length: 45 - 60 minutes.
* Talks should be unique to Nomad PHP and not available in video format online.
* Talk should not be recorded or made available elsewhere online for at least 3 months following your talk.
* The talk will be featured on our page and promoted via social media.
* Speakers will receive a financial stipend.
* Upon being selected we will reach out with further details.
*Talk ideas: AI & Machine Learning, APIs, Containerization, Databases, DevOps, Documentation, Frameworks, Performance, Security, Serverless, Testing, Tools, Upgrading/ Modernization, and more.
*Submit here: https://www.papercall.io/nomadphp
Now that you have some information - make sure to apply to all of these options! Can't wait to see all of your awesome talks you present :D!
9169 views · 5 years ago
Hey there! This reading is not going to be a technical one. Instead, it's just a little portion of information that you might have not known before. I once worked for a project that did currency exchanges. As you probably know, currencies have 3-letter codes (ISO 4217), and I asked myself if there's a currency with code "PHP".

PHP: Philippine peso! In Philippines you can code PHP for PHP!
Philippine Pesos

But there's more to it.. "PHP: Prvi Hrvatski Pištolj" stands for "first Croatian pistol". Next time someone tells me that it's too easy to shoot your own leg with PHP, I'll definitely agree.
If you don't believe me - checkout these 10 most common mistakes PHP programmers make from Toptal!

Or checkout Eric Wastl's list of things in PHP that make him sad. Or these three weird facts about PHP that you might not have known. The thing is PHP is a great programming language for building web applications, but... it's not without it's quirks.

___What else does PHP stand for???___

Project Honey Pot - system targeted at spammers and email harversters.

Pigeonhole principle - if n items are put into m containers, with n > m, then at least one container must contain more than one item. Mathematicians can be even more weird then programmers, can't they? And remember, programmers can right something like if (true == false)...


PHP has even more meanings, see this wikipedia page) for reference and havePHun!
8798 views · 3 years ago


Welcome back! If you’re new to this series have a look at Part 1 here


Today’s focus is on templating, the aesthetic that will make or break your web application.

Having a clean design with well defined CSS that’s responsive and user friendly goes a long way.

Developers often stick to their lane but delving into templating will bode in your favor, you can indeed
create a functional and launch-worthy application all on your own!

Let’s jump into it!

Structured structure


Everything you tackle should be found with ease down the line. Therefore careful planning is fundamental to the success and sustainability of your project. You’ll also find that clearly defining your work lends itself to more productivity overall as you spend less that explaining your work during a handover / looking for a specific piece of code or resource. You’ll probably end up spending more time on actual work.
Finding your own unique pattern with file structure and CSS identifiers will also work in your favor as something unique to your process will most likely be easier to remember and form a tactile relationship with.

Our project’s current structure looks like this:


>If you need to backtrack, Part 1 is a great place to start!

In part 1, we created our index.php which displays info from our database.

Let’s take this a step further and create a header and a footer for our index.php

Create a file called header.php and save this to your includes folder.

Next, create a file called footer.php and save this to your includes folder.

Your file structure should now look like this.


A header above all the rest


The header file will be a file we reuse throughout your web application. This file will contain important information that’s vital to the functionality and aesthetic of your website.
The type of info you’ll expect to see in a header.php file:
Script includes
Such as JQuery and important libraries
CSS includes
CSS files loaded from internal or external sources
Meta information
Contains important information that’s readable by search engines.
The basic structure of the beginning of your app, including your menu, and your logo.
For now, how header is going to have a basic layout.

Let’s get our HTML on!

<html>
<head>
<title>My Awesome CMS – Page Title</title>
</head>
<body>


A footer that sets the bar

Create a file called footer.php and save it to your includes folder (yourcms/includes/footer.php).

Add this code to your new file.

</body>
</html>


Next, let’s focus on the gravy… The CSS


CSS, when written beautifully, can truly set you apart.

You can tell your web application to load various styles to specific elements by defining unique identifiers.
Styles that are only used once are denoted with a # (a CSS “ID”) whereas styles that are reused multiple times are denoted with a . (a CSS “class”)

The best way to delve into the realm of CSS is to learn by experience.

Let’s create!


First, we need to create and load our CSS file. Remember our nifty new pal header.php? This created a convenient way to load our CSS file!

Add the following code to your header.php just above the </head> tag.

<link href=”../assets/css/style.css” type=”text/css” rel=”stylesheet”/> 


The ../ in the link to our stylesheet means we have to leave the current directory (the directory that header.php is in) and look for the assets/css/ directories.

Go ahead and create the css folder under your assets folder.

Next we’re going to create some simple CSS to test things out.

It’s time to add some style!


We are going to create two divs.
A div is a divider / section in HTML.
Add this to your index.php (located in your CMS’ root folder) above the <?php tag.

<div id="myfirstid"></div>
<div class="myfirstclass"></div>


Then, create a CSS file

Add this:

#myfirstid{
Background:lightblue;
Font-family:Arial;
Font-size:44px;
Font-weight: Bold;
}
.myfirstclass{
Font-size:15px;
Color: darkblue;
}


Save your newly created CSS to assets/css/ as style.css.

Pulling it all together, let’s see what we can do!


Let’s apply what we just learned to our index.php. But first, we should add our header.php and footer.php files.

Including everyone


Add this to the top of your index.php file:

include(‘includes/header.php’);


Remove the <divs> we used for practice earlier, we have something better in store!

Add this to the bottom of your index.php:

include(‘includes/footer.php’);


Next, let’s modify our code so we can add some style to the data we retrieve from our database.

Modify the following line:
foreach($getmydata as $mydata){ echo "Title: "; echo $mydata['title']; echo "<br/>"; echo "Content: "; echo $mydata['content']; echo "<br/>"; echo "Author: "; echo $mydata['author']; echo "<br/>"; echo "<br/>";


as follows:
?>

<div id=”myfirstid”>
<?php
foreach($getmydata as $mydata){
echo "<div class=”myfirstclass”>Title: ";
echo $mydata['title'];
echo "<br/>";
echo "Content: ";
echo $mydata['content'];
echo "<br/>";
echo "Author: ";
echo $mydata['author'];
echo "</div><br/><br/>";
}?>
</div>
<?php


Your full index.php should now look like this:

<?php
include('includes/header.php');
include('includes/conn.php');

if ($letsconnect -> connect_errno) { echo "Error " . $letsconnect -> connect_error;

}else{

$getmydata=$letsconnect -> query("SELECT * FROM content");

?>
<div id="myfirstid">
<?php
foreach($getmydata as $mydata){
echo "<div class=”myfirstclass”>Title: ";
echo $mydata['title'];
echo "<br/>";
echo "Content: ";
echo $mydata['content'];
echo "<br/>";
echo "Author: ";
echo $mydata['author'];
echo "</div><br/><br/>";
}
?>
</div>
<?php
}

$letsconnect -> close();
include('includes/footer.php');
?>


Go ahead, test it out!

There’s a lot to unpack and I will break things down a little more during our next tutorial!

Challenge


Study the final index.php and try to form a few theories about why closing a php tag is necessary before adding raw html.

Next Up: #CodeWithMe Part 4: Building A Good Base

8194 views · 3 years ago


Welcome back! If you're new to this series have a look at Part 1 here

Today we are going to beef things up a bit and we will focus on the backend and some key CMS functionality.

It's time to get excited, this is where you'll start to see your barebones structure morph into something extraordinary!

Tired of my intro? That's ok! Let's jump into it!

Getting the DB on board


Before we delve into this, it's imperative that we take a minute and plan things out.

The database tables that are vital to any CMS are the menu, the user table, and the content table.

Our menu table will start of as follows:

CREATE TABLE 'mydbname'.'menus' ( 'ID' INT(11) NOT NULL AUTO_INCREMENT , 'menuname' VARCHAR(100) NOT NULL , 'item' VARCHAR(50) NOT NULL , 'itemlink' VARCHAR(100) NOT NULL , PRIMARY KEY ('ID')) ENGINE = MyISAM COMMENT = 'menu table';


Let's break this down a bit.

In the SQL above, we're creating a new table called menus.

Essentially our structure looks like this:

ID | Menuname | Item | Itemlink

Our ID field is our unique identifier (our PRIMARY KEY).

Tip: Remember, you can use raw SQL or a tool like PhpMyAdmin to create your db tables/execute SQL queries.

Next up is our user table.

CREATE TABLE 'mydbname'.'users' ( 'ID' INT(11) NOT NULL AUTO_INCREMENT , 'username' VARCHAR(100) NOT NULL , 'password' VARCHAR(50) NOT NULL , 'email' VARCHAR(100) NOT NULL , PRIMARY KEY ('ID')) ENGINE = MyISAM COMMENT = 'user table';


Visually represented this structure looks like this:

ID | Username | Password | Email

Our ID field is our unique identifier.

And finally, our content table modifications. You probably remember creating a rudimentary content table in Part 1 of the series.

ALTER TABLE 'mydbname'.'content' ADD content_type VARCHAR(50);


Yep, you guessed right, in the above statement we are altering our content table and adding a new field called content type.

Our new table structure now looks like this:

ID | Title | Content | Author | Content Type

Planning to Add to the Backend


Next , we're going to add a menu section, an add user section, and we'll also modify our content section.

Let's do this! reate a file called menus.php in your backend folder.

Next, code a HTML form to save your menu data.

The form needs the following fields:

Menu Name (we called this menuname in our db table).

Menu Item Name (we called this item in our db table).

Menu Link (we called this itemlink in our db table).

Try to follow Part 1 to do this on your own.

If you get a little stuck, that's ok. You can also follow the example below:

<form method="post" action="<?php $_SERVER['PHP_SELF'];?>"/>

<input type="text" name="menuname" class="mytextbox" placeholder="Menu Name" required />

<input type="text" name="item" class="mytextbox" placeholder="Item" required />

<input type="text" name="itemlink" class="mytextbox" placeholder="Item Link" required />

<input type="submit" value="Save Menu Item" name="savemenu" class="mybutton"/>

</form>


Notice the use of CSS classes? The gravy!

This will come in handy in our next tutorial.

Next, let's add the form processing code as we need to save these fields to the database. Remember to use the sanitization technique you learned in Part 2.

Add this above your <form> tag.

<?php

if(isset($_POST['savemenu'])){

include('../includes/conn.php');

if ($letsconnect->connect_error) {

die("Your Connection failed: " . $letsconnect->connect_error);

}else{

$menuname = $letsconnect ->real_escape_string($_POST['menuname']);

$item = $letsconnect -> real_escape_string($_POST['item']);

$itemlink = $letsconnect->real_escape_string($_POST['itemlink']);

$sql = "INSERT INTO menus(menuname,item,itemlink) VALUES ('".$menuname."', '".$item."', '".$itemlink."')";

if (mysqli_query($letsconnect, $sql)) {

echo "Your data was saved successfully!";

} else { echo "Error: " . $sql . "" . mysqli_error($letsconnect);

} $letsconnect->close();

}

}

?>


Ok phew, the menu data capturing section is done.

Let's move on to the user data capturing section, and modify the content capturing screen.

Repeat the steps above and create these two screens. Remember to keep an eye out for our database field names that we defined earlier! If you get stuck, look at the end result below:

Create adduser.php in your backend folder.

Create your data capturing form.


<form method="post" action="<?php $_SERVER['PHP_SELF'];?>"/>

<input type="text" name="username" class="mytextbox" placeholder="Username" required/>

<input type="password" name="password" class="mytextbox" placeholder="Password" required />

<input type="email" name="email" class="mytextbox" placeholder="Email" required />

<input type="submit" value="Save Menu Item" name="saveuser" class="mybutton"/>

</form>


Add your PHP processing code, remember the security!

Add this above your <form> tag.

<?php

if(isset($_POST[‘saveuser])){

include('../includes/conn.php');

if ($letsconnect->connect_error) {

die("Your Connection failed: " . $letsconnect->connect_error);

}else{

$menuname = $letsconnect -> real_escape_string($_POST[‘username']);

$item = $letsconnect -> real_escape_string($_POST[‘password']);

$itemlink = $letsconnect -> real_escape_string($_POST[‘email']);

$sql = "INSERT INTO menus(username,password,email) VALUES ('".$username."', '".$password."', '".$email."')";

if (mysqli_query($letsconnect, $sql)) {

echo "Your data was saved successfully!";

} else { echo "Error: " . $sql . "" . mysqli_error($letsconnect);

} $letsconnect->close();

}

}

?>


Please note that I will be covering Password security in the tutorials that follow.

Make sure that you are using your localhost server to complete this tutorial series. Do not publish your work until you complete this series.

Lastly, let's move to our content capturing screen which is currently found in index.php in the backend folder.

We will be changing this to a more professional dashboard in the tutorials that follow!
Our current file looks like this:


<html>

<head><title>Backend - Capture Content</title></head>

<body>

<?php

if(isset($_POST['savedata'])){

include('../includes/conn.php');

if ($letsconnect->connect_error) {

die("Your Connection failed: " . $letsconnect->connect_error);

}else{

$title = $letsconnect -> real_escape_string($_POST['title']);

$content = $letsconnect -> real_escape_string($_POST['content']);

$author = $letsconnect -> real_escape_string($_POST['author']);

$sql = "INSERT INTO content (title,content,author) VALUES ('".$title."', '".$content."', '".$author."')";

if (mysqli_query($letsconnect, $sql)) {

echo "Your data was saved successfully!";

} else { echo "Error: " . $sql . "" . mysqli_error($letsconnect);

} $letsconnect->close();

}

}

?>

<form action="<?php $_SERVER[‘PHP_SELF'];?>" method="post">

<input type="text" name="title" placeholder="Content Title here" required/>

<textarea name="content">Content Here</textarea>

<input type="text" name="author" placeholder="Author" required/>

<input type="submit" value="Save My Data" name="savedata"/>

</form>

</body>

</html>


We need to modify this slightly to include our new field, content_type.

Add the input field in your <form> above the submit button.


<input type="text" name="content_type" placeholder="Content Type" required/>;


Next, add the content_type to the sanitization lineup.

$content_type = $letsconnect->real_escape_string($_POST['content_type']);


Lastly, store this variable to the database by modifying the $sql.

$sql = "INSERT INTO content (title,content,author,content_type) VALUES ('".$title."', '".$content."', '".$author."', '".$content_type."')";


Conclusion


Chopping and changing is not always as daunting. Find a rhythm. There are many ways to make cumbersome coding a breeze and we will delve into that in the tutorials to come.

Challenge


Think of ways to test what we just did through retrieving and echoing data from the database.

Next Up: #CodeWithMe Part 5 Building a good base Continued

SPONSORS

The Ultimate Managed Hosting Platform