PHP & Web Development Blogs

Search Results For: implement
Showing 6 to 10 of 14 blog articles.
12667 views · 5 years ago
Creating a PHP Daemon Service

What is a Daemon?

The term daemon was coined by the programmers of Project MAC at MIT. It is inspired on Maxwell's demon in charge of sorting molecules in the background. The UNIX systems adopted this terminology for daemon programs.

It also refers to a character from Greek mythology that performs the tasks for which the gods do not want to take. As stated in the "Reference System Administrator UNIX", in ancient Greece, the concept of "personal daemon" was, in part, comparable to the modern concept of "guardian angel." BSD family of operating systems use the image as a demon's logo.

Daemons are usually started at machine boot time. In the technical sense, a demon is considered a process that does not have a controlling terminal, and accordingly there is no user interface. Most often, the ancestor process of the deamon is init - process root on UNIX, although many daemons run from special rcd scripts started from a terminal console.

Richard Stevenson describes the following steps for writing daemons:
    . Resetting the file mode creation mask to 0 function umask(), to mask some bits of access rights from the starting process.
    . Cause fork() and finish the parent process. This is done so that if the process was launched as a group, the shell believes that the group finished at the same time, the child inherits the process group ID of the parent and gets its own process ID. This ensures that it will not become process group leader.
    . Create a new session by calling setsid(). The process becomes a leader of the new session, the leader of a new group of processes and loses the control of the terminal.
    . Make the root directory of the current working directory as the current directory will be mounted.
    . Close all file descriptors.
    . Make redirect descriptors 0,1 and 2 (STDIN, STDOUT and STDERR) to /dev/null or files /var/log/project_name.out because some standard library functions use these descriptors.
    . Record the pid (process ID number) in the pid-file: /var/run/projectname.pid.
    . Correctly process the signals and SigTerm SigHup: end with the destruction of all child processes and pid - files and / or re-configuration.

How to Create Daemons in PHP

To create demons in PHP you need to use the extensions pcntl and posix. To implement the fast communication withing daemon scripts it is recommended to use the extension libevent for asynchronous I/O.

Lets take a closer look at the code to start a daemon:
umask(0);
$pid = pcntl_fork(); 
if ($pid < 0) {
print('fork failed');
exit 1;
}


After a fork, the execution of the program works as if there are two branches of the code, one for the parent process and the second for the child process. What distinguishes these two processes is the result value returned the fork() function call. The parent process ID receives the newly created process number and the child process receives a 0.
if ($pid > 0) { echo "daemon process started
";
exit; }

$sid = posix_setsid(); if ($sid < 0) {
exit 2;
}

chdir('/'); file_put_contents($pidFilename, getmypid() );
run_process();


The implementation of step 5 "to close all file descriptors" can be done in two ways. Well, closing all file descriptors is difficult to implement in PHP. You just need to open any file descriptors before fork(). Second, you can override the standard output to an error log file using init_set() or use buffering using ob_start() to a variable and store it in log file:
ob_start();
var_dump($some_object);
$content = ob_get_clean();
fwrite($fd_log, $content); 


Typically, ob_start() is the start of the daemon life cycle and ob_get_clean() and fwrite() calls are the end. However, you can directly override STDIN, STDOUT and STDERR:
ini_set('error_log', $logDir.'/error.log');
fclose(STDIN); 
fclose(STDOUT);
fclose(STDERR);
$STDIN = fopen('/dev/null', 'r');
$STDOUT = fopen($logDir.'/application.log', 'ab');
$STDERR = fopen($logDir.'/application.error.log', 'ab');


Now, our process is disconnected from the terminal and the standard output is redirected to a log file.

Handling Signals

Signal processing is carried out with the handlers that you can use either via the library pcntl (pcntl_signal_dispatch()), or by using libevent. In the first case, you must define a signal handler:
function sig_handler($signo)
{
global $fd_log;
switch ($signo) {
case SIGTERM:
fclose($fd_log); unlink($pidfile); exit;
break;
case SIGHUP:
init_data(); break;
default:
}
}

pcntl_signal(SIGTERM, "sig_handler");
pcntl_signal(SIGHUP, "sig_handler");


Note that signals are only processed when the process is in an active mode. Signals received when the process is waiting for input or in sleep mode will not be processed. Use the wait function pcntl_signal_dispatch(). We can ignore the signal using flag SIG_IGN: pcntl_signal(SIGHUP, SIG_IGN); Or, if necessary, restore the signal handler using the flag SIG_DFL, which was previously installed by default: pcntl_signal(SIGHUP, SIG_DFL);

Asynchronous I/O with Libevent

In the case you use blocking input / output signal processing is not applied. It is recommended to use the library libevent which provides non-blocking as input / output, processing signals, and timers. Libevent library provides a simple mechanism to start the callback functions for events on file descriptor: Write, Read, Timeout, Signal.

Initially, you have to declare one or more events with an handler (callback function) and attach them to the basic context of the events:
$base = event_base_new();
$event = event_new();
$errno = 0;
$errstr = '';
$socket = stream_socket_server("tcp://$IP:$port", $errno, $errstr);
stream_set_blocking($socket, 0); event_set($event, $socket, EV_READ | EV_PERSIST, 'onAccept', $base);


Function handlers 'onRead', 'onWrite', 'onError' must implement the processing logic. Data is written into the buffer, which is obtained in the non-blocking mode:
function onRead($buffer, $id)
{
while($read = event_buffer_read($buffer, 256)) {
var_dump($read);
}
}


The main event loop runs with the function event_base_loop($base);. With a few lines of code, you can exit the handler only by calling: event_base_loobreak(); or after the specified time (timeout) event_loop_exit();.

Error handling deals with failure Events:
function onError($buffer, $error, $id)
{
global $id, $buffers, $ctx_connections;
event_buffer_disable($buffers[$id], EV_READ | EV_WRITE);
event_buffer_free($buffers[$id]);
fclose($ctx_connections[$id]);
unset($buffers[$id], $ctx_connections[$id]);
}


It should be noted the following subtlety: Working with timers is only possible through the file descriptor. The example of official the documentation does not work. Here is an example of processing that runs at regular intervals.
$event2 = event_new();
$tmpfile = tmpfile();
event_set($event2, $tmpfile, 0, 'onTimer', $interval);
$res = event_base_set($event2, $base);
event_add($event2, 1000000 * $interval);


With this code we can have a working timer finishes only once. If we need a "permanent" Timer, using the function onTimer we need create a new event each time, and reassign it to process through a "period of time":
function onTimer($tmpfile, $flag, $interval)
{
$global $base, $event2;

if ($event2) {
event_delete($event2);
event_free($event2);
}

call_user_function(‘process_data’,$args);

$event2 = event_new();
event_set($event2, $tmpfile, 0, 'onTimer', $interval);
$res = event_base_set($event2, $base);
event_add($event2, 1000000 * $interval);
}


At the end of the daemon we must release all previously allocated resources:
event_delete($event);
event_free($event);
event_base_free($base);

event_base_set($event, $base);
event_add($event);


Also it should be noted that for the signal processing handler is set the flag EV_SIGNAL: event_set($event, SIGHUP, EV_SIGNAL, 'onSignal', $base);

If needed constant signal processing, it is necessary to set a flag EV_PERSIST. Here follows a handler for the event onAccept, which occurs when a new connection is a accepted on a file descriptor:
function onAccept($socket, $flag, $base) {
global $id, $buffers, $ctx_connections;
$id++;
$connection = stream_socket_accept($socket);
stream_set_blocking($connection, 0);
$buffer = event_buffer_new($connection, 'onRead', NULL, 'onError', $id);
event_buffer_base_set($buffer, $base);
event_buffer_timeout_set($buffer, 30, 30);
event_buffer_watermark_set($buffer, EV_READ, 0, 0xffffff); event_buffer_priority_set($buffer, 10); event_buffer_enable($buffer, EV_READ | EV_PERSIST); $ctx_connections[$id] = $connection;
$buffers[$id] = $buffer;
}


Monitoring a Daemon

It is good practice to develop the application so that it was possible to monitor the daemon process. Key indicators for monitoring are the number of items processed / requests in the time interval, the speed of processing with queries, the average time to process a single request or downtime.

With the help of these metrics can be understood workload of our demon, and if it does not cope with the load it gets, you can run another process in parallel, or for running multiple child processes.

To determine these variables need to check these features at regular intervals, such as once per second. For example downtime is calculated as the difference between the measurement interval and total time daemon.

Typically downtime is determined as a percentage of a measurement interval. For example, if in one second were executed 10 cycles with a total processing time of 50ms, the time will be 950ms or 95%.

Query performance wile be 10rps (request per second). Average processing time of one request: the ratio of the total time spent on processing requests to the number of requests processed, will be 5ms.

These characteristics, as well as additional features such as memory stack size queue, number of transactions, the average time to access the database, and so on.

An external monitor can be obtain data through a TCP connection or unix socket, usually in the format of Nagios or zabbix, depending on the monitoring system. To do this, the demon should use an additional system port.

As mentioned above, if one worker process can not handle the load, usually we run in parallel multiple processes. Starting a parallel process should be done by the parent master process that uses fork() to launch a series of child processes.

Why not run processes using exec() or system()? Because, as a rule, you must have direct control over the master and child processes. In this case, we can handle it via interaction signals. If you use the exec command or system, then launch the initial interpreter, and it has already started processes that are not direct descendants of the parent process.

Also, there is a misconception that you can make a demon process through command nohup. Yes, it is possible to issue a command: nohup php mydaemon.php -master >> /var/log/daemon.log 2 >> /var/log/daemon.error.log &

But, in this case, would be difficult to perform log rotation, as nohup "captures" file descriptors for STDOUT / STDERR and release them only at the end of the command, which may overload of the process or the entire server. Overload demon process may affect the integrity of data processing and possibly cause partial loss of some data.

Starting a Daemon

Starting the daemon must happen either automatically at boot time, or with the help of a "boot script."

All startup scripts are usually in the directory /etc/rc.d. The startup script in the directory service is made /etc/init.d/ . Run command start service myapp or start group /etc/init.d/myapp depending on the type of OS.

Here is a sample script text:
#! /bin/sh
#
$appdir = /usr/share/myapp/app.php
$parms = --master –proc=8 --daemon
export $appdir
export $parms
if [ ! -x appdir ]; then
exit 1
fi

if [ -x /etc/rc.d/init.d/functions ]; then
. /etc/rc.d/init.d/functions
fi

RETVAL=0

start () {
echo "Starting app"
daemon /usr/bin/php $appdir $parms
RETVAL=$?
[ $RETVAL -eq 0 ] && touch /var/lock/subsys/mydaemon
echo
return $RETVAL
}

stop () {
echo -n "Stopping $prog: "
killproc /usr/bin/fetchmail
RETVAL=$?
[ $RETVAL -eq 0 ] && rm -f /var/lock/subsys/mydaemon
echo
return $RETVAL
}

case in
start)
start
;;
stop)
stop
;;
restart)
stop
start
;;
status)
status /usr/bin/mydaemon
;;
*)
echo "Usage:
php
if (is_file('app.phar')) {
unlink('app.phar');
}
$phar = new Phar('app.phar', 0, 'app.phar');
$phar->compressFiles(Phar::GZ);
$phar->setSignatureAlgorithm (Phar::SHA1);
$files = array();
$files['bootstrap.php'] = './bootstrap.php';
$rd = new RecursiveIteratorIterator(new RecursiveDirectoryIterator('.'));
foreach($rd as $file){
if ($file->getFilename() != '..' && $file->getFilename() != '.' && $file->getFilename() != __FILE__) {
if ( $file->getPath() != './log'&& $file->getPath() != './script'&& $file->getPath() != '.')
$files[substr($file->getPath().DIRECTORY_SEPARATOR.$file->getFilename(),2)] =
$file->getPath().DIRECTORY_SEPARATOR.$file->getFilename();
}
}
if (isset($opt['version'])) {
$version = $opt['version'];
$file = "buildFromIterator(new ArrayIterator($files));
$phar->setStub($phar->createDefaultStub('bootstrap.php'));
$phar = null;
}
 {start|stop|restart|status}"
;;

RETVAL=$?
exit $RETVAL


Distributing Your PHP Daemon

To distribute a daemon it is better to pack it in a single phar archive module. The assembled module should include all the necessary PHP and .ini files.

Below is a sample build script:
#php app.phar
myDaemon version 0.1 Debug
usage:
--daemon – run as daemon
--debug – run in debug mode
--settings – print settings
--nofork – not run child processes
--check – check dependency modules
--master – run as master
--proc=[8] – run child processes


Additionally, it may be advisable to make a PEAR package as a standard unix-console utility that when run with no arguments prints its own usage instruction:
[NMD%%CODE%%]


Conclusion

Creating daemons in PHP it is not hard but to make them run correctly it is important to follow the steps described in this article.

Post a comment here if you have questions or comments on how to create daemon services in PHP.
9706 views · 3 years ago


Welcome back!, if you’re new please be sure to read Part 1 here.


This tutorial will focus primarily on Security and will touch on how to plan functionality.

Planning out an application and seeing progress regularly is a good strategy as you are most likely to complete your tasks in a timely fashion with this approach.

Ready?, ok let’s jump into it!

DISCLAIMER


We highly recommend that you follow these tutorials on a localhost testing server like Uniserver. Read through Part 1 here to look at our recommendations. These tutorials follow a phased approach and it is highly recommended that you do not make snippets of code live prior to completing this tutorial series.


Where we left off – the serious stuff.


In the previous tutorial we saved variables to the database.

It’s important to note that further steps are needed to ensure that data transactions to / from the database are secure.

A great first step is to ensure that all POST data (data transmitted after a user clicks a form’s submit button) is sanitized.

What we’re trying to prevent


One of the most common exploits is SQL Injection, an attack most commonly used to insert SQL into db queries. POST data that’s not sanitized leaves a huge security hole for malicious exploits. In some cases SQL injection can be leveraged to rage an all out assault on a server’s operating system.

A few examples of a basic version of what this might look like can be seen below.


OUTCOME


This might delete your database table


OUTCOME


This might provide access to the entire user table and the password protected area/dashboard.


***Please note that there are various types of SQL injection techniques and I will delve into this during the course of this series.***


So what exactly is sanitization and what does it do?


When sanitizing POST data, we are essentially looking for any special characters that are often used in SQL injection attacks.

In many ways, this tiny piece of code is the unsung superhero of many database driven applications.

Let’s secure that POST data!


Navigate to your backend folder and open index.php

Locate the following line of code:

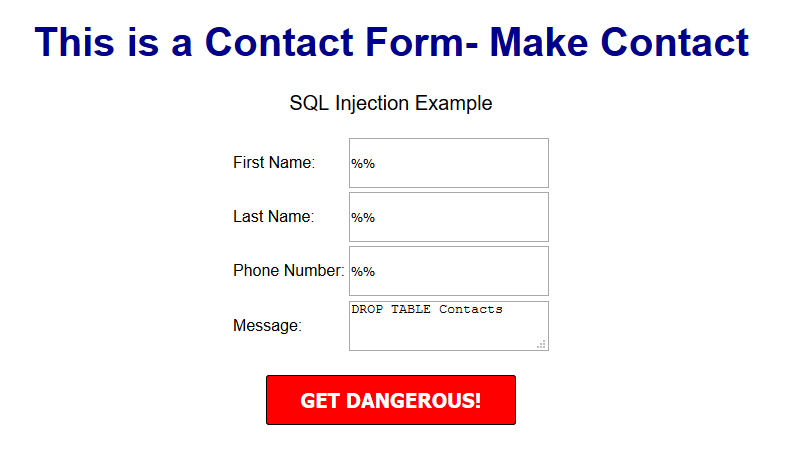
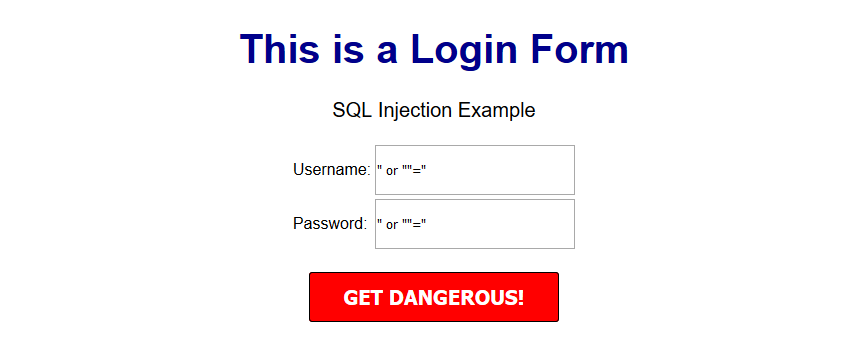
$sql = "INSERT INTO content(title,content,author)VALUES ('".$_POST["title"]."', '".$_POST["content"]."', '".$_POST["author"]."')";


Ok, let’s get to work.

Based on what I mentioned a few moments ago, it’s clear that our SQL statement is vulnerable so we need to sanitize the POST data pronto!

The method I will focus on first is $mysqli->real_escape_string. This will escape any special characters found in the POST data.

Add the following just above your $sql.

$title = $letsconnect -> real_escape_string($_POST['title']);

$content = $letsconnect -> real_escape_string($_POST['content']);

$author = $letsconnect -> real_escape_string($_POST['author']);


Did you notice the use of $letsconnect? This was used because of our db connection defined in conn.php.

Our new query will look like this:

$sql = "INSERT INTO content (title,content,author) VALUES ('".$title."', '".$content."', '".$author."')";


Go ahead and replace the old $sql.

Phew!, we can breathe easy now.

Next, let’s lighten things up a bit by focusing on functionality and aesthetics.


A phased approach is the best way to tackle projects of any size.

I tend to jot this down on paper before creating a more legible professional spec!.

Typically the phased approach lends itself to logical progression.

For example, over the next several days I will go over the following:

* Account Access
* The login process
* The registration process
* The password recovery process
* Frontend
* The look and feel
* Menus
* Sidebars
*Main Content
*Footer
* Backend
* Content Management
* Add/Edit/Delete
* Security

This will give us a good springboard to delve into more complex functionality.

The aesthetic I have in mind will be barebones at first with clean CSS practices (this will make life a whole lot easier when we have to make changes down the line!).

Challenge :


Plan out your own CMS, think about the user interface and design choices you’d like to implement, and create a phased approach.

Conclusion


I hope this tutorial encouraged you to think about security and understand one of the most common exploits. During the course of this series, you will receive the tools necessary to beef up security while maintaining your sanity!

Next up


CodeWithMe – Let’s go templating.
7677 views · 5 years ago
Iterator in PHP

Every time I see this
$users = [new User(), new User()];

I see a lost opportunity to use Iterator.

Why Iterators?

Collections are an awesome way to organize your previously no-named array. There is a couple of reasons why you should use iterators. One of reason stays for behavior, you can specify exact behavior on standard calls such as next, current, valid etc. Other reason could be that you want to ensure that collection contains an only specific type of an object.

Understand a suffer from using an array of unknown value types.
Very common in the PHP world arrays are used to store all kind of data, in many dimensions in many nested forms. Arrays introduced infinite flexibility to the developer, but because of that, they become very evil.

Example:

- Your function (getUsers) returns an array of User objects.
- Another function (setUsersToActiveState) using getUsers output array and set all users active status to true.
- setUsersToActiveState loop through the array and expect to call a specific method on array item. For example, the method name is getActiveStatus.
- If given array is an array of desired objects which have a callable method getActiveStatus, all fine. But if not exception will be thrown.
- How we can ensure that given array is always an array of objects of a specific type?

public function getUsers(): array
{

return $userArray;
}

public function setUsersToActiveState()
{
$users = $this->getUsers();

foreach ($users as $user) {
if(!$user->getActiveStatus()) {
$user->setActiveStatus(true);
}
}
}

There immediately two problems occurred.
    . One is the problem of type. Our IDE doesn't know what's inside array of $users, so because of that IDE can't suggest us how to use $user element. (I put this comment block above foreach, it works for phpStorm and I guess for some other IDEs)
    . Your colleagues! How they possibly know what's inside array if there is no any hint.
    . Bonus problem, getUsers can return literally any array and there won't be warning in the system.

Solution


class UsersCollection implements \IteratorAggregate
{

private $users = [];

public function getIterator() : UserIterator
{
return new UserIterator($this);
}

public function getUser($position)
{
if (isset($this->users[$position])) {
return $this->users[$position];
}

return null;
}

public function count() : int
{
return count($this->users);
}

public function addUser(User $users)
{
$this->users[] = $users;
}
}

class UserIterator implements \Iterator
{

private $position = 0;


private $userCollection;

public function __construct(UsersCollection $userCollection)
{
$this->userCollection = $userCollection;
}

public function current() : User
{
return $this->userCollection->getUser($this->position);
}

public function next()
{
$this->position++;
}

public function key() : int
{
return $this->position;
}

public function valid() : bool
{
return !is_null($this->userCollection->getUser($this->position));
}

public function rewind()
{
$this->position = 0;
}
}

Tests

Off course there is the tests to ensure that our Collection and Iterator works like a charm. For this example I using syntax for PHPUnit framework.

class UsersCollectionTest extends TestCase
{

public function testUsersCollectionShouldReturnNullForNotExistingUserPosition()
{
$usersCollection = new UsersCollection();

$this->assertEquals(null, $usersCollection->getUser(1));
}


public function testEmptyUsersCollection()
{
$usersCollection = new UsersCollection();

$this->assertEquals(new UserIterator($usersCollection), $usersCollection->getIterator());

$this->assertEquals(0, $usersCollection->count());
}


public function testUsersCollectionWithUserElements()
{
$usersCollection = new UsersCollection();
$usersCollection->addUser($this->getUserMock());

$this->assertEquals(new UserIterator($usersCollection), $usersCollection->getIterator());
$this->assertEquals($this->getUserMock(), $usersCollection->getUser(1));
$this->assertEquals(2, $usersCollection->count());
}

private function getUserMock()
{
}
}


class UserIteratorTest extends MockClass
{

public function testCurrent()
{
$iterator = $this->getIterator();
$current = $iterator->current();

$this->assertEquals($this->getUserMock(), $current);
}


public function testNext()
{
$iterator = $this->getIterator();
$iterator->next();

$this->assertEquals(1, $iterator->key());
}


public function testKey()
{
$iterator = $this->getIterator();

$iterator->next();
$iterator->next();

$this->assertEquals(2, $iterator->key());
}


public function testValidIfItemInvalid()
{
$iterator = $this->getIterator();

$iterator->next();
$iterator->next();
$iterator->next();

$this->assertEquals(false, $iterator->valid());
}


public function testValidIfItemIsValid()
{
$iterator = $this->getIterator();

$iterator->next();

$this->assertEquals(true, $iterator->valid());
}


public function testRewind()
{
$iterator = $this->getIterator();

$iterator->rewind();

$this->assertEquals(0, $iterator->key());
}

private function getIterator() : UserIterator
{
return new UserIterator($this->getCollection());
}

private function getCollection() : UsersCollection
{
$userItems[] = $this->getUserMock();

$usersCollection = new UsersCollection();

foreach ($userItems as $user) {
$usersCollection->addUser($user);
}

return $usersCollection;
}

private function getUserMock()
{
}
}


Usage


public function getUsers(): UsersCollection
{
$userCollection = new UsersCollection();

foreach ($whatIGetFromDatabase as $user) {
$userCollection->addUser($user);
}
return $userCollection;
}

public fucntion setUsersToActiveState()
{
$users = $this->getUsers();

foreach ($users as $user) {
if(!$user->getActiveStatus()) {
$user->setActiveStatus(true);
}
}
}

As you can see setUsersToActiveState remains the same, we only do not need to specify for our IDE or collagues what type $users variable is.

Extending functionalities

Believe or not you can reuse this two objects and just change names of variables to fit most of the needs. But if you want any more complex functionality, than feel free to add it in iterator or collection.

Example 1


For example, let's say that userCollection accepts only users with age more than 18. Implementation will happen in UsersCollection class in the method addUser.

 public function addUser(User $users)
{
if ($user->getAge() > 18) {
$this->users[] = $users;
}
}

Example 2

You need to add bulk users. Then you can expand your userCollection with additional method addUsers and it might look like this.

public function addUsers(array $users)
{
foreach($users as $user) {
$this->addUser(User $users);
}
}

4634 views · 5 years ago
PHP Basics

It's 2018, and you're a top-notch modern web developer, with a load of knowledge and tools right there at your disposal: Google and StackOverflow, debugger with a GUI, IDE with autocomplete, you name it. Occasionally, though, you still find yourself in a plain old text console on a remote server, or you have to do something without IDE, or there is no network connection... In such cases it might be helpful to feel comfortable in a simple terminal. In this post I'm going to list some switches for the PHP command that you can use to get information and some utilities.

Getting basic information about PHP


$ php -i
phpinfo()
PHP Version => 7.2.10-0ubuntu1

System => Linux awesome 4.18.0-10-generic #11-Ubuntu SMP Thu Oct 11 15:13:55 UTC 2018 x86_64
Build Date => Sep 13 2018 13:38:55
Server API => Command Line Interface
Virtual Directory Support => disabled
...


Full information about your PHP interpreter. Pipe the output to the Unix less command in order to get pagination and search: php -i | less. Type Q to exit the less shell. Some distros might lack less, in that case you may try php -i | more, which doesn't give you search but still has pagination.

Want a short summary of which PHP extensions you have? Just ask:

$ php -m
[PHP Modules]
calendar
Core
ctype
date
dom
ds
exif
...


More specific info about core and extensions' functions and classes


Full information about functions and classes provided by an extension:

$ php --re ds
Extension [ <persistent> extension #46 ds version 1.2.6 ] {

- Dependencies {
Dependency [ json (Required) ]
Dependency [ spl (Required) ]
}

- Classes [11] {
Interface [ <internal:ds> interface Ds\Hashable ] {

- Constants [0] {
}

- Static properties [0] {
}
...


Information on a specific class:

$ php --rc Ds\Vector
Class [ <internal:ds> <iterateable> final class Ds\Vector implements Ds\Sequence, Traversable, Countable, JsonSerializable, Ds\Collection ] {

- Constants [1] {
Constant [ public integer MIN_CAPACITY ] { 8 }
}

- Static properties [0] {
}
...


Same for a function:

$ php --rf fopen
Function [ <internal:standard> function fopen ] {

- Parameters [4] {
Parameter #0 [ <required> $filename ]
Parameter #1 [ <required> $mode ]
Parameter #2 [ <optional> $use_include_path ]
Parameter #3 [ <optional> $context ]
}
}


Utilities


Ever found yourself creating a dummy PHP file of just a few lines - only to be run once and then deleted? The -a switch might be what you're looking for:

$ php -a
Interactive mode enabled

php > var_dump(join(", ", [1, 2, 3]));
php shell code:1:
string(7) "1, 2, 3"
php >


It starts an interactive shell so you can type any PHP code and execute it straight away. Requires PHP to be compiled with readline support (most distros have that anyway).

Want a quick check for any parse/syntax errors in a PHP file? Use linter:

$ php -l test.php 
PHP Parse error: syntax error, unexpected 'array_shift' (T_STRING) in test.php on line 4
Errors parsing test.php


It has a web-server!


Yes! Just in case you missed it, as of PHP 5.4.0, the CLI SAPI provides a built-in web server. Want a quick look at a web page generated by an app? Here you go:

$ cd /my_application/document_root
$ php -S localhost:8000


Then open http://localhost:8000/ in your browser of choice and enjoy!

Hope you also have enjoyed this reading. Your feedback and questions are always appreciated!
4301 views · 3 years ago
Using AI for Weather Forecasting

Technology is constantly changing the way we interact, research, and react. One such way artificial intelligence is impacting our daily lives, and we may not even realize it is in weather forecasting.


The forecast we usually have been receiving in our phones and in older times primarily in newspapers, was based on data collected via satellites, radar system and weather balloons. In recent times there has been the addition of IoT based sensors as well. However, with the advent of Artificial Intelligence (AI) finding its way in numerous areas, AI has taken a role in improving the accuracy of weather as well.

The Dataset expansion

A significantly enormous set of data is available - from the weather satellites in space, to the private and government owned weather stations which are gaining real-time data. IBM for instance has more the 0.25 million weather stations that help IBM collect real-time data. Additionally, as we are in the age of Internet of Things (IOT), each small device to big device- cellphones, solar panels and vehicles everything has become or is yet to become yet another data source. Companies like GE have installed IOT street lights, which help in monitoring air quality and humidity. These are some of the few sources which help us in collecting the vast amount of data necessary for building on the AI technology, in future these sources and the amount of available data would grow exponentially.

Google and Weather forecast

Using the AI technology Google is able to develop a weather forecast tool, it has been trained to predict rainfalls accurately as much as six hours before. The underlying technology on which this prediction is build upon is U-Net convolutional neural network which is originally used in biomedical research. It works by taking satellite images as input and uses AI technology to transform these images into high resolution images. The only off-set is this is not real-time prediction and the delay due to complex calculations results in using six-hour old data and hence can only predict six-hours before.

IBM and its efforts in weather prediction

The quest for IBM to venture into weather forecasting began with IBM acquiring The Weather Company. IBM plans on using the large amount of weather data available coupled with IBM Watson and the cloud platform to enhance weather forecasting. In 2019 IBM developed Global High-Resolution Atmospheric Forecasting System (GRAF) in order to forecast weather conditions 12 hours prior to a greater degree of accuracy. The radius encompassed by the GRAF is also more narrowed down up to 3 kilometers as opposed to generally being 10-15 kilometers. Another of its marvel is that it gives accurate predictions down to each hour and not just daily.

Artificial Intelligence and Panasonic

Panasonic is the company behind TAMDAR, the weather sensor installed on commercial airplanes. With this advantage of extensive amount of data from in-flight sensors as well as publicly available data Panasonic developed Global 4D Weather. Proving to their claim of being the most advanced global forecasting platform globally they were able to timely predict Hurricane Irma in its early days.

Uses of Weather Forecasting


Sales

Everyday life decisions are affected by weather, it makes us choose in the way we travel, things we eat and things we buy to wear. The rise in temperature may increase sales of chilled drinks, if the company is fully aware of the forecast it would be able to manage productions as per demand. AI can help brands in maximizing sales based on weather forecasts and in minimizing waste.

Natural Disasters

The Panasonic Global 4D weather predicting Hurricane Irma is just another example where timely prediction can save millions of lives in face of situations like floods and Hurricanes. Companies like IBM combine weather forecasting data with utilities distribution network, which enables them to narrow down areas with likely outages. This enables utilities to place their workforce timely so the repair process catering to damage repairs post disasters is shortened. This in turn brings huge benefits to the overall economy.

Agriculture

The weather and agriculture have the most obvious correlation, each process in farming from sowing to reaping all depends on the weather. As farmers cultivate on huge farming lands, accurate information about each part of the land can help farmers in improving their crops and yield by manifolds. Weather conditions can lead to almost 90 percent of crop losses, 25 percent of these losses can be avoided using accurate AI prediction models to forecast weather and in turn improve the yield.

Transportation

Sea travel has always been eventful, timely prediction of storms by using machine learning techniques and hyper-local data allows companies to plan shipments accordingly and avoid severe weather conditions that usually result in delays. Tools like IBM’s Operations Dashboard for Ground Transportation equips in enhancing productivity based on weather predictions.

Another of the implementation of AI in transportation industry corelating to weather is fuel consumption. For instance, using weather prediction models to reduce airplane fuel consumption during its ascent.

To conclude Artificial Intelligence has a key role to play in weather forecasting, weather direct or indirectly impacts each sector in the economy. As the amount of information available to improve predictions increases exponentially it gives a chance to AI to improve accuracy even further. As we continue narrowing down weather conditions precise to time and location the benefits of such advancements across all industries are innumerable.

SPONSORS