
It took me quite some time to settle on my first blog post in this series and I found myself thinking about the most requested functionality in my career – The good ‘ol Custom CMS – typically geared towards clients that want a straight forward, secure solution that can be expanded upon in a modular format and that’s their IP.
This will be our starting point. A blank slate to build something epic with clean code and even cleaner design. And in the spirit of building from scratch, I will refrain from using classes or a framework. The main reasoning behind this is to truly get everyone acquainted with and excited about PHP development.
Join me as I transform rudimentary code into something extraordinary that can be morphed into just about any Content, PHP, and MySQL driven project. So without further ado, let’s jump into it!
The bare necessities
If you’re just getting started with development, there’s a nifty bite sized server called
UniformServer that will be your best friend throughout your coding career.
PHPMyAdmin (an awesome visual db management tool) comes built in so if you’re looking for a work right out of the box solution, this is it.
Alternatively, you can opt for
XAMPP or use an alternative server of your choice.
Now here’s where the exciting stuff begins, mapping things out.
I don’t see this done/encouraged often enough. Feel free to grab a piece of paper to logically map out your steps or produce a rough draft of where you’d like this project to go.
In this tutorial, I would like to achieve the following:
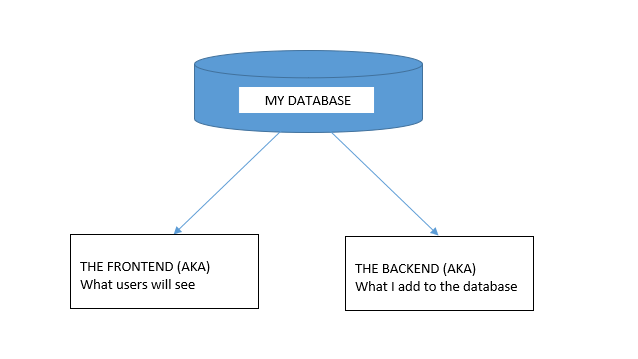
DB, DB, Set up your DB.
This requires a bit of planning but let’s start of with the basic structure we need to see this through.
We are going to need a user table and a content table and are a few ways to tackle this.
If you’re using the PHPMyAdmin tool you can create your database, add user permissions (Click on Permissions after creating your database), and create a table with ease.
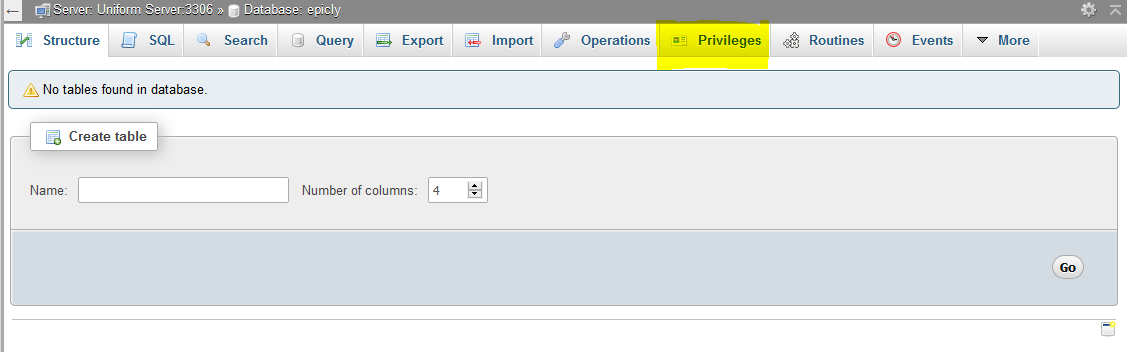
If you’re like me and prefer to look at good ‘ol SQL then writing an SQL statement is the preferred approach.
CREATE TABLE <code>mydbname</code>.<code>content</code> ( <code>ID</code> INT(11) NOT NULL AUTO_INCREMENT , <code>title</code> VARCHAR(100) NOT NULL , <code>content</code> LONGTEXT NOT NULL , <code>author</code> VARCHAR(50) NOT NULL , PRIMARY KEY (<code>ID</code>)) ENGINE = MyISAM COMMENT = 'content table';
Understanding the SQL statement
In a nutshell we are creating a table with important fields. Namely:
####
ID | Title | Content | Author
#######
The ID field is our unique identifier.
Now we can move on to the file structure.
Everything has a place in the file structure game
You can use a structure that speaks to your coding style / memory.
I tend to use the following:
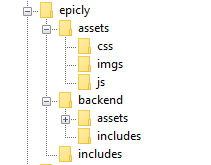
Choose a name for your CMS, which should be placed at the webroot of your localhost/server.
Replicate the folder structure as per the above example.
Next, we’re going to create a basic connection file.
You can create a
conn.php file in your root/includes folder.
The connection file will provide crucial information to connect to the database.
Type the following into your
conn.php file, remember to include your own database credentials.
<?php

$letsconnect = new mysqli("localhost","dbuser","dbpass","dbname");

?>
Let’s go to the homepage (index.php)
Create a file called
index.php at the root of your CMS folder.
I will be adding comments in my code to help you understand what each line does.
Comments are a useful tool for developers to add important notes private to their code.
We need to pull information from the database so it’s imperative that we include our connection file.
<?php

include('includes/conn.php');

if ($letsconnect -> connect_errno) { echo "Error " . $letsconnect -> connect_error;

}else{

$getmydata=$letsconnect -> query("SELECT * FROM content");

foreach($getmydata as $mydata){	echo "Title: ";	echo $mydata['title'];	echo "<br/>";	echo "Content: ";	echo $mydata['content'];	echo "<br/>";	echo "Author: ";	echo $mydata['author'];	echo "<br/>";	echo "<br/>";

}

}

$letsconnect -> close();

?>
Let’s get a (very) basic backend up and running
Create a file called
index.php in your backend folder.
We need to create a basic form to capture our data.
Let’s code some HTML!
<html>

<head><title>Backend - Capture Content</title></head>

<body>

<form action="<?php $_SERVER[‘PHP_SELF’];?>" method="post">

<input type="text" name="title" placeholder="Content Title here" required/>

<textarea name="content">Content Here</textarea>

<input type="text" name="author" placeholder="Author" required/>

<input type="submit" value="Save My Data" name="savedata"/>

</form>

</body>

</html>
Next, we need to process the form data.
Type the following just above the
<form>
tag.
<?php

if(isset($_POST['savedata'])){

include('../includes/conn.php');

if ($letsconnect->connect_error) {

die("Your Connection failed: " . $letsconnect->connect_error);

}else{

$sql = "INSERT INTO content(title,content,author)VALUES ('".$_POST["title"]."', '".$_POST["content"]."', '".$_POST["author"]."')";

if (mysqli_query($letsconnect, $sql)) {

echo "Your data was saved successfully!";

} else { echo "Error: " . $sql . "" . mysqli_error($letsconnect);

} $letsconnect->close();

}

}

?>
Note, this is a basic MySQL query to insert data. However, before using this in production it's important to add proper escaping and security to prevent SQL injections. This will be covered in the next article.
Congrats you made it to the end of tutorial 1!
Test out your creation, modify your content, and play around.
Go to your sitename/index.php to see your frontend after capturing data via sitename/backend/index.php
Next Up:
codewithme Now With Security, Functionality, and Aesthetics in mind.
Conclusion
Coding doesn’t have to be daunting and it’s my aim to divide a complex system into bitesized tutorials so you can truly use the knowledge you’ve acquired in your own projects.


 g10dra 117,471
  mike 79,708
  crocodile2u 78,222
  harikrishnanr 62,343
  calevans 37,880
  MindNovae 28,831
  dmamontov 19,396
  tanja 16,738
  damnjan 13,171
  ahmedkhan

