PHP & Web Development Blogs

Search Results For: developers
Showing 11 to 15 of 32 blog articles.
9598 views · 5 years ago
When PHP Frameworks Suck

INTRO

If you are working as a PHP software developer, there is an extremely high chance that all of your application, you’re currently working on, using frameworks of any kind.
PHP community developers of all levels worship frameworks since there are big historical and practical reasons for that.

Historical reasons

Since early PHP versions, developers were disreputable because not everybody considered PHP as a programming language, similar to JavaScript a couple of years ago. While strong type language existed decades ago, PHP continues to be soft type since now, only in version 7 basic types were introduced. There is also a matter of the fact that you can script in PHP without using a single object.

But that opened a space for frameworks to step in and introduce themselves as a tool or standard which will shape projects, give them right and order, introduce structure and rules.
And finally, they did. Frameworks are good examples of nice structures, using all available new features PHP offers with every version, enforcing some good practice, etc.

Practical reasons

The framework offers a lot of common problems already solved. They offer a nice ecosystem for other developers to contribute and plug their components. There is a lot of online resources for learning and stay updated about any particular framework. Also, what every framework community tries very hard, is to make setup and usage easy.

WHEN PHP FRAMEWORKS SUCKS

I recently had the opportunity to give a talk on a conference and one meetup about why PHP framework sometimes sucks. Sometimes things we see in framework tutorials does not seem to be very much aligned with some object-oriented standards we are striving to enforce, and with basic clean code guidelines. On the other hand, there is nothing wrong with using a framework, if you use it right.

This article is the first "pilot" article in this series. In every new blog in this series, we will go more in-depth about every specific topic I covered during my presentation.
I'm very excited to share this knowledge, as I saw many developers suffer from bonded-to-framework disease.

https://twitter.com/damnjan/status/1058306144458956800

I won’t spend much time here on any particular framework discussion. This series will be just a guide on how to unbind yourself from frameworks and use them as a tool, instead of being independent.

**Here is the link to the presentation slides.**
9526 views · 4 years ago


Welcome back! If you’re new to this series have a look at Part 1 here


Today’s focus is on templating, the aesthetic that will make or break your web application.

Having a clean design with well defined CSS that’s responsive and user friendly goes a long way.

Developers often stick to their lane but delving into templating will bode in your favor, you can indeed
create a functional and launch-worthy application all on your own!

Let’s jump into it!

Structured structure


Everything you tackle should be found with ease down the line. Therefore careful planning is fundamental to the success and sustainability of your project. You’ll also find that clearly defining your work lends itself to more productivity overall as you spend less that explaining your work during a handover / looking for a specific piece of code or resource. You’ll probably end up spending more time on actual work.
Finding your own unique pattern with file structure and CSS identifiers will also work in your favor as something unique to your process will most likely be easier to remember and form a tactile relationship with.

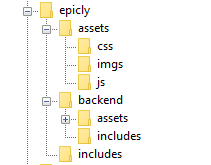
Our project’s current structure looks like this:


>If you need to backtrack, Part 1 is a great place to start!

In part 1, we created our index.php which displays info from our database.

Let’s take this a step further and create a header and a footer for our index.php

Create a file called header.php and save this to your includes folder.

Next, create a file called footer.php and save this to your includes folder.

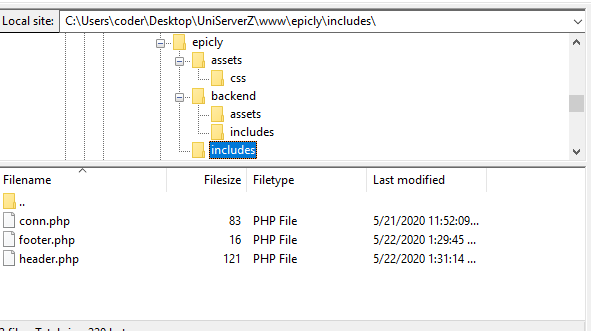
Your file structure should now look like this.


A header above all the rest


The header file will be a file we reuse throughout your web application. This file will contain important information that’s vital to the functionality and aesthetic of your website.
The type of info you’ll expect to see in a header.php file:
Script includes
Such as JQuery and important libraries
CSS includes
CSS files loaded from internal or external sources
Meta information
Contains important information that’s readable by search engines.
The basic structure of the beginning of your app, including your menu, and your logo.
For now, how header is going to have a basic layout.

Let’s get our HTML on!

<html>
<head>
<title>My Awesome CMS – Page Title</title>
</head>
<body>


A footer that sets the bar

Create a file called footer.php and save it to your includes folder (yourcms/includes/footer.php).

Add this code to your new file.

</body>
</html>


Next, let’s focus on the gravy… The CSS


CSS, when written beautifully, can truly set you apart.

You can tell your web application to load various styles to specific elements by defining unique identifiers.
Styles that are only used once are denoted with a # (a CSS “ID”) whereas styles that are reused multiple times are denoted with a . (a CSS “class”)

The best way to delve into the realm of CSS is to learn by experience.

Let’s create!


First, we need to create and load our CSS file. Remember our nifty new pal header.php? This created a convenient way to load our CSS file!

Add the following code to your header.php just above the </head> tag.

<link href=”../assets/css/style.css” type=”text/css” rel=”stylesheet”/> 


The ../ in the link to our stylesheet means we have to leave the current directory (the directory that header.php is in) and look for the assets/css/ directories.

Go ahead and create the css folder under your assets folder.

Next we’re going to create some simple CSS to test things out.

It’s time to add some style!


We are going to create two divs.
A div is a divider / section in HTML.
Add this to your index.php (located in your CMS’ root folder) above the <?php tag.

<div id="myfirstid"></div>
<div class="myfirstclass"></div>


Then, create a CSS file

Add this:

#myfirstid{
Background:lightblue;
Font-family:Arial;
Font-size:44px;
Font-weight: Bold;
}
.myfirstclass{
Font-size:15px;
Color: darkblue;
}


Save your newly created CSS to assets/css/ as style.css.

Pulling it all together, let’s see what we can do!


Let’s apply what we just learned to our index.php. But first, we should add our header.php and footer.php files.

Including everyone


Add this to the top of your index.php file:

include(‘includes/header.php’);


Remove the <divs> we used for practice earlier, we have something better in store!

Add this to the bottom of your index.php:

include(‘includes/footer.php’);


Next, let’s modify our code so we can add some style to the data we retrieve from our database.

Modify the following line:
foreach($getmydata as $mydata){ echo "Title: "; echo $mydata['title']; echo "<br/>"; echo "Content: "; echo $mydata['content']; echo "<br/>"; echo "Author: "; echo $mydata['author']; echo "<br/>"; echo "<br/>";


as follows:
?>

<div id=”myfirstid”>
<?php
foreach($getmydata as $mydata){
echo "<div class=”myfirstclass”>Title: ";
echo $mydata['title'];
echo "<br/>";
echo "Content: ";
echo $mydata['content'];
echo "<br/>";
echo "Author: ";
echo $mydata['author'];
echo "</div><br/><br/>";
}?>
</div>
<?php


Your full index.php should now look like this:

<?php
include('includes/header.php');
include('includes/conn.php');

if ($letsconnect -> connect_errno) { echo "Error " . $letsconnect -> connect_error;

}else{

$getmydata=$letsconnect -> query("SELECT * FROM content");

?>
<div id="myfirstid">
<?php
foreach($getmydata as $mydata){
echo "<div class=”myfirstclass”>Title: ";
echo $mydata['title'];
echo "<br/>";
echo "Content: ";
echo $mydata['content'];
echo "<br/>";
echo "Author: ";
echo $mydata['author'];
echo "</div><br/><br/>";
}
?>
</div>
<?php
}

$letsconnect -> close();
include('includes/footer.php');
?>


Go ahead, test it out!

There’s a lot to unpack and I will break things down a little more during our next tutorial!

Challenge


Study the final index.php and try to form a few theories about why closing a php tag is necessary before adding raw html.

Next Up: #CodeWithMe Part 4: Building A Good Base

8904 views · 4 years ago
Laravel Eloquent Relationship Part 2

As you all know, Laravel Eloquent Relationships are powerful and easy methods introduced by Laravel for helping developers to reduce the complexity when connecting with multiple tables. While connecting with multiple tables, this method is very easy for developers for creating the application

Here you can see the next three methods of the eloquent relationships:
   
. Has Many Through Relationship
    . One to Many Polymorphic
    . Many to many Polymorphic

HAS MANY THROUGH ELOQUENT RELATIONSHIP

Has many through is a little bit complicated while understanding. I will provide a shortcut method to provide access data of another mode relationship. We will create a user table, post table, and country table and they will be interconnected with each other.

Here we will see Many through relationship will use hasManyThrough() for the relation


Create Migrations


Users table

 Schema::create('users', function (Blueprint $table) {

$table->increments('id');

$table->string('name');

$table->string('email')->unique();

$table->string('password');

$table->integer('country_id')->unsigned();

$table->rememberToken();

$table->timestamps();

$table->foreign('country_id')->references('id')->on('countries')

->onDelete('cascade');

});


Posts table

Schema::create('posts', function (Blueprint $table) {

$table->increments('id');

$table->string("name");

$table->integer('user_id')->unsigned();

$table->timestamps();

$table->foreign('user_id')->references('id')->on('users')

->onDelete('cascade');

});


Countries table

Schema::create('countries', function (Blueprint $table) {

$table->increments('id');

$table->string('name');

$table->timestamps();

});


Create Models


Country Model

<?php


namespace App;

use Illuminate\Database\Eloquent\Model;


class Country extends Model

{

public function posts(){

return $this->hasManyThrough(

Post::class,

User::class,

'country_id',
'user_id',
'id',
'id'
);

}

}


Now we can retrieve records by

$country = Country::find(1); 

dd($country->posts);


ONE TO MANY POLYMORPHIC RELATIONSHIP

One to many polymorphic relationships used one model belongs to another model on a single file. For example, we will have tweets and blogs, both having the comment system. So we need to add the comments. Then we can manage both in a single table


Here we will use sync with a pivot table, create records, get all data, delete, update, and everything related to one too many relationships.

Now I will show one too many polymorphic will use morphMany() and morphTo() for relation.


Create Migrations

Posts table

Schema::create('posts', function (Blueprint $table) {

$table->increments('id');

$table->string("name");

$table->timestamps();

});

Videos Table

Schema::create('videos', function (Blueprint $table) {

$table->increments('id');

$table->string("name");

$table->timestamps();

});

Comments Table

Schema::create('comments', function (Blueprint $table) {

$table->increments('id');

$table->string("body");

$table->integer('commentable_id');

$table->string("commentable_type");

$table->timestamps();

});


Create Models

Post Model

<?php

namespace App;

use Illuminate\Database\Eloquent\Model;


class Post extends Model

{


public function comments(){

return $this->morphMany(Comment::class, 'commentable');

}

}

Video Model

<?php

namespace App;

use Illuminate\Database\Eloquent\Model;


class Video extends Model{


public function comments(){

return $this->morphMany(Comment::class, 'commentable');

}

}

Comment Model

<?php

namespace App;

use Illuminate\Database\Eloquent\Model;

class Comment extends Model{


public function commentable(){

return $this->morphTo();

}

}


Create Records


$post = Post::find(1); 

$comment = new Comment;

$comment->body = "Hi Harikrishnan";

$post->comments()->save($comment);


$video = Video::find(1);

$comment = new Comment;

$comment->body = "Hi Harikrishnan";

$video->comments()->save($comment);


Now we can retrieve records


$post = Post::find(1); 

dd($post->comments);


$video = Video::find(1);

dd($video->comments);


MANY TO MANY POLYMORPHIC RELATIONSHIPS

Many to many polymorphic is also a little bit complicated like above. If we have a tweet, video and tag table, we need to connect each table like every tweet and video will have multiple persons to tag. And for each and every tag there will be multiple tweet or videos.

Here we can understand the creating of many to many polymorphic relationships, with a foreign key schema of one to many relationships, use sync with a pivot table, create records, attach records, get all records, delete, update, where condition and etc..


Here morphToMany() and morphedByMany() will be used for many to many polymorphic relationships

Creating Migrations

Posts Table

Schema::create('posts', function (Blueprint $table) {

$table->increments('id');

$table->string("name");

$table->timestamps();

});

Videos Table

Schema::create('videos', function (Blueprint $table) {

$table->increments('id');

$table->string("name");

$table->timestamps();

});

Tags table

Schema::create('tags', function (Blueprint $table) {

$table->increments('id');

$table->string("name");

$table->timestamps();

});

Taggables table

Schema::create('taggables', function (Blueprint $table) {

$table->integer("tag_id");

$table->integer("taggable_id");

$table->string("taggable_type");

});


Creating ModelsPost Model


<?php

namespace App;

use Illuminate\Database\Eloquent\Model;

class Post extends Model

{


public function tags(){

return $this->morphToMany(Tag::class, 'taggable');

}

}


Video Model

<?php

namespace App;

use Illuminate\Database\Eloquent\Model;

class Video extends Model

{


public function tags(){

return $this->morphToMany(Tag::class, 'taggable');

}

}

Tag Model

<?php

namespace App;

use Illuminate\Database\Eloquent\Model;

class Tag extends Model

{


public function posts(){

return $this->morphedByMany(Post::class, 'taggable');

}


public function videos(){

return $this->morphedByMany(Video::class, 'taggable');

}

}

Creating Records

$post = Post::find(1); 
$tag = new Tag;
$tag->name = "Hi Harikrishnan";
$post->tags()->save($tag);


$video = Video::find(1);
$tag = new Tag;
$tag->name = "Vishnu";
$video->tags()->save($tag);


$post = Post::find(1);
$tag1 = new Tag;
$tag1->name = "Kerala Blasters";
$tag2 = new Tag;
$tag2->name = "Manajapadda";
$post->tags()->saveMany([$tag1, $tag2]);


$video = Video::find(1);
$tag1 = new Tag;
$tag1->name = "Kerala Blasters";
$tag2 = new Tag;
$tag2->name = "Manajappada";
$video->tags()->saveMany([$tag1, $tag2]);


$post = Post::find(1);
$tag1 = Tag::find(3);
$tag2 = Tag::find(4);
$post->tags()->attach([$tag1->id, $tag2->id]);


$video = Video::find(1);
$tag1 = Tag::find(3);
$tag2 = Tag::find(4);
$video->tags()->attach([$tag1->id, $tag2->id]);


$post = Post::find(1);
$tag1 = Tag::find(3);
$tag2 = Tag::find(4);
$post->tags()->sync([$tag1->id, $tag2->id]);


$video = Video::find(1);
$tag1 = Tag::find(3);
$tag2 = Tag::find(4);
$video->tags()->sync([$tag1->id, $tag2->id]);


Now we can retrieve records

$post = Post::find(1); 
dd($post->tags);


$video = Video::find(1);
dd($video->tags)


$tag = Tag::find(1);
dd($tag->posts);


$tag = Tag::find(1);
dd($tag->videos);


Hence we completed all the relationships. In the above blog how has many through relationship, one to many polymorphic relationships and many to many polymorphic are working. This feature is introduced from Laravel 5.0 onwards and till the current version. Without the model, we can’t able to do this relationship. If we are using an eloquent relationship it will be very useful while developing an application.
8405 views · 7 months ago


In modern software architecture, developers are constantly exploring new paradigms to enhance the performance, scalability, and maintainability of their applications. One such architectural pattern gaining popularity is Command Query Responsibility Segregation (CQRS). CQRS separates the responsibility of handling read and write operations, offering numerous benefits in complex systems. In this article, we'll delve into CQRS and explore its implementation in PHP.

What is CQRS?


CQRS, coined by Greg Young, is an architectural pattern that segregates the responsibility for handling read and write operations in a system. In traditional CRUD-based architectures, the same model is often used for both reading and writing data. However, CQRS advocates for a clear distinction between commands (write operations that modify state) and queries (read operations that retrieve data).

Key Concepts of CQRS:
   

. Command: Commands represent actions that modify the state of the system. They encapsulate the intent to perform an operation, such as creating, updating, or deleting data.
   
. Query: Queries retrieve data from the system without modifying its state. They are read-only operations used to fetch information for presentation or analysis.
   
. Command Handler: Responsible for processing commands by executing the necessary business logic and updating the system's state accordingly.
   
. Query Handler: Handles queries by retrieving data from the appropriate data source and returning the results to the caller.
   
. Separate Models: CQRS often involves maintaining separate models for commands and queries. This allows each model to be optimized for its specific use case, leading to improved performance and scalability.

Implementing CQRS in PHP:


Implementing CQRS in PHP involves structuring your application to separate command and query responsibilities effectively. Here's a high-level overview of how to implement CQRS in PHP:

1. Define Commands and Queries:


Start by defining the commands and queries your application will support. Commands should encapsulate actions that modify state, while queries should retrieve data.

class CreateProductCommand {
public $name;
public $price;
}

class GetProductQuery {
public $productId;
}


2. Create Command and Query Handlers:


Next, implement handlers for processing commands and queries. Command handlers execute the necessary business logic to fulfill the command, while query handlers retrieve data based on the query criteria.

class CreateProductCommandHandler {
public function handle(CreateProductCommand $command) {
}
}

class GetProductQueryHandler {
public function handle(GetProductQuery $query) {
}
}


3. Use Separate Models:


Maintain separate models for commands and queries to optimize each for its specific purpose. This separation allows you to design models tailored to the needs of write and read operations.

class Product {
public $name;
public $price;
}

class ProductView {
public $name;
public $price;
}


4. Wiring Everything Together:


Finally, wire up your command and query handlers to the appropriate endpoints or controllers in your application. Dispatch commands to their respective handlers and invoke query handlers to retrieve data.

$command = new CreateProductCommand();
$command->name = "Example Product";
$command->price = 99.99;

$handler = new CreateProductCommandHandler();
$handler->handle($command);

$query = new GetProductQuery();
$query->productId = 123;

$handler = new GetProductQueryHandler();
$product = $handler->handle($query);


Benefits of CQRS in PHP:


-Improved Scalability: Separating read and write operations allows you to scale each independently based on demand.

-Enhanced Performance: Optimizing models and handlers for specific tasks can lead to improved performance and responsiveness.

-Simplified Maintenance: Clear separation of concerns makes the codebase easier to understand, maintain, and extend over time.

-Flexibility: CQRS enables flexibility in choosing the most suitable data storage and retrieval mechanisms for different use cases.

Conclusion:


CQRS is a powerful architectural pattern that offers numerous advantages for building complex and scalable PHP applications. By segregating command and query responsibilities, developers can achieve better performance, scalability, and maintainability in their systems. While implementing CQRS in PHP requires careful planning and design, the benefits it provides make it a compelling choice for projects requiring high performance and flexibility.
8095 views · 5 years ago
Now that the Thanksgiving and Black Friday are left behind, we're all back at our desks, some of us having PHPStorm open for the whole day. In this post, I'll say a few words on this beautiful IDE, PHPUnit and XDebug.
You know that unit tests are essential, don't you? So do the PHPStorm developers. This industry-standard level IDE has tons of capabilities for integrating test frameworks and debuggers into your project. Even if you use VMs or containers to run your development environment, chances are they got you covered!

Blind Pew from Treasure Island

I often see even experienced PHP programmers debugging their code with var_dump(), which is obviously not the best way to do it. If you see the code for the first time, if you work with legacy code - step-by-step interactive debugging is the way to go. Sometimes it can save you hours of old school var_dumping.

As of unit tests, I often hear that it's good enough to run tests from the terminal. I even know a guy who runs watch phpunit /path/to/test while developing: this way the test is run every 2 seconds, you switch to the terminal whenever you want to see the latest results and that's it. However, there are certain advantages in running tests from the IDE. First, it's super-handy to launch a test method, test class or a whole folder with tests, just by pressing a hotkey. Second, the test results appear right there, in PHPStorm, with failures and their stack traces, every entry clickable and takes you directly to the file:line where a nasty thing happened. I also find the ability to run a debugger for a unit test, extremely attractive. Test fails, you click on a trace entry, get to a problematic line, place a break point, re-run the test in debug mode - and there you go.

For all those integrations, you will first need to setup the PHP interpreter for the project: Configuring PHP Development Environment. You will find both local and remote interpreter setups. "Local" is the PHP that you have on your workstation, the host machine. "Remote" can be pretty much everything: SSH if your Dev environment runs on a shared sandbox for all developers, docker or docker-compose if you run it using docker containers.

Next step - creating PHPUnit configuration. Go toSettings -> Languages and Frameworks -> PHP -> Test Frameworks. Follow this guide, it has much more information which will be more up-to-date than this post.Don't forget to set Path Mappings for your remote environments! That is, you probably have your project in, say, $HOME/projects/cool-project, but inside a docker or on a remote host it might be located at /app or /var/www, then you have to let PHPStorm know about this.

Once you're done with PHPUnit setup, you can finally run your tests! The default shortcut on my Linux machine isCtrl+Shift+F10 (shortcuts are usually different on Mac though). Place a cursor inside a test method, press the shotcut: PHPStorm will launch PHPUnit withthat particular test method! When the cursor in a scope of test class but not inside a test method - the whole test class will be run. And, you also can select a whole folder with tests, in the project tree and run it, ain't that cool?

A small tip for the docker-compose lovers. When I first set PHPStorm integration with docker-compose and ran the tests, I was quite surprised (unpleasantly) to see that myphp-fpm service that I was connecting to, is gone after the test process is finished. Took me some time to figure out that it's PHPStorm's expected behavior. It stops the target service after it's done testing. A workaround I started to use is as follows: I just add another service calledphpunit which uses a php-fpm or php-cli image, and is not needed by anything except unit testing in PHPStorm.

Now to debugging.


Debugging is like being the detective in a crime movie where you are also the murderer. Filipe Fortes a.k.a. @fortes


Obviously, your PHP interpreter in development environment will need a debugger extension in order for you to debug interactively. PHPStorm support the two most widely used options: XDebug and Zend Debugger. When using docker I usually make a separate Dockerfile for development, using production image as base, then add development tools,XDebug being the most important. Honestly, I've never usedZend Debugger, so have little to tell about its' nuances.

Got an extension? Go to Debugging Ultimate Guide! Debugger settings in PHPStorm are atSettings -> Languages and Frameworks -> PHP -> Debug. Most of the time you don't need to change them.Again, a note for docker-compose users. There is an XDebug setting that allow debugger to resolve the client (PHPStorm) IP address:xdebug.remoteconnect_back_. That's a disappointment but those will not work, at least with a default docker-compose setup. Thing is, all containers in a compose stack are running behind a network proxy provided by docker-compose. That is, the REMOTE_ADDR for all the containers will always be the IP of proxy. A workaround:

* disablexdebug.remoteconnect_back_;
* add.user.ini to the application root folder with the following contents:xdebug.remotehost = 192.168.X.X_ (your machine's IP address in the LAN). It's generally a good idea to exclude.user.ini from VCS control.

As a conclusion: if you still usevardump()_ to debug, stop living in the stone age, upgrade your knowledge and become more productive! If you don't write unit tests, start doing it. If your managers say it's a waste of time, tell them that it's coding without tests that is a waste of time. And, if you find this post of any use, or have an opinion, or a question - please do comment!

SPONSORS

PHP Tutorials and Videos