PHP & Web Development Blogs

Search Results For: laravel
Showing 1 to 5 of 13 blog articles.
36035 views · 7 years ago
Making Charts and Graphs using Laravel

Installing composer

Composer is a package management tool for PHP. Laravel requires composer for installation. We can download composer from https://getcomposer.org/download/

After installation that you can test whether composer installed or not by command
composer

Installing Laravel

The current stable version of laravel is laravel 5.6. We can install laravel package with three ways.

In command prompt or terminal by running composer global require "laravel/installer" and then Laravel new

or

We can create the project with Composer by running composer create-project --prefer-dist laravel/laravel

or

Directly clone from github
git clone https://github.com/laravel/laravel/tree/master and after that composer update

Laravel local development server

Run the below command in command prompt or terminal
PHP artisan serve


Above command will start to local development servehttp://localhost:8000 or if you want to change default port:

php artisan serve --port 


Generating charts and graphs

We are using consoletvs package for generating charts. So for installation we can first move inside to our project using command prompt or terminal. We are following the below steps to install

Step 1:

First we need to install ConsoleTVs/Charts composer package inside our laravel project.
composer require consoletvs/charts


Step 2:

After successfully installation of above package, open app/config.php and add service provider.
In config/app.php


'providers' => [
....
ConsoleTVs\Charts\ChartsServiceProvider::class,
],


After the service provider we need to add alias
'aliases' => [
....
'Charts' => ConsoleTVs\Charts\Facades\Charts::class,
]


Step 3

We need to configure of database for application. We can configure in either .env file or config/database.php file.


Step 4

We can migrate our default tables that is user. We can find the table in database/migration folder.

Step 5

We can generate dummy records for demo in users table. For creating dummy records, we need to run the below command in command prompt or terminal
php artisan tinker>>> factory(App\User::class, 20)->create();

the above command will create a set of 20 records.

If we need to add more records we need to run the above command or we can increase the count as much as we want. For example
php artisan tinker>>> factory(App\User::class, 2000)->create();


Step 6Creating controller

For creating controller we need to run below command in terminal or command prompt
php artisan make controller:<controller_name>


Step 7Adding the routes

We can add the routes for navigating our application. You can find routes file inside routes folder. Before 5.4 we can find routes.php file itself, now its web.php. If you are using laravel 5.2 routes.php will inside app/http folder.

So inside web.php:

Route::get('create-chart/{type}','ChartController@makeChart');


Here type will be the parameter we are passing and it will focus to makeChart() function inside chartcontroller

Step 8

Import charts to controller, for that in the namespace section add:

Use charts;


Step 9

We can put the below code into chartController

public function makeChart($type)
{
switch ($type) {
case 'bar':
$users = User::where(DB::raw("(DATE_FORMAT(created_at,'%Y'))"),date('Y'))
->get();
$chart = Charts::database($users, 'bar', 'highcharts')
->title("Monthly new Register Users")
->elementLabel("Total Users")
->dimensions(1000, 500)
->responsive(true)
->groupByMonth(date('Y'), true);
break;
case 'pie':
$chart = Charts::create('pie', 'highcharts')
->title('HDTuto.com Laravel Pie Chart')
->labels(['Codeigniter', 'Laravel', 'PHP'])
->values([5,10,20])
->dimensions(1000,500)
->responsive(true);
break;
case 'donut':
$chart = Charts::create('donut', 'highcharts')
->title('HDTuto.com Laravel Donut Chart')
->labels(['First', 'Second', 'Third'])
->values([5,10,20])
->dimensions(1000,500)
->responsive(true);
break;
case 'line':
$chart = Charts::create('line', 'highcharts')
->title('HDTuto.com Laravel Line Chart')
->elementLabel('HDTuto.com Laravel Line Chart Lable')
->labels(['First', 'Second', 'Third'])
->values([5,10,20])
->dimensions(1000,500)
->responsive(true);
break;
case 'area':
$chart = Charts::create('area', 'highcharts')
->title('HDTuto.com Laravel Area Chart')
->elementLabel('HDTuto.com Laravel Line Chart label')
->labels(['First', 'Second', 'Third'])
->values([5,10,20])
->dimensions(1000,500)
->responsive(true);
break;
case 'geo':
$chart = Charts::create('geo', 'highcharts')
->title('HDTuto.com Laravel GEO Chart')
->elementLabel('HDTuto.com Laravel GEO Chart label')
->labels(['ES', 'FR', 'RU'])
->colors(['#3D3D3D', '#985689'])
->values([5,10,20])
->dimensions(1000,500)
->responsive(true);
break;
default:
break;
}
return view('chart', compact('chart'));
}


Step 10

Create a blade file. Blade is the view file used inside the laravel. You can add new blade file with any name with an extension of .blade.php
Here we are creating chart.blade.php

<!DOCTYPE html>
<html lang="en">
<head>
<meta charset="utf-8">
<meta http-equiv="X-UA-Compatible" content="IE=edge">
<meta name="viewport" content="width=device-width, initial-scale=1">
<title>My Charts</title>
{!! Charts::styles() !!}
</head>
<body>

<div class="app">
<center>
{!! $chart->html() !!}
</center>
</div>

{!! Charts::scripts() !!}
{!! $chart->script() !!}
</body>
</html>


Step 11

We can run our laravel application in local development server by php artisan serve command:

http://localhost:8000/create-chart/bar
http://localhost:8000/create-chart/pie
http://localhost:8000/create-chart/donut
http://localhost:8000/create-chart/line
http://localhost:8000/create-chart/area
http://localhost:8000/create-chart/geo



In the above example we was creating line chart, geo chart, bar chart, pie chart, donut chart, line chart and area chart. We can also create gauge chart, progressbar chart, areaspline chart, scatter chart, percentage chart etc using consoletvs charts composer package.

There are a lot of jQuery libraries also available like amcharts, chartjs, highcharts, google, material, chartist, fusioncharts, morris, plottablejs etc. However, using this plugin we can easily create charts without having to use jQuery, another advantage to building it in with Laravel.
34240 views · 7 years ago
Introduction to Gitlab CI for PHP developers
As a developer, you've probably at least heard something about CI - Continuous integration. And if you haven't - you better fix it ASAP, because that's something awesome to have on your skill list and can get extremely helpful in your everyday work. This post will focus on CI for PHP devs, and specifically, on CI implementation from Gitlab. I will suppose you know the basics of Git, PHP, PHPUnit, Docker and unix shell. Intended audience - intermediate PHP devs.
Adding something to your workflow must serve a purpose. In this case the goal is to automate routine tasks and achieve better quality control. Even a basic PHP project IMO needs the following:
* linter) checks (cannot merge changes that are invalid on the syntax level)
* Code style checks
* Unit and integration tests
All of those can be just run eventually, of course. But I prefer an automated CI approach even in my personal projects because it leads to a higher level of discipline, you simply can't avoid following a set of rules that you've developed. Also, it reduces a risk of releasing a bug or regression, thus improving quality.
Gitlab is as generous as giving you their CI for free, even for your private repos. At this point it is starting to look as advertising, therefore a quick comparison table for Gitlab, Github, Bitbucket. AFAIK, Github does not have a built-in solution, instead it is easily integrated with third parties, of which Travis CI seems to be the most popular - I will therefore mention Travis here.

Public repositories (OSS projects). All 3 providers have a free offer for the open-source community!


| Provider | Limits |
|---|---|
| Gitlab | 2,000 CI pipeline minutes per group per month, shared runners |
| Travis | Apparently unlimited |
| Bitbucket| 50 min/month, max 5 users, File storage <= 1Gb/month |

Private repositories


| Provider | Price | Limits |
|---|---|---|
| Gitlab | Free | 2,000 CI pipeline minutes per group per month, shared runners |
| Travis | $69/month | Unlimited builds, 1 job at a time |
| Bitbucket| Free | 50 min/month, max 5 users, File storage <= 1Gb/month |

Getting started

I made a small project based on Laravel framework and called it "ci-showcase". I work in Linux environment, and the commands I use in the examples, are for linux shell. They should be pretty much the same on Mac and nearly the same on Windows though.
composer create-project laravel/laravel ci-showcase

Next, I went to gitlab website and created a new public project: https://gitlab.com/crocodile2u/ci-showcase. Cloned the repo and copied all files and folders from the newly created project - the the new git repo. In the root folder, I placed a .gitignore file:
.idea
vendor
.env

Then the .env file:
APP_ENV=development

Then I generated the application encryption key: php artisan key:generate, and then I wanted to verify that the primary setup works as expected: ./vendor/bin/phpunit, which produced the output OK (2 tests, 2 assertions). Nice, time to commit this: git commit &amp;&amp; git push

At this point, we don't yet have any CI, let's do something about it!

Adding .gitlab-ci.yml

Everyone going to implement CI with Gitlab, is strongly encouraged to bookmark this page: https://docs.gitlab.com/ee/ci/README.html. I will simply provide a short introduction course here plus a bit of boilerplate code to get you started easier.
First QA check that we're going to add is PHP syntax check. PHP has a built-in linter, which you can invoke like this: php -l my-file.php. This is what we're going to use. Because the php -l command doesn't support multiple files as arguments, I've written a small wrapper shell script and saved it to ci/linter.sh:
#!/bin/sh
files=<code>sh ci/get-changed-php-files.sh | xargs</code>last_status=0
status=0
# Loop through changed PHP files and run php -l on each
for f in "$files" ; do message=<code>php -l $f</code> last_status="$?" if [ "$last_status" -ne "0" ]; then # Anything fails -> the whole thing fails echo "PHP Linter is not happy about $f: $message" status="$last_status" fi
done
if [ "$status" -ne "0" ]; then echo "PHP syntax validation failed!"
fi
exit $status

Most of the time, you don't actually want to check each and every PHP file that you have. Instead, it's better to check only those files that have been changed. The Gitlab pipeline runs on every push to the repository, and there is a way to know which PHP files have been changed. Here's a simple script, meet ci/get-changed-php-files.sh:
#!/bin/sh
# What's happening here?
#
# 1. We get names and statuses of files that differ in current branch from their state in origin/master.
# These come in form (multiline)
# 2. The output from git diff is filtered by unix grep utility, we only need files with names ending in .php
# 3. One more filter: filter *out* (grep -v) all lines starting with R or D.
# D means "deleted", R means "renamed"
# 4. The filtered status-name list is passed on to awk command, which is instructed to take only the 2nd part
# of every line, thus just the filename
git diff --name-status origin/master | grep '\.php$' | grep -v "^[RD]" | awk '{ print }'

These scripts can easily be tested in your local environment ( at least if you have a Linux machine, that is ;-) ).
Now, as we have our first check, we'll finally create our .gitlab-ci.yml. This is where your pipeline is declared using YAML notation:
# we're using this beautiful tool for our pipeline: https://github.com/jakzal/phpqa
image: jakzal/phpqa:alpine
# For this sample pipeline, we'll only have 1 stage, in real-world you would like to also add at least "deploy"
stages: - QA
linter:
stage: QA
# this is the main part: what is actually executed
script: - sh ci/get-changed-php-files.sh | xargs sh ci/linter.sh

The first line is image: jakzal/phpqa:alpine and it's telling Gitlab that we want to run our pipeline using a PHP-QA utility by jakzal. It is a docker image containing PHP and a huge variety of QA-tools. We declare one stage - QA, and this stage by now has just a single job named linter. Every job can have it's own docker image, but we don't need that for the purpose of this tutorial. Our project reaches Step 2. Once I had pushed these changes, I immediately went to the project's CI/CD page. Aaaand.... the pipeline was already running! I clicked on the linter job and saw the following happy green output:
Running with gitlab-runner 11.9.0-rc2 (227934c0) on docker-auto-scale ed2dce3a
Using Docker executor with image jakzal/phpqa:alpine ...
Pulling docker image jakzal/phpqa:alpine ...
Using docker image sha256:12bab06185e59387a4bf9f6054e0de9e0d5394ef6400718332c272be8956218f for jakzal/phpqa:alpine ...
Running on runner-ed2dce3a-project-11318734-concurrent-0 via runner-ed2dce3a-srm-1552606379-07370f92...
Initialized empty Git repository in /builds/crocodile2u/ci-showcase/.git/
Fetching changes...
Created fresh repository.
From https://gitlab.com/crocodile2u/ci-showcase * [new branch] master -> origin/master * [new branch] step-1 -> origin/step-1 * [new branch] step-2 -> origin/step-2
Checking out 1651a4e3 as step-2...
Skipping Git submodules setup
$ sh ci/get-changed-php-files.sh | xargs sh ci/linter.sh
Job succeeded

It means that our pipeline was successfully created and run!

PHP Code Sniffer.

PHP Code Sniffer is a tool for keeping app of your PHP files in one uniform code style. It has a hell of customizations and settings, but here we will only perform simple check for compatibilty with PSR-2 standard. A good practice is to create a configuration XML file in your project. I will put it in the root folder. Code sniffer can use a few file names, of which I prefer phpcs.xml:
<?xml version="1.0"?>
/resources

I also will append another section to .gitlab-ci.yml:
code-style:	stage: QA	script:	# Variable $files will contain the list of PHP files that have changes	- files=<code>sh ci/get-changed-php-files.sh</code> # If this list is not empty, we execute the phpcs command on all of them - if [ ! -z "$files" ]; then echo $files | xargs phpcs; fi

Again, we check only those PHP files that differ from master branch, and pass their names to phpcs utility. That's it, Step 3 is finished! If you go to see the pipeline now, you will notice that linter and code-style jobs run in parallel.

Adding PHPUnit

Unit and integration tests are essential for a successful and maintaiable modern software project. In PHP world, PHPUnit is de facto standard for these purposes. The PHPQA docker image already has PHPUnit, but that's not enough. Our project is based on Laravel, which means it depends on a bunch of third-party libraries, Laravel itself being one of them. Those are installed into vendor folder with composer. You might have noticed that our .gitignore file has vendor folder as one of it entries, which means that it is not managed by the Version Control System. Some prefer their dependencies to be part of their Git repository, I prefer to have only the composer.json declarations in Git. Makes the repo much much smaller than the other way round, also makes it easy to avoid bloating your production builds with libraries only needed for development.
Composer is also included into PHPQA docker image, and we can enrich our .gitlab-ci.yml:
test:	stage: QA	cache:	key: dependencies-including-dev	paths: - vendor/	script:	- composer install	- ./vendor/bin/phpunit

PHPUnit requires some configuration, but in the very beginning we used composer create-project to create our project boilerplate.laravel/laravel package has a lot of things included in it, and phpunit.xml is also one of them. All I had to do was to add another line to it:
xml

APP_KEY enironment variable is essential for Laravel to run, so I generated a key with php artisan key:generate.
git commit & git push, and we have all three jobs on theQA stage!

Checking that our checks work

In this branch I intentionally added changes that should fail all three job in our pipeline, take a look at git diff. And we have this out from the pipeline stages:Linter:
$ ci/linter.sh
PHP Linter is not happy about app/User.php:
Parse error: syntax error, unexpected 'syntax' (T_STRING), expecting function (T_FUNCTION) or const (T_CONST) in app/User.php on line 11
Errors parsing app/User.php
PHP syntax validation failed!
ERROR: Job failed: exit code 255

**Code-style**:
$ if [ ! -z "$files" ]; then echo $files | xargs phpcs; fi
FILE: ...ilds/crocodile2u/ci-showcase/app/Http/Controllers/Controller.php
----------------------------------------------------------------------
FOUND 0 ERRORS AND 1 WARNING AFFECTING 1 LINE
---------------------------------------------------------------------- 13 | WARNING | Line exceeds 120 characters; contains 129 characters
----------------------------------------------------------------------
Time: 39ms; Memory: 6MB
ERROR: Job failed: exit code 123

**test**:
$ ./vendor/bin/phpunit
PHPUnit 7.5.6 by Sebastian Bergmann and contributors.
F. 2 / 2 (100%)
Time: 102 ms, Memory: 14.00 MB
There was 1 failure:
1) Tests\Unit\ExampleTest::testBasicTest
This test is now failing
Failed asserting that false is true.
/builds/crocodile2u/ci-showcase/tests/Unit/ExampleTest.php:17
FAILURES!
Tests: 2, Assertions: 2, Failures: 1.
ERROR: Job failed: exit code 1

Congratulations, our pipeline is running, and we now have much less chance of messing up the result of our work.

Conclusion

Now you know how to set up a basic QA pipeline for your PHP project. There's still a lot to learn. Pipeline is a powerful tool. For instance, it can make deployments to different environments for you. Or it can build docker images, store artifacts and more! Sounds cool? Then spend 5 minutes of your time and leave a comment, you can also tell me if there is a pipeline topic you would like to be covered in next posts.
23457 views · 7 years ago
Generate PDF from HTML in Laravel 5.7

Today, I will share with you how to create a PDF file from HTML blade file in Laravel 5.7. We will be using dompdf package for generating the PDF file.

In the below example, we will install barryvdh/laravel-dompdf using composer package and thereafter we will add new route url with controller. Then we will create a blade file. Then after we have to just run project with serve and we can check the PDF file is for download.

Download Laravel 5.7

Now I am going to explain the step by step from scratch with laravel installation for dompdf. To get started, we need to download fresh Laravel 5.7 application using command, so open our terminal and run the below command in the command prompt:

composer create-project --prefer-dist laravel/laravel blog


Install laravel-dompdf Package

Now we will install barryvdh/laravel-dompdf composer package by using the following composer command in ourLlaravel 5.7 application.

composer require barryvdh/laravel-dompdf


Then the package is successfully installed in our application, after that open config/app.php file and we need to add alias and service provider.
config/app.php

'providers' => [
....
Barryvdh\DomPDF\ServiceProvider::class,
],

'aliases' => [
....
'PDF' => Barryvdh\DomPDF\Facade::class,
]


Create Routes

Now we need to create routes for the items listing. so now open our "routes/web.php" file and we need to add following route.
routes/web.php

Route::get('demo-generate-pdf','HomeController@demoGeneratePDF');


Create Controller

Here,we need to create a new controllerHomeController (mostly it will be there, we can skip this step if we don't need to create a controller) that will manage our pdf generation using the generatePDF() method of route.
app/Http/Controllers/HomeController.php

<?php
namespace App\Http\Controllers;
use Illuminate\Http\Request;
use PDF;

class HomeController extends Controller
{
public function demoGeneratePDF()
{
$data = ['title' => 'Welcome to My Blog'];
$pdf = PDF::loadView('myPDF', $data);

return $pdf->download('demo.pdf');
}
}


Create Blade File

In the final step, let us create demoPDF.blade.php in the resources/views/demoPDF.blade.php for structure of pdf file and add the following code:
resources/views/demoPDF.blade.php

<!DOCTYPE html>
<html>
<head>
<title>Hi</title>
</head>
<body>
<h1>Welcome to My BLOG - {{ $title }}</h1>
<p>Lorem ipsum dolor sit amet, consectetur adipisicing elit, sed do eiusmod
tempor incididunt ut labore et dolore magna aliqua. Ut enim ad minim veniam,
quis nostrud exercitation ullamco laboris nisi ut aliquip ex ea commodo
consequat. Duis aute irure dolor in reprehenderit in voluptate velit esse
cillum dolore eu fugiat nulla pariatur. Excepteur sint occaecat cupidatat non
proident, sunt in culpa qui officia deserunt mollit anim id est laborum.</p>
</body>
</html>


Now run the below command for serve and test it:

php artisan serve

20271 views · 7 years ago
Creating a Tiny Blog Management system in Laravel 5.7

Hey There,
I am expecting you are familiar with PHP. In this post I will be using the Laravel framework to create a small blog system. I am showing here very simple steps to create blogs, If you want this complete code then please message me.
What are major Prequisites for Laravel:
* PHP version >= 5.6
* Composer should be installed in system

Create a project with name tiny_blog with following command

composer create-project laravel/laravel --prefer-dist tiny_blog


enter into the laravel project

cd tiny_blog


create a migration file using following artisan command
<pre>php artisan make:migration create_blog_table</pre>
After this command you will found a new file created in database/migrations folder in your project, Just edit the file having 'create_blog_table' appended in its name

Now replace following code to create table schema with function up(), So now the method will look like following:

public function up()
{
Schema::create('blogs', function (Blueprint $table) {
$table->increments('id');
$table->integer('user_id');
$table->string('category');
$table->string('title');
$table->text('description');
$table->timestamps();
});

}


replace following snippet with down method, it will look like following:

public function down()
{
Schema::dropIfExists('blogs');
}


Its time to run the migration file we have created

php artisan migrate


After running,It will create the blogs table in database.Now time to create form and insert data into the table

Laravel itsef provide authentication , use following artisan command :

php artisan make:auth


Now start Larvel:

php artisan serve


it will start the laravel development server at http://127.0.0.1:8000


Now if you run that url the basic default ui will be created and login & register link you can see in Top right position of header

You can register and login now.this feature is provided by authentication module.
Now we need to create a controller for manage blogs with following command:

php artisan make:controller BlogController


will create a file namedBlogController.php in** app/HTTP/controllers** folder location

Now we need to create a Model also, use following command

php artisan make:model Blog


will create a file namedBlog.php in app folder location

Now in Controller we need to create a method for create blogs and available that method in Routes to access it via url. Just editroutes/web.php file and add the following line

Route::get('blog/create','BlogController@createBlog');

/create/blog/ will be url route that land on Blog Controller's createBlog method using get method.

Now before running this route just go to the app/Http/Controllers folder and Edit BlogController.php file and Add the createBlog method in that class as following

public function createBlog()
{
return view('blog.create');
}


This code will try to load the view from/resources/views/blog/create.blade.php

In Laravel blade is a template engine. As we had not created the view file yet, so we need to create a blog folder inside/resources/views/ folder then inside blog folder create a file create.blade.php with following form

@extends('layouts.app')

@section('content')
<div class="container">
@if ($errors->any())
<div class="alert alert-danger">
<ul>
@foreach ($errors->all() as $error)
<li>{{ $error }}</li>
@endforeach
</ul>
</div><br />
@endif
<div class="row">
<form method="post" action="{{url('blog/create')}}">
<div class="form-group">
<input type="hidden" value="{{csrf_token()}}" name="_token" />
<label for="title">Title:</label>
<input type="text" class="form-control" name="title"/>
</div>
<div class="form-group">
<label for="title">Category/Tags:</label>
<input type="text" class="form-control" name="category"/>
</div>
<div class="form-group">
<label for="description">Description:</label>
<textarea cols="10" rows="10" class="form-control" name="description"></textarea>
</div>
<button type="submit" class="btn btn-primary">Submit</button>
</form>
</div>
</div>
@endsection


Now we need to add a additional route to handle the post request on blog/create route, Just edit routes/web.php file and just add following line in last:

Route::post('blog/create','BlogController@saveBlog'); 


post route to handle the form post on route blog/create


Now create a method name saveBlog to save the user input data in the form
 public function saveBlog(Request $request)
{
$blog = new Blog();

$this->validate($request, [
'title'=>'required',
'category'=>'required',
'description'=> 'required'
]);

$blog->createBlog($request->all());
return redirect('blog/index')->with('success', 'New blog has been created successfully :)'); }


Notice This method is using Blog object that we don't know that where it comes from? , So to make above code working we need to include the model which we created earlier need to include in our controller file So use following code to include it before the class created.

use App\Blog;


Now following line shows that there is a method named createBlog in Model(app/Blog.php), but in actual it is not there:

$blog->createBlog($data);


So go to the file app/Blog.php and Edit it and inside the class add following method:

 public function createBlog($data)
{

$this->user_id = auth()->user()->id;
$this->title = $data['title'];
$this->description = $data['description'];
$this->category = $data['category'];
$this->save();
return 1;
}


Now the creation of blog task has been done , Its time to show the created Entries So just create a route blog/index in routes/web.php

Route::get('blog/index','BlogController@showAllBlogs');


get route blog/index to show all the created blogs by current user


Now just add a method in controller
public function showAllBlogs()
{
$blogs = Blog::where('user_id', auth()->user()->id)->get();

return view('blog.index',compact('blogs'));
}


This method requires to create a index view in blog folder , So create a file named index.blade.php in /resources/views/blog/ folder with following code

@extends('layouts.app')

@section('content')
<div class="container">
@if(\Session::has('success'))
<div class="alert alert-success">
{{\Session::get('success')}}
</div>
@endif
<a type="button" href="{{url('blog/create')}}" class="btn btn-primary">Add New Blog</a>
<br>
<table class="table table-striped">
<thead>
<tr>
<td>ID</td>
<td>Title</td>
<td>Category</td>
<td>Description</td>
<td colspan="2">Action</td>
</tr>
</thead>
<tbody>
@foreach($blogs as $blog)
<tr>
<td>{{$blog->id}}</td>
<td>{{$blog->title}}</td>
<td>{{$blog->category}}</td>
<td>{{$blog->description}}</td>
<td>Edit</td>
<td>Delete</td>
</tr>
@endforeach
</tbody>
</table>
<div>
@endsection


Now all code is ready but we need to add 1 line of code to prevent the blog controller without authentication or without login

just add the following constructor method in BlogController class

 public function __construct()
{
$this->middleware('auth');
}


this constructor method will call very first when user will try to access any of BlogController class method, and the middleware will check whether user is logged in then only it will allow to access that method otherwise it will redirect to login page automatically.


After It Run your Code and you will able to create and listing your created blogs/articles. but the Edit and Delete links are not working right now, If you want that also working then please comment here or message me. If we get multiple requests then definitely i will write its part 2 article


Thanks very much for reading this blog, if you have any doubt about it then let me know in comments or by messaging me.

Following is the final code for BlogController.php

<?php

namespace App\Http\Controllers;

use Illuminate\Http\Request;
use App\Blog;


class BlogController extends Controller
{
public function __construct()
{
$this->middleware('auth');
}

public function createBlog()
{
return view('blog/create');
}


public function saveBlog(Request $request)
{
$blog = new Blog();

$this->validate($request, [
'title'=>'required',
'category'=>'required',
'description'=> 'required'
]);

$blog->createBlog($request->all());
return redirect('blog/index')->with('success', 'New blog has been created successfully :)');
}

public function showAllBlogs()
{
$blogs = Blog::where('user_id', auth()->user()->id)->get();

return view('blog.index',compact('blogs'));
}

}
18578 views · 7 years ago
Why Cloudways is the Perfect Managed Hosting for PHP Applications

The following is a sponsored blogpost by Cloudways


Developing an application is not the sole thing you should bank on. You must strive to find the best hosting solution to deploy that application also. The application’s speed is dependent on the hosting provider, that is why I always advise you to go for the best hosting solution to get the ultimate app performance.

Now a days, it is a big challenge to choose any web hosting, as each hosting has its own pros and cons which you must know, before considering it finally for the deployment. I don’t recommend shared hosting for PHP/Laravel based applications, because you always get lot of server hassles like downtime, hacking, 500 errors, lousy support and other problems that are part and parcel of shared hosting.

For PHP applications, you must focus on more technical aspects like caching, configs, databases, etc. because these are essential performance points for any vanilla or framework-based PHP application. Additionally, if the app focuses on user engagement (for instance, ecommerce store), the hosting solution should be robust enough to handle spikes in traffic.

Here, I would like to introduce Cloudways PHP server hosting to you which provides easy, developer and designer friendly managed hosting platform. With Cloudways, you don't need to focus on PHP hosting, but must focus on building your application. You can easily launch cloud servers on five providers including DigitalOcean, Linode, Vultr, AWS and GCE.


Cloudways ThunderStack


Being a developer, you must be familiar with the concept of stack - an arrangement of technologies that form the underlying hosting solution.

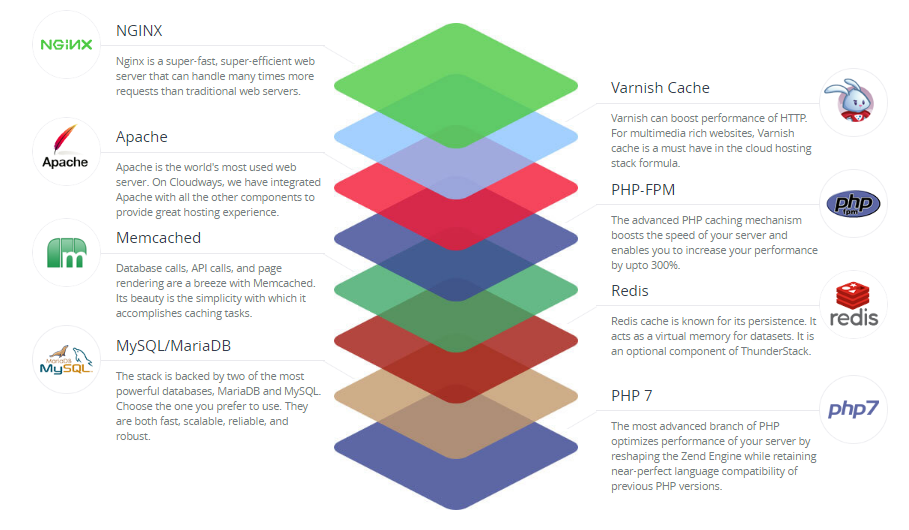
To provide a blazing fast speed and a glitch-free performance, Cloudways has built a PHP stack, known as ThunderStack. This stack consists of technologies that offer maximum uptime and page load speed to all PHP applications. Check out the following visual representation of ThunderStack and the constituent technologies:


alt_text


As you can see, ThunderStack comprises of a mix of static and dynamic caches with two web servers, Nginx and Apache. This combination ensures the ultimate experience for the users and visitors of your application.


Frameworks and CMS


The strength and popularity of PHP lies in the variety of frameworks and CMS it offers to the developers. Realizing this diversity, Cloudways offers a hassle-free installation of major PHP frameworks including Symfony, Laravel, CakePHP, Zend, and Codeigniter. Similarly, popular CMS such as WordPress, Bolt, Craft, October, Couch, and Coaster CMS - you can install these with the 1-click option. The best part is that if you have a framework or CMS that is not on the list, you can easily install it through Composer.


1-Click PHP Server & Application Installation


Setting up a stack on an unmanaged VPS could take an entire day!

When you opt for Cloudways managed cloud hosting, the entire process of setting up the server, installation of core PHP files and then the setup of the required framework is over in a matter of minutes.

Just sign up at Cloudways, choose your desired cloud provider, and select the PHP stack application.


alt_text


As you can see, your LAMP stack is ready for business in minutes.

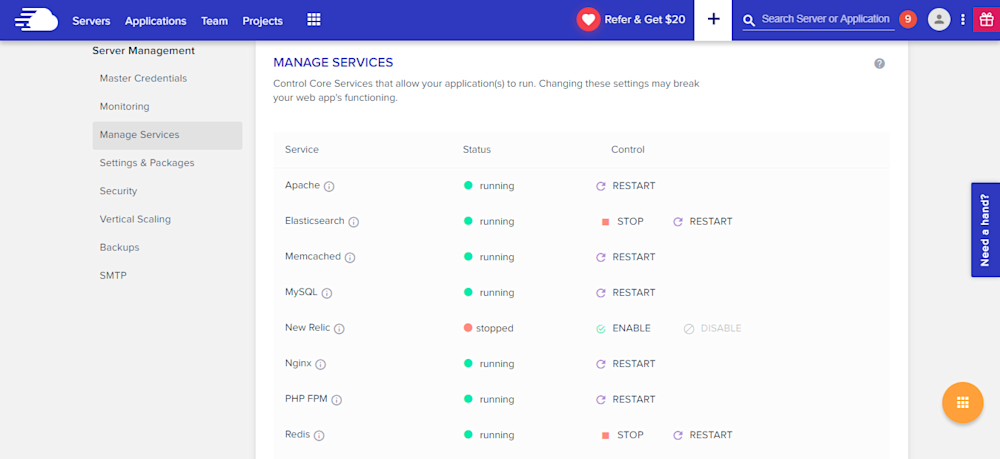
Many PHP applications fail because essential services are either turned off or not set up properly. Cloudways offers a centralized location where you can view and set the status of all essential services such as:


* Apache
* Elasticsearch
* Memcached
* MySQL
* PHP-FPM
* Nginx
* New Relic
* Redis
* Varnish


alt_text


Similarly, you can manage SMTP add-ons without any fuss.


Staging Environment


With Cloudways, you can test your web applications for possible bugs and errors before taking it live.

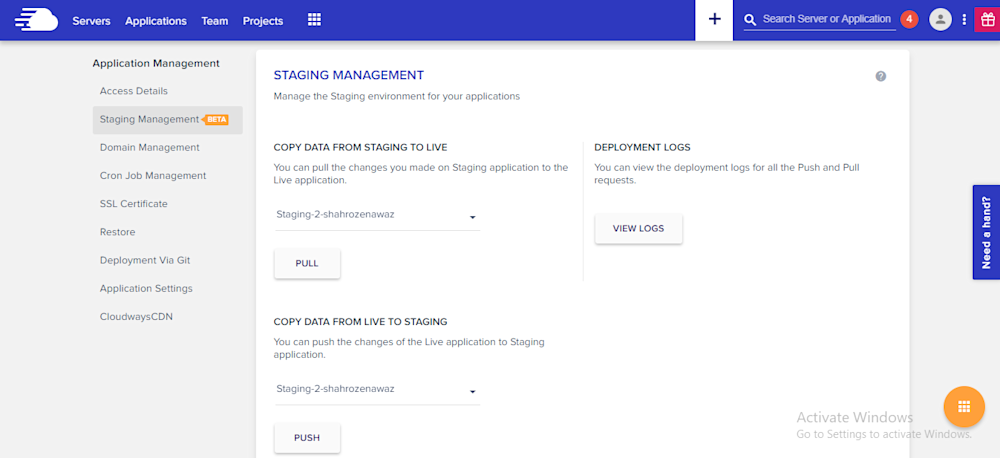
Using the staging feature, developers can first deploy their web sites on test domains where they can analyze the applications performance and potential problems. This helps site administrators to fix those issues timely and view the application performance in real-time.

A default sub domain comes pre-installed with the newly launched application, making it easy for the administrators to test the applications on those testing subdomains. Overall, it's a great feature which helps developers know about the possible errors that may arise during the live deployment.

alt_text

Pre-Installed Composer & Git


PHP development requires working with external libraries and packages. Suppose you are working with Laravel and you need to install an external package. Since Composer has become the standard way of installing packages, it comes preinstalled on the Cloudways platform. Just launch the application and start using Composer in your project.

Similarly, if you are familiar with Git and maintain your project on GitHub or BitBucket, you don’t need to worry about Git installation. Git also comes pre-configured on Cloudways. You can start running commands right after application launch.


Cloudways MySQL Manager


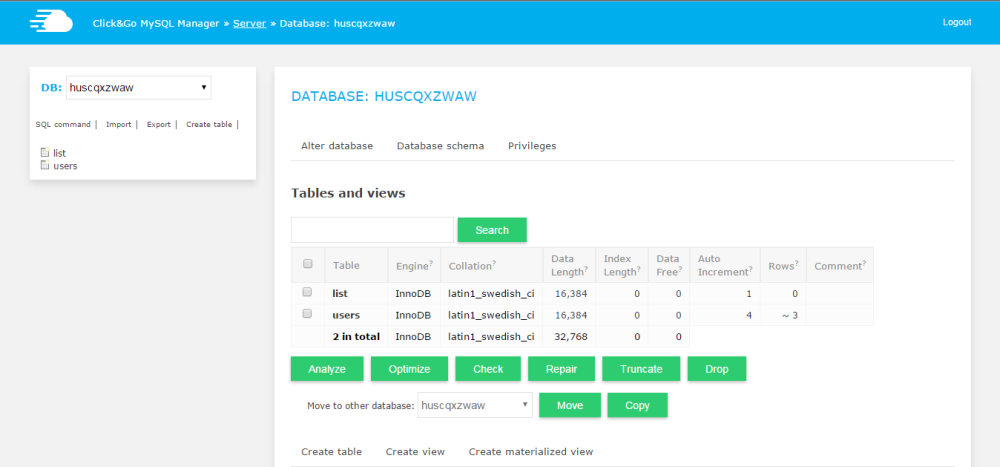
When you work with databases in PHP, you need a database manager. On the Cloudways platform, you will get a custom-built MySQL manager, in which you can perform all the tasks of a typical DB manager.

alt_text


However, if you wish to install and use another database manager like PHPMyAdmin, you can install it by following this simple guide on installing PHPMyadmin.


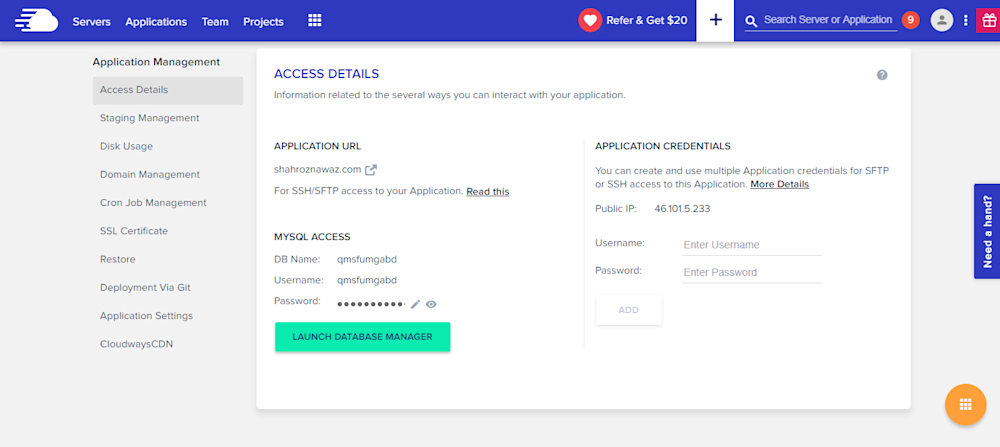
Server & Application Level SSH


If you use Linux, you typically use SSH for accessing the server(s) and individual applications. A third-party developer requires application and server level access as per the requirements of the client. Cloudways offers SSH access to fit the requirements of the client and users.

alt_text


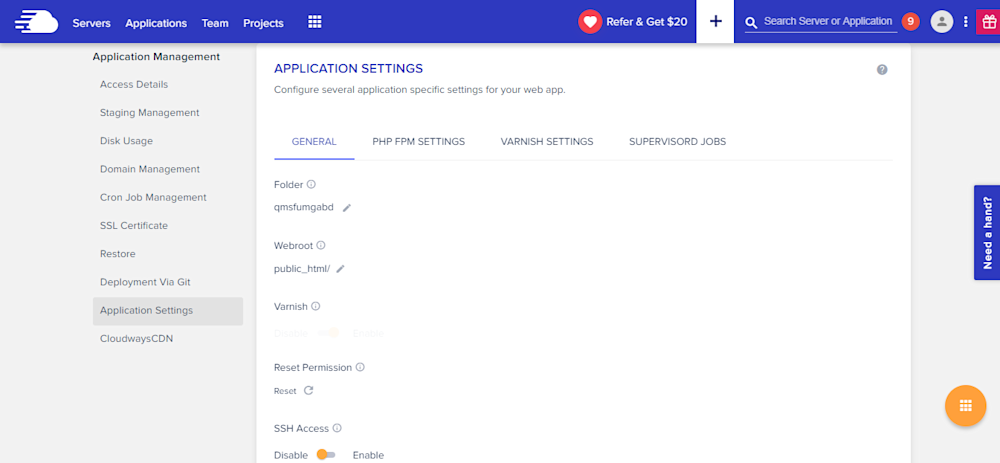
PHP-FPM, Varnish & Cron Settings


Cloudways provides custom UI panel to set and maintain PHP-FPM and Varnish settings. Although the default configuration is already in place, you can easily change all the settings to suit your own, particular development related requirements. In Varnish settings, you can define URL that you want to exclude from caching. You can also set permissions in this panel.

alt_text


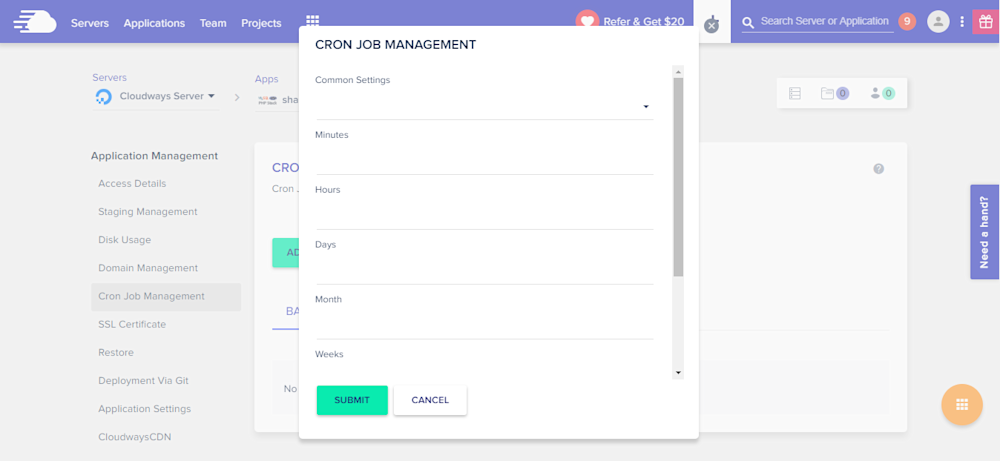
Cron job is a very commonly used component of PHP application development process. On Cloudways platform, you can easily set up Cron jobs in just a few clicks. Just declare the PHP script URL and the time when the script will run.

alt_text


Cloudways API & Personal Assistant Bot


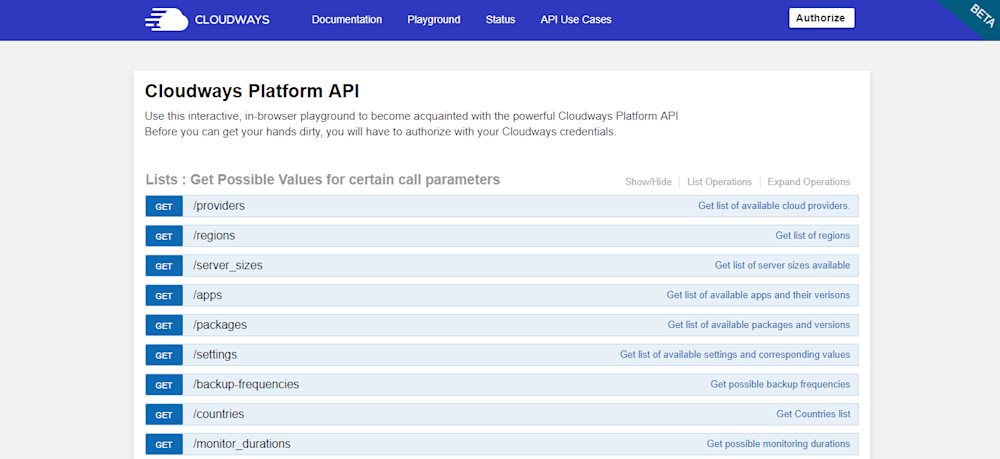
Cloudways provides an internal API that offers all important aspects of the server and application management. Through Cloudways API, you can easily develop, integrate, automate, and manage your servers and web apps on Cloudways Platform using the RESTful API. Check out some of the use cases developed using Cloudways API. You just need your API key and email for authentication of the HTTP calls on API Playground and custom applications.

alt_text


Cloudways employs a smart assistant named CloudwaysBot to notify all users about server and application level issues. CloudwaysBot sends the notifications on pre-approved channels including email, Slack and popular task management tools such as Asana and Trello.


Run Your APIs on PHP Stack


Do you have your own API which you want to run on the PHP stack? No problem, because you can do that, too with Cloudways! You can also use REST API like Slim, Silex, Lumen, and others. You can use APIs to speed up performance and require fast servers with lots of resources. So, if you think that your API response time is getting slower due to the large number of requests, you can easily scale your server(s) with a click to address the situation.


Team Collaboration


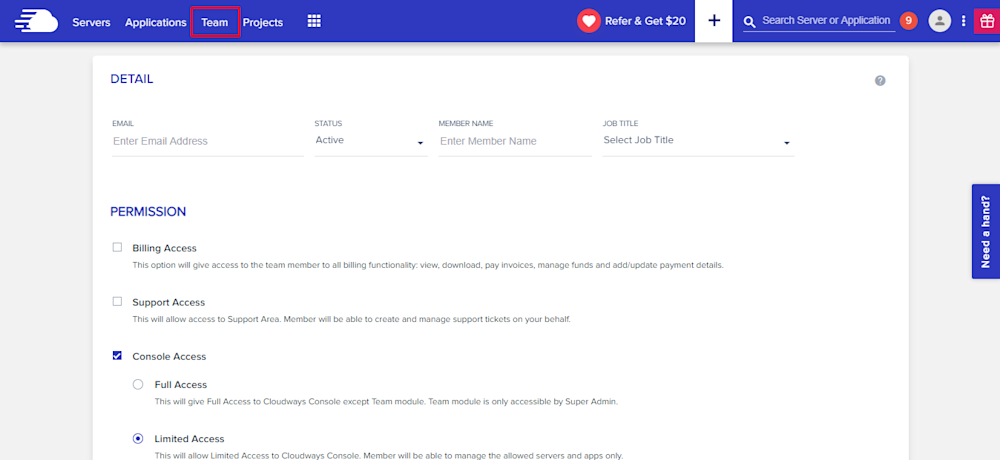
When you work on a large number of applications with multiple developers, you need to assign them on any specific application. Cloudways provides an awesome feature of team collaboration through which you can assign developers to specific application and give access to them. You can use this tool to assign one developer to multiple applications. Through team feature, you can connect the team together and work on single platform. Access can be of different type; i.e. billing, support and console. You can either give the full access or a limited one by selecting the features in Team tab.

alt_text


Final Words


Managed cloud hosting ensures that you are not bothered by any hosting or server related issues. For practical purposes, this means that developers can concentrate on writing awesome code without worrying about underlying infrastructure and hosting related issues. Do sign up and check out Cloudways for the best and the most cost-effective cloud hosting solution for your next PHP project!

SPONSORS

The Ultimate Managed Hosting Platform