PHP & Web Development Blogs

Search Results For: security
Showing 6 to 10 of 15 blog articles.
4823 views · 4 years ago


People that visit your website face an invisible threat each time they log on. Small businesses are especially vulnerable to digital data breaches, and that can change the way your customers feel about you. But, although you cannot stop hackers from trying, there are things you can do as a business owner to make your website a safer experience for everyone. Keep reading for tips.

Mature digitally.


You may be ahead of the times when it comes to products and services, but, chances are, your website hasn't fully kept up. It's time to learn all you can about the internet and digital security. If you are already somewhat tech savvy, a PHP Security Course from Nomad PHP can help you better understand everything from cryptography to website error messages.

Adapting to today's digital environment means transforming your website to quickly and easily identify threats via machine learning and network monitoring. And, as Upwork explains, digital maturity not only keeps your website safe, but adopting this mindset can also increase your efficiency and accuracy by reducing human errors.

Understand the threats.


It is not enough to simply keep up with your website, you also have to understand the types of threats that are out there. You're likely familiar with ransomware and phishing, but, it's also a good idea to know how a website can get hacked. Your site's content management system and vulnerabilities within your operating system are all weak points that hackers can easily identify.

Insist on security measures.


When customers log into your website, they input their credentials. Each time they do so, you can best protect their information by keeping your systems up to date. You'll also want to ensure that your site is hosted on a secure service and that you have an SSL certificate installed.

If you are not already, have your IT department or managed IT services perform regular website security checks. PhoenixNAP, an IT services provider, notes that those websites working via WordPress should also be safely outfitted with the most recent security plug-ins.

Eliminate spam.


If your website allows for comments that are not manually approved, anyone on the internet can post. This leaves it open for hackers and other unscrupulous individuals to comment with spam and malicious links that your customers may inadvertently click on. While many of these simply exist as a way for the commenter to drive traffic to another website, others are designed to draw your readers' attention, gain their trust, and access their personal information.

Prioritize passwords.


Your customers' passwords are the keys by which they open the door to your website. Unfortunately, many people do not treat them with as much care as they do the keys they use in the non-digital world.

It's true, passwords can be a pain, but you are not doing yourself or your customers any favors by allowing simple one-word passcodes to access your site. Instead, design your site to require a strong password. How-To Geek asserts that this will have a minimum of 12 characters and include a combination of upper and lower case letters, symbols, and numbers.

While you will likely rely on your IT experts to secure your website, the truth is that it is ultimately up to you to ensure this is done. So even if you are not a digital mastermind, knowing all you can about web security can help you be a better business owner. Your customers will be safer, and a secure website is just one way to strengthen your business's online presence and keep up with today's -- and tomorrow's -- technology.
8830 views · 4 years ago


Welcome back! If you're new to this series have a look at Part 1 here

Today we are going to beef things up a bit and we will focus on the backend and some key CMS functionality.

It's time to get excited, this is where you'll start to see your barebones structure morph into something extraordinary!

Tired of my intro? That's ok! Let's jump into it!

Getting the DB on board


Before we delve into this, it's imperative that we take a minute and plan things out.

The database tables that are vital to any CMS are the menu, the user table, and the content table.

Our menu table will start of as follows:

CREATE TABLE 'mydbname'.'menus' ( 'ID' INT(11) NOT NULL AUTO_INCREMENT , 'menuname' VARCHAR(100) NOT NULL , 'item' VARCHAR(50) NOT NULL , 'itemlink' VARCHAR(100) NOT NULL , PRIMARY KEY ('ID')) ENGINE = MyISAM COMMENT = 'menu table';


Let's break this down a bit.

In the SQL above, we're creating a new table called menus.

Essentially our structure looks like this:

ID | Menuname | Item | Itemlink

Our ID field is our unique identifier (our PRIMARY KEY).

Tip: Remember, you can use raw SQL or a tool like PhpMyAdmin to create your db tables/execute SQL queries.

Next up is our user table.

CREATE TABLE 'mydbname'.'users' ( 'ID' INT(11) NOT NULL AUTO_INCREMENT , 'username' VARCHAR(100) NOT NULL , 'password' VARCHAR(50) NOT NULL , 'email' VARCHAR(100) NOT NULL , PRIMARY KEY ('ID')) ENGINE = MyISAM COMMENT = 'user table';


Visually represented this structure looks like this:

ID | Username | Password | Email

Our ID field is our unique identifier.

And finally, our content table modifications. You probably remember creating a rudimentary content table in Part 1 of the series.

ALTER TABLE 'mydbname'.'content' ADD content_type VARCHAR(50);


Yep, you guessed right, in the above statement we are altering our content table and adding a new field called content type.

Our new table structure now looks like this:

ID | Title | Content | Author | Content Type

Planning to Add to the Backend


Next , we're going to add a menu section, an add user section, and we'll also modify our content section.

Let's do this! reate a file called menus.php in your backend folder.

Next, code a HTML form to save your menu data.

The form needs the following fields:

Menu Name (we called this menuname in our db table).

Menu Item Name (we called this item in our db table).

Menu Link (we called this itemlink in our db table).

Try to follow Part 1 to do this on your own.

If you get a little stuck, that's ok. You can also follow the example below:

<form method="post" action="<?php $_SERVER['PHP_SELF'];?>"/>

<input type="text" name="menuname" class="mytextbox" placeholder="Menu Name" required />

<input type="text" name="item" class="mytextbox" placeholder="Item" required />

<input type="text" name="itemlink" class="mytextbox" placeholder="Item Link" required />

<input type="submit" value="Save Menu Item" name="savemenu" class="mybutton"/>

</form>


Notice the use of CSS classes? The gravy!

This will come in handy in our next tutorial.

Next, let's add the form processing code as we need to save these fields to the database. Remember to use the sanitization technique you learned in Part 2.

Add this above your <form> tag.

<?php

if(isset($_POST['savemenu'])){

include('../includes/conn.php');

if ($letsconnect->connect_error) {

die("Your Connection failed: " . $letsconnect->connect_error);

}else{

$menuname = $letsconnect ->real_escape_string($_POST['menuname']);

$item = $letsconnect -> real_escape_string($_POST['item']);

$itemlink = $letsconnect->real_escape_string($_POST['itemlink']);

$sql = "INSERT INTO menus(menuname,item,itemlink) VALUES ('".$menuname."', '".$item."', '".$itemlink."')";

if (mysqli_query($letsconnect, $sql)) {

echo "Your data was saved successfully!";

} else { echo "Error: " . $sql . "" . mysqli_error($letsconnect);

} $letsconnect->close();

}

}

?>


Ok phew, the menu data capturing section is done.

Let's move on to the user data capturing section, and modify the content capturing screen.

Repeat the steps above and create these two screens. Remember to keep an eye out for our database field names that we defined earlier! If you get stuck, look at the end result below:

Create adduser.php in your backend folder.

Create your data capturing form.


<form method="post" action="<?php $_SERVER['PHP_SELF'];?>"/>

<input type="text" name="username" class="mytextbox" placeholder="Username" required/>

<input type="password" name="password" class="mytextbox" placeholder="Password" required />

<input type="email" name="email" class="mytextbox" placeholder="Email" required />

<input type="submit" value="Save Menu Item" name="saveuser" class="mybutton"/>

</form>


Add your PHP processing code, remember the security!

Add this above your <form> tag.

<?php

if(isset($_POST[‘saveuser])){

include('../includes/conn.php');

if ($letsconnect->connect_error) {

die("Your Connection failed: " . $letsconnect->connect_error);

}else{

$menuname = $letsconnect -> real_escape_string($_POST[‘username']);

$item = $letsconnect -> real_escape_string($_POST[‘password']);

$itemlink = $letsconnect -> real_escape_string($_POST[‘email']);

$sql = "INSERT INTO menus(username,password,email) VALUES ('".$username."', '".$password."', '".$email."')";

if (mysqli_query($letsconnect, $sql)) {

echo "Your data was saved successfully!";

} else { echo "Error: " . $sql . "" . mysqli_error($letsconnect);

} $letsconnect->close();

}

}

?>


Please note that I will be covering Password security in the tutorials that follow.

Make sure that you are using your localhost server to complete this tutorial series. Do not publish your work until you complete this series.

Lastly, let's move to our content capturing screen which is currently found in index.php in the backend folder.

We will be changing this to a more professional dashboard in the tutorials that follow!
Our current file looks like this:


<html>

<head><title>Backend - Capture Content</title></head>

<body>

<?php

if(isset($_POST['savedata'])){

include('../includes/conn.php');

if ($letsconnect->connect_error) {

die("Your Connection failed: " . $letsconnect->connect_error);

}else{

$title = $letsconnect -> real_escape_string($_POST['title']);

$content = $letsconnect -> real_escape_string($_POST['content']);

$author = $letsconnect -> real_escape_string($_POST['author']);

$sql = "INSERT INTO content (title,content,author) VALUES ('".$title."', '".$content."', '".$author."')";

if (mysqli_query($letsconnect, $sql)) {

echo "Your data was saved successfully!";

} else { echo "Error: " . $sql . "" . mysqli_error($letsconnect);

} $letsconnect->close();

}

}

?>

<form action="<?php $_SERVER[‘PHP_SELF'];?>" method="post">

<input type="text" name="title" placeholder="Content Title here" required/>

<textarea name="content">Content Here</textarea>

<input type="text" name="author" placeholder="Author" required/>

<input type="submit" value="Save My Data" name="savedata"/>

</form>

</body>

</html>


We need to modify this slightly to include our new field, content_type.

Add the input field in your <form> above the submit button.


<input type="text" name="content_type" placeholder="Content Type" required/>;


Next, add the content_type to the sanitization lineup.

$content_type = $letsconnect->real_escape_string($_POST['content_type']);


Lastly, store this variable to the database by modifying the $sql.

$sql = "INSERT INTO content (title,content,author,content_type) VALUES ('".$title."', '".$content."', '".$author."', '".$content_type."')";


Conclusion


Chopping and changing is not always as daunting. Find a rhythm. There are many ways to make cumbersome coding a breeze and we will delve into that in the tutorials to come.

Challenge


Think of ways to test what we just did through retrieving and echoing data from the database.

Next Up: #CodeWithMe Part 5 Building a good base Continued

7463 views · 4 years ago
Ideas to help your PHP dev team grow their skills

Your biggest asset is also your biggest risk... your developers

Your business thrives because of the incredible work and innovation of your developers. With simple keystrokes your developers can completely transform your business, add new features, and drive new sales.

But those same keystrokes can take down production, create security back doors, and put your business at risk. That's why it's more important than ever for your team members to be up to speed with the latest technology, especially around performance and security.

Of course, some things are easier said than done - after all everyone is super busy these days. So how can you help keep your team members learning, and putting your business first in the process?

Conference Parties


There's nothing better than attending a PHP or programming conference in person - the chance to meet speakers face to face, to network, the knowledge, and the hallway track. However, many companies aren't able to afford multiple (or even one) conference for their developers - especially ones that require airfare and hotel.

However, that doesn't mean you shouldn't still participate in these conferences. The good news is that roughly once a quarter Nomad PHP streams talks from a conference right to your computer. This means that your team members can all participate in a multi-day conference from the comfort of your office (or their home) - and you can provide this for your team for less than the cost of a single conference ticket!

Make the conference party even more special by providing lunch during the lunch break, bringing in party gifts, having give-aways during the conference, and planning activities during longer breaks for your team.

Since many conferences take place on Friday, not only are you providing invaluable training and an incredible work benefit, but ending the week on a super positive note that your team members will appreciate (and your risk assessment teams will greatly appreciate as new security practices and compliance practices are put into place).

Monthly Lunch and Learns


Every month Nomad PHP offers live virtual talks by the industry's top experts. With talks at 11am Pacific, and 6pm Pacific it's a perfect time to grab a conference room and order a couple pizzas for lunch (or if Eastern, grab some snacks and maybe a beer) and play the monthly meeting on the large screen.

Your team members will have the opportunity to take notes, discuss with each other, and perhaps most importantly ask the speaker real-world questions that directly impact your business, providing tangible solutions to the problems they are facing.

And since every Nomad PHP Pro meeting is recorded, your team members can refer back to the video at any time, watching sections relevant to them or digging in for more information.

Developer Book Club


Encourage your team members to share what they're learning with others, and help build each other up. Not only are you helping grow skills and ensure your team is following the latest best practices, but you're also fostering a mentor-mentality within your team - where each team member feels invested in the growth of other members.

With Nomad PHP you receive a new issue of [php[architect]](/books) each month and have several additional books available to read on demand - providing the latest updates and an invaluable resource to help your book club get started.

Developer Movie Nights


Sometimes we all just want to get away, grab some popcorn, and watch a movie. Similar to lunch and learns, give your developers a night or two where they can get together and watch one of the 250+ training videos available on Nomad PHP. You can even make it a movie marathon!

Whether it's pizza, popcorn, sodas, beers - your team members will have the chance to kick back, relax a bit, build team camaraderie, and learn valuable skills to help your business succeed. Essentially, turning a training day into a fun team-bonding activity.

Learning Path Challenges


Every company has challenges, and areas they need their team members to master. Whether it's DevOps and containerization, security, performance, management, modernization, or soft skills - work with your team to determine what skills will help them succeed and work with your team members to put together video learning paths.

Your team members can watch through these videos on-demand, go back and replay to refresh their knowledge, and work their way towards mastery in the subjects that will help your company succeed.

Certification


Show that you are invested in your developers by helping them earn Professional Certification. These certifications demonstrate that your team members have a fundamental grasp of the technology they are working with and understand when and how to use this technology.

With free certification exams included with Nomad PHP - you no longer have to worry about failed exams or expensive test credits. Your team members can take the exams at their own pace, discover the areas they need to improve, and take the exam again when they are ready. After all, shouldn't the goal of certification be to help your developers learn these skills and prove their expertise?

You can go even further with certifications by having a special company award, framing their certificate, or calling out newly certified developers at team meetings or all-hands.

Learning Incentives/ Rewards


Of course there are even more ways you can help your developers learn new skills, grow their careers, and build loyalty within your company. With Nomad PHP there are numerous ways for your team members to grow their skills, and numerous ways you can reward/ incentivize them - from rewards for the most active learner, to setting goals for learning new skills, to obtaining certifications, to attending streams, to watching videos on-demand. All of these are included with our Professional Nomad PHP Team subscriptions.

Want to learn more about getting a Nomad Team Subscription for your developers? Give us a call (844) CODE-PHP

Have more ideas on how to help your developers grow their skills or help employers make education more accessible? Please leave your ideas in the comments below!
10564 views · 4 years ago


Welcome back!, if you’re new please be sure to read Part 1 here.


This tutorial will focus primarily on Security and will touch on how to plan functionality.

Planning out an application and seeing progress regularly is a good strategy as you are most likely to complete your tasks in a timely fashion with this approach.

Ready?, ok let’s jump into it!

DISCLAIMER


We highly recommend that you follow these tutorials on a localhost testing server like Uniserver. Read through Part 1 here to look at our recommendations. These tutorials follow a phased approach and it is highly recommended that you do not make snippets of code live prior to completing this tutorial series.
Where we left off – the serious stuff.


In the previous tutorial we saved variables to the database.

It’s important to note that further steps are needed to ensure that data transactions to / from the database are secure.

A great first step is to ensure that all POST data (data transmitted after a user clicks a form’s submit button) is sanitized.

What we’re trying to prevent


One of the most common exploits is SQL Injection, an attack most commonly used to insert SQL into db queries. POST data that’s not sanitized leaves a huge security hole for malicious exploits. In some cases SQL injection can be leveraged to rage an all out assault on a server’s operating system.

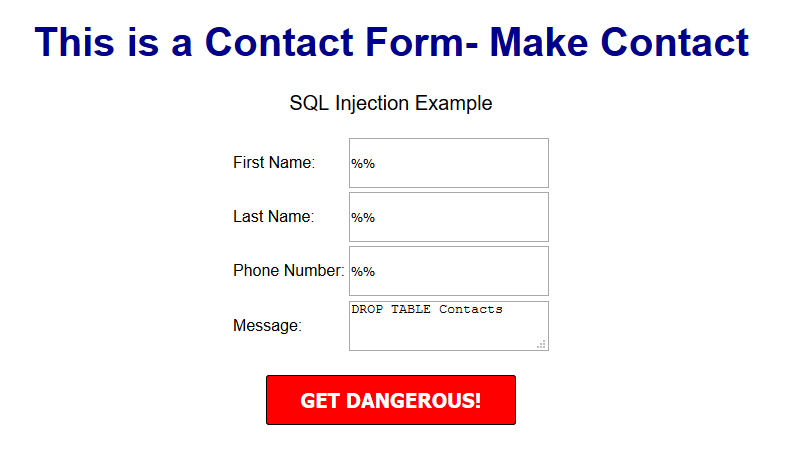
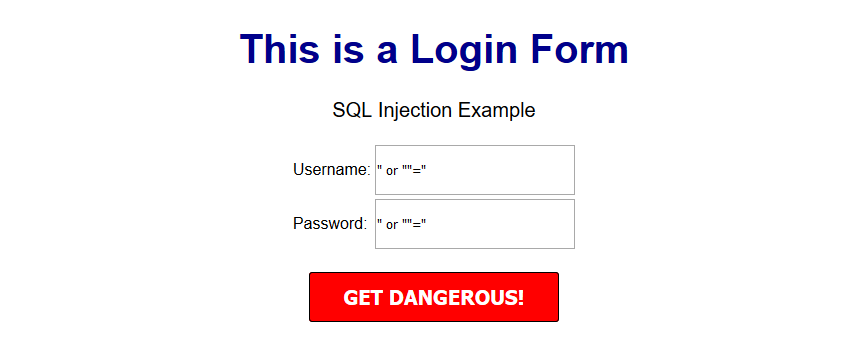
A few examples of a basic version of what this might look like can be seen below.


OUTCOME


This might delete your database table


OUTCOME


This might provide access to the entire user table and the password protected area/dashboard.


***Please note that there are various types of SQL injection techniques and I will delve into this during the course of this series.***


So what exactly is sanitization and what does it do?


When sanitizing POST data, we are essentially looking for any special characters that are often used in SQL injection attacks.

In many ways, this tiny piece of code is the unsung superhero of many database driven applications.

Let’s secure that POST data!


Navigate to your backend folder and open index.php

Locate the following line of code:

$sql = "INSERT INTO content(title,content,author)VALUES ('".$_POST["title"]."', '".$_POST["content"]."', '".$_POST["author"]."')";


Ok, let’s get to work.

Based on what I mentioned a few moments ago, it’s clear that our SQL statement is vulnerable so we need to sanitize the POST data pronto!

The method I will focus on first is $mysqli->real_escape_string. This will escape any special characters found in the POST data.

Add the following just above your $sql.

$title = $letsconnect -> real_escape_string($_POST['title']);

$content = $letsconnect -> real_escape_string($_POST['content']);

$author = $letsconnect -> real_escape_string($_POST['author']);


Did you notice the use of $letsconnect? This was used because of our db connection defined in conn.php.

Our new query will look like this:

$sql = "INSERT INTO content (title,content,author) VALUES ('".$title."', '".$content."', '".$author."')";


Go ahead and replace the old $sql.

Phew!, we can breathe easy now.

Next, let’s lighten things up a bit by focusing on functionality and aesthetics.


A phased approach is the best way to tackle projects of any size.

I tend to jot this down on paper before creating a more legible professional spec!.

Typically the phased approach lends itself to logical progression.

For example, over the next several days I will go over the following:

* Account Access
* The login process
* The registration process
* The password recovery process
* Frontend
* The look and feel
* Menus
* Sidebars
*Main Content
*Footer
* Backend
* Content Management
* Add/Edit/Delete
* Security

This will give us a good springboard to delve into more complex functionality.

The aesthetic I have in mind will be barebones at first with clean CSS practices (this will make life a whole lot easier when we have to make changes down the line!).

Challenge :


Plan out your own CMS, think about the user interface and design choices you’d like to implement, and create a phased approach.

Conclusion


I hope this tutorial encouraged you to think about security and understand one of the most common exploits. During the course of this series, you will receive the tools necessary to beef up security while maintaining your sanity!

Next up


CodeWithMe – Let’s go templating.
12221 views · 4 years ago


It took me quite some time to settle on my first blog post in this series and I found myself thinking about the most requested functionality in my career – The good ‘ol Custom CMS – typically geared towards clients that want a straight forward, secure solution that can be expanded upon in a modular format and that’s their IP.

This will be our starting point. A blank slate to build something epic with clean code and even cleaner design. And in the spirit of building from scratch, I will refrain from using classes or a framework. The main reasoning behind this is to truly get everyone acquainted with and excited about PHP development.

Join me as I transform rudimentary code into something extraordinary that can be morphed into just about any Content, PHP, and MySQL driven project. So without further ado, let’s jump into it!

The bare necessities


If you’re just getting started with development, there’s a nifty bite sized server called UniformServer that will be your best friend throughout your coding career. PHPMyAdmin (an awesome visual db management tool) comes built in so if you’re looking for a work right out of the box solution, this is it.

Alternatively, you can opt for XAMPP or use an alternative server of your choice.

Now here’s where the exciting stuff begins, mapping things out.


I don’t see this done/encouraged often enough. Feel free to grab a piece of paper to logically map out your steps or produce a rough draft of where you’d like this project to go.

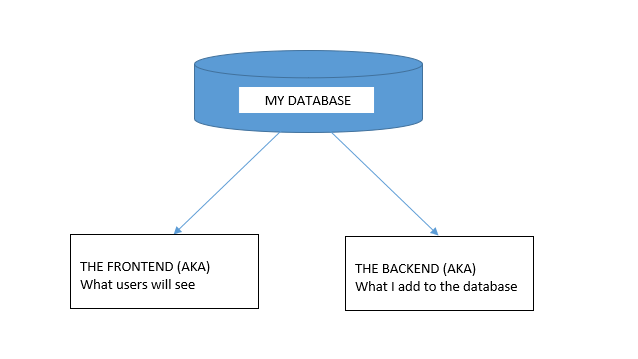
In this tutorial, I would like to achieve the following:


DB, DB, Set up your DB.


This requires a bit of planning but let’s start of with the basic structure we need to see this through.

We are going to need a user table and a content table and are a few ways to tackle this.

If you’re using the PHPMyAdmin tool you can create your database, add user permissions (Click on Permissions after creating your database), and create a table with ease.


If you’re like me and prefer to look at good ‘ol SQL then writing an SQL statement is the preferred approach.


CREATE TABLE <code>mydbname</code>.<code>content</code> ( <code>ID</code> INT(11) NOT NULL AUTO_INCREMENT , <code>title</code> VARCHAR(100) NOT NULL , <code>content</code> LONGTEXT NOT NULL , <code>author</code> VARCHAR(50) NOT NULL , PRIMARY KEY (<code>ID</code>)) ENGINE = MyISAM COMMENT = 'content table';

Understanding the SQL statement

In a nutshell we are creating a table with important fields. Namely:

####

ID | Title | Content | Author

#######

The ID field is our unique identifier.Now we can move on to the file structure.

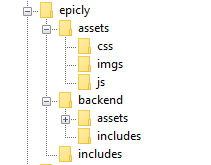
Everything has a place in the file structure game


You can use a structure that speaks to your coding style / memory.

I tend to use the following:


Choose a name for your CMS, which should be placed at the webroot of your localhost/server.

Replicate the folder structure as per the above example.

Next, we’re going to create a basic connection file.


You can create a conn.php file in your root/includes folder.

The connection file will provide crucial information to connect to the database.

Type the following into your conn.php file, remember to include your own database credentials.


<?php

$letsconnect = new mysqli("localhost","dbuser","dbpass","dbname");

?>


Let’s go to the homepage (index.php)


Create a file called index.php at the root of your CMS folder.

I will be adding comments in my code to help you understand what each line does.

Comments are a useful tool for developers to add important notes private to their code.

We need to pull information from the database so it’s imperative that we include our connection file.


<?php

include('includes/conn.php');

if ($letsconnect -> connect_errno) { echo "Error " . $letsconnect -> connect_error;

}else{

$getmydata=$letsconnect -> query("SELECT * FROM content");

foreach($getmydata as $mydata){ echo "Title: "; echo $mydata['title']; echo "<br/>"; echo "Content: "; echo $mydata['content']; echo "<br/>"; echo "Author: "; echo $mydata['author']; echo "<br/>"; echo "<br/>";

}

}

$letsconnect -> close();

?>


Let’s get a (very) basic backend up and running


Create a file called index.php in your backend folder.

We need to create a basic form to capture our data.

Let’s code some HTML!


<html>

<head><title>Backend - Capture Content</title></head>

<body>

<form action="<?php $_SERVER[‘PHP_SELF’];?>" method="post">

<input type="text" name="title" placeholder="Content Title here" required/>

<textarea name="content">Content Here</textarea>

<input type="text" name="author" placeholder="Author" required/>

<input type="submit" value="Save My Data" name="savedata"/>

</form>

</body>

</html>


Next, we need to process the form data.


Type the following just above the
<form> 
tag.


<?php

if(isset($_POST['savedata'])){

include('../includes/conn.php');

if ($letsconnect->connect_error) {

die("Your Connection failed: " . $letsconnect->connect_error);

}else{

$sql = "INSERT INTO content(title,content,author)VALUES ('".$_POST["title"]."', '".$_POST["content"]."', '".$_POST["author"]."')";

if (mysqli_query($letsconnect, $sql)) {

echo "Your data was saved successfully!";

} else { echo "Error: " . $sql . "" . mysqli_error($letsconnect);

} $letsconnect->close();

}

}

?>


Note, this is a basic MySQL query to insert data. However, before using this in production it's important to add proper escaping and security to prevent SQL injections. This will be covered in the next article.


Congrats you made it to the end of tutorial 1!


Test out your creation, modify your content, and play around.

Go to your sitename/index.php to see your frontend after capturing data via sitename/backend/index.php

Next Up:


codewithme Now With Security, Functionality, and Aesthetics in mind.


Conclusion


Coding doesn’t have to be daunting and it’s my aim to divide a complex system into bitesized tutorials so you can truly use the knowledge you’ve acquired in your own projects.

SPONSORS