PHP & Web Development Blogs

Search Results For: code
Showing 16 to 20 of 47 blog articles.
8787 views · 3 years ago


Welcome back! If you’re new to this series have a look at Part 1 here


Today’s focus is on templating, the aesthetic that will make or break your web application.

Having a clean design with well defined CSS that’s responsive and user friendly goes a long way.

Developers often stick to their lane but delving into templating will bode in your favor, you can indeed
create a functional and launch-worthy application all on your own!

Let’s jump into it!

Structured structure


Everything you tackle should be found with ease down the line. Therefore careful planning is fundamental to the success and sustainability of your project. You’ll also find that clearly defining your work lends itself to more productivity overall as you spend less that explaining your work during a handover / looking for a specific piece of code or resource. You’ll probably end up spending more time on actual work.
Finding your own unique pattern with file structure and CSS identifiers will also work in your favor as something unique to your process will most likely be easier to remember and form a tactile relationship with.

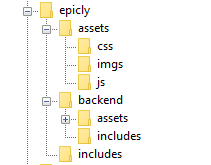
Our project’s current structure looks like this:


>If you need to backtrack, Part 1 is a great place to start!

In part 1, we created our index.php which displays info from our database.

Let’s take this a step further and create a header and a footer for our index.php

Create a file called header.php and save this to your includes folder.

Next, create a file called footer.php and save this to your includes folder.

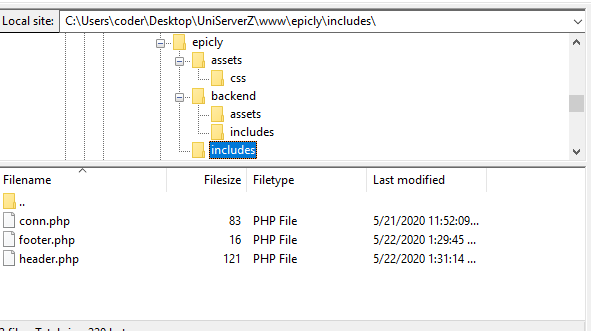
Your file structure should now look like this.


A header above all the rest


The header file will be a file we reuse throughout your web application. This file will contain important information that’s vital to the functionality and aesthetic of your website.
The type of info you’ll expect to see in a header.php file:
Script includes
Such as JQuery and important libraries
CSS includes
CSS files loaded from internal or external sources
Meta information
Contains important information that’s readable by search engines.
The basic structure of the beginning of your app, including your menu, and your logo.
For now, how header is going to have a basic layout.

Let’s get our HTML on!

<html>
<head>
<title>My Awesome CMS – Page Title</title>
</head>
<body>


A footer that sets the bar

Create a file called footer.php and save it to your includes folder (yourcms/includes/footer.php).

Add this code to your new file.

</body>
</html>


Next, let’s focus on the gravy… The CSS


CSS, when written beautifully, can truly set you apart.

You can tell your web application to load various styles to specific elements by defining unique identifiers.
Styles that are only used once are denoted with a # (a CSS “ID”) whereas styles that are reused multiple times are denoted with a . (a CSS “class”)

The best way to delve into the realm of CSS is to learn by experience.

Let’s create!


First, we need to create and load our CSS file. Remember our nifty new pal header.php? This created a convenient way to load our CSS file!

Add the following code to your header.php just above the </head> tag.

<link href=”../assets/css/style.css” type=”text/css” rel=”stylesheet”/> 


The ../ in the link to our stylesheet means we have to leave the current directory (the directory that header.php is in) and look for the assets/css/ directories.

Go ahead and create the css folder under your assets folder.

Next we’re going to create some simple CSS to test things out.

It’s time to add some style!


We are going to create two divs.
A div is a divider / section in HTML.
Add this to your index.php (located in your CMS’ root folder) above the <?php tag.

<div id="myfirstid"></div>
<div class="myfirstclass"></div>


Then, create a CSS file

Add this:

#myfirstid{
Background:lightblue;
Font-family:Arial;
Font-size:44px;
Font-weight: Bold;
}
.myfirstclass{
Font-size:15px;
Color: darkblue;
}


Save your newly created CSS to assets/css/ as style.css.

Pulling it all together, let’s see what we can do!


Let’s apply what we just learned to our index.php. But first, we should add our header.php and footer.php files.

Including everyone


Add this to the top of your index.php file:

include(‘includes/header.php’);


Remove the <divs> we used for practice earlier, we have something better in store!

Add this to the bottom of your index.php:

include(‘includes/footer.php’);


Next, let’s modify our code so we can add some style to the data we retrieve from our database.

Modify the following line:
foreach($getmydata as $mydata){ echo "Title: "; echo $mydata['title']; echo "<br/>"; echo "Content: "; echo $mydata['content']; echo "<br/>"; echo "Author: "; echo $mydata['author']; echo "<br/>"; echo "<br/>";


as follows:
?>

<div id=”myfirstid”>
<?php
foreach($getmydata as $mydata){
echo "<div class=”myfirstclass”>Title: ";
echo $mydata['title'];
echo "<br/>";
echo "Content: ";
echo $mydata['content'];
echo "<br/>";
echo "Author: ";
echo $mydata['author'];
echo "</div><br/><br/>";
}?>
</div>
<?php


Your full index.php should now look like this:

<?php
include('includes/header.php');
include('includes/conn.php');

if ($letsconnect -> connect_errno) { echo "Error " . $letsconnect -> connect_error;

}else{

$getmydata=$letsconnect -> query("SELECT * FROM content");

?>
<div id="myfirstid">
<?php
foreach($getmydata as $mydata){
echo "<div class=”myfirstclass”>Title: ";
echo $mydata['title'];
echo "<br/>";
echo "Content: ";
echo $mydata['content'];
echo "<br/>";
echo "Author: ";
echo $mydata['author'];
echo "</div><br/><br/>";
}
?>
</div>
<?php
}

$letsconnect -> close();
include('includes/footer.php');
?>

Go ahead, test it out!

There’s a lot to unpack and I will break things down a little more during our next tutorial!

Challenge


Study the final index.php and try to form a few theories about why closing a php tag is necessary before adding raw html.

Next Up: #CodeWithMe Part 4: Building A Good Base

8187 views · 3 years ago


Welcome back! If you're new to this series have a look at Part 1 here

Today we are going to beef things up a bit and we will focus on the backend and some key CMS functionality.

It's time to get excited, this is where you'll start to see your barebones structure morph into something extraordinary!

Tired of my intro? That's ok! Let's jump into it!

Getting the DB on board


Before we delve into this, it's imperative that we take a minute and plan things out.

The database tables that are vital to any CMS are the menu, the user table, and the content table.

Our menu table will start of as follows:

CREATE TABLE 'mydbname'.'menus' ( 'ID' INT(11) NOT NULL AUTO_INCREMENT , 'menuname' VARCHAR(100) NOT NULL , 'item' VARCHAR(50) NOT NULL , 'itemlink' VARCHAR(100) NOT NULL , PRIMARY KEY ('ID')) ENGINE = MyISAM COMMENT = 'menu table';


Let's break this down a bit.

In the SQL above, we're creating a new table called menus.

Essentially our structure looks like this:

ID | Menuname | Item | Itemlink

Our ID field is our unique identifier (our PRIMARY KEY).

Tip: Remember, you can use raw SQL or a tool like PhpMyAdmin to create your db tables/execute SQL queries.

Next up is our user table.

CREATE TABLE 'mydbname'.'users' ( 'ID' INT(11) NOT NULL AUTO_INCREMENT , 'username' VARCHAR(100) NOT NULL , 'password' VARCHAR(50) NOT NULL , 'email' VARCHAR(100) NOT NULL , PRIMARY KEY ('ID')) ENGINE = MyISAM COMMENT = 'user table';


Visually represented this structure looks like this:

ID | Username | Password | Email

Our ID field is our unique identifier.

And finally, our content table modifications. You probably remember creating a rudimentary content table in Part 1 of the series.

ALTER TABLE 'mydbname'.'content' ADD content_type VARCHAR(50);


Yep, you guessed right, in the above statement we are altering our content table and adding a new field called content type.

Our new table structure now looks like this:

ID | Title | Content | Author | Content Type

Planning to Add to the Backend


Next , we're going to add a menu section, an add user section, and we'll also modify our content section.

Let's do this! reate a file called menus.php in your backend folder.

Next, code a HTML form to save your menu data.

The form needs the following fields:

Menu Name (we called this menuname in our db table).

Menu Item Name (we called this item in our db table).

Menu Link (we called this itemlink in our db table).

Try to follow Part 1 to do this on your own.

If you get a little stuck, that's ok. You can also follow the example below:

<form method="post" action="<?php $_SERVER['PHP_SELF'];?>"/>

<input type="text" name="menuname" class="mytextbox" placeholder="Menu Name" required />

<input type="text" name="item" class="mytextbox" placeholder="Item" required />

<input type="text" name="itemlink" class="mytextbox" placeholder="Item Link" required />

<input type="submit" value="Save Menu Item" name="savemenu" class="mybutton"/>

</form>


Notice the use of CSS classes? The gravy!

This will come in handy in our next tutorial.

Next, let's add the form processing code as we need to save these fields to the database. Remember to use the sanitization technique you learned in Part 2.

Add this above your <form> tag.

<?php

if(isset($_POST['savemenu'])){

include('../includes/conn.php');

if ($letsconnect->connect_error) {

die("Your Connection failed: " . $letsconnect->connect_error);

}else{

$menuname = $letsconnect ->real_escape_string($_POST['menuname']);

$item = $letsconnect -> real_escape_string($_POST['item']);

$itemlink = $letsconnect->real_escape_string($_POST['itemlink']);

$sql = "INSERT INTO menus(menuname,item,itemlink) VALUES ('".$menuname."', '".$item."', '".$itemlink."')";

if (mysqli_query($letsconnect, $sql)) {

echo "Your data was saved successfully!";

} else { echo "Error: " . $sql . "" . mysqli_error($letsconnect);

} $letsconnect->close();

}

}

?>


Ok phew, the menu data capturing section is done.

Let's move on to the user data capturing section, and modify the content capturing screen.

Repeat the steps above and create these two screens. Remember to keep an eye out for our database field names that we defined earlier! If you get stuck, look at the end result below:

Create adduser.php in your backend folder.

Create your data capturing form.


<form method="post" action="<?php $_SERVER['PHP_SELF'];?>"/>

<input type="text" name="username" class="mytextbox" placeholder="Username" required/>

<input type="password" name="password" class="mytextbox" placeholder="Password" required />

<input type="email" name="email" class="mytextbox" placeholder="Email" required />

<input type="submit" value="Save Menu Item" name="saveuser" class="mybutton"/>

</form>


Add your PHP processing code, remember the security!

Add this above your <form> tag.

<?php

if(isset($_POST[‘saveuser])){

include('../includes/conn.php');

if ($letsconnect->connect_error) {

die("Your Connection failed: " . $letsconnect->connect_error);

}else{

$menuname = $letsconnect -> real_escape_string($_POST[‘username']);

$item = $letsconnect -> real_escape_string($_POST[‘password']);

$itemlink = $letsconnect -> real_escape_string($_POST[‘email']);

$sql = "INSERT INTO menus(username,password,email) VALUES ('".$username."', '".$password."', '".$email."')";

if (mysqli_query($letsconnect, $sql)) {

echo "Your data was saved successfully!";

} else { echo "Error: " . $sql . "" . mysqli_error($letsconnect);

} $letsconnect->close();

}

}

?>


Please note that I will be covering Password security in the tutorials that follow.

Make sure that you are using your localhost server to complete this tutorial series. Do not publish your work until you complete this series.

Lastly, let's move to our content capturing screen which is currently found in index.php in the backend folder.

We will be changing this to a more professional dashboard in the tutorials that follow!
Our current file looks like this:


<html>

<head><title>Backend - Capture Content</title></head>

<body>

<?php

if(isset($_POST['savedata'])){

include('../includes/conn.php');

if ($letsconnect->connect_error) {

die("Your Connection failed: " . $letsconnect->connect_error);

}else{

$title = $letsconnect -> real_escape_string($_POST['title']);

$content = $letsconnect -> real_escape_string($_POST['content']);

$author = $letsconnect -> real_escape_string($_POST['author']);

$sql = "INSERT INTO content (title,content,author) VALUES ('".$title."', '".$content."', '".$author."')";

if (mysqli_query($letsconnect, $sql)) {

echo "Your data was saved successfully!";

} else { echo "Error: " . $sql . "" . mysqli_error($letsconnect);

} $letsconnect->close();

}

}

?>

<form action="<?php $_SERVER[‘PHP_SELF'];?>" method="post">

<input type="text" name="title" placeholder="Content Title here" required/>

<textarea name="content">Content Here</textarea>

<input type="text" name="author" placeholder="Author" required/>

<input type="submit" value="Save My Data" name="savedata"/>

</form>

</body>

</html>


We need to modify this slightly to include our new field, content_type.

Add the input field in your <form> above the submit button.


<input type="text" name="content_type" placeholder="Content Type" required/>;


Next, add the content_type to the sanitization lineup.

$content_type = $letsconnect->real_escape_string($_POST['content_type']);


Lastly, store this variable to the database by modifying the $sql.

$sql = "INSERT INTO content (title,content,author,content_type) VALUES ('".$title."', '".$content."', '".$author."', '".$content_type."')";


Conclusion


Chopping and changing is not always as daunting. Find a rhythm. There are many ways to make cumbersome coding a breeze and we will delve into that in the tutorials to come.

Challenge


Think of ways to test what we just did through retrieving and echoing data from the database.

Next Up: #CodeWithMe Part 5 Building a good base Continued

4421 views · 3 years ago


People that visit your website face an invisible threat each time they log on. Small businesses are especially vulnerable to digital data breaches, and that can change the way your customers feel about you. But, although you cannot stop hackers from trying, there are things you can do as a business owner to make your website a safer experience for everyone. Keep reading for tips.

Mature digitally.


You may be ahead of the times when it comes to products and services, but, chances are, your website hasn't fully kept up. It's time to learn all you can about the internet and digital security. If you are already somewhat tech savvy, a PHP Security Course from Nomad PHP can help you better understand everything from cryptography to website error messages.

Adapting to today's digital environment means transforming your website to quickly and easily identify threats via machine learning and network monitoring. And, as Upwork explains, digital maturity not only keeps your website safe, but adopting this mindset can also increase your efficiency and accuracy by reducing human errors.

Understand the threats.


It is not enough to simply keep up with your website, you also have to understand the types of threats that are out there. You're likely familiar with ransomware and phishing, but, it's also a good idea to know how a website can get hacked. Your site's content management system and vulnerabilities within your operating system are all weak points that hackers can easily identify.

Insist on security measures.


When customers log into your website, they input their credentials. Each time they do so, you can best protect their information by keeping your systems up to date. You'll also want to ensure that your site is hosted on a secure service and that you have an SSL certificate installed.

If you are not already, have your IT department or managed IT services perform regular website security checks. PhoenixNAP, an IT services provider, notes that those websites working via WordPress should also be safely outfitted with the most recent security plug-ins.

Eliminate spam.


If your website allows for comments that are not manually approved, anyone on the internet can post. This leaves it open for hackers and other unscrupulous individuals to comment with spam and malicious links that your customers may inadvertently click on. While many of these simply exist as a way for the commenter to drive traffic to another website, others are designed to draw your readers' attention, gain their trust, and access their personal information.

Prioritize passwords.


Your customers' passwords are the keys by which they open the door to your website. Unfortunately, many people do not treat them with as much care as they do the keys they use in the non-digital world.

It's true, passwords can be a pain, but you are not doing yourself or your customers any favors by allowing simple one-word passcodes to access your site. Instead, design your site to require a strong password. How-To Geek asserts that this will have a minimum of 12 characters and include a combination of upper and lower case letters, symbols, and numbers.

While you will likely rely on your IT experts to secure your website, the truth is that it is ultimately up to you to ensure this is done. So even if you are not a digital mastermind, knowing all you can about web security can help you be a better business owner. Your customers will be safer, and a secure website is just one way to strengthen your business's online presence and keep up with today's -- and tomorrow's -- technology.
7763 views · 5 years ago
Standalone PHP Class for Managing Session Based Multiple Cart

Hi Guys,

I am sharing you a standalone class for managing a session based cart system. In this class I have provided multiple methods for adding, updating and deleting the products. and By using this class you may manage multiple cart objects with different data only you need to pass a different key in constructor of that class.

Let me share you the How can we use that Class:


Include The cart class


require 'PhpKart.class.php';


Create a Cart Object initializing the Cart base key name, by using different keys we can manage multiple cart data in a same project , like main cart or wishlist


$obj1 = new PhpKart("MainCart");


Here Maincart is the keyname in which $obj1 insert/modify/delete the data


Adding any product inside cart


$obj1->add_to_cart($product_id=123,$quantity=2,$product_information=array("product_name"=>"Tomato","Price"=>20));


Where parameter1 is product, id,parameter 2 is quantity, and Parameter 3 is product information Array


Now If we want to update the quantity in product_id=123 with quantity 5 then use following:


$obj1->add_to_cart($product_id=123,$quantity=5);


Here we did not pass the information array again because no matter you pass or not if the product information is already added in the cart then if won't be affected So no ned to pass this, only pass product id and its Quantity


If we want to add another product:


$obj1->add_to_cart($product_id=145,$quantity=3,$product_information=array("product_name"=>"Potato","Price"=>30));


Now we have a case what if our product is already having some quantity and we want to increase into it or decrease into it, Then to retrieve the already added product information, using AlreadyExists method by passing product id,it will return array if it exists and it will return boolean false if not exists:


$already_exists=$obj1->AlreadyExists($product_id=145); 
if($already_exists !== false )
{
print_r($already_exists);
}


If we want to remove any product from cart:


$obj1->remove_from_cart($product_id=145);


If we want to get all products from the current cart


print_r( $obj1->getAllItems() );


It will return you an array with all the items exist in the current cart


Getting all item's count inside the current cart


echo $obj1->getTotalItems(); 


If we want to get calculate total amount in the current cart


echo $obj1->getCartTotalAmount($priceKeyName='Price')


Note: In the above snippet we need to provide teh same key name which we have used for product price in project information array at the time of adding items in cart array, and need to take the same key name in all the products inserting in Same Cart


If we want to clear/reset the current cart then use following:


$obj1->clear_cart(); 


Now if we want to save some other user interested items separately which use likes but don't want to buy now so that items can be Add into wishlist So we need to create new object with different cart ket name and that list will be manage separately using it's object. Like Following:


Create new Object by passing different Key

$obj2=new PhpKart("MyWishlist"); 


Add a new item to $obj2 object containing the items user want to add in his/her wishlist


$obj2->add_to_cart($product_id=159,$quantity=8,$product_information=array("product_name"=>"Baby Toy","Price"=>100));


Show the total cart Amount


echo $obj2->getCartTotalAmount("Price"); 


Full Source Code


Following is the full code for that cart managing Class . Just create a file named PhpKart.class.php and add following code in it:

<?php 
if(!session_id()){
@session_start();
}


class PhpKart{

private $cart_key;

public function __construct($CartkeyName)
{
$this->cart_key=$CartkeyName;
}
public function add_to_cart($product_id,$quantity='1',$product_information=array())
{
$_SESSION[$this->cart_key][$product_id]['product_id']=$product_id;
$_SESSION[$this->cart_key][$product_id]['quantity']=$quantity;
if(!isset($_SESSION[$this->cart_key][$product_id]['product_information']) && !empty($product_information)){
$_SESSION[$this->cart_key][$product_id]['product_information']=$product_information;
}
}
public function remove_from_cart($product_id)
{
unset($_SESSION[$this->cart_key][$product_id]);
}
public function clear_cart()
{
unset($_SESSION[$this->cart_key]);
}
public function getTotalItems()
{
return count($_SESSION[$this->cart_key]);
}
public function getCartTotalAmount($price_key_name)
{
$total=0;
foreach($_SESSION[$this->cart_key] as $row)
{
$total += ($row['product_information'][$price_key_name]*$row['quantity']);
}

return $total;
}
public function AlreadyExists($product_id)
{
if (isset($_SESSION[$this->cart_key][$product_id]))
{
return $_SESSION[$this->cart_key][$product_id];
}
else
{
return false;
}
}
public function getAllItems()
{
return $_SESSION[$this->cart_key];
}


}

?>

11945 views · 5 years ago
Five Composer Tips Every PHP Developer Should Know

Composer is the way that that PHP developers manage libraries and their dependencies. Previously, developers mainly stuck to existing frameworks. If you were a Symfony developer, you used Symfony and libraries built around it. You didn’t dare cross the line to Zend Framework. These days however, developers focus less on frameworks, and more on the libraries they need to build the project they are working on. This decoupling of projects from frameworks is largely possible because of Composer and the ecosystem that has built up around it.

Like PHP, Composer is easy to get started in, but complex enough to take time and practice to master. The Composer manual does a great job of getting you up and running quickly, but some of the commands are involved enough so that many developers miss some of their power because they simply don’t understand.

I’ve picked out five commands that every user of Composer should master. In each section I give you a little insight into the command, how it is used, when it is used and why this one is important.

1: Require

Sample:

$ composer require monolog/monolog


Require is the most common command that most developers will use when using Composer. In addition to the vendor/package, you can also specify a version number to load along with modifiers. For instance, if you want version 1.18.0 of monolog specifically and never want the update command to update this, you would use this command.

$ composer require monolog/monolog:1.18.0


This command will not grab the current version of monolog (currently 1.18.2) but will instead install the specific version 1.18.0.

If you always want the most recent version of monolog greater than 1.8.0 you can use the > modifier as shown in this command.

$ composer require monolog/monolog:>1.18.0


If you want the latest in patch in your current version but don’t want any minor updates that may introduce new features, you can specify that using the tilde.

$ composer require monolog/monolog:~1.18.0


The command above will install the latest version of monolog v1.18. Updates will never update beyond the latest 1.18 version.

If you want to stay current on your major version but never want to go above it you can indicate that with the caret.

$ composer require monolog/monolog:^1.18.0


The command above will install the latest version of monolog 1. Updates continue to update beyond 1.18, but will never update to version 2.

There are other options and flags for require, you can find the complete documentation of the command here.

2: Install a package globally

The most common use of Composer is to install and manage a library within a given project. There are however, times when you want to install a given library globally so that all of your projects can use it without you having to specifically require it in each project. Composer is up to the challenge with a modifier to the require command we discussed above, global. The most common use of this is when you are using Composer to manage packages like PHPUnit.

$ composer global require "phpunit/phpunit:^5.3.*"


The command above would install PHPUnit globally. It would also allow it to be updated throughout the 5.0.0 version because we specified ~5.3.* as the version number. You should be careful in installing packages globally. As long as you do not need different versions for different projects you are ok. However, should you start a project and want to use PHPUnit 6.0.0 (when it releases) but PHPUnit 6 breaks backwards compatibility with the PHPUnit 5.* version, you would have trouble. Either you would have to stay with PHPUnit 5 for your new project, or you would have to test all your projects to make sure that your Unit Tests work after upgrading to PHPUnit 6.

Globally installed projects are something to be thought through carefully. When in doubt, install the project locally.

3: Update a single library with Composer

One of the great powers of Composer is that developers can now easily keep their dependencies up-to-date. Not only that, as we discussed in tip #1, each developer can define exactly what “up-to-date” means for them. With this simple command, Composer will check all of your dependencies in a project and download/install the latest applicable versions.

$ composer update


What about those times when you know that a new version of a specific package has released and you want it, but nothing else updated. Composer has you covered here too.

$ composer update monolog/monolog


This command will ignore everything else, and only update the monolog package and it’s dependencies.

It’s great that you can update everything, but there are times when you know that updating one or more of your packages is going to break things in a way that you aren’t ready to deal with. Composer allows you the freedom to cherry-pick the packages that you want to update, and leave the rest for a later time.

4: Don’t install dev dependencies

In a lot of projects I am working on, I want to make sure that the libraries I download and install are working before I start working with them. To this end, many packages will include things like Unit Tests and documentation. This way I can run the unit Tests on my own to validate the package first. This is all fine and good, except when I don’t want them. There are times when I know the package well enough, or have used it enough, to not have to bother with any of that.

Many packages create a distribution package that does not contain tests or docs. (The League of Extraordinary Packages does this by default on all their packages.) If you specify the --prefer-dist flag, Composer will look for a distribution file and use it instead of pulling directly from github. Of course if you want want to make sure you get the full source and all the artifacts, you can use the --prefer-src flag.

5: Optimize your autoload

Regardless of whether you --prefer-dist or --prefer-source, when your package is incorporated into your project with require, it just adds it to the end of your autoloader. This isn’t always the best solution. Therefore Composer gives us the option to optimize the autoloader with the --optimize switch. Optimizing your autoloader converts your entire autoloader into classmaps. Instead of the autoloader having to use file_exists() to locate a file, Composer creates an array of file locations for each class. This can speed up your application by as much as 30%.

$ composer dump-autoload --optimize


The command above can be issued at any time to optimize your autoloader. It’s a good idea to execute this before moving your application into production.

$ composer require monolog/monolog:~1.18.0 -o


You can also use the optimize flag with the require command. Doing this every time you require a new package will keep your autoloader up-to-date. That having said, it’s still a good idea to get in the habit of using the first command as a safety net when you roll to production, just to make sure.

BONUS: Commit your composer.lock

After you have installed your first package with composer, you now have two files in the root of your project, composer.json and composer.lock. Of the two, composer.lock is the most important one. It contains detailed information about every package and version installed. When you issue a composer install in a directory with a composer.lock file, composer will install the exact same packages and versions. Therefore, by pulling a git repo on a production server will replicate the exact same packages in production that were installed in development. Of course the corollary of this is that you never want to commit your vendor/ directory. Since you can recreate it exactly, there is no need to store all of that code in your repo.

It is recommended that also commit your composer.json. When you check out your repo into production and do an install, composer will use the composer.lock instead of the composer.json when present. This means that your production environment is setup exactly like your development environment.

SPONSORS