
Learn from your fellow PHP developers with our PHP blogs, or help share the knowledge you've gained by writing your own.

;extension=sockets
extension=sockets
server.php file$host = 'localhost';
$port = '9000';
$null = NULL; function send_message($msg)
{
global $clients;
foreach($clients as $changed_socket)
{
@socket_write($changed_socket,$msg,strlen($msg));
}
return true;
}
function unmask($text) {
$length = ord($text[1]) & 127;
if($length == 126) {
$masks = substr($text, 4, 4);
$data = substr($text, 8);
}
elseif($length == 127) {
$masks = substr($text, 10, 4);
$data = substr($text, 14);
}
else {
$masks = substr($text, 2, 4);
$data = substr($text, 6);
}
$text = "";
for ($i = 0; $i < strlen($data); ++$i) {
$text .= $data[$i] ^ $masks[$i%4];
}
return $text;
}
function mask($text)
{
$b1 = 0x80 | (0x1 & 0x0f);
$length = strlen($text);
if($length <= 125)
$header = pack('CC', $b1, $length);
elseif($length > 125 && $length < 65536)
$header = pack('CCn', $b1, 126, $length);
elseif($length >= 65536)
$header = pack('CCNN', $b1, 127, $length);
return $header.$text;
}
function perform_handshaking($receved_header,$client_conn, $host, $port)
{
$headers = array();
$lines = preg_split("/
/", $receved_header);
foreach($lines as $line)
{
$line = chop($line);
if(preg_match('/\A(\S+): (.*)\z/', $line, $matches))
{
$headers[$matches[1]] = $matches[2];
}
}
$secKey = $headers['Sec-WebSocket-Key'];
$secAccept = base64_encode(pack('H*', sha1($secKey . '258EAFA5-E914-47DA-95CA-C5AB0DC85B11')));
$upgrade = "HTTP/1.1 101 Web Socket Protocol Handshake
" .
"Upgrade: websocket
" .
"Connection: Upgrade
" .
"WebSocket-Origin: $host
" .
"WebSocket-Location: ws://$host:$port/php-ws/chat-daemon.php
".
"Sec-WebSocket-Accept:$secAccept
";
socket_write($client_conn,$upgrade,strlen($upgrade));
}
$socket = socket_create(AF_INET, SOCK_STREAM, SOL_TCP);
socket_set_option($socket, SOL_SOCKET, SO_REUSEADDR, 1);
socket_bind($socket, 0, $port);
socket_listen($socket);
$clients = array($socket);
while (true) {
$changed = $clients;
socket_select($changed, $null, $null, 0, 10);

if (in_array($socket, $changed)) {
$socket_new = socket_accept($socket);	$clients[] = $socket_new;
$header = socket_read($socket_new, 1024);	perform_handshaking($header, $socket_new, $host, $port);
socket_getpeername($socket_new, $ip);	$response = mask(json_encode(array('type'=>'system', 'message'=>$ip.' connected')));	send_message($response);
$found_socket = array_search($socket, $changed);
unset($changed[$found_socket]);
}

foreach ($changed as $changed_socket) {

while(socket_recv($changed_socket, $buf, 1024, 0) >= 1)
{
$received_text = unmask($buf);	$tst_msg = json_decode($received_text, true);	$user_name = $tst_msg['name'];	$user_message = $tst_msg['message'];	$user_color = $tst_msg['color'];
$response_text = mask(json_encode(array('type'=>'usermsg', 'name'=>$user_name, 'message'=>$user_message, 'color'=>$user_color)));
send_message($response_text);	break 2;	}

$buf = @socket_read($changed_socket, 1024, PHP_NORMAL_READ);
if ($buf === false) {	$found_socket = array_search($changed_socket, $clients);
socket_getpeername($changed_socket, $ip);
unset($clients[$found_socket]);

$response = mask(json_encode(array('type'=>'system', 'message'=>$ip.' disconnected')));
send_message($response);
}
}
}
socket_close($socket);
$host = 'localhost';
$port = '9000';
$subfolder = "php_ws/";
$colors = array('#007AFF','#FF7000','#FF7000','#15E25F','#CFC700','#CFC700','#CF1100','#CF00BE','#F00');
$color_pick = array_rand($colors);
<!DOCTYPE html>
<html>
<head>
<meta name="viewport" content="width=device-width, initial-scale=1">
</head>
<body>
<div class="chat-wrapper">
<div id="message-box"></div>
<div class="user-panel">
<input type="text" name="name" id="name" placeholder="Your Name" maxlength="15" />
<input type="text" name="message" id="message" placeholder="Type your message here..." maxlength="100" />
<button id="send-message">Send</button>
</div>
</div>
</body>
</html>
<style type="text/css">
.chat-wrapper {
font: bold 11px/normal 'lucida grande', tahoma, verdana, arial, sans-serif;
 background: #00a6bb;
 padding: 20px;
 margin: 20px auto;
 box-shadow: 2px 2px 2px 0px #00000017;
max-width:700px;
min-width:500px;
}
#message-box {
 width: 97%;
 display: inline-block;
 height: 300px;
 background: #fff;
 box-shadow: inset 0px 0px 2px #00000017;
 overflow: auto;
 padding: 10px;
}
.user-panel{
 margin-top: 10px;
}
input[type=text]{
 border: none;
 padding: 5px 5px;
 box-shadow: 2px 2px 2px #0000001c;
}
input[type=text]#name{
 width:20%;
}
input[type=text]#message{
 width:60%;
}
button#send-message {
 border: none;
 padding: 5px 15px;
 background: #11e0fb;
 box-shadow: 2px 2px 2px #0000001c;
}
</style>
<script src="https://ajax.googleapis.com/ajax/libs/jquery/3.3.1/jquery.min.js"></script>
<script language="javascript" type="text/javascript">
var msgBox = $('#message-box');
var wsUri = "ws://".$host.":".$port."/php-ws/server.php";
websocket = new WebSocket(wsUri);

websocket.onopen = function(ev) {	msgBox.append('<div class="system_msg" style="color:#bbbbbb">Welcome to my "Chat box"!</div>');	}
websocket.onmessage = function(ev) {
var response	= JSON.parse(ev.data);
var res_type	= response.type;	var user_message	= response.message;	var user_name	= response.name;	var user_color	= response.color;	switch(res_type){
case 'usermsg':
msgBox.append('<div><span class="user_name" style="color:' + user_color + '">' + user_name + '</span> : <span class="user_message">' + user_message + '</span></div>');
break;
case 'system':
msgBox.append('<div style="color:#bbbbbb">' + user_message + '</div>');
break;
}
msgBox[0].scrollTop = msgBox[0].scrollHeight;	};

websocket.onerror	= function(ev){ msgBox.append('<div class="system_error">Error Occurred - ' + ev.data + '</div>'); };
websocket.onclose	= function(ev){ msgBox.append('<div class="system_msg">Connection Closed</div>'); };
$('#send-message').click(function(){
send_message();
});

$( "#message" ).on( "keydown", function( event ) {
 if(event.which==13){
 send_message();
 }
});

function send_message(){
var message_input = $('#message');	var name_input = $('#name');
if(message_input.val() == ""){	alert("Enter your Name please!");
return;
}
if(message_input.val() == ""){	alert("Enter Some message Please!");
return;
}
var msg = {
message: message_input.val(),
name: name_input.val(),
color : '<?php echo $colors[$color_pick]; ?>'
};
websocket.send(JSON.stringify(msg));
message_input.val('');	}
</script>
php -q c:\xampp\htdocs\php-ws\server.php

umask(0);
$pid = pcntl_fork();
if ($pid < 0) {
 print('fork failed');
 exit 1;
}
if ($pid > 0) { echo "daemon process started
";
 exit;
}

$sid = posix_setsid();
if ($sid < 0) {
 exit 2;
}

chdir('/');
file_put_contents($pidFilename, getmypid() );
run_process();ob_start();
var_dump($some_object);
$content = ob_get_clean();
fwrite($fd_log, $content); ini_set('error_log', $logDir.'/error.log');
fclose(STDIN);
fclose(STDOUT);
fclose(STDERR);
$STDIN = fopen('/dev/null', 'r');
$STDOUT = fopen($logDir.'/application.log', 'ab');
$STDERR = fopen($logDir.'/application.error.log', 'ab');
function sig_handler($signo)
{
 global $fd_log;
 switch ($signo) {
 case SIGTERM:
 fclose($fd_log); unlink($pidfile); exit;
 break;
 case SIGHUP:
 init_data(); break;
 default:
 }
}


pcntl_signal(SIGTERM, "sig_handler");
pcntl_signal(SIGHUP, "sig_handler");
$base = event_base_new();
$event = event_new();
$errno = 0;
$errstr = '';
$socket = stream_socket_server("tcp://$IP:$port", $errno, $errstr);
stream_set_blocking($socket, 0);
event_set($event, $socket, EV_READ | EV_PERSIST, 'onAccept', $base);
function onRead($buffer, $id)
{
 while($read = event_buffer_read($buffer, 256)) {
 var_dump($read);
 }
}
function onError($buffer, $error, $id)
{
 global $id, $buffers, $ctx_connections;
 event_buffer_disable($buffers[$id], EV_READ | EV_WRITE);
 event_buffer_free($buffers[$id]);
 fclose($ctx_connections[$id]);
 unset($buffers[$id], $ctx_connections[$id]);
}
$event2 = event_new();
$tmpfile = tmpfile();
event_set($event2, $tmpfile, 0, 'onTimer', $interval);
$res = event_base_set($event2, $base);
event_add($event2, 1000000 * $interval);
function onTimer($tmpfile, $flag, $interval)
{
 $global $base, $event2;

 if ($event2) {
 event_delete($event2);
 event_free($event2);
 }

 call_user_function(‘process_data’,$args);

 $event2 = event_new();
 event_set($event2, $tmpfile, 0, 'onTimer', $interval);
 $res = event_base_set($event2, $base);
 event_add($event2, 1000000 * $interval);
}
event_delete($event);
event_free($event);
event_base_free($base);

event_base_set($event, $base);
event_add($event);
function onAccept($socket, $flag, $base) {
 global $id, $buffers, $ctx_connections;
 $id++;
 $connection = stream_socket_accept($socket);
 stream_set_blocking($connection, 0);
 $buffer = event_buffer_new($connection, 'onRead', NULL, 'onError', $id);
 event_buffer_base_set($buffer, $base);
 event_buffer_timeout_set($buffer, 30, 30);
 event_buffer_watermark_set($buffer, EV_READ, 0, 0xffffff); event_buffer_priority_set($buffer, 10); event_buffer_enable($buffer, EV_READ | EV_PERSIST); $ctx_connections[$id] = $connection;
 $buffers[$id] = $buffer;
}
#! /bin/sh
#
$appdir = /usr/share/myapp/app.php
$parms = --master –proc=8 --daemon
export $appdir
export $parms
if [ ! -x appdir ]; then
 exit 1
fi

if [ -x /etc/rc.d/init.d/functions ]; then
 . /etc/rc.d/init.d/functions
fi

RETVAL=0

start () {
 echo "Starting app"
 daemon /usr/bin/php $appdir $parms
 RETVAL=$?
 [ $RETVAL -eq 0 ] && touch /var/lock/subsys/mydaemon
 echo
 return $RETVAL
}

stop () {
 echo -n "Stopping $prog: "
 killproc /usr/bin/fetchmail
 RETVAL=$?
 [ $RETVAL -eq 0 ] && rm -f /var/lock/subsys/mydaemon
 echo
 return $RETVAL
}

case in
 start)
 start
 ;;
 stop)
 stop
 ;;
 restart)
 stop
 start
 ;;
 status)
 status /usr/bin/mydaemon
 ;;
 *)
echo "Usage: {start|stop|restart|status}"
;;
RETVAL=$?
exit $RETVAL
#php app.phar
myDaemon version 0.1 Debug
usage:
--daemon – run as daemon
--debug – run in debug mode
--settings – print settings
--nofork – not run child processes
--check – check dependency modules
--master – run as master
--proc=[8] – run child processes

$key = ftok(__FILE__, 'A');
$queue = msg_get_queue($key);

msg_send($queue, 1, 'message, type 1');
msg_send($queue, 2, 'message, type 2');
msg_send($queue, 3, 'message, type 3');
msg_send($queue, 1, 'message, type 1');

echo "send 4 messages
";
$key = ftok('queue-send.php', 'A');
$queue = msg_get_queue($key);

for ($i = 1; $i <= 3; $i++) {
 echo "type: {$i}
";

 while ( msg_receive($queue, $i, $msgtype, 4096, $message, false, MSG_IPC_NOWAIT) ) {
 echo "type: {$i}, msgtype: {$msgtype}, message: {$message}
";
 }
}
u% php queue-send.php
send 4 messages
u% php queue-receive.php
type: 1
type: 1, msgtype: 1, message: s:15:"message, type 1";
type: 1, msgtype: 1, message: s:15:"message, type 1";
type: 2
type: 2, msgtype: 2, message: s:15:"message, type 2";
type: 3
type: 3, msgtype: 3, message: s:15:"message, type 3";
while (msg_receive($queue, $i, $msgtype, 4096, $message, false, MSG_IPC_NOWAIT)) {
$key = ftok('queue-send.php', 'A');
$queue = msg_get_queue($key);

while ( msg_receive($queue, 0, $msgtype, 4096, $message) ) {
 echo "msgtype: {$msgtype}, message: {$message}
";
}
$pid = pcntl_fork();
$key = ftok('queue-send.php', 'A');
$queue = msg_get_queue($key);

if ($pid == -1) {
 exit;
} elseif ($pid) {
 exit;
} else {
 while ( msg_receive($queue, 0, $msgtype, 4096, $message) ) {
 echo "msgtype: {$msgtype}, message: {$message}
";
 }
}

posix_setsid();
$id = ftok(__FILE__, 'A');


$shmId = shm_attach($id);

$var = 1;

if (shm_has_var($shmId, $var)) {
 $data = (array) shm_get_var($shmId, $var);
} else {
 $data = array();
}

$data[time()] = file_get_contents(__FILE__);

shm_put_var($shmId, $var, $data);
$id = ftok(__DIR__ . '/shared-memory-write-base.php', 'A');
$shmId = shm_attach($id);
$var = 1;

if (shm_has_var($shmId, $var)) {
 $data = (array) shm_get_var($shmId, $var);
} else {
 $data = array();
}

foreach ($data as $key => $value) {
 $path = "/tmp/$key.php";
 file_put_contents($path, $value);

 echo $path . PHP_EOL;
}
$id = ftok(__FILE__, 'A');

$semId = sem_get($id);

sem_acquire($semId);

$data = file_get_contents(__DIR__.'/06050396.JPG', FILE_BINARY);

$shmId = shm_attach($id, strlen($data)+4096);
$var = 1;

if (shm_has_var($shmId, $var)) {
 $data = shm_get_var($shmId, $var);

 $filename = '/tmp/' . time();
 file_put_contents($filename, $data, FILE_BINARY);

 shm_remove($shmId);
} else {
 shm_put_var($shmId, $var, $data);
}

sem_release($semId);
<?php
namespace App;

use App\Comment;
use App\CommentVote;
use App\CommentSpam;
use App\User;
use Auth;

class CommentModel
{


}

?>
public function getAllComments($pageId)
 {
 $comments = Comment::where('page_id',$pageId)->get();

 $commentsData = [];


 foreach ($comments as $key) {
 $user = User::find($key->users_id);
 $name = $user->name;
 $replies = $this->replies($key->id);
 $photo = $user->first()->photo_url;
 $reply = 0;
 $vote = 0;
 $voteStatus = 0;
 $spam = 0;
 if(Auth::user()){
 $voteByUser = CommentVote::where('comment_id',$key->id)->where('user_id',Auth::user()->id)->first();
 $spamComment = CommentSpam::where('comment_id',$key->id)->where('user_id',Auth::user()->id)->first();


 if($voteByUser){
 $vote = 1;
 $voteStatus = $voteByUser->vote;
 }

 if($spamComment){
 $spam = 1;
 }
 }


 if(sizeof($replies) > 0){
 $reply = 1;
 }

 if(!$spam){
 array_push($commentsData,[
 "name" => $name,
 "photo_url" => (string)$photo,
 "commentid" => $key->id,
 "comment" => $key->comment,
 "votes" => $key->votes,
 "reply" => $reply,
 "votedByUser" =>$vote,
 "vote" =>$voteStatus,
 "spam" => $spam,
 "replies" => $replies,
 "date" => $key->created_at->toDateTimeString()
 ]);
 }


 }
 $collection = collect($commentsData);
 return $collection->sortBy('votes');
 }
protected function replies($commentId)
 {
 $comments = Comment::where('reply_id',$commentId)->get();
 $replies = [];


 foreach ($comments as $key) {
 $user = User::find($key->users_id);
 $name = $user->name;
 $photo = $user->first()->photo_url;

 $vote = 0;
 $voteStatus = 0;
 $spam = 0;


 if(Auth::user()){
 $voteByUser = CommentVote::where('comment_id',$key->id)->where('user_id',Auth::user()->id)->first();
 $spamComment = CommentSpam::where('comment_id',$key->id)->where('user_id',Auth::user()->id)->first();

 if($voteByUser){
 $vote = 1;
 $voteStatus = $voteByUser->vote;
 }

 if($spamComment){
 $spam = 1;
 }
 }
 if(!$spam){


 array_push($replies,[
 "name" => $name,
 "photo_url" => $photo,
 "commentid" => $key->id,
 "comment" => $key->comment,
 "votes" => $key->votes,
 "votedByUser" => $vote,
 "vote" => $voteStatus,
 "spam" => $spam,
 "date" => $key->created_at->toDateTimeString()
 ]);
 }


 }


 $collection = collect($replies);
 return $collection->sortBy('votes');
 }
public function createComment($arary)
 {
 $comment = Comment::create($array);


 if($comment)
 return [ "status" => "true","commentId" => $comment->id ];
 else
 return [ "status" => "false" ];
 }
<?php
namespace App;

use App\Comment;
use App\CommentSpam;
use App\CommentVote;
use App\User;
use Auth;

class CommentModel
{
 public function getAllComments($pageId)
 {
 $comments = Comment::where('page_id', $pageId)->get();

 $commentsData = [];

 foreach ($comments as $key) {
 $user = User::find($key->users_id);
 $name = $user->name;
 $replies = $this->replies($key->id);
 $photo = $user->first()->photo_url;
 $reply = 0;
 $vote = 0;
 $voteStatus = 0;
 $spam = 0;
 if (Auth::user()) {
 $voteByUser = CommentVote::where('comment_id', $key->id)->where('user_id', Auth::user()->id)->first();
 $spamComment = CommentSpam::where('comment_id', $key->id)->where('user_id', Auth::user()->id)->first();

 if ($voteByUser) {
 $vote = 1;
 $voteStatus = $voteByUser->vote;
 }

 if ($spamComment) {
 $spam = 1;
 }
 }

 if (sizeof($replies) > 0) {
 $reply = 1;
 }

 if (!$spam) {
 array_push($commentsData, [
 "name" => $name,
 "photo_url" => (string) $photo,
 "commentid" => $key->id,
 "comment" => $key->comment,
 "votes" => $key->votes,
 "reply" => $reply,
 "votedByUser" => $vote,
 "vote" => $voteStatus,
 "spam" => $spam,
 "replies" => $replies,
 "date" => $key->created_at->toDateTimeString(),
 ]);
 }

 }
 $collection = collect($commentsData);
 return $collection->sortBy('votes');
 }

 protected function replies($commentId)
 {
 $comments = Comment::where('reply_id', $commentId)->get();
 $replies = [];

 foreach ($comments as $key) {
 $user = User::find($key->users_id);
 $name = $user->name;
 $photo = $user->first()->photo_url;

 $vote = 0;
 $voteStatus = 0;
 $spam = 0;

 if (Auth::user()) {
 $voteByUser = CommentVote::where('comment_id', $key->id)->where('user_id', Auth::user()->id)->first();
 $spamComment = CommentSpam::where('comment_id', $key->id)->where('user_id', Auth::user()->id)->first();

 if ($voteByUser) {
 $vote = 1;
 $voteStatus = $voteByUser->vote;
 }

 if ($spamComment) {
 $spam = 1;
 }
 }
 if (!$spam) {

 array_push($replies, [
 "name" => $name,
 "photo_url" => $photo,
 "commentid" => $key->id,
 "comment" => $key->comment,
 "votes" => $key->votes,
 "votedByUser" => $vote,
 "vote" => $voteStatus,
 "spam" => $spam,
 "date" => $key->created_at->toDateTimeString(),
 ]);
 }

 }

 $collection = collect($replies);
 return $collection->sortBy('votes');
 }

 public function createComment($arary)
 {
 $comment = Comment::create($array);

 if ($comment) {
 return ["status" => "true", "commentId" => $comment->id];
 } else {
 return ["status" => "false"];
 }

 }

 public function voteComment($commentId, $array)
 {
 $comments = Comment::find($commentId);
 $data = [
 "comment_id" => $commentId,
 'vote' => $array->vote,
 'user_id' => $array->users_id,
 ];

 if ($array->vote == "up") {
 $comment = $comments->first();
 $vote = $comment->votes;
 $vote++;
 $comments->votes = $vote;
 $comments->save();
 }

 if ($array->vote == "down") {
 $comment = $comments->first();
 $vote = $comment->votes;
 $vote--;
 $comments->votes = $vote;
 $comments->save();
 }

 if (CommentVote::create($data)) {
 return true;
 }

 }

 public function spamComment($commentId, $array)
 {
 $comments = Comment::find($commentId);

 $comment = $comments->first();
 $spam = $comment->spam;
 $spam++;
 $comments->spam = $spam;
 $comments->save();

 $data = [
 "comment_id" => $commentId,
 'user_id' => $array->users_id,
 ];

 if (CommentSpam::create($data)) {
 return true;
 }

 }
}
?>
<?php

namespace App\Http\Controllers;

use Illuminate\Http\Request;
use App\Http\Requests;
use App\Comment;
use App\CommentVote;
use App\CommentSpam;
use App\User;
use Auth;

class CommentController extends Controller
{


 public function index($pageId)
 {
 $comments = Comment::where('page_id',$pageId)->get();

 $commentsData = [];


 foreach ($comments as $key) {
 $user = User::find($key->users_id);
 $name = $user->name;
 $replies = $this->replies($key->id);
 $photo = $user->first()->photo_url;
 $reply = 0;
 $vote = 0;
 $voteStatus = 0;
 $spam = 0;
 if(Auth::user()){
 $voteByUser = CommentVote::where('comment_id',$key->id)->where('user_id',Auth::user()->id)->first();
 $spamComment = CommentSpam::where('comment_id',$key->id)->where('user_id',Auth::user()->id)->first();


 if($voteByUser){
 $vote = 1;
 $voteStatus = $voteByUser->vote;
 }

 if($spamComment){
 $spam = 1;
 }
 }


 if(sizeof($replies) > 0){
 $reply = 1;
 }

 if(!$spam){
 array_push($commentsData,[
 "name" => $name,
 "photo_url" => (string)$photo,
 "commentid" => $key->id,
 "comment" => $key->comment,
 "votes" => $key->votes,
 "reply" => $reply,
 "votedByUser" =>$vote,
 "vote" =>$voteStatus,
 "spam" => $spam,
 "replies" => $replies,
 "date" => $key->created_at->toDateTimeString()
 ]);
 }


 }
 $collection = collect($commentsData);
 return $collection->sortBy('votes');
 }

 protected function replies($commentId)
 {
 $comments = Comment::where('reply_id',$commentId)->get();
 $replies = [];


 foreach ($comments as $key) {
 $user = User::find($key->users_id);
 $name = $user->name;
 $photo = $user->first()->photo_url;

 $vote = 0;
 $voteStatus = 0;
 $spam = 0;


 if(Auth::user()){
 $voteByUser = CommentVote::where('comment_id',$key->id)->where('user_id',Auth::user()->id)->first();
 $spamComment = CommentSpam::where('comment_id',$key->id)->where('user_id',Auth::user()->id)->first();

 if($voteByUser){
 $vote = 1;
 $voteStatus = $voteByUser->vote;
 }

 if($spamComment){
 $spam = 1;
 }
 }
 if(!$spam){


 array_push($replies,[
 "name" => $name,
 "photo_url" => $photo,
 "commentid" => $key->id,
 "comment" => $key->comment,
 "votes" => $key->votes,
 "votedByUser" => $vote,
 "vote" => $voteStatus,
 "spam" => $spam,
 "date" => $key->created_at->toDateTimeString()
 ]);
 }


 }


 $collection = collect($replies);
 return $collection->sortBy('votes');
 }


 public function store(Request $request)
 {
 $this->validate($request, [
 'comment' => 'required',
 'reply_id' => 'filled',
 'page_id' => 'filled',
 'users_id' => 'required',
 ]);
 $comment = Comment::create($request->all());
 if($comment)
 return [ "status" => "true","commentId" => $comment->id ];
 }


 public function update(Request $request, $commentId,$type)
 {
 if($type == "vote"){


 $this->validate($request, [
 'vote' => 'required',
 'users_id' => 'required',
 ]);

 $comments = Comment::find($commentId);
 $data = [
 "comment_id" => $commentId,
 'vote' => $request->vote,
 'user_id' => $request->users_id,
 ];

 if($request->vote == "up"){
 $comment = $comments->first();
 $vote = $comment->votes;
 $vote++;
 $comments->votes = $vote;
 $comments->save();
 }

 if($request->vote == "down"){
 $comment = $comments->first();
 $vote = $comment->votes;
 $vote--;
 $comments->votes = $vote;
 $comments->save();
 }

 if(CommentVote::create($data))
 return "true";
 }

 if($type == "spam"){


 $this->validate($request, [
 'users_id' => 'required',
 ]);

 $comments = Comment::find($commentId);


 $comment = $comments->first();
 $spam = $comment->spam;
 $spam++;
 $comments->spam = $spam;
 $comments->save();

 $data = [
 "comment_id" => $commentId,
 'user_id' => $request->users_id,
 ];

 if(CommentSpam::create($data))
 return "true";
 }
 }


 public function destroy($id)
 {
 }
}?>
<?php

namespace App\Http\Controllers;

use App\CommentModel;
use Illuminate\Http\Request;

class CommentController extends Controller
{

 private $commentModel = null;
 private function __construct()
 {
 $this->commentModel = new CommentModel();
 }


 public function index($pageId)
 {
 return $this->commentModel->getAllComments($pageId);
 }


 public function store(Request $request)
 {
 $this->validate($request, [
 'comment' => 'required',
 'reply_id' => 'filled',
 'page_id' => 'filled',
 'users_id' => 'required',
 ]);
 return $this->commentModel->createComment($request->all());
 }


 public function update(Request $request, $commentId, $type)
 {
 if ($type == "vote") {

 $this->validate($request, [
 'vote' => 'required',
 'users_id' => 'required',
 ]);

 return $this->commentModel->voteComment($commentId, $request->all());
 }

 if ($type == "spam") {

 $this->validate($request, [
 'users_id' => 'required',
 ]);

 return $this->commentModel->spamComment($commentId, $request->all());
 }
 }

}
?>

CREATE TABLE <code>mydbname</code>.<code>content</code> ( <code>ID</code> INT(11) NOT NULL AUTO_INCREMENT , <code>title</code> VARCHAR(100) NOT NULL , <code>content</code> LONGTEXT NOT NULL , <code>author</code> VARCHAR(50) NOT NULL , PRIMARY KEY (<code>ID</code>)) ENGINE = MyISAM COMMENT = 'content table';
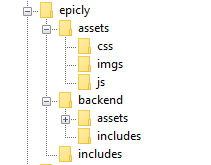
conn.php file in your root/includes folder.conn.php file, remember to include your own database credentials.
<?php

$letsconnect = new mysqli("localhost","dbuser","dbpass","dbname");

?>
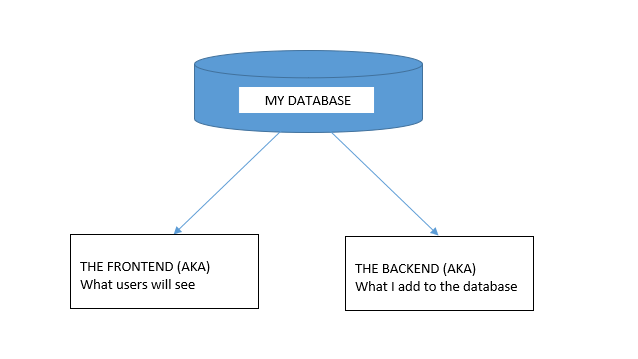
index.php at the root of your CMS folder.
<?php

include('includes/conn.php');

if ($letsconnect -> connect_errno) { echo "Error " . $letsconnect -> connect_error;

}else{

$getmydata=$letsconnect -> query("SELECT * FROM content");

foreach($getmydata as $mydata){	echo "Title: ";	echo $mydata['title'];	echo "<br/>";	echo "Content: ";	echo $mydata['content'];	echo "<br/>";	echo "Author: ";	echo $mydata['author'];	echo "<br/>";	echo "<br/>";

}

}

$letsconnect -> close();

?>
index.php in your backend folder.
<html>

<head><title>Backend - Capture Content</title></head>

<body>

<form action="<?php $_SERVER[‘PHP_SELF’];?>" method="post">

<input type="text" name="title" placeholder="Content Title here" required/>

<textarea name="content">Content Here</textarea>

<input type="text" name="author" placeholder="Author" required/>

<input type="submit" value="Save My Data" name="savedata"/>

</form>

</body>

</html>
<form>
<?php

if(isset($_POST['savedata'])){

include('../includes/conn.php');

if ($letsconnect->connect_error) {

die("Your Connection failed: " . $letsconnect->connect_error);

}else{

$sql = "INSERT INTO content(title,content,author)VALUES ('".$_POST["title"]."', '".$_POST["content"]."', '".$_POST["author"]."')";

if (mysqli_query($letsconnect, $sql)) {

echo "Your data was saved successfully!";

} else { echo "Error: " . $sql . "" . mysqli_error($letsconnect);

} $letsconnect->close();

}

}

?>
Note, this is a basic MySQL query to insert data. However, before using this in production it's important to add proper escaping and security to prevent SQL injections. This will be covered in the next article.
 g10dra 118,625
  mike 79,926
  crocodile2u 78,608
  harikrishnanr 62,462
  calevans 37,995
  MindNovae 28,984
  dmamontov 19,454
  tanja 16,788
  damnjan 13,223
  ahmedkhan
 SPONSORS

SPONSORS

