PHP & Web Development Blogs

Search Results For: code
Showing 11 to 15 of 47 blog articles.
13341 views · 5 years ago
Why Cloudways is the Perfect Managed Hosting for PHP Applications

The following is a sponsored blogpost by Cloudways


Developing an application is not the sole thing you should bank on. You must strive to find the best hosting solution to deploy that application also. The application’s speed is dependent on the hosting provider, that is why I always advise you to go for the best hosting solution to get the ultimate app performance.

Now a days, it is a big challenge to choose any web hosting, as each hosting has its own pros and cons which you must know, before considering it finally for the deployment. I don’t recommend shared hosting for PHP/Laravel based applications, because you always get lot of server hassles like downtime, hacking, 500 errors, lousy support and other problems that are part and parcel of shared hosting.

For PHP applications, you must focus on more technical aspects like caching, configs, databases, etc. because these are essential performance points for any vanilla or framework-based PHP application. Additionally, if the app focuses on user engagement (for instance, ecommerce store), the hosting solution should be robust enough to handle spikes in traffic.

Here, I would like to introduce Cloudways PHP server hosting to you which provides easy, developer and designer friendly managed hosting platform. With Cloudways, you don't need to focus on PHP hosting, but must focus on building your application. You can easily launch cloud servers on five providers including DigitalOcean, Linode, Vultr, AWS and GCE.


Cloudways ThunderStack


Being a developer, you must be familiar with the concept of stack - an arrangement of technologies that form the underlying hosting solution.

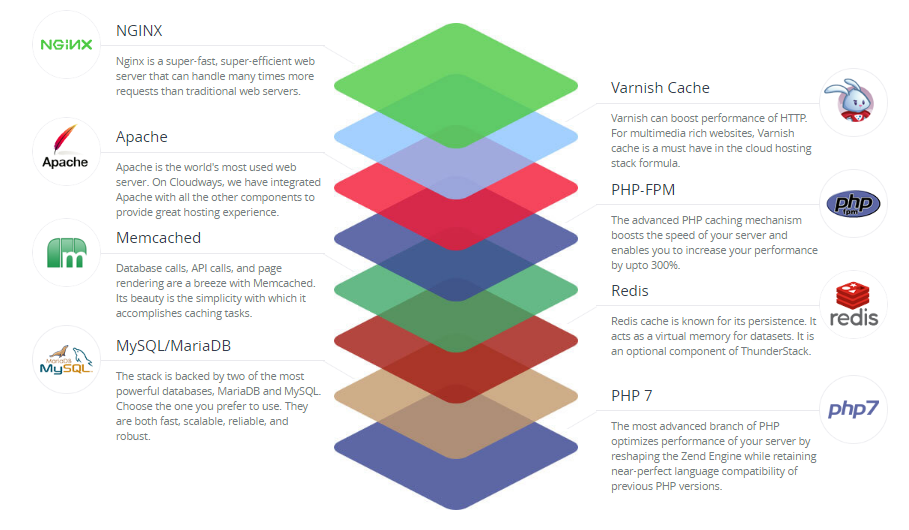
To provide a blazing fast speed and a glitch-free performance, Cloudways has built a PHP stack, known as ThunderStack. This stack consists of technologies that offer maximum uptime and page load speed to all PHP applications. Check out the following visual representation of ThunderStack and the constituent technologies:


alt_text


As you can see, ThunderStack comprises of a mix of static and dynamic caches with two web servers, Nginx and Apache. This combination ensures the ultimate experience for the users and visitors of your application.


Frameworks and CMS


The strength and popularity of PHP lies in the variety of frameworks and CMS it offers to the developers. Realizing this diversity, Cloudways offers a hassle-free installation of major PHP frameworks including Symfony, Laravel, CakePHP, Zend, and Codeigniter. Similarly, popular CMS such as WordPress, Bolt, Craft, October, Couch, and Coaster CMS - you can install these with the 1-click option. The best part is that if you have a framework or CMS that is not on the list, you can easily install it through Composer.


1-Click PHP Server & Application Installation


Setting up a stack on an unmanaged VPS could take an entire day!

When you opt for Cloudways managed cloud hosting, the entire process of setting up the server, installation of core PHP files and then the setup of the required framework is over in a matter of minutes.

Just sign up at Cloudways, choose your desired cloud provider, and select the PHP stack application.


alt_text


As you can see, your LAMP stack is ready for business in minutes.

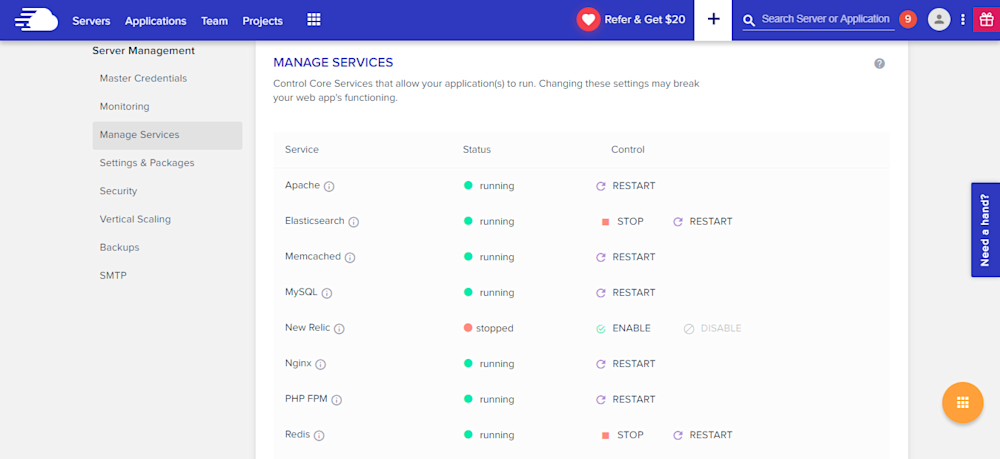
Many PHP applications fail because essential services are either turned off or not set up properly. Cloudways offers a centralized location where you can view and set the status of all essential services such as:


* Apache
* Elasticsearch
* Memcached
* MySQL
* PHP-FPM
* Nginx
* New Relic
* Redis
* Varnish


alt_text


Similarly, you can manage SMTP add-ons without any fuss.


Staging Environment


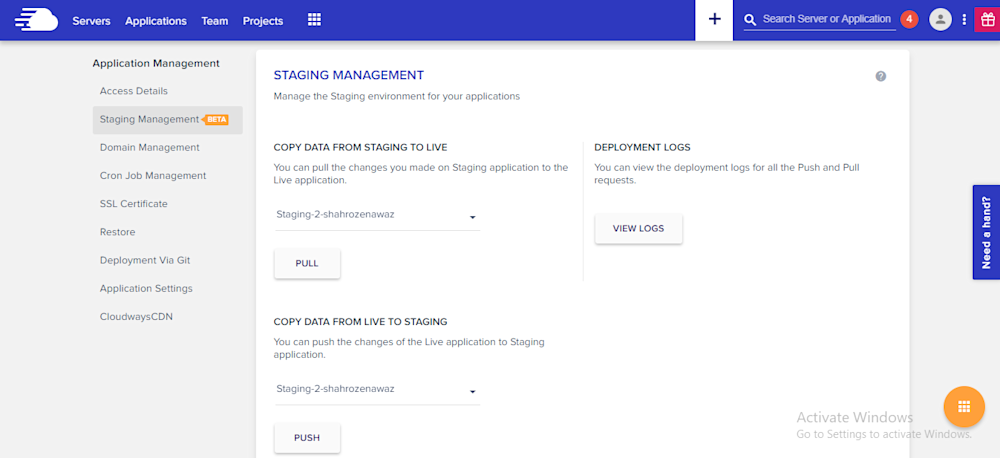
With Cloudways, you can test your web applications for possible bugs and errors before taking it live.

Using the staging feature, developers can first deploy their web sites on test domains where they can analyze the applications performance and potential problems. This helps site administrators to fix those issues timely and view the application performance in real-time.

A default sub domain comes pre-installed with the newly launched application, making it easy for the administrators to test the applications on those testing subdomains. Overall, it's a great feature which helps developers know about the possible errors that may arise during the live deployment.

alt_text

Pre-Installed Composer & Git


PHP development requires working with external libraries and packages. Suppose you are working with Laravel and you need to install an external package. Since Composer has become the standard way of installing packages, it comes preinstalled on the Cloudways platform. Just launch the application and start using Composer in your project.

Similarly, if you are familiar with Git and maintain your project on GitHub or BitBucket, you don’t need to worry about Git installation. Git also comes pre-configured on Cloudways. You can start running commands right after application launch.


Cloudways MySQL Manager


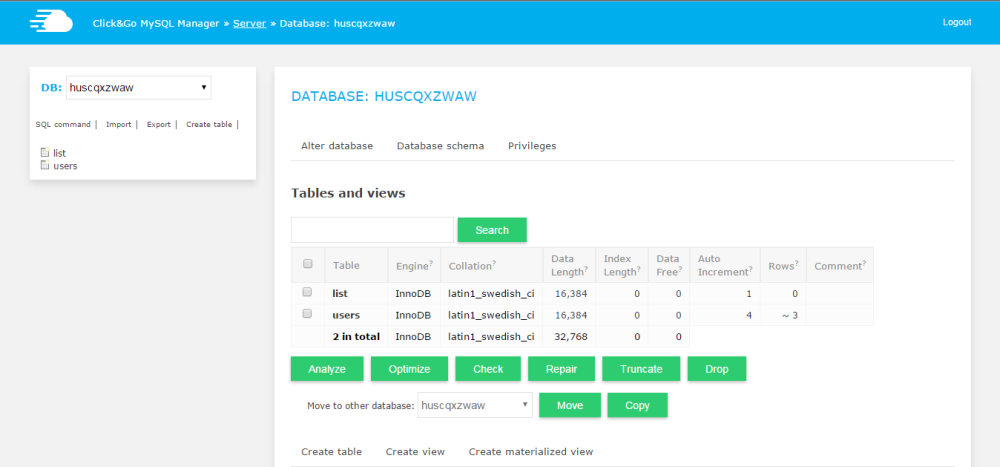
When you work with databases in PHP, you need a database manager. On the Cloudways platform, you will get a custom-built MySQL manager, in which you can perform all the tasks of a typical DB manager.

alt_text


However, if you wish to install and use another database manager like PHPMyAdmin, you can install it by following this simple guide on installing PHPMyadmin.


Server & Application Level SSH


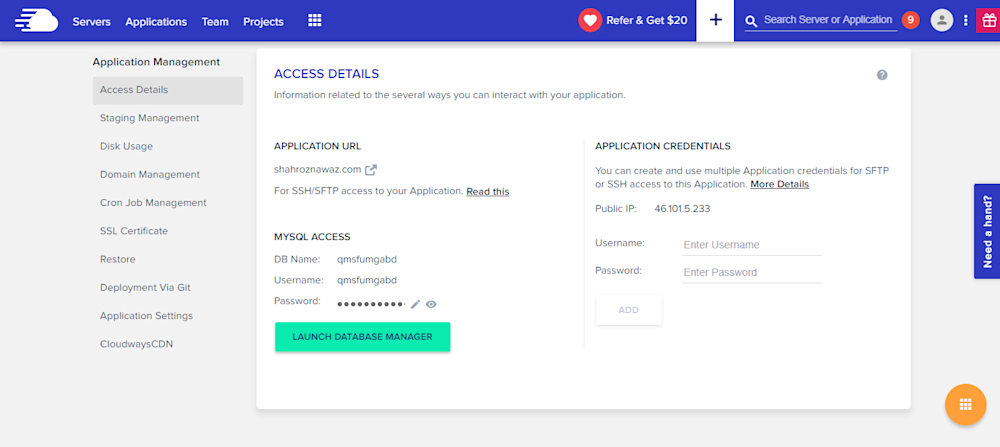
If you use Linux, you typically use SSH for accessing the server(s) and individual applications. A third-party developer requires application and server level access as per the requirements of the client. Cloudways offers SSH access to fit the requirements of the client and users.

alt_text


PHP-FPM, Varnish & Cron Settings


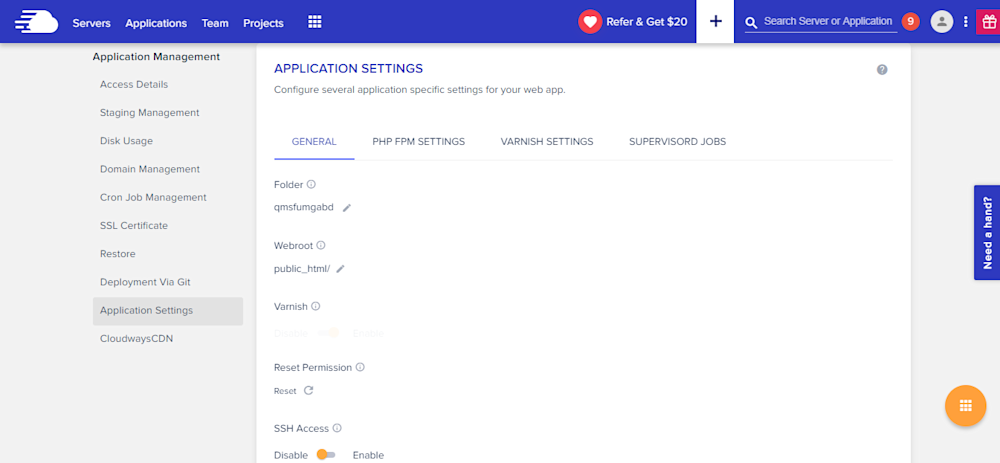
Cloudways provides custom UI panel to set and maintain PHP-FPM and Varnish settings. Although the default configuration is already in place, you can easily change all the settings to suit your own, particular development related requirements. In Varnish settings, you can define URL that you want to exclude from caching. You can also set permissions in this panel.

alt_text


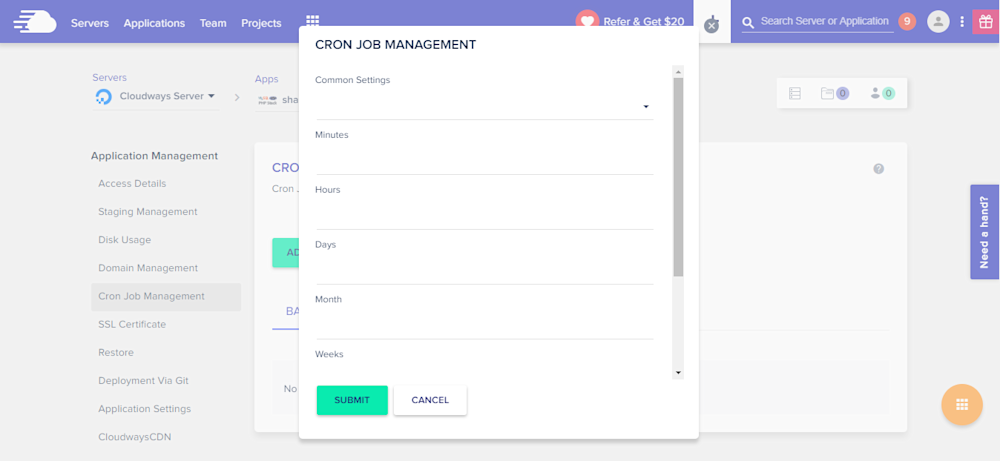
Cron job is a very commonly used component of PHP application development process. On Cloudways platform, you can easily set up Cron jobs in just a few clicks. Just declare the PHP script URL and the time when the script will run.

alt_text


Cloudways API & Personal Assistant Bot


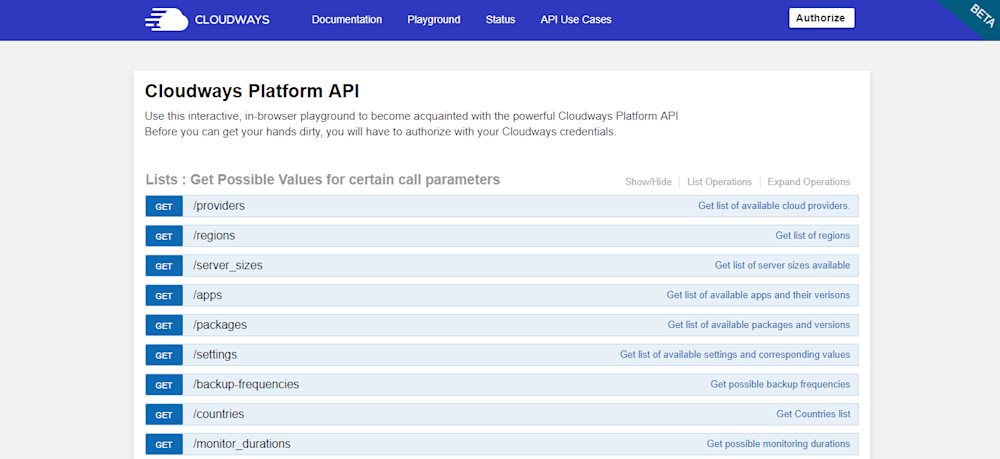
Cloudways provides an internal API that offers all important aspects of the server and application management. Through Cloudways API, you can easily develop, integrate, automate, and manage your servers and web apps on Cloudways Platform using the RESTful API. Check out some of the use cases developed using Cloudways API. You just need your API key and email for authentication of the HTTP calls on API Playground and custom applications.

alt_text


Cloudways employs a smart assistant named CloudwaysBot to notify all users about server and application level issues. CloudwaysBot sends the notifications on pre-approved channels including email, Slack and popular task management tools such as Asana and Trello.


Run Your APIs on PHP Stack


Do you have your own API which you want to run on the PHP stack? No problem, because you can do that, too with Cloudways! You can also use REST API like Slim, Silex, Lumen, and others. You can use APIs to speed up performance and require fast servers with lots of resources. So, if you think that your API response time is getting slower due to the large number of requests, you can easily scale your server(s) with a click to address the situation.


Team Collaboration


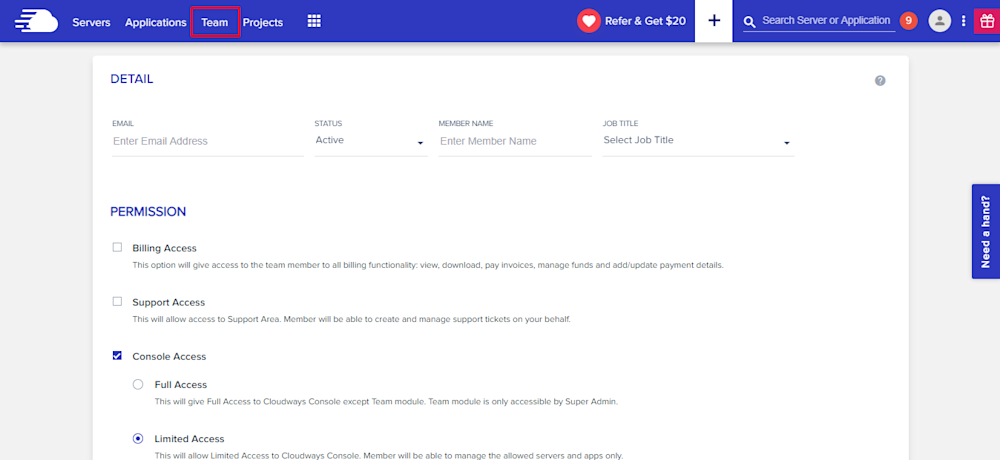
When you work on a large number of applications with multiple developers, you need to assign them on any specific application. Cloudways provides an awesome feature of team collaboration through which you can assign developers to specific application and give access to them. You can use this tool to assign one developer to multiple applications. Through team feature, you can connect the team together and work on single platform. Access can be of different type; i.e. billing, support and console. You can either give the full access or a limited one by selecting the features in Team tab.

alt_text


Final Words


Managed cloud hosting ensures that you are not bothered by any hosting or server related issues. For practical purposes, this means that developers can concentrate on writing awesome code without worrying about underlying infrastructure and hosting related issues. Do sign up and check out Cloudways for the best and the most cost-effective cloud hosting solution for your next PHP project!
7823 views · 5 years ago
Custom extension to Laravel Application class

Hello folks! This post is for those of you using Laravel. This beautiful framework makes web development super-easy compared to most of competitors. In the heart of Laravel is the Application class, which is responsible for bootstrapping, registering services and also serves as a dependency injection container. What I do with my Laravel apps, is that I take a slight detour from the common path by adding a custom Application class. While this is not really necessary, I find this approach nice, and will try to share my thought below.

It's normal practice in Laravel world to build all kinds of objects like this:

$cache = app("cache");


I find it a bit confusing to call app("cache"") and expect a Cache\Repository instance as result. If I pass the result of this call to a function that requires a Cache\Repository as parameter, I will probably have a code inspection warning from IDE. Moreover, if I want proper autocompletion, I will have to add additional comment:


$cache = app("cache");


This is where a custom application class might be handy:

namespace App;
class MyApp extends Application
{
public function cacheRepository(): Repository
{
return $this->make(Repository::class);
}
}


This way I get a TypeError in case of a misconfiguration, and I have a type-hint which allows the IDE to recognize the return value. Bye-bye nasty comment lines and IDE warnings! I make a method per service, with type-hints, like dbConnection() or viewFactory() - works really well for me!

I also thought that, if I have a custom class, then all the custom setup that normally you have in bootstrap/app.php, should reside in that custom class:

namespace App;
class MyApp extends Application
{
public function __construct()
{
define('LARAVEL_START', microtime(true));
define("APP_ROOT", realpath(__DIR__ . "/../"));
parent::__construct(APP_ROOT);
$this->setUp();
}
private function setUp()
{
$this->singleton(
Contracts\Http\Kernel::class,
\App\Http\Kernel::class
);
}
}


Then your bootstrap/app.php becomes just this:

return new \App\MyApp;


The Laravel app() function will also return an instance of MyApp from now on. However, it's @phpdoc says it returns \Illuminate\Foundation\Application, so for better clarity, I also added my own accessor method:

namespace App;
class MyApp extends Application
{
public static function app(): self
{

$ret = parent::getInstance();
return $ret;
}
}


I tend to limit the use of global/static functions and methods, but sometimes it can be handy, and whenever I need an instance of MyApp, I just call MyApp::app(). The IDE wil be aware of the return type due to the type-hint, so I get everything I want for clean and clear development.
With your projects in Laravel, you may or may not want to follow this particular advice, but just be aware that extending a framework built-in classes for your team's comfort, is definitely something that can make your life easier. See you around, don't forget to leave comments!
12006 views · 4 years ago


It took me quite some time to settle on my first blog post in this series and I found myself thinking about the most requested functionality in my career – The good ‘ol Custom CMS – typically geared towards clients that want a straight forward, secure solution that can be expanded upon in a modular format and that’s their IP.

This will be our starting point. A blank slate to build something epic with clean code and even cleaner design. And in the spirit of building from scratch, I will refrain from using classes or a framework. The main reasoning behind this is to truly get everyone acquainted with and excited about PHP development.

Join me as I transform rudimentary code into something extraordinary that can be morphed into just about any Content, PHP, and MySQL driven project. So without further ado, let’s jump into it!

The bare necessities


If you’re just getting started with development, there’s a nifty bite sized server called UniformServer that will be your best friend throughout your coding career. PHPMyAdmin (an awesome visual db management tool) comes built in so if you’re looking for a work right out of the box solution, this is it.

Alternatively, you can opt for XAMPP or use an alternative server of your choice.

Now here’s where the exciting stuff begins, mapping things out.


I don’t see this done/encouraged often enough. Feel free to grab a piece of paper to logically map out your steps or produce a rough draft of where you’d like this project to go.

In this tutorial, I would like to achieve the following:


DB, DB, Set up your DB.


This requires a bit of planning but let’s start of with the basic structure we need to see this through.

We are going to need a user table and a content table and are a few ways to tackle this.

If you’re using the PHPMyAdmin tool you can create your database, add user permissions (Click on Permissions after creating your database), and create a table with ease.


If you’re like me and prefer to look at good ‘ol SQL then writing an SQL statement is the preferred approach.


CREATE TABLE <code>mydbname</code>.<code>content</code> ( <code>ID</code> INT(11) NOT NULL AUTO_INCREMENT , <code>title</code> VARCHAR(100) NOT NULL , <code>content</code> LONGTEXT NOT NULL , <code>author</code> VARCHAR(50) NOT NULL , PRIMARY KEY (<code>ID</code>)) ENGINE = MyISAM COMMENT = 'content table';

Understanding the SQL statement

In a nutshell we are creating a table with important fields. Namely:

####

ID | Title | Content | Author

#######

The ID field is our unique identifier.Now we can move on to the file structure.

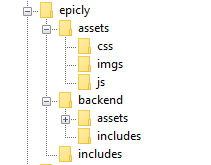
Everything has a place in the file structure game


You can use a structure that speaks to your coding style / memory.

I tend to use the following:


Choose a name for your CMS, which should be placed at the webroot of your localhost/server.

Replicate the folder structure as per the above example.

Next, we’re going to create a basic connection file.


You can create a conn.php file in your root/includes folder.

The connection file will provide crucial information to connect to the database.

Type the following into your conn.php file, remember to include your own database credentials.


<?php

$letsconnect = new mysqli("localhost","dbuser","dbpass","dbname");

?>


Let’s go to the homepage (index.php)


Create a file called index.php at the root of your CMS folder.

I will be adding comments in my code to help you understand what each line does.

Comments are a useful tool for developers to add important notes private to their code.

We need to pull information from the database so it’s imperative that we include our connection file.


<?php

include('includes/conn.php');

if ($letsconnect -> connect_errno) { echo "Error " . $letsconnect -> connect_error;

}else{

$getmydata=$letsconnect -> query("SELECT * FROM content");

foreach($getmydata as $mydata){ echo "Title: "; echo $mydata['title']; echo "<br/>"; echo "Content: "; echo $mydata['content']; echo "<br/>"; echo "Author: "; echo $mydata['author']; echo "<br/>"; echo "<br/>";

}

}

$letsconnect -> close();

?>


Let’s get a (very) basic backend up and running


Create a file called index.php in your backend folder.

We need to create a basic form to capture our data.

Let’s code some HTML!


<html>

<head><title>Backend - Capture Content</title></head>

<body>

<form action="<?php $_SERVER[‘PHP_SELF’];?>" method="post">

<input type="text" name="title" placeholder="Content Title here" required/>

<textarea name="content">Content Here</textarea>

<input type="text" name="author" placeholder="Author" required/>

<input type="submit" value="Save My Data" name="savedata"/>

</form>

</body>

</html>


Next, we need to process the form data.


Type the following just above the
<form> 
tag.


<?php

if(isset($_POST['savedata'])){

include('../includes/conn.php');

if ($letsconnect->connect_error) {

die("Your Connection failed: " . $letsconnect->connect_error);

}else{

$sql = "INSERT INTO content(title,content,author)VALUES ('".$_POST["title"]."', '".$_POST["content"]."', '".$_POST["author"]."')";

if (mysqli_query($letsconnect, $sql)) {

echo "Your data was saved successfully!";

} else { echo "Error: " . $sql . "" . mysqli_error($letsconnect);

} $letsconnect->close();

}

}

?>


Note, this is a basic MySQL query to insert data. However, before using this in production it's important to add proper escaping and security to prevent SQL injections. This will be covered in the next article.

Congrats you made it to the end of tutorial 1!


Test out your creation, modify your content, and play around.

Go to your sitename/index.php to see your frontend after capturing data via sitename/backend/index.php

Next Up:


codewithme Now With Security, Functionality, and Aesthetics in mind.


Conclusion


Coding doesn’t have to be daunting and it’s my aim to divide a complex system into bitesized tutorials so you can truly use the knowledge you’ve acquired in your own projects.
6274 views · 4 years ago


At Nomad PHP our goal is to empower developers in building a habit of continuous learning - and that means we have a habit of continuous improvement ourselves. Here are just some of the things we've done this year (with much more coming down the road)!

Website Redesign


We've refreshed the look and feel of Nomad PHP to better emphasize the goal of Nomad PHP - to help developers build a habit of continuous learning and grow their careers. This includes numerous usability enhancements as well as a focus on our new book library, blogs, and certification in addition to virtual meetups, workshops, conferences, and on-demand videos.

Free Meetups


As technology has advanced, more and more meetups and usergroups are able to stream their local usergroup meetings.

As our goal has always been to make technology accessible, we are proud to provide free streaming technology for local user groups, and share local user group meetings on our live virtual meetup schedule.

Student and Professional subscribers will continue to have access to our monthly conference level Pro Talks, hands on virtual workshops, and live conference streams in addition to streams by local user groups.

You can find a list of all upcoming talks (free and Pro) on our Live Meetings Page, or add your user group stream here.

Free Subscriber Tier


As our mission has evolved from being the meetup for developers without a meetup group to building an inclusive community of PHP developers where you can network, grow your skills, and share your knowledge with others - we are excited to announce our new Free Tier.

With a free Nomad PHP account you can:

* Stream free meetups

* Watch ad-supported videos in SD

* Read PHP blogs and write your own

* Network with other PHP developers

Create your free developer account to get started.

New Student Tier


To provide the best value, we've also restructured our plans to provide professional online meetings, workshops, and conference streaming to our Student Tier. This will allow students and new developers the chance to learn from the best speakers and top practioners and obtain entry level certifications at the best price possible.

However, with the addition of PHP Books and Magazines, and in order to provide the best value while keeping the Student plan affordable, new Student subscribers will not have access to the PHP Book and Magazine Library, or advanced certifications. These will now require a professional plan.

Student plans start at $12.95/mo

PHP Books and Magazines


We're excited to announce that we have expanded our PHP library. In addition to the ability to read the latest issues of php[architect] magazine, Professional subscribers now have access to read PHP and web development books online.

We're excited to announce the availability of Chris Hartjes' bookThe Grumpy Programmer's Guide to Testing PHP Applications, as well as several titles from Notes for Professionals, andUndisturbed REST: a Guide to Designing the Perfect API.

More titles including exclusive titles will be made available for online reading soon.

You can view our entire PHP Library here.

Blog Updates


We've received a lot of feedback on the blog writing process, and have upgraded several aspects of our blogging software. This includes the ability to save drafts prior to publishing, and the ability to upload, edit, and crop images and videos. We've also added some bug fixes for editing and writing code.

We're also excited to share that members with Student and Professional plans can now have their ownVLOG (video blog) with the ability to screencast/ record video from your webcam within the blog.

To see the most recent blog posts, or write your own, visit the Nomad PHP Blogs.

Certification Updates


We've updated our certifications for better usability and readability. We've also reworked some of the code samples and questions in our Level 1 PHP Certification exam.

You can find our available exams, test your skills, and obtain your Nomad PHP certification here.

Team Management


Our new team manager allows you to easily add or remove team members with your Nomad PHP team subscription. You'll also find real time metrics on how your team is using Nomad PHP, who on your team is investing in their growth and streaming meetups, watching videos, reading books, and earning certifications, and the overall content value consumed by your team.

The Team Manager is available to new teams, and will be made available to existing team managers over the next several weeks.

2020 Roadmap


There's still plenty of more great things coming in 2020. Here are the items at the top of our list:

* Mobile app for offline viewing

* Desktop app for offline viewing

* Nomad PHP member only books

* PHP Level 2 Certification

* Interactive tutorials

* Better video support in blogs

* Ability to schedule blog posts

* Meeting software for local usergroups

* Improved plan management for subscribers
Of course, what's most important to us is what's most important to you. Leave what you want to see on Nomad PHP in the comments below and if we're able to we'll get it added to our roadmap!
10414 views · 4 years ago


Welcome back!, if you’re new please be sure to read Part 1 here.


This tutorial will focus primarily on Security and will touch on how to plan functionality.

Planning out an application and seeing progress regularly is a good strategy as you are most likely to complete your tasks in a timely fashion with this approach.

Ready?, ok let’s jump into it!

DISCLAIMER


We highly recommend that you follow these tutorials on a localhost testing server like Uniserver. Read through Part 1 here to look at our recommendations. These tutorials follow a phased approach and it is highly recommended that you do not make snippets of code live prior to completing this tutorial series.
Where we left off – the serious stuff.


In the previous tutorial we saved variables to the database.

It’s important to note that further steps are needed to ensure that data transactions to / from the database are secure.

A great first step is to ensure that all POST data (data transmitted after a user clicks a form’s submit button) is sanitized.

What we’re trying to prevent


One of the most common exploits is SQL Injection, an attack most commonly used to insert SQL into db queries. POST data that’s not sanitized leaves a huge security hole for malicious exploits. In some cases SQL injection can be leveraged to rage an all out assault on a server’s operating system.

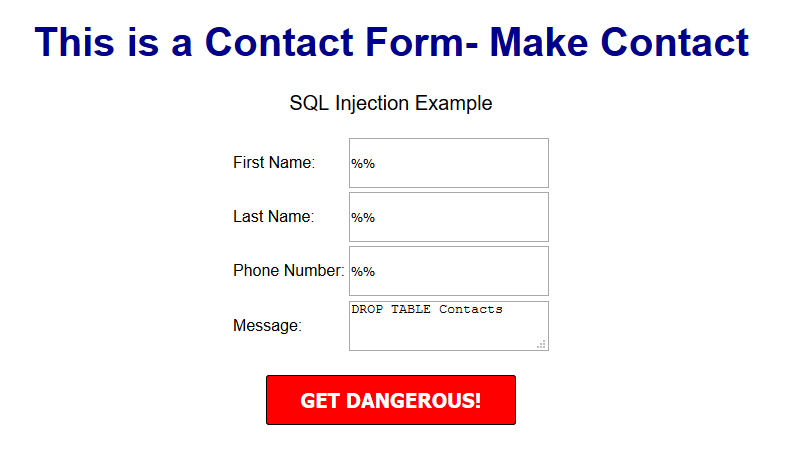
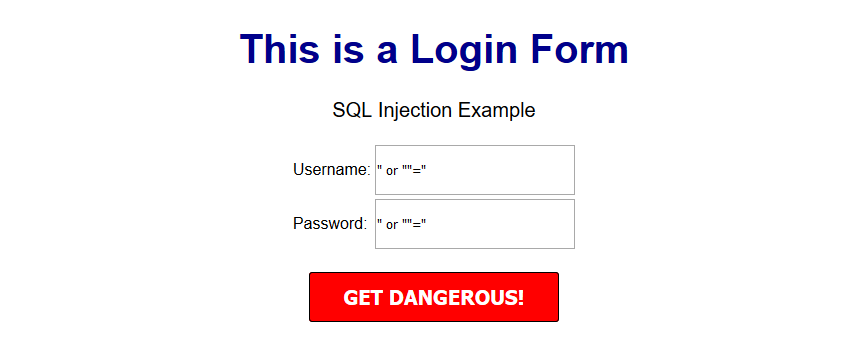
A few examples of a basic version of what this might look like can be seen below.


OUTCOME


This might delete your database table


OUTCOME


This might provide access to the entire user table and the password protected area/dashboard.


***Please note that there are various types of SQL injection techniques and I will delve into this during the course of this series.***


So what exactly is sanitization and what does it do?


When sanitizing POST data, we are essentially looking for any special characters that are often used in SQL injection attacks.

In many ways, this tiny piece of code is the unsung superhero of many database driven applications.

Let’s secure that POST data!


Navigate to your backend folder and open index.php

Locate the following line of code:

$sql = "INSERT INTO content(title,content,author)VALUES ('".$_POST["title"]."', '".$_POST["content"]."', '".$_POST["author"]."')";


Ok, let’s get to work.

Based on what I mentioned a few moments ago, it’s clear that our SQL statement is vulnerable so we need to sanitize the POST data pronto!

The method I will focus on first is $mysqli->real_escape_string. This will escape any special characters found in the POST data.

Add the following just above your $sql.

$title = $letsconnect -> real_escape_string($_POST['title']);

$content = $letsconnect -> real_escape_string($_POST['content']);

$author = $letsconnect -> real_escape_string($_POST['author']);


Did you notice the use of $letsconnect? This was used because of our db connection defined in conn.php.

Our new query will look like this:

$sql = "INSERT INTO content (title,content,author) VALUES ('".$title."', '".$content."', '".$author."')";


Go ahead and replace the old $sql.

Phew!, we can breathe easy now.

Next, let’s lighten things up a bit by focusing on functionality and aesthetics.


A phased approach is the best way to tackle projects of any size.

I tend to jot this down on paper before creating a more legible professional spec!.

Typically the phased approach lends itself to logical progression.

For example, over the next several days I will go over the following:

* Account Access
* The login process
* The registration process
* The password recovery process
* Frontend
* The look and feel
* Menus
* Sidebars
*Main Content
*Footer
* Backend
* Content Management
* Add/Edit/Delete
* Security

This will give us a good springboard to delve into more complex functionality.

The aesthetic I have in mind will be barebones at first with clean CSS practices (this will make life a whole lot easier when we have to make changes down the line!).

Challenge :


Plan out your own CMS, think about the user interface and design choices you’d like to implement, and create a phased approach.

Conclusion


I hope this tutorial encouraged you to think about security and understand one of the most common exploits. During the course of this series, you will receive the tools necessary to beef up security while maintaining your sanity!

Next up


CodeWithMe – Let’s go templating.

SPONSORS

The Ultimate Managed Hosting Platform