PHP & Web Development Blogs

Search Results For: building
Showing 6 to 10 of 17 blog articles.
5685 views · 4 years ago
Top 12 PHP Libraries to Leverage Your Web App Development


PHP, by all means, is an immensely powerful language!


We may fall short of words, but there won't come any end to its qualities. The endless functionalities and possibilities of this server-side scripting language have managed to get it a strong and supportive community of PHP programmers on a global level. At present, PHP powers more than half on websites and applications on the internet.


Do you know what makes PHP so praiseworthy?


It is the simplicity, easy programming structure, and developer-friendly web functionalities that are to be credited to turn PHP into one of the top programming languages. You can create highly interactive and dynamic websites and applications with desired results by making use of PHP.


However, coding often could be a tough and tedious task to accomplish. As a solution to this, you get built-in PHP libraries that optimize the process of coding for maximum productivity.


But what are these libraries?


That's exactly what you will find out as you move ahead in this article, a list of top 12 PHP libraries capable of leading the development process in an intended manner.


So, without waiting any further, let's move ahead to learn about PHP libraries in-depth.


PChart


PChart is a PHP library assisting with the generation of text data in the form of something more appealing to the eyes and known as visual charts.


You can use this library to represent data as bar charts, pie charts, and many more different formats. The PHP script here utilizes SQL queries to put data in the impressive charts or graphs form.


Mink


Another well-known in the list of PHP libraries is Mink. It allows you to keep an eye on if a proper interaction is happening between your web apps and the browser. Eliminating the API differences between the two types of browser emulators, Mink offers an authentic testing environment for you. It also supports PHPUnit, Behat, and Symfony2.


Monolog


Monolog is a PHP logging library that helps you with saving logs to the specified locations by sending them to set files, sockets, inboxes, databases, or other web services. The use of the PSR-3 interface permits to type-hint logs in counter to your libraries that maintain optimum interoperability.


Hoa


This modular, extensible, and structured set of PHP libraries we know as Hoa establishes a link between the research and the industry.


It recommends essential paradigms, mechanisms, and algorithms for building the reliability of a site. Many PHP developers in different parts of the world use Hoa for ideal PHP development.


Guzzle


Guzzle is an HTTP client library for PHP that enables you to send HTTP requests to combine with web services.


It offers a simple interface that makes the development of query strings, POST requests, HTTP cookies, and many other attributes possible. You can also use Guzzle to send synchronous and asynchronous requests from the similar interface.


Ratchet


If your need is to develop real-time, two-directional apps between clients and servers over WebSockets, Ratchet is the PHP library you need to do it effectively.


Creating event-driven apps with Ratchet is a rapid, simple, and easy job to do!


Geocoder


Geocoder is a library to create applications that are very well geo-aware.


With Geocoder, there is an abstraction layer that helps with geocoding manipulations.


It is further split into two parts, known as HttpAdapter and Provider.


ImageWorkshop


ImageWorkshop is an open-source PHP library letting you work over the manipulation of images with layers. You can crop, resize, add watermarks, create thumbnails, and so much more. You can also enhance the images on the sites.


PhpThumb


phpThumb is the library specialized at handling the work associated with creating thumbnails with minimal coding. Accepting every image source type and image formats, it makes you do a lot ranging from rotating or cropping to watermarking or defining the image quality.


Parody


This simple library we know as Parody is used to copy classes and objects. It also provides results for method calls, acquiring properties, instantiating objects, and more. Sequential method chaining is used by Parody to produce defining class structures.


Imagine


This object-oriented PHP library is meant for working with images along with manipulating them. The often adopted operations such as resizing, cropping, and applying filters happen instantly and relatively well with Imagine.


With Imagine, you get a color class that forms the RGB values of any given color. Draw shapes like arc, ellipse, line, etc. with the features available.


PhpFastCache


PhpFastCache is an open-source PHP library that makes caching feasible. Coming as a single-file, it can be integrated within a matter of minutes.


Caching methods supported by PhpFastCache involve apc, memcache, memcached, wincache, pdo, and mpdo.


The Bottom Line


It's not about what extra difference these libraries make; it's about what significant individual contributions these libraries make for a final desired PHP app or website.


A PHP programmer, too, agrees with these libraries' benefits.


It's your time now to try and believe!
4685 views · 4 years ago
Using AI for Weather Forecasting

Technology is constantly changing the way we interact, research, and react. One such way artificial intelligence is impacting our daily lives, and we may not even realize it is in weather forecasting.

The forecast we usually have been receiving in our phones and in older times primarily in newspapers, was based on data collected via satellites, radar system and weather balloons. In recent times there has been the addition of IoT based sensors as well. However, with the advent of Artificial Intelligence (AI) finding its way in numerous areas, AI has taken a role in improving the accuracy of weather as well.

The Dataset expansion

A significantly enormous set of data is available - from the weather satellites in space, to the private and government owned weather stations which are gaining real-time data. IBM for instance has more the 0.25 million weather stations that help IBM collect real-time data. Additionally, as we are in the age of Internet of Things (IOT), each small device to big device- cellphones, solar panels and vehicles everything has become or is yet to become yet another data source. Companies like GE have installed IOT street lights, which help in monitoring air quality and humidity. These are some of the few sources which help us in collecting the vast amount of data necessary for building on the AI technology, in future these sources and the amount of available data would grow exponentially.

Google and Weather forecast

Using the AI technology Google is able to develop a weather forecast tool, it has been trained to predict rainfalls accurately as much as six hours before. The underlying technology on which this prediction is build upon is U-Net convolutional neural network which is originally used in biomedical research. It works by taking satellite images as input and uses AI technology to transform these images into high resolution images. The only off-set is this is not real-time prediction and the delay due to complex calculations results in using six-hour old data and hence can only predict six-hours before.

IBM and its efforts in weather prediction

The quest for IBM to venture into weather forecasting began with IBM acquiring The Weather Company. IBM plans on using the large amount of weather data available coupled with IBM Watson and the cloud platform to enhance weather forecasting. In 2019 IBM developed Global High-Resolution Atmospheric Forecasting System (GRAF) in order to forecast weather conditions 12 hours prior to a greater degree of accuracy. The radius encompassed by the GRAF is also more narrowed down up to 3 kilometers as opposed to generally being 10-15 kilometers. Another of its marvel is that it gives accurate predictions down to each hour and not just daily.

Artificial Intelligence and Panasonic

Panasonic is the company behind TAMDAR, the weather sensor installed on commercial airplanes. With this advantage of extensive amount of data from in-flight sensors as well as publicly available data Panasonic developed Global 4D Weather. Proving to their claim of being the most advanced global forecasting platform globally they were able to timely predict Hurricane Irma in its early days.

Uses of Weather Forecasting


Sales

Everyday life decisions are affected by weather, it makes us choose in the way we travel, things we eat and things we buy to wear. The rise in temperature may increase sales of chilled drinks, if the company is fully aware of the forecast it would be able to manage productions as per demand. AI can help brands in maximizing sales based on weather forecasts and in minimizing waste.

Natural Disasters

The Panasonic Global 4D weather predicting Hurricane Irma is just another example where timely prediction can save millions of lives in face of situations like floods and Hurricanes. Companies like IBM combine weather forecasting data with utilities distribution network, which enables them to narrow down areas with likely outages. This enables utilities to place their workforce timely so the repair process catering to damage repairs post disasters is shortened. This in turn brings huge benefits to the overall economy.

Agriculture

The weather and agriculture have the most obvious correlation, each process in farming from sowing to reaping all depends on the weather. As farmers cultivate on huge farming lands, accurate information about each part of the land can help farmers in improving their crops and yield by manifolds. Weather conditions can lead to almost 90 percent of crop losses, 25 percent of these losses can be avoided using accurate AI prediction models to forecast weather and in turn improve the yield.

Transportation

Sea travel has always been eventful, timely prediction of storms by using machine learning techniques and hyper-local data allows companies to plan shipments accordingly and avoid severe weather conditions that usually result in delays. Tools like IBM’s Operations Dashboard for Ground Transportation equips in enhancing productivity based on weather predictions.

Another of the implementation of AI in transportation industry corelating to weather is fuel consumption. For instance, using weather prediction models to reduce airplane fuel consumption during its ascent.

To conclude Artificial Intelligence has a key role to play in weather forecasting, weather direct or indirectly impacts each sector in the economy. As the amount of information available to improve predictions increases exponentially it gives a chance to AI to improve accuracy even further. As we continue narrowing down weather conditions precise to time and location the benefits of such advancements across all industries are innumerable.

8685 views · 4 years ago


Welcome back! If you're new to this series have a look at Part 1 here

Today we are going to beef things up a bit and we will focus on the backend and some key CMS functionality.

It's time to get excited, this is where you'll start to see your barebones structure morph into something extraordinary!

Tired of my intro? That's ok! Let's jump into it!

Getting the DB on board


Before we delve into this, it's imperative that we take a minute and plan things out.

The database tables that are vital to any CMS are the menu, the user table, and the content table.

Our menu table will start of as follows:

CREATE TABLE 'mydbname'.'menus' ( 'ID' INT(11) NOT NULL AUTO_INCREMENT , 'menuname' VARCHAR(100) NOT NULL , 'item' VARCHAR(50) NOT NULL , 'itemlink' VARCHAR(100) NOT NULL , PRIMARY KEY ('ID')) ENGINE = MyISAM COMMENT = 'menu table';


Let's break this down a bit.

In the SQL above, we're creating a new table called menus.

Essentially our structure looks like this:

ID | Menuname | Item | Itemlink

Our ID field is our unique identifier (our PRIMARY KEY).

Tip: Remember, you can use raw SQL or a tool like PhpMyAdmin to create your db tables/execute SQL queries.

Next up is our user table.

CREATE TABLE 'mydbname'.'users' ( 'ID' INT(11) NOT NULL AUTO_INCREMENT , 'username' VARCHAR(100) NOT NULL , 'password' VARCHAR(50) NOT NULL , 'email' VARCHAR(100) NOT NULL , PRIMARY KEY ('ID')) ENGINE = MyISAM COMMENT = 'user table';


Visually represented this structure looks like this:

ID | Username | Password | Email

Our ID field is our unique identifier.

And finally, our content table modifications. You probably remember creating a rudimentary content table in Part 1 of the series.

ALTER TABLE 'mydbname'.'content' ADD content_type VARCHAR(50);


Yep, you guessed right, in the above statement we are altering our content table and adding a new field called content type.

Our new table structure now looks like this:

ID | Title | Content | Author | Content Type

Planning to Add to the Backend


Next , we're going to add a menu section, an add user section, and we'll also modify our content section.

Let's do this! reate a file called menus.php in your backend folder.

Next, code a HTML form to save your menu data.

The form needs the following fields:

Menu Name (we called this menuname in our db table).

Menu Item Name (we called this item in our db table).

Menu Link (we called this itemlink in our db table).

Try to follow Part 1 to do this on your own.

If you get a little stuck, that's ok. You can also follow the example below:

<form method="post" action="<?php $_SERVER['PHP_SELF'];?>"/>

<input type="text" name="menuname" class="mytextbox" placeholder="Menu Name" required />

<input type="text" name="item" class="mytextbox" placeholder="Item" required />

<input type="text" name="itemlink" class="mytextbox" placeholder="Item Link" required />

<input type="submit" value="Save Menu Item" name="savemenu" class="mybutton"/>

</form>


Notice the use of CSS classes? The gravy!

This will come in handy in our next tutorial.

Next, let's add the form processing code as we need to save these fields to the database. Remember to use the sanitization technique you learned in Part 2.

Add this above your <form> tag.

<?php

if(isset($_POST['savemenu'])){

include('../includes/conn.php');

if ($letsconnect->connect_error) {

die("Your Connection failed: " . $letsconnect->connect_error);

}else{

$menuname = $letsconnect ->real_escape_string($_POST['menuname']);

$item = $letsconnect -> real_escape_string($_POST['item']);

$itemlink = $letsconnect->real_escape_string($_POST['itemlink']);

$sql = "INSERT INTO menus(menuname,item,itemlink) VALUES ('".$menuname."', '".$item."', '".$itemlink."')";

if (mysqli_query($letsconnect, $sql)) {

echo "Your data was saved successfully!";

} else { echo "Error: " . $sql . "" . mysqli_error($letsconnect);

} $letsconnect->close();

}

}

?>


Ok phew, the menu data capturing section is done.

Let's move on to the user data capturing section, and modify the content capturing screen.

Repeat the steps above and create these two screens. Remember to keep an eye out for our database field names that we defined earlier! If you get stuck, look at the end result below:

Create adduser.php in your backend folder.

Create your data capturing form.


<form method="post" action="<?php $_SERVER['PHP_SELF'];?>"/>

<input type="text" name="username" class="mytextbox" placeholder="Username" required/>

<input type="password" name="password" class="mytextbox" placeholder="Password" required />

<input type="email" name="email" class="mytextbox" placeholder="Email" required />

<input type="submit" value="Save Menu Item" name="saveuser" class="mybutton"/>

</form>


Add your PHP processing code, remember the security!

Add this above your <form> tag.

<?php

if(isset($_POST[‘saveuser])){

include('../includes/conn.php');

if ($letsconnect->connect_error) {

die("Your Connection failed: " . $letsconnect->connect_error);

}else{

$menuname = $letsconnect -> real_escape_string($_POST[‘username']);

$item = $letsconnect -> real_escape_string($_POST[‘password']);

$itemlink = $letsconnect -> real_escape_string($_POST[‘email']);

$sql = "INSERT INTO menus(username,password,email) VALUES ('".$username."', '".$password."', '".$email."')";

if (mysqli_query($letsconnect, $sql)) {

echo "Your data was saved successfully!";

} else { echo "Error: " . $sql . "" . mysqli_error($letsconnect);

} $letsconnect->close();

}

}

?>


Please note that I will be covering Password security in the tutorials that follow.

Make sure that you are using your localhost server to complete this tutorial series. Do not publish your work until you complete this series.

Lastly, let's move to our content capturing screen which is currently found in index.php in the backend folder.

We will be changing this to a more professional dashboard in the tutorials that follow!
Our current file looks like this:


<html>

<head><title>Backend - Capture Content</title></head>

<body>

<?php

if(isset($_POST['savedata'])){

include('../includes/conn.php');

if ($letsconnect->connect_error) {

die("Your Connection failed: " . $letsconnect->connect_error);

}else{

$title = $letsconnect -> real_escape_string($_POST['title']);

$content = $letsconnect -> real_escape_string($_POST['content']);

$author = $letsconnect -> real_escape_string($_POST['author']);

$sql = "INSERT INTO content (title,content,author) VALUES ('".$title."', '".$content."', '".$author."')";

if (mysqli_query($letsconnect, $sql)) {

echo "Your data was saved successfully!";

} else { echo "Error: " . $sql . "" . mysqli_error($letsconnect);

} $letsconnect->close();

}

}

?>

<form action="<?php $_SERVER[‘PHP_SELF'];?>" method="post">

<input type="text" name="title" placeholder="Content Title here" required/>

<textarea name="content">Content Here</textarea>

<input type="text" name="author" placeholder="Author" required/>

<input type="submit" value="Save My Data" name="savedata"/>

</form>

</body>

</html>


We need to modify this slightly to include our new field, content_type.

Add the input field in your <form> above the submit button.


<input type="text" name="content_type" placeholder="Content Type" required/>;


Next, add the content_type to the sanitization lineup.

$content_type = $letsconnect->real_escape_string($_POST['content_type']);


Lastly, store this variable to the database by modifying the $sql.

$sql = "INSERT INTO content (title,content,author,content_type) VALUES ('".$title."', '".$content."', '".$author."', '".$content_type."')";
Conclusion


Chopping and changing is not always as daunting. Find a rhythm. There are many ways to make cumbersome coding a breeze and we will delve into that in the tutorials to come.

Challenge


Think of ways to test what we just did through retrieving and echoing data from the database.

Next Up: #CodeWithMe Part 5 Building a good base Continued

9491 views · 4 years ago


Welcome back! If you’re new to this series have a look at Part 1 here


Today’s focus is on templating, the aesthetic that will make or break your web application.

Having a clean design with well defined CSS that’s responsive and user friendly goes a long way.

Developers often stick to their lane but delving into templating will bode in your favor, you can indeed
create a functional and launch-worthy application all on your own!

Let’s jump into it!

Structured structure


Everything you tackle should be found with ease down the line. Therefore careful planning is fundamental to the success and sustainability of your project. You’ll also find that clearly defining your work lends itself to more productivity overall as you spend less that explaining your work during a handover / looking for a specific piece of code or resource. You’ll probably end up spending more time on actual work.
Finding your own unique pattern with file structure and CSS identifiers will also work in your favor as something unique to your process will most likely be easier to remember and form a tactile relationship with.

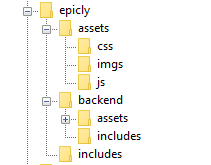
Our project’s current structure looks like this:


>If you need to backtrack, Part 1 is a great place to start!

In part 1, we created our index.php which displays info from our database.

Let’s take this a step further and create a header and a footer for our index.php

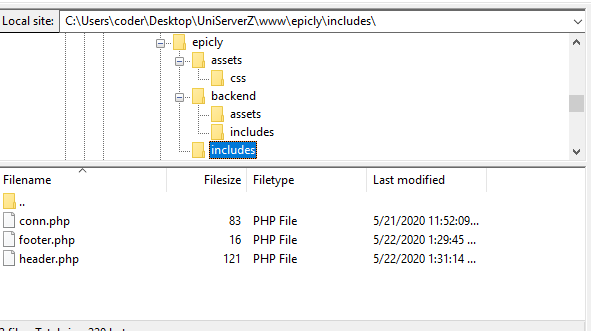
Create a file called header.php and save this to your includes folder.

Next, create a file called footer.php and save this to your includes folder.

Your file structure should now look like this.


A header above all the rest


The header file will be a file we reuse throughout your web application. This file will contain important information that’s vital to the functionality and aesthetic of your website.
The type of info you’ll expect to see in a header.php file:
Script includes
Such as JQuery and important libraries
CSS includes
CSS files loaded from internal or external sources
Meta information
Contains important information that’s readable by search engines.
The basic structure of the beginning of your app, including your menu, and your logo.
For now, how header is going to have a basic layout.

Let’s get our HTML on!

<html>
<head>
<title>My Awesome CMS – Page Title</title>
</head>
<body>


A footer that sets the bar

Create a file called footer.php and save it to your includes folder (yourcms/includes/footer.php).

Add this code to your new file.

</body>
</html>


Next, let’s focus on the gravy… The CSS


CSS, when written beautifully, can truly set you apart.

You can tell your web application to load various styles to specific elements by defining unique identifiers.
Styles that are only used once are denoted with a # (a CSS “ID”) whereas styles that are reused multiple times are denoted with a . (a CSS “class”)

The best way to delve into the realm of CSS is to learn by experience.

Let’s create!


First, we need to create and load our CSS file. Remember our nifty new pal header.php? This created a convenient way to load our CSS file!

Add the following code to your header.php just above the </head> tag.

<link href=”../assets/css/style.css” type=”text/css” rel=”stylesheet”/> 


The ../ in the link to our stylesheet means we have to leave the current directory (the directory that header.php is in) and look for the assets/css/ directories.

Go ahead and create the css folder under your assets folder.

Next we’re going to create some simple CSS to test things out.

It’s time to add some style!


We are going to create two divs.
A div is a divider / section in HTML.
Add this to your index.php (located in your CMS’ root folder) above the <?php tag.

<div id="myfirstid"></div>
<div class="myfirstclass"></div>


Then, create a CSS file

Add this:

#myfirstid{
Background:lightblue;
Font-family:Arial;
Font-size:44px;
Font-weight: Bold;
}
.myfirstclass{
Font-size:15px;
Color: darkblue;
}


Save your newly created CSS to assets/css/ as style.css.

Pulling it all together, let’s see what we can do!


Let’s apply what we just learned to our index.php. But first, we should add our header.php and footer.php files.

Including everyone


Add this to the top of your index.php file:

include(‘includes/header.php’);


Remove the <divs> we used for practice earlier, we have something better in store!

Add this to the bottom of your index.php:

include(‘includes/footer.php’);


Next, let’s modify our code so we can add some style to the data we retrieve from our database.

Modify the following line:
foreach($getmydata as $mydata){ echo "Title: "; echo $mydata['title']; echo "<br/>"; echo "Content: "; echo $mydata['content']; echo "<br/>"; echo "Author: "; echo $mydata['author']; echo "<br/>"; echo "<br/>";


as follows:
?>

<div id=”myfirstid”>
<?php
foreach($getmydata as $mydata){
echo "<div class=”myfirstclass”>Title: ";
echo $mydata['title'];
echo "<br/>";
echo "Content: ";
echo $mydata['content'];
echo "<br/>";
echo "Author: ";
echo $mydata['author'];
echo "</div><br/><br/>";
}?>
</div>
<?php


Your full index.php should now look like this:

<?php
include('includes/header.php');
include('includes/conn.php');

if ($letsconnect -> connect_errno) { echo "Error " . $letsconnect -> connect_error;

}else{

$getmydata=$letsconnect -> query("SELECT * FROM content");

?>
<div id="myfirstid">
<?php
foreach($getmydata as $mydata){
echo "<div class=”myfirstclass”>Title: ";
echo $mydata['title'];
echo "<br/>";
echo "Content: ";
echo $mydata['content'];
echo "<br/>";
echo "Author: ";
echo $mydata['author'];
echo "</div><br/><br/>";
}
?>
</div>
<?php
}

$letsconnect -> close();
include('includes/footer.php');
?>


Go ahead, test it out!

There’s a lot to unpack and I will break things down a little more during our next tutorial!

Challenge


Study the final index.php and try to form a few theories about why closing a php tag is necessary before adding raw html.

Next Up: #CodeWithMe Part 4: Building A Good Base

6273 views · 4 years ago


At Nomad PHP our goal is to empower developers in building a habit of continuous learning - and that means we have a habit of continuous improvement ourselves. Here are just some of the things we've done this year (with much more coming down the road)!

Website Redesign


We've refreshed the look and feel of Nomad PHP to better emphasize the goal of Nomad PHP - to help developers build a habit of continuous learning and grow their careers. This includes numerous usability enhancements as well as a focus on our new book library, blogs, and certification in addition to virtual meetups, workshops, conferences, and on-demand videos.

Free Meetups


As technology has advanced, more and more meetups and usergroups are able to stream their local usergroup meetings.

As our goal has always been to make technology accessible, we are proud to provide free streaming technology for local user groups, and share local user group meetings on our live virtual meetup schedule.

Student and Professional subscribers will continue to have access to our monthly conference level Pro Talks, hands on virtual workshops, and live conference streams in addition to streams by local user groups.

You can find a list of all upcoming talks (free and Pro) on our Live Meetings Page, or add your user group stream here.

Free Subscriber Tier


As our mission has evolved from being the meetup for developers without a meetup group to building an inclusive community of PHP developers where you can network, grow your skills, and share your knowledge with others - we are excited to announce our new Free Tier.

With a free Nomad PHP account you can:

* Stream free meetups

* Watch ad-supported videos in SD

* Read PHP blogs and write your own

* Network with other PHP developers

Create your free developer account to get started.

New Student Tier


To provide the best value, we've also restructured our plans to provide professional online meetings, workshops, and conference streaming to our Student Tier. This will allow students and new developers the chance to learn from the best speakers and top practioners and obtain entry level certifications at the best price possible.

However, with the addition of PHP Books and Magazines, and in order to provide the best value while keeping the Student plan affordable, new Student subscribers will not have access to the PHP Book and Magazine Library, or advanced certifications. These will now require a professional plan.

Student plans start at $12.95/mo

PHP Books and Magazines


We're excited to announce that we have expanded our PHP library. In addition to the ability to read the latest issues of php[architect] magazine, Professional subscribers now have access to read PHP and web development books online.

We're excited to announce the availability of Chris Hartjes' bookThe Grumpy Programmer's Guide to Testing PHP Applications, as well as several titles from Notes for Professionals, andUndisturbed REST: a Guide to Designing the Perfect API.

More titles including exclusive titles will be made available for online reading soon.

You can view our entire PHP Library here.

Blog Updates


We've received a lot of feedback on the blog writing process, and have upgraded several aspects of our blogging software. This includes the ability to save drafts prior to publishing, and the ability to upload, edit, and crop images and videos. We've also added some bug fixes for editing and writing code.

We're also excited to share that members with Student and Professional plans can now have their ownVLOG (video blog) with the ability to screencast/ record video from your webcam within the blog.

To see the most recent blog posts, or write your own, visit the Nomad PHP Blogs.

Certification Updates


We've updated our certifications for better usability and readability. We've also reworked some of the code samples and questions in our Level 1 PHP Certification exam.

You can find our available exams, test your skills, and obtain your Nomad PHP certification here.

Team Management


Our new team manager allows you to easily add or remove team members with your Nomad PHP team subscription. You'll also find real time metrics on how your team is using Nomad PHP, who on your team is investing in their growth and streaming meetups, watching videos, reading books, and earning certifications, and the overall content value consumed by your team.

The Team Manager is available to new teams, and will be made available to existing team managers over the next several weeks.

2020 Roadmap


There's still plenty of more great things coming in 2020. Here are the items at the top of our list:

* Mobile app for offline viewing

* Desktop app for offline viewing

* Nomad PHP member only books

* PHP Level 2 Certification

* Interactive tutorials

* Better video support in blogs

* Ability to schedule blog posts

* Meeting software for local usergroups

* Improved plan management for subscribers
Of course, what's most important to us is what's most important to you. Leave what you want to see on Nomad PHP in the comments below and if we're able to we'll get it added to our roadmap!

SPONSORS

PHP Tutorials and Videos