PHP & Web Development Blogs

Search Results For: laravel
Showing 6 to 10 of 13 blog articles.
13958 views · 6 years ago
Working With Thin Controller And Fat Model Concept In Laravel

Models and controllers are one of the most essential programming handlers in the Laravel MVC framework, and both are used vastly for different functional operations. Models in Laravel are created inside the app folder and are mostly used to interact with the database using Eloquent ORM, while the controllers are located inside the directory App/Http/Controllers.

As a programmer, you should have the knowledge how to keep the balance in between the programming usage of Models and controllers. As which one should be more utilized for allowing functional tasks in applications deployed on any PHP MySQL hosting.


What is the Concept of Thin Controller and FAT Models


The concept of the thin controller and fat model is that we do less work in our controllers and more work in our models. Like we use our controllers to validate our data and then pass it to the models. While in models, we define our actual functional logic and main coding operations of the desired application. This code structuring process is also a very basic concept of MVC and also the differentiating factor from the conventional complex programming which we mistakenly ignore sometimes.


Why FAT Controllers Are Bad For Handling Code


Controllers are always meant to be defined short and concise, and it should only be used for receiving requests and return responses to it. Anything else further should be programmed in Models, which is actually made for main functional operations.

Placing functional logic in controllers can be bad for many reasons for your applications deployed on anyhosting for PHP. As it not only makes code structure long but also makes it complex sometimes. Further placing code in Controllers is also not recommended because if same functionality is needed somewhere else in route, then pulling out the whole code from their becomes difficult and so its reusability in the application.

Though Laravel is an MVC framework while developing on laravel, we sometimes ignore this and write mostly all our code including the extending of App\Model and all our functional logic in controller route methods. What we can do here is we can create a sub model of our parent model. For example, our parent model is User then we can create another sub model of username in CustomerModel if you are using the same User model for all types of users. In this model, we will write all the logic related to user type Customer.

So now let's take an example of my existing blog creating comment system with laravel and vuejs. In that article, you can see I have made so much mess in my controller methods. Mostly, I have written all my comments logic in my methods, so to shorten that let's clean them in this article. Inside app folder, I will create a new file with name CommentModel.php. Inside this file, I will write my whole logic for comment functions. This is my basic file:


<?php
namespace App;

use App\Comment;
use App\CommentVote;
use App\CommentSpam;
use App\User;
use Auth;

class CommentModel
{


}

?>


Right now it contains no function but has the reference of all my models which I required for this model. Let's first add a function namedgetallcomments passing$pageId as a parameter inside it. The function will get all the comments for the given page:


public function getAllComments($pageId)
{
$comments = Comment::where('page_id',$pageId)->get();

$commentsData = [];


foreach ($comments as $key) {
$user = User::find($key->users_id);
$name = $user->name;
$replies = $this->replies($key->id);
$photo = $user->first()->photo_url;
$reply = 0;
$vote = 0;
$voteStatus = 0;
$spam = 0;
if(Auth::user()){
$voteByUser = CommentVote::where('comment_id',$key->id)->where('user_id',Auth::user()->id)->first();
$spamComment = CommentSpam::where('comment_id',$key->id)->where('user_id',Auth::user()->id)->first();


if($voteByUser){
$vote = 1;
$voteStatus = $voteByUser->vote;
}

if($spamComment){
$spam = 1;
}
}


if(sizeof($replies) > 0){
$reply = 1;
}

if(!$spam){
array_push($commentsData,[
"name" => $name,
"photo_url" => (string)$photo,
"commentid" => $key->id,
"comment" => $key->comment,
"votes" => $key->votes,
"reply" => $reply,
"votedByUser" =>$vote,
"vote" =>$voteStatus,
"spam" => $spam,
"replies" => $replies,
"date" => $key->created_at->toDateTimeString()
]);
}


}
$collection = collect($commentsData);
return $collection->sortBy('votes');
}


Now I will create another function namedreplies which takes$commentId as a parameter. The function is more or less programmed in the same manner as the upper function get all comments.


protected function replies($commentId)
{
$comments = Comment::where('reply_id',$commentId)->get();
$replies = [];


foreach ($comments as $key) {
$user = User::find($key->users_id);
$name = $user->name;
$photo = $user->first()->photo_url;

$vote = 0;
$voteStatus = 0;
$spam = 0;


if(Auth::user()){
$voteByUser = CommentVote::where('comment_id',$key->id)->where('user_id',Auth::user()->id)->first();
$spamComment = CommentSpam::where('comment_id',$key->id)->where('user_id',Auth::user()->id)->first();

if($voteByUser){
$vote = 1;
$voteStatus = $voteByUser->vote;
}

if($spamComment){
$spam = 1;
}
}
if(!$spam){


array_push($replies,[
"name" => $name,
"photo_url" => $photo,
"commentid" => $key->id,
"comment" => $key->comment,
"votes" => $key->votes,
"votedByUser" => $vote,
"vote" => $voteStatus,
"spam" => $spam,
"date" => $key->created_at->toDateTimeString()
]);
}


}


$collection = collect($replies);
return $collection->sortBy('votes');
}


Now lets create a functioncreate comment which passes$array as a parameter in it:


public function createComment($arary)
{
$comment = Comment::create($array);


if($comment)
return [ "status" => "true","commentId" => $comment->id ];
else
return [ "status" => "false" ];
}


Similarly, Now I will create all the function for comment in myCommentModel, so that all the functions gets accumulated in one model.


<?php
namespace App;

use App\Comment;
use App\CommentSpam;
use App\CommentVote;
use App\User;
use Auth;

class CommentModel
{
public function getAllComments($pageId)
{
$comments = Comment::where('page_id', $pageId)->get();

$commentsData = [];

foreach ($comments as $key) {
$user = User::find($key->users_id);
$name = $user->name;
$replies = $this->replies($key->id);
$photo = $user->first()->photo_url;
$reply = 0;
$vote = 0;
$voteStatus = 0;
$spam = 0;
if (Auth::user()) {
$voteByUser = CommentVote::where('comment_id', $key->id)->where('user_id', Auth::user()->id)->first();
$spamComment = CommentSpam::where('comment_id', $key->id)->where('user_id', Auth::user()->id)->first();

if ($voteByUser) {
$vote = 1;
$voteStatus = $voteByUser->vote;
}

if ($spamComment) {
$spam = 1;
}
}

if (sizeof($replies) > 0) {
$reply = 1;
}

if (!$spam) {
array_push($commentsData, [
"name" => $name,
"photo_url" => (string) $photo,
"commentid" => $key->id,
"comment" => $key->comment,
"votes" => $key->votes,
"reply" => $reply,
"votedByUser" => $vote,
"vote" => $voteStatus,
"spam" => $spam,
"replies" => $replies,
"date" => $key->created_at->toDateTimeString(),
]);
}

}
$collection = collect($commentsData);
return $collection->sortBy('votes');
}

protected function replies($commentId)
{
$comments = Comment::where('reply_id', $commentId)->get();
$replies = [];

foreach ($comments as $key) {
$user = User::find($key->users_id);
$name = $user->name;
$photo = $user->first()->photo_url;

$vote = 0;
$voteStatus = 0;
$spam = 0;

if (Auth::user()) {
$voteByUser = CommentVote::where('comment_id', $key->id)->where('user_id', Auth::user()->id)->first();
$spamComment = CommentSpam::where('comment_id', $key->id)->where('user_id', Auth::user()->id)->first();

if ($voteByUser) {
$vote = 1;
$voteStatus = $voteByUser->vote;
}

if ($spamComment) {
$spam = 1;
}
}
if (!$spam) {

array_push($replies, [
"name" => $name,
"photo_url" => $photo,
"commentid" => $key->id,
"comment" => $key->comment,
"votes" => $key->votes,
"votedByUser" => $vote,
"vote" => $voteStatus,
"spam" => $spam,
"date" => $key->created_at->toDateTimeString(),
]);
}

}

$collection = collect($replies);
return $collection->sortBy('votes');
}

public function createComment($arary)
{
$comment = Comment::create($array);

if ($comment) {
return ["status" => "true", "commentId" => $comment->id];
} else {
return ["status" => "false"];
}

}

public function voteComment($commentId, $array)
{
$comments = Comment::find($commentId);
$data = [
"comment_id" => $commentId,
'vote' => $array->vote,
'user_id' => $array->users_id,
];

if ($array->vote == "up") {
$comment = $comments->first();
$vote = $comment->votes;
$vote++;
$comments->votes = $vote;
$comments->save();
}

if ($array->vote == "down") {
$comment = $comments->first();
$vote = $comment->votes;
$vote--;
$comments->votes = $vote;
$comments->save();
}

if (CommentVote::create($data)) {
return true;
}

}

public function spamComment($commentId, $array)
{
$comments = Comment::find($commentId);

$comment = $comments->first();
$spam = $comment->spam;
$spam++;
$comments->spam = $spam;
$comments->save();

$data = [
"comment_id" => $commentId,
'user_id' => $array->users_id,
];

if (CommentSpam::create($data)) {
return true;
}

}
}
?>


Now we have all our required methods inCommentModel. So now let's clean upCommentController which is currently bit complex and lengthy in code structure. As right nowCommentController look like this:


<?php

namespace App\Http\Controllers;

use Illuminate\Http\Request;
use App\Http\Requests;
use App\Comment;
use App\CommentVote;
use App\CommentSpam;
use App\User;
use Auth;

class CommentController extends Controller
{


public function index($pageId)
{
$comments = Comment::where('page_id',$pageId)->get();

$commentsData = [];


foreach ($comments as $key) {
$user = User::find($key->users_id);
$name = $user->name;
$replies = $this->replies($key->id);
$photo = $user->first()->photo_url;
$reply = 0;
$vote = 0;
$voteStatus = 0;
$spam = 0;
if(Auth::user()){
$voteByUser = CommentVote::where('comment_id',$key->id)->where('user_id',Auth::user()->id)->first();
$spamComment = CommentSpam::where('comment_id',$key->id)->where('user_id',Auth::user()->id)->first();


if($voteByUser){
$vote = 1;
$voteStatus = $voteByUser->vote;
}

if($spamComment){
$spam = 1;
}
}


if(sizeof($replies) > 0){
$reply = 1;
}

if(!$spam){
array_push($commentsData,[
"name" => $name,
"photo_url" => (string)$photo,
"commentid" => $key->id,
"comment" => $key->comment,
"votes" => $key->votes,
"reply" => $reply,
"votedByUser" =>$vote,
"vote" =>$voteStatus,
"spam" => $spam,
"replies" => $replies,
"date" => $key->created_at->toDateTimeString()
]);
}


}
$collection = collect($commentsData);
return $collection->sortBy('votes');
}

protected function replies($commentId)
{
$comments = Comment::where('reply_id',$commentId)->get();
$replies = [];


foreach ($comments as $key) {
$user = User::find($key->users_id);
$name = $user->name;
$photo = $user->first()->photo_url;

$vote = 0;
$voteStatus = 0;
$spam = 0;


if(Auth::user()){
$voteByUser = CommentVote::where('comment_id',$key->id)->where('user_id',Auth::user()->id)->first();
$spamComment = CommentSpam::where('comment_id',$key->id)->where('user_id',Auth::user()->id)->first();

if($voteByUser){
$vote = 1;
$voteStatus = $voteByUser->vote;
}

if($spamComment){
$spam = 1;
}
}
if(!$spam){


array_push($replies,[
"name" => $name,
"photo_url" => $photo,
"commentid" => $key->id,
"comment" => $key->comment,
"votes" => $key->votes,
"votedByUser" => $vote,
"vote" => $voteStatus,
"spam" => $spam,
"date" => $key->created_at->toDateTimeString()
]);
}


}


$collection = collect($replies);
return $collection->sortBy('votes');
}


public function store(Request $request)
{
$this->validate($request, [
'comment' => 'required',
'reply_id' => 'filled',
'page_id' => 'filled',
'users_id' => 'required',
]);
$comment = Comment::create($request->all());
if($comment)
return [ "status" => "true","commentId" => $comment->id ];
}


public function update(Request $request, $commentId,$type)
{
if($type == "vote"){


$this->validate($request, [
'vote' => 'required',
'users_id' => 'required',
]);

$comments = Comment::find($commentId);
$data = [
"comment_id" => $commentId,
'vote' => $request->vote,
'user_id' => $request->users_id,
];

if($request->vote == "up"){
$comment = $comments->first();
$vote = $comment->votes;
$vote++;
$comments->votes = $vote;
$comments->save();
}

if($request->vote == "down"){
$comment = $comments->first();
$vote = $comment->votes;
$vote--;
$comments->votes = $vote;
$comments->save();
}

if(CommentVote::create($data))
return "true";
}

if($type == "spam"){


$this->validate($request, [
'users_id' => 'required',
]);

$comments = Comment::find($commentId);


$comment = $comments->first();
$spam = $comment->spam;
$spam++;
$comments->spam = $spam;
$comments->save();

$data = [
"comment_id" => $commentId,
'user_id' => $request->users_id,
];

if(CommentSpam::create($data))
return "true";
}
}


public function destroy($id)
{
}
}?>


After cleaning up the controller it will look much simpler and easy to understand like this:


<?php

namespace App\Http\Controllers;

use App\CommentModel;
use Illuminate\Http\Request;

class CommentController extends Controller
{

private $commentModel = null;
private function __construct()
{
$this->commentModel = new CommentModel();
}


public function index($pageId)
{
return $this->commentModel->getAllComments($pageId);
}


public function store(Request $request)
{
$this->validate($request, [
'comment' => 'required',
'reply_id' => 'filled',
'page_id' => 'filled',
'users_id' => 'required',
]);
return $this->commentModel->createComment($request->all());
}


public function update(Request $request, $commentId, $type)
{
if ($type == "vote") {

$this->validate($request, [
'vote' => 'required',
'users_id' => 'required',
]);

return $this->commentModel->voteComment($commentId, $request->all());
}

if ($type == "spam") {

$this->validate($request, [
'users_id' => 'required',
]);

return $this->commentModel->spamComment($commentId, $request->all());
}
}

}
?>


Wrap Up!


So Isn't it looking much cleaner and simpler to understand now? This is what actually a thin controller and fat model looks like. We have all our logic related to Comment system programmed in ourCommentModel and our controller is now just used to transfer data from the user to our model and returning the response which is coming from our model.

So this is how the structuring of the thin controller and fat model is made. Give your thoughts in the comments below.
13503 views · 5 years ago
Why Cloudways is the Perfect Managed Hosting for PHP Applications

The following is a sponsored blogpost by Cloudways


Developing an application is not the sole thing you should bank on. You must strive to find the best hosting solution to deploy that application also. The application’s speed is dependent on the hosting provider, that is why I always advise you to go for the best hosting solution to get the ultimate app performance.

Now a days, it is a big challenge to choose any web hosting, as each hosting has its own pros and cons which you must know, before considering it finally for the deployment. I don’t recommend shared hosting for PHP/Laravel based applications, because you always get lot of server hassles like downtime, hacking, 500 errors, lousy support and other problems that are part and parcel of shared hosting.

For PHP applications, you must focus on more technical aspects like caching, configs, databases, etc. because these are essential performance points for any vanilla or framework-based PHP application. Additionally, if the app focuses on user engagement (for instance, ecommerce store), the hosting solution should be robust enough to handle spikes in traffic.

Here, I would like to introduce Cloudways PHP server hosting to you which provides easy, developer and designer friendly managed hosting platform. With Cloudways, you don't need to focus on PHP hosting, but must focus on building your application. You can easily launch cloud servers on five providers including DigitalOcean, Linode, Vultr, AWS and GCE.


Cloudways ThunderStack


Being a developer, you must be familiar with the concept of stack - an arrangement of technologies that form the underlying hosting solution.

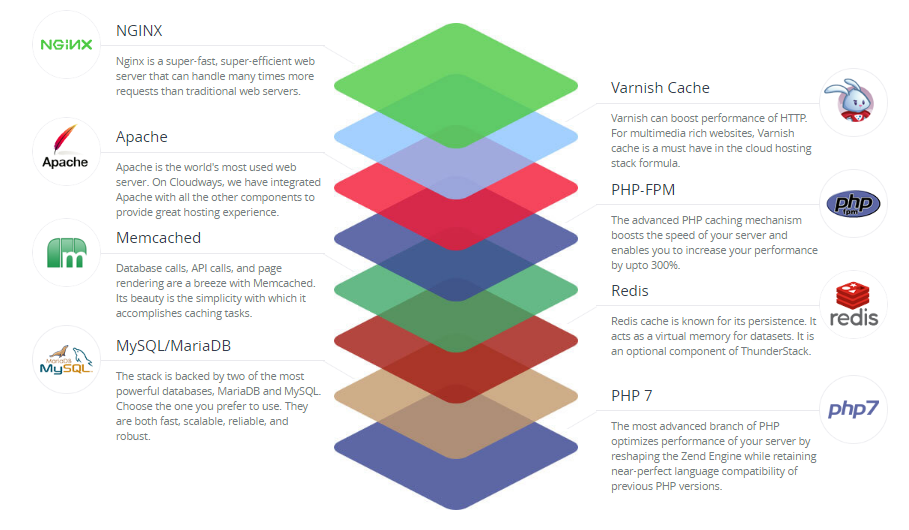
To provide a blazing fast speed and a glitch-free performance, Cloudways has built a PHP stack, known as ThunderStack. This stack consists of technologies that offer maximum uptime and page load speed to all PHP applications. Check out the following visual representation of ThunderStack and the constituent technologies:


alt_text


As you can see, ThunderStack comprises of a mix of static and dynamic caches with two web servers, Nginx and Apache. This combination ensures the ultimate experience for the users and visitors of your application.


Frameworks and CMS


The strength and popularity of PHP lies in the variety of frameworks and CMS it offers to the developers. Realizing this diversity, Cloudways offers a hassle-free installation of major PHP frameworks including Symfony, Laravel, CakePHP, Zend, and Codeigniter. Similarly, popular CMS such as WordPress, Bolt, Craft, October, Couch, and Coaster CMS - you can install these with the 1-click option. The best part is that if you have a framework or CMS that is not on the list, you can easily install it through Composer.


1-Click PHP Server & Application Installation


Setting up a stack on an unmanaged VPS could take an entire day!

When you opt for Cloudways managed cloud hosting, the entire process of setting up the server, installation of core PHP files and then the setup of the required framework is over in a matter of minutes.

Just sign up at Cloudways, choose your desired cloud provider, and select the PHP stack application.


alt_text


As you can see, your LAMP stack is ready for business in minutes.

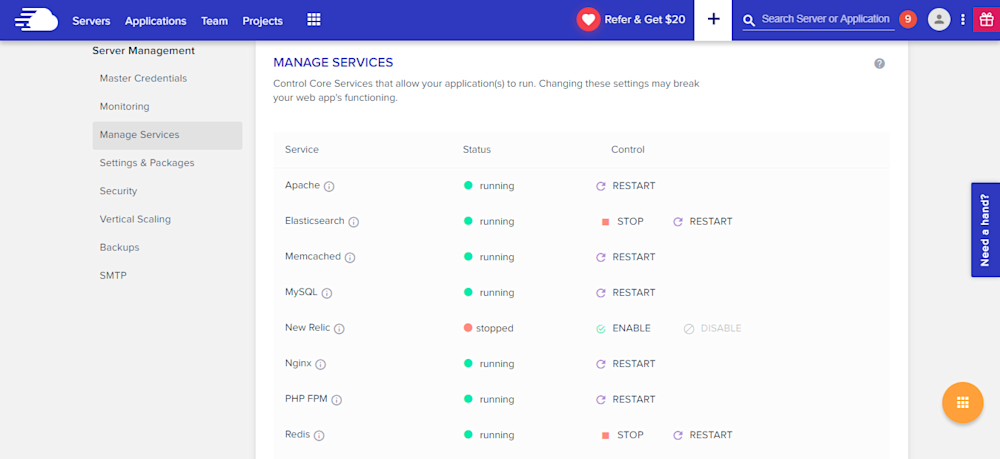
Many PHP applications fail because essential services are either turned off or not set up properly. Cloudways offers a centralized location where you can view and set the status of all essential services such as:


* Apache
* Elasticsearch
* Memcached
* MySQL
* PHP-FPM
* Nginx
* New Relic
* Redis
* Varnish


alt_text


Similarly, you can manage SMTP add-ons without any fuss.


Staging Environment


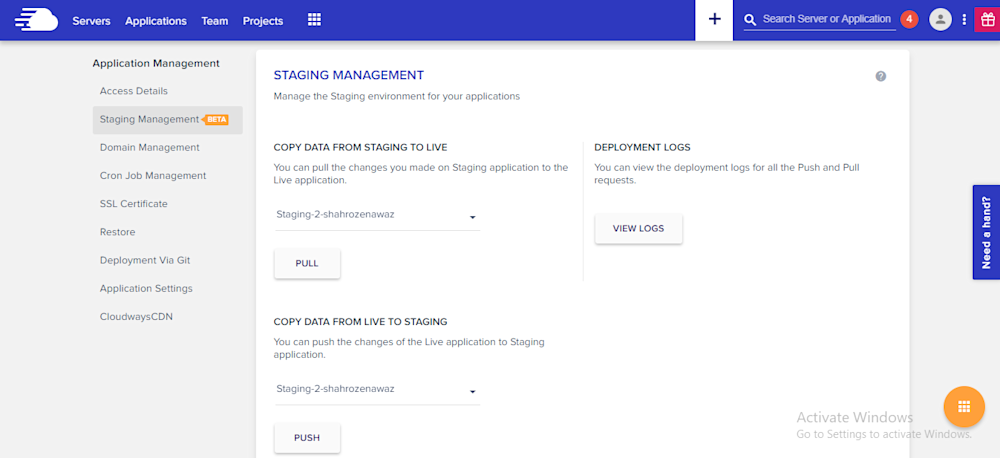
With Cloudways, you can test your web applications for possible bugs and errors before taking it live.

Using the staging feature, developers can first deploy their web sites on test domains where they can analyze the applications performance and potential problems. This helps site administrators to fix those issues timely and view the application performance in real-time.

A default sub domain comes pre-installed with the newly launched application, making it easy for the administrators to test the applications on those testing subdomains. Overall, it's a great feature which helps developers know about the possible errors that may arise during the live deployment.

alt_text

Pre-Installed Composer & Git


PHP development requires working with external libraries and packages. Suppose you are working with Laravel and you need to install an external package. Since Composer has become the standard way of installing packages, it comes preinstalled on the Cloudways platform. Just launch the application and start using Composer in your project.

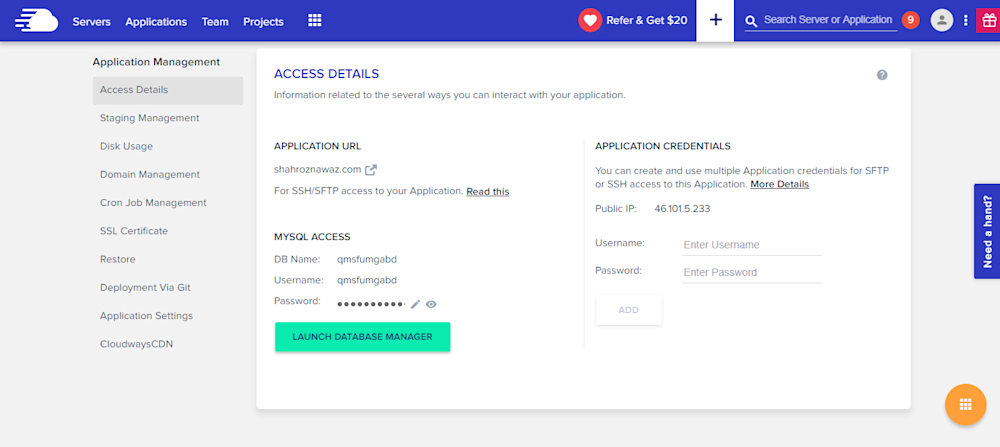
Similarly, if you are familiar with Git and maintain your project on GitHub or BitBucket, you don’t need to worry about Git installation. Git also comes pre-configured on Cloudways. You can start running commands right after application launch.


Cloudways MySQL Manager


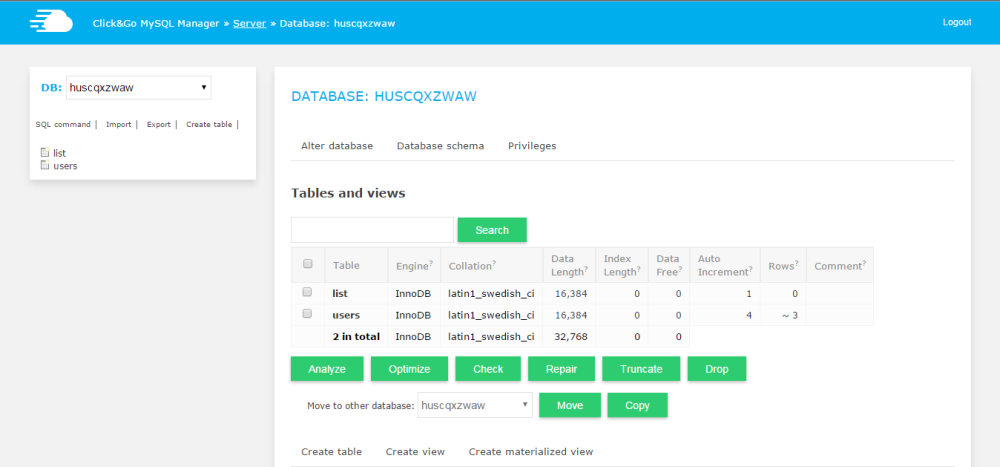
When you work with databases in PHP, you need a database manager. On the Cloudways platform, you will get a custom-built MySQL manager, in which you can perform all the tasks of a typical DB manager.

alt_text


However, if you wish to install and use another database manager like PHPMyAdmin, you can install it by following this simple guide on installing PHPMyadmin.


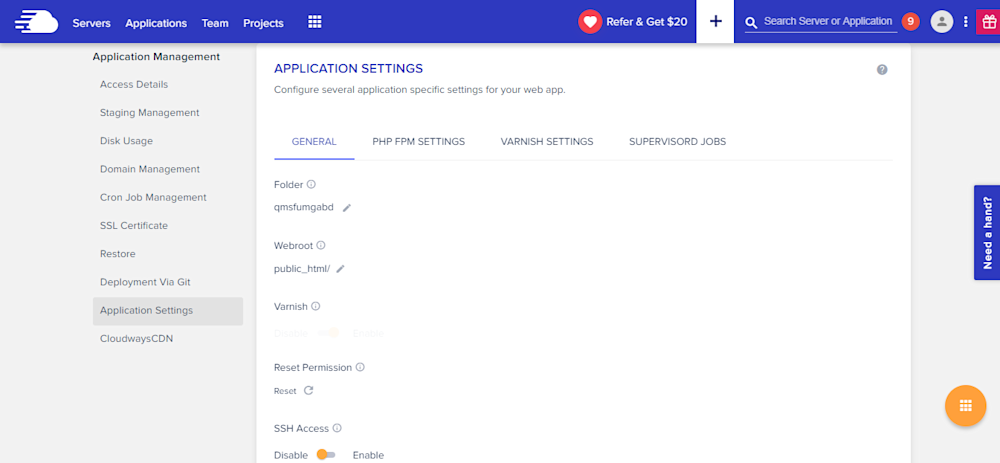
Server & Application Level SSH


If you use Linux, you typically use SSH for accessing the server(s) and individual applications. A third-party developer requires application and server level access as per the requirements of the client. Cloudways offers SSH access to fit the requirements of the client and users.

alt_text


PHP-FPM, Varnish & Cron Settings


Cloudways provides custom UI panel to set and maintain PHP-FPM and Varnish settings. Although the default configuration is already in place, you can easily change all the settings to suit your own, particular development related requirements. In Varnish settings, you can define URL that you want to exclude from caching. You can also set permissions in this panel.

alt_text


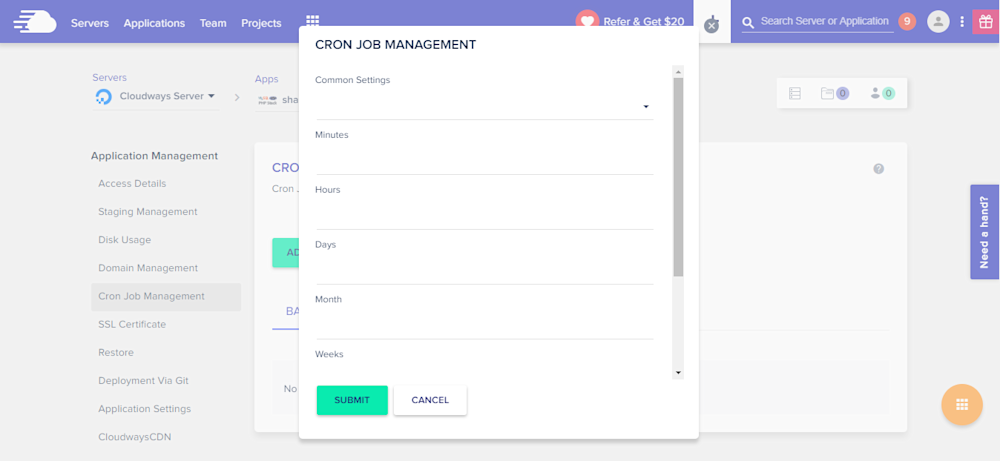
Cron job is a very commonly used component of PHP application development process. On Cloudways platform, you can easily set up Cron jobs in just a few clicks. Just declare the PHP script URL and the time when the script will run.

alt_text


Cloudways API & Personal Assistant Bot


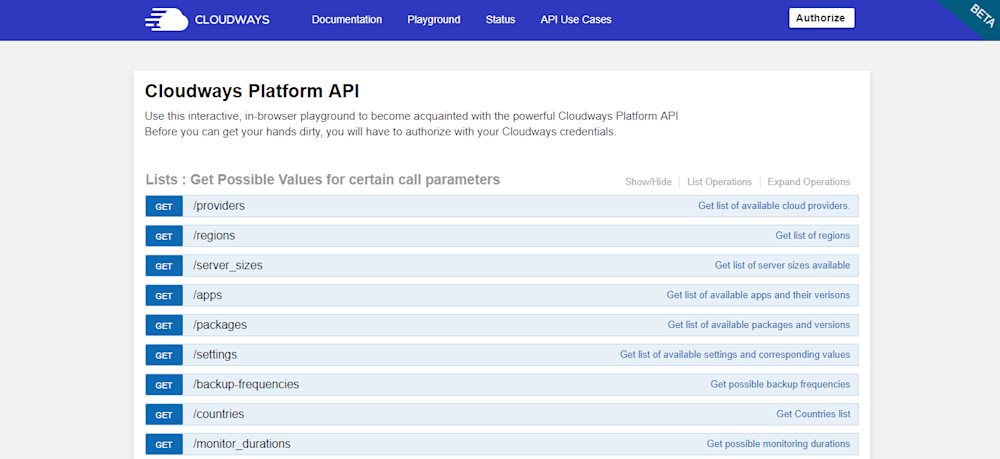
Cloudways provides an internal API that offers all important aspects of the server and application management. Through Cloudways API, you can easily develop, integrate, automate, and manage your servers and web apps on Cloudways Platform using the RESTful API. Check out some of the use cases developed using Cloudways API. You just need your API key and email for authentication of the HTTP calls on API Playground and custom applications.

alt_text


Cloudways employs a smart assistant named CloudwaysBot to notify all users about server and application level issues. CloudwaysBot sends the notifications on pre-approved channels including email, Slack and popular task management tools such as Asana and Trello.


Run Your APIs on PHP Stack


Do you have your own API which you want to run on the PHP stack? No problem, because you can do that, too with Cloudways! You can also use REST API like Slim, Silex, Lumen, and others. You can use APIs to speed up performance and require fast servers with lots of resources. So, if you think that your API response time is getting slower due to the large number of requests, you can easily scale your server(s) with a click to address the situation.


Team Collaboration


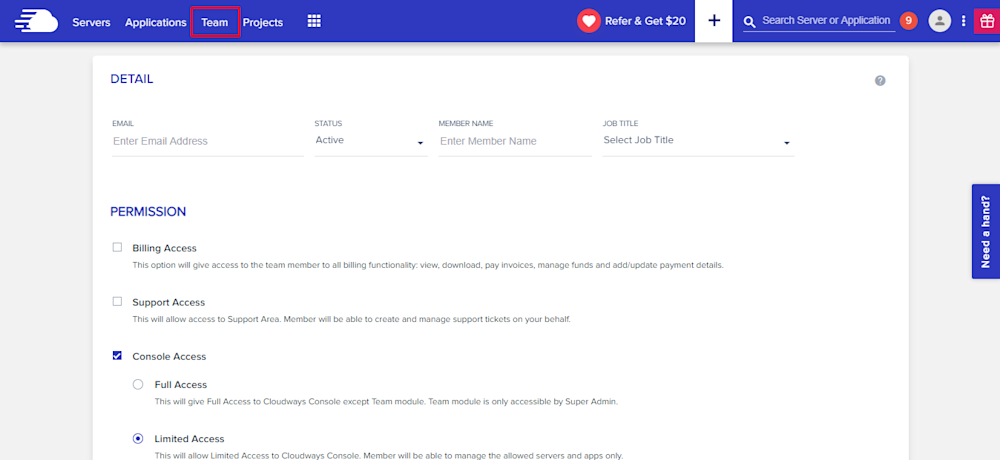
When you work on a large number of applications with multiple developers, you need to assign them on any specific application. Cloudways provides an awesome feature of team collaboration through which you can assign developers to specific application and give access to them. You can use this tool to assign one developer to multiple applications. Through team feature, you can connect the team together and work on single platform. Access can be of different type; i.e. billing, support and console. You can either give the full access or a limited one by selecting the features in Team tab.

alt_text


Final Words


Managed cloud hosting ensures that you are not bothered by any hosting or server related issues. For practical purposes, this means that developers can concentrate on writing awesome code without worrying about underlying infrastructure and hosting related issues. Do sign up and check out Cloudways for the best and the most cost-effective cloud hosting solution for your next PHP project!
10369 views · 6 years ago
Halloween is filled with ghouls, ghosts, zombies and lots of other spookiness, but the scariest thing ever is FOMO. It’s conference season and several have their call for papers out (including us at Nomad PHP :D). This is the perfect time for you to share your knowledge with the community. Whether it’s your first time or 100th time - it can be scary to put yourself out there and do a talk, but worse than that is not taking the chance and submitting your talk and doing the presentation. Plus, many of these events host lightning talks (short 5-15 minute talks) - meaning you can test out your talk risk free ;)

So here is your chance - submit for one or submit for all of them. May the odds be ever in your favor!

Fosdem 2019

First we have Fosdem 2019 which will take place on February 2 & 3 in Brussels,Belgium. Some facts about this call for papers:
*Deadline: November 3, 2018
* Presentations are expected to be 50 minutes long (including audience questions) and should cater to a varied technical audience. For examples check out youtube.
*Submit your proposals via Pentabarf: https://fosdem.org/submit.
* The conference covers reasonable travel expenses agreed upon in advance as well as arranges accommodations

Midwest PHP 2019

Next up we have Midwest PHP which will take place on March 8 & 9 in Bloomington, Minnesota.
*Deadline: November 15, 2018
* There is a speaker package included (conference pass, 2 hotel nights, airfare/travel - $500 max, lunch, etc.)
* Make sure the talk title and abstract define the exact topic and what you hope people will learn from it.
* Recommended to submit more than one talk because it can increase your chances of one of them being picked.
*Submit your talk here: [https://cfp.midwestphp.org/] (https://cfp.midwestphp.org/)

Longhorn PHP

Next we have Longhorn PHP which will take place on May 2 (tutorial day) then MAy 3 &4 (conference) in Austin, Texas.
*Deadline: December 15, 2018
* For all speakers, you'll get a full conference pass (tutorial day and main conference days), including access to lunch, after-parties, and any other activities included in the conference.
* For speakers remote to the Austin area, we'll provide 3 nights at the speaker hotel (4 nights if presenting a talk and a tutorial) near the conference venue.
* For speakers outside Texas, we'll book you an Economy or equivalent round-trip airfare on a flight into Austin we'd be comfortable taking ourselves (we're conference speakers too!). Plus, we'll arrange transportation between the Austin airport and the speaker hotel.
* Three different session lengths: 3 hour tutorials, 60 minute talks, and 30 minute talks.
* It doesn't have to just be a PHP related talk. For more information on talks click here.
*Submit your talk here: https://cfp.longhornphp.com/.

Laravel Live India 2019

Then we have LaravelLive India 2019 in Mumbai, India.
*Deadline: December 31, 2018
* Talk length is 30 minutes - Q&A up to the presenters discretion but would be included in the 30 minute time limit.
* Talks will be recorded and distributed for free as well as the presentation slides.
* Looking for a range of talks from PHP (security, testing and frameworks), web development, HTML5, JavaScript, mobile development, emerging technologies and non-technical proposals that will appeal to developers.
*Talk guidelines: Objective with clear expectation for audience, short and to the point description, mention of employer is only allowed at the beginning of the content and background image/wallpaper shouldn’t include company name/logos.
*Submit your talk here: [https://www.papercall.io/laravellive-india] (https://www.papercall.io/laravellive-india)

Nomad PHP

(you know you want to)

Last but not least - this is an ongoing call for papers. This is perfect if you want to present from the comfort of your office, home or really wherever you are. It’s via RingCentral meetings and will be live and recorded. This is for none other than Nomad PHP.
*Deadline: Anytime :D
* Talk length: 45 - 60 minutes.
* Talks should be unique to Nomad PHP and not available in video format online.
* Talk should not be recorded or made available elsewhere online for at least 3 months following your talk.
* The talk will be featured on our page and promoted via social media.
* Speakers will receive a financial stipend.
* Upon being selected we will reach out with further details.
*Submit here: [https://www.papercall.io/nomadphp] (https://www.papercall.io/nomadphp)
Now that you have some information - it’s the perfect time to take it all in and get started on your talk proposals :)! Looking forward to seeing all the amazing talks that will be coming out!!!
9136 views · 4 years ago


Recently I was faced with a task to post data from a .csv file to an external REST API. I’m just going to log in to this article about what I did to get the job done.

Let’s start by creating a template for uploading the file. For this article’s sake, lets make the changes in the dashboard.blade.php file.


<form method="post" enctype="multipart/form-data"> @csrf <div class="custom-file"> <input type="file" accept=".csv" name="excel" class="custom-file-input" id="customFile" /> <label class="custom-file-label" for="customFile">Choose file</label > </div> <div> <button type="submit" class="btn btn-primary btn-sm" style="margin-top: 10px" >Submit> </div>

</form>

Note : Don’t forget to add enctype=”multipart/form-data”!


Once the user has submitted the file, we need a new router to process the file and send its content to the REST API. Let’s start by creating a Controller.


php artisan make:controller UploadController


Now in the web.php file,


Route::post('/upload', [UploadController::class, 'upload'])->name('upload')->middleware('auth');


In the UploadController.php , create a function named upload. We will be writing all the code inside this function. Also, we need an action for the form.


<form method="post" action="{{route('upload')}}" enctype="multipart/form-data">


Now inside the upload function, we need to get the submitted file and parse its contents.

Get the submitted file,


$file = $request->file('excel');


Parse the submitted file,


if (($handle = fopen($file, "r")) !== FALSE) { while (($data = fgetcsv($handle, 1000, ",")) !== FALSE) { ..... }

}


We will be using a dummy REST API to create users — https://reqres.in/api/users. This is the request body required to create a user.


{ "name": "test", "job": "test"

}


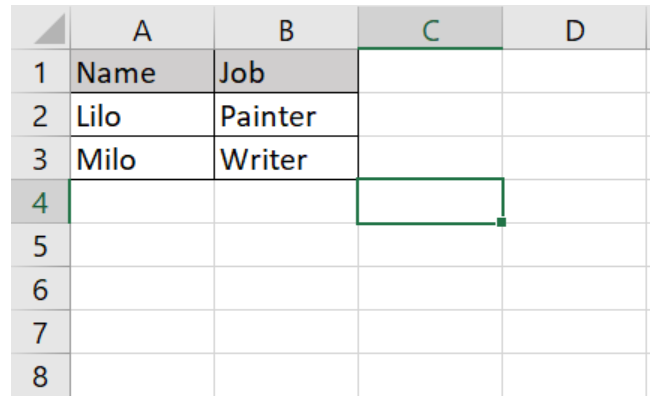
Keeping this in mind, we will create a sample .csv template to be submitted. The fields need to be two, namely Name and Job.


We need to send the values from this file as the request body to the API. So let’s add the code to loop through the content of this file.


if (($handle = fopen($file, "r")) !== FALSE) { while (($data = fgetcsv($handle, 1000, ",")) !== FALSE) { Http::post('https://reqres.in/api/users', [ 'name' => $data[0], 'job' => $data[1], ]); }

}


This will create each student for each row of the file. But we don’t need to send the data of the first row of the file.

Full code:


public function upload(Request $request){ $file = $request->file('excel'); if($file){ $row = 1; $array = []; if (($handle = fopen($file, "r")) !== FALSE) { while (($data = fgetcsv($handle, 1000, ",")) !== FALSE) { if($row > 1){ Http::post('https://reqres.in/api/users', [ 'name' => $data[0], 'job' => $data[1], ]); array_push($array,$data[0]); } $request->session()->flash('status', 'Users '.implode($array,", ").' created successfully!'); $row++; } } }else{ $request->session()->flash('error', 'Please choose a file to submit.'); } return view('dashboard');

}


This will post the data starting from the second row of the file, display a success message once the users are created, and an error message if the submit button is clicked without choosing a file.

Full template:


<div class="container max-w-7xl mx-auto sm:px-6 lg:px-8" style="width: 50%"> @if (session('status')) <div class="alert alert-success"> {{ session('status') }} </div> @endif @if (session('error')) <div class="alert alert-error"> {{ session('error') }} </div> @endif <form action="{{route('upload')}}" method="post" enctype="multipart/form-data"> @csrf <div class="custom-file"> <input type="file" accept=".csv" name="excel" class="custom-file-input" id="customFile" /> <label class="custom-file-label" for="customFile">Choose file</label> </div> <div> <button type="submit" class="btn btn-primary btn-sm" style="margin-top: 10px">Submit</button> </div> </form>

</div>


That’s it, thanks for reading :)
9044 views · 4 years ago
Laravel Eloquent Relationship Part 2

As you all know, Laravel Eloquent Relationships are powerful and easy methods introduced by Laravel for helping developers to reduce the complexity when connecting with multiple tables. While connecting with multiple tables, this method is very easy for developers for creating the application

Here you can see the next three methods of the eloquent relationships:
   
. Has Many Through Relationship
    . One to Many Polymorphic
    . Many to many Polymorphic

HAS MANY THROUGH ELOQUENT RELATIONSHIP

Has many through is a little bit complicated while understanding. I will provide a shortcut method to provide access data of another mode relationship. We will create a user table, post table, and country table and they will be interconnected with each other.

Here we will see Many through relationship will use hasManyThrough() for the relation


Create Migrations


Users table

 Schema::create('users', function (Blueprint $table) {

$table->increments('id');

$table->string('name');

$table->string('email')->unique();

$table->string('password');

$table->integer('country_id')->unsigned();

$table->rememberToken();

$table->timestamps();

$table->foreign('country_id')->references('id')->on('countries')

->onDelete('cascade');

});


Posts table

Schema::create('posts', function (Blueprint $table) {

$table->increments('id');

$table->string("name");

$table->integer('user_id')->unsigned();

$table->timestamps();

$table->foreign('user_id')->references('id')->on('users')

->onDelete('cascade');

});


Countries table

Schema::create('countries', function (Blueprint $table) {

$table->increments('id');

$table->string('name');

$table->timestamps();

});


Create Models


Country Model

<?php


namespace App;

use Illuminate\Database\Eloquent\Model;


class Country extends Model

{

public function posts(){

return $this->hasManyThrough(

Post::class,

User::class,

'country_id',
'user_id',
'id',
'id'
);

}

}


Now we can retrieve records by

$country = Country::find(1); 

dd($country->posts);


ONE TO MANY POLYMORPHIC RELATIONSHIP

One to many polymorphic relationships used one model belongs to another model on a single file. For example, we will have tweets and blogs, both having the comment system. So we need to add the comments. Then we can manage both in a single table


Here we will use sync with a pivot table, create records, get all data, delete, update, and everything related to one too many relationships.

Now I will show one too many polymorphic will use morphMany() and morphTo() for relation.


Create Migrations

Posts table

Schema::create('posts', function (Blueprint $table) {

$table->increments('id');

$table->string("name");

$table->timestamps();

});

Videos Table

Schema::create('videos', function (Blueprint $table) {

$table->increments('id');

$table->string("name");

$table->timestamps();

});

Comments Table

Schema::create('comments', function (Blueprint $table) {

$table->increments('id');

$table->string("body");

$table->integer('commentable_id');

$table->string("commentable_type");

$table->timestamps();

});


Create Models

Post Model

<?php

namespace App;

use Illuminate\Database\Eloquent\Model;


class Post extends Model

{


public function comments(){

return $this->morphMany(Comment::class, 'commentable');

}

}

Video Model

<?php

namespace App;

use Illuminate\Database\Eloquent\Model;


class Video extends Model{


public function comments(){

return $this->morphMany(Comment::class, 'commentable');

}

}

Comment Model

<?php

namespace App;

use Illuminate\Database\Eloquent\Model;

class Comment extends Model{


public function commentable(){

return $this->morphTo();

}

}


Create Records


$post = Post::find(1); 

$comment = new Comment;

$comment->body = "Hi Harikrishnan";

$post->comments()->save($comment);


$video = Video::find(1);

$comment = new Comment;

$comment->body = "Hi Harikrishnan";

$video->comments()->save($comment);


Now we can retrieve records


$post = Post::find(1); 

dd($post->comments);


$video = Video::find(1);

dd($video->comments);


MANY TO MANY POLYMORPHIC RELATIONSHIPS

Many to many polymorphic is also a little bit complicated like above. If we have a tweet, video and tag table, we need to connect each table like every tweet and video will have multiple persons to tag. And for each and every tag there will be multiple tweet or videos.

Here we can understand the creating of many to many polymorphic relationships, with a foreign key schema of one to many relationships, use sync with a pivot table, create records, attach records, get all records, delete, update, where condition and etc..


Here morphToMany() and morphedByMany() will be used for many to many polymorphic relationships

Creating Migrations

Posts Table

Schema::create('posts', function (Blueprint $table) {

$table->increments('id');

$table->string("name");

$table->timestamps();

});

Videos Table

Schema::create('videos', function (Blueprint $table) {

$table->increments('id');

$table->string("name");

$table->timestamps();

});

Tags table

Schema::create('tags', function (Blueprint $table) {

$table->increments('id');

$table->string("name");

$table->timestamps();

});

Taggables table

Schema::create('taggables', function (Blueprint $table) {

$table->integer("tag_id");

$table->integer("taggable_id");

$table->string("taggable_type");

});


Creating ModelsPost Model


<?php

namespace App;

use Illuminate\Database\Eloquent\Model;

class Post extends Model

{


public function tags(){

return $this->morphToMany(Tag::class, 'taggable');

}

}


Video Model

<?php

namespace App;

use Illuminate\Database\Eloquent\Model;

class Video extends Model

{


public function tags(){

return $this->morphToMany(Tag::class, 'taggable');

}

}

Tag Model

<?php

namespace App;

use Illuminate\Database\Eloquent\Model;

class Tag extends Model

{


public function posts(){

return $this->morphedByMany(Post::class, 'taggable');

}


public function videos(){

return $this->morphedByMany(Video::class, 'taggable');

}

}

Creating Records

$post = Post::find(1); 
$tag = new Tag;
$tag->name = "Hi Harikrishnan";
$post->tags()->save($tag);


$video = Video::find(1);
$tag = new Tag;
$tag->name = "Vishnu";
$video->tags()->save($tag);


$post = Post::find(1);
$tag1 = new Tag;
$tag1->name = "Kerala Blasters";
$tag2 = new Tag;
$tag2->name = "Manajapadda";
$post->tags()->saveMany([$tag1, $tag2]);


$video = Video::find(1);
$tag1 = new Tag;
$tag1->name = "Kerala Blasters";
$tag2 = new Tag;
$tag2->name = "Manajappada";
$video->tags()->saveMany([$tag1, $tag2]);


$post = Post::find(1);
$tag1 = Tag::find(3);
$tag2 = Tag::find(4);
$post->tags()->attach([$tag1->id, $tag2->id]);


$video = Video::find(1);
$tag1 = Tag::find(3);
$tag2 = Tag::find(4);
$video->tags()->attach([$tag1->id, $tag2->id]);


$post = Post::find(1);
$tag1 = Tag::find(3);
$tag2 = Tag::find(4);
$post->tags()->sync([$tag1->id, $tag2->id]);


$video = Video::find(1);
$tag1 = Tag::find(3);
$tag2 = Tag::find(4);
$video->tags()->sync([$tag1->id, $tag2->id]);


Now we can retrieve records

$post = Post::find(1); 
dd($post->tags);


$video = Video::find(1);
dd($video->tags)


$tag = Tag::find(1);
dd($tag->posts);


$tag = Tag::find(1);
dd($tag->videos);


Hence we completed all the relationships. In the above blog how has many through relationship, one to many polymorphic relationships and many to many polymorphic are working. This feature is introduced from Laravel 5.0 onwards and till the current version. Without the model, we can’t able to do this relationship. If we are using an eloquent relationship it will be very useful while developing an application.

SPONSORS

PHP Tutorials and Videos