PHP & Web Development Blogs

Search Results For: security
Showing 1 to 5 of 15 blog articles.
40374 views · 5 years ago
Securing PHP RESTful APIs using Firebase JWT Library

Hello Guys,

In our Last Blog Post, we have created restful apis,But not worked on its security and authentication. Login api can be public but after login apis should be authenticate using any secure token. one of them is JWT, So i am providing the Steps for Create and use JWT Token in our already created API.


Now its time To Implement JWT Authentication IN our Api, So these are the steps to implement it in our already created Apis


Step 1:Install and include Firebase JWT(JSON WEB TOKEN) in our project with following composer command        


 composer require firebase/php-jwt 


include the composer installed packages
require_once('vendor/autoload.php');


use namespace using following:
 use \Firebase\JWT\JWT; 


Step 2: Create a JWT server side using Firebase Jwt Library's encode method in Login action , and return it to Client


Define a private variable named Secret_Key in Class like following:

 private {
$payload = array(
'iss' => $_SERVER['HOST_NAME'],
'exp' => time()+600, 'uId' => $UiD
);
try{
$jwt = JWT::encode($payload, $this->Secret_Key,'HS256'); $res=array("status"=>true,"Token"=>$jwt);
}catch (UnexpectedValueException $e) {
$res=array("status"=>false,"Error"=>$e->getMessage());
}
return $res;
}


In our login action , if the user has been logged in successfully then with the status,_data_ and message just replace the login success code with following code:

$return['status']=1;
$return['_data_']=$UserData[0];
$return['message']='User Logged in Successfully.';

$jwt=$obj->generateToken($UserData[0]['id']);
if($jwt['status']==true)
{
$return['JWT']=$jwt['Token'];
}
else{
unset($return['_data_']);
$return['status']=0;
$return['message']='Error:'.$jwt['Error'];
}


Step 3: Now with every request after login should have the JWT token in its Post(even we can receive it in get or authentication header also but here we are receiving it in post)


No afetr successfully login you will get the JWt Token in your response,Just add that Token with every post request of after login api calls. So we will do it using postman, Find the screenshot 1 for checking the JWT Token is coming in login api response

JWT DEMO LOGIN API RESPONSE


Step 4:After reciving the JWt in every after login api call, we need to check whether the token is fine using JWT decode method in After login Apis like
UserBlogs
is a After login Api, So for verify that we are creating Authencate method in class like following:


 public function Authenticate($JWT,$Curret_User_id)
{
try {
$decoded = JWT::decode($JWT,$this->Secret_Key, array('HS256'));
$payload = json_decode(json_encode($decoded),true);

if($payload['uId'] == $Curret_User_id) {
$res=array("status"=>true);
}else{
$res=array("status"=>false,"Error"=>"Invalid Token or Token Exipred, So Please login Again!");
}
}catch (UnexpectedValueException $e) {
$res=array("status"=>false,"Error"=>$e->getMessage());
}
return $res;

}


Step 5: Cross check the response returned by Authenticate method in
UserBlogs
Action of api , replace the
UserBlogs
Action inner content with following code:


 if(isset($_POST['Uid']))
{

$resp=$obj->Authenticate($_POST['JWT'],$_POST['Uid']);
if($resp['status']==false)
{
$return['status']=0;
$return['message']='Error:'.$resp['Error'];
}
else{
$blogs=$obj->get_all_blogs($_POST['Uid']);
if(count($blogs)>0)
{
$return['status']=1;
$return['_data_']=$blogs;
$return['message']='Success.';
}
else
{
$return['status']=0;
$return['message']='Error:Invalid UserId!';
}
}
}
else
{
$return['status']=0;
$return['message']='Error:User Id not provided!';
}


Ah great its time to check out the UserBlogs Api, please find the screenshoot for that, Remember we need to put the JWt Token in POST Parameter as we have already recived that Value in Login Api call.

JWT DEMO Authentication in userBlogs API Call

Now if you want to verify that token is expiring in given time(10 minutes after generation time/login time), i am just clicking the same api with same token after 10 minutes and you can see there will not return any data and it is returning status false with following message :


JWT DEMO Authentication in userBlogs API Call


Also if you want to eloborate it more then i suggest you to try with modify Uid value with same token , you will another authentication issue and also if you modify the JWT token also then also you will not get the desired result and get authentication Issue

Thanks for reading out if you want the complete code of this file then please find following:
<?php 
header("Content-Type: application/json; charset=UTF-8");
require_once('vendor/autoload.php');
use \Firebase\JWT\JWT;

class DBClass {

private $host = "localhost";
private $username = "root";
private $password = ""; private $database = "news";

public $connection;

private $Secret_Key="*$%43MVKJTKMN$#";
public function connect(){

$this->connection = null;

try{
$this->connection = new PDO("mysql:host=" . $this->host . ";dbname=" . $this->database, $this->username, $this->password);
$this->connection->exec("set names utf8");
}catch(PDOException $exception){
echo "Error: " . $exception->getMessage();
}

return $this->connection;
}

public function login($email,$password){

if($this->connection==null)
{
$this->connect();
}

$query = "SELECT id,name,email,createdAt,updatedAt from users where email= ? and password= ?";
$stmt = $this->connection->prepare($query);
$stmt->execute(array($email,md5($password)));
$ret= $stmt->fetchAll(PDO::FETCH_ASSOC);
return $ret;
}

public function get_all_blogs($Uid){

if($this->connection==null)
{
$this->connect();
}

$query = "SELECT b.*,u.id as Uid,u.email as Uemail,u.name as Uname from blogs b join users u on u.id=b.user_id where b.user_id= ?";
$stmt = $this->connection->prepare($query);
$stmt->execute(array($Uid));
$ret= $stmt->fetchAll(PDO::FETCH_ASSOC);
return $ret;
}

public function response($array)
{
echo json_encode($array);
exit;
}

public function generateToken($UiD)
{
$payload = array(
'iss' => $_SERVER['HOST_NAME'],
'exp' => time()+600, 'uId' => $UiD
);
try{
$jwt = JWT::encode($payload, $this->Secret_Key,'HS256'); $res=array("status"=>true,"Token"=>$jwt);
}catch (UnexpectedValueException $e) {
$res=array("status"=>false,"Error"=>$e->getMessage());
}
return $res;
}

public function Authenticate($JWT,$Current_User_id)
{
try {
$decoded = JWT::decode($JWT,$this->Secret_Key, array('HS256'));
$payload = json_decode(json_encode($decoded),true);

if($payload['uId'] == $Current_User_id) {
$res=array("status"=>true);
}else{
$res=array("status"=>false,"Error"=>"Invalid Token or Token Exipred, So Please login Again!");
}
}catch (UnexpectedValueException $e) {
$res=array("status"=>false,"Error"=>$e->getMessage());
}
return $res;

}
}

$return=array();
$obj = new DBClass();
if(isset($_GET['action']) && $_GET['action']!='')
{
if($_GET['action']=="login")
{
if(isset($_POST['email']) && isset($_POST['password']))
{
$UserData=$obj->login($_POST['email'],$_POST['password']);
if(count($UserData)>0)
{
$return['status']=1;
$return['_data_']=$UserData[0];
$return['message']='User Logged in Successfully.';

$jwt=$obj->generateToken($UserData[0]['id']);
if($jwt['status']==true)
{
$return['JWT']=$jwt['Token'];
}
else{
unset($return['_data_']);
$return['status']=0;
$return['message']='Error:'.$jwt['Error'];
}

}
else
{
$return['status']=0;
$return['message']='Error:Invalid Email or Password!';
}
}
else
{
$return['status']=0;
$return['message']='Error:Email or Password not provided!';
}
}
elseif($_GET['action']=="UserBlogs")
{
if(isset($_POST['Uid']))
{

$resp=$obj->Authenticate($_POST['JWT'],$_POST['Uid']);
if($resp['status']==false)
{
$return['status']=0;
$return['message']='Error:'.$resp['Error'];
}
else{
$blogs=$obj->get_all_blogs($_POST['Uid']);
if(count($blogs)>0)
{
$return['status']=1;
$return['_data_']=$blogs;
$return['message']='Success.';
}
else
{
$return['status']=0;
$return['message']='Error:Invalid UserId!';
}
}
}
else
{
$return['status']=0;
$return['message']='Error:User Id not provided!';
}
}
}
else
{
$return['status']=0;
$return['message']='Error:Action not provided!';
}
$obj->response($return);
$obj->connection=null;
?>

19939 views · 1 years ago


To bridge the gap between web-based and cloud-based applications, businesses often rely on skilled DevOps developers. These professionals play a crucial role in ensuring seamless integration, efficient customization, and robust back-end infrastructure for applications. The expertise of DevOps developers is indispensable for optimizing development workflows and enhancing collaboration between development and operations teams in the dynamic landscape of app development services.

In the realm of cloud computing, web based application in cloud computing play a pivotal role. Technically, web apps, as the name suggests, are applications hosted on remote servers & accessible through web browsers. On the other hand, cloud-based apps are web applications that come with advanced functionalities & elaborate compatibility.


In the realm of contemporary software development, the demand for innovative solutions is evident in the competition between web and cloud-based applications. These two platforms share similarities but diverge significantly in crucial aspects. This article will delve into the distinctions between web-based and cloud-based applications, exploring facets such as back-end infrastructure, scalability, and technical perspectives, shedding light on the nuances that developers navigate in this dynamic landscape, including the pivotal role of technologies like chatbot development.
What Is a Web Application?

A web-based app is an application designed and developed for the web browser. Unlike cloud based application development, the web app completely depends on the web server for functionality & processing. This application program is mainly stored on the remote server & delivered through a web browser interface over the internet. According to web application development company, web apps have client-server architecture & their codes are divided into 2 major components – server-side architecture & client-side architecture.

Server-side architecture: The server-side architecture or script usually deals with data processing. The web server can process a client request & send a response back. This web app architecture defines a simultaneous interaction between database instances, components, user interfaces, middleware systems, and servers.

Client-side architecture: The client-side architecture mainly deals with interface functionalities such as drop-down boxes and buttons. When a user clicks on the link, the browser will start loading the client-side script & rendering a text and graphic element for interaction.
Types of Web Apps
Nowadays, many businesses are already adopting various kinds of web-based applications because of their several advantages, features, and functionalities. 8 most popular types of web apps include:
    . Static Web Apps
Static web applications, constructed using HTML, CSS, and JavaScript, lack the flexibility of dynamic counterparts. These web based services provide content directly to users without requiring server-side modifications, resulting in simplicity and straightforward development. Key benefits of these apps include:
Very fast load time
Highly secure
Less complex to build
    . Dynamic Web Apps
This is a complex type that provides real-time data based on the server response and the user’s request. Dynamic web apps can be developed either as a conventional website with several pages and levels of navigation or as a single-page web application. They use several server-side and client-side languages to create web pages such as HTML, CSS, JavaScript, Python, PHP, Ruby, etc. Key benefits of dynamic web apps include:
Wider audience reach
Scalable in comparison to static web apps
Very flexible in terms of a new content update
    . Single Page Apps
A single page web app entirely runs on the browser & never requires browser reloading. This is actually a dynamic web app that manages all data on a single HTML page. This type of web app is faster than traditional websites as its logic is implemented in the browser directly than a server. Gmail, Netflix, Pinterest & Paypal are the best examples of single page applications. Key benefits include:
Enhanced user experience
Minimized server load
Improved app performance
    . Multiple-Page Apps
Multiple page apps are designed multiple pages separately and combined to form a website. They have different pages with static information like texts & images. Web based app development companies recommend using multiple-page apps as they offer excellent control over search engine optimization techniques. Major benefits of Multiple page apps include:
Ideal for SEO
Quick browser back or forward navigation
Simple to develop
    . Animated Web Apps
This is a type of web application that effectively supports synchronization & animation on the web platform. These applications are widely used by freelancers and creative companies to present their creativity better. Technically, JavaScript, HTML5, FLASH, and CSS are used to create animated web applications. Key benefits of AWAs include
Improved User Engagement
Enhanced Navigation
Excellent Branding
    . Web Apps with CMS
In this web application, content is updated constantly. It helps to manage, modify and create digital content with ease. WordPress is one of the best examples of CMS web applications. A variety of languages are used to create content management systems such as C#, PHP, Java, and Python. Key advantages of CMS web apps include:
Quick content creation & management
Efficient & quick updates
A vast range of features
    . E-commerce Web Apps
It’s a complicated and advanced dynamic web application that allows users to buy & sell goods electronically. These web based services encompass transaction and payment integration as key components, facilitating seamless order processing, payment acceptance, and logistical management for businesses involved in online commerce. Key benefits of these web apps include:
Scale business quickly
Offers customer insights through tracking & analytics
Sell goods across the world
    . Progressive Web Apps
Progressive web apps or PWAs are also called cross-platform web apps usually built with HTML, CSS, & JavaScript. PWAs use different features, APIs, and progressive methods to deliver a seamless experience. Progressive web apps boost the adaptability and speed of web applications. These apps are still easy to access if internet connectivity is poor. Key benefits of progressive web apps include:
Fast loading time
No installation required
Quickly respond to user interactions
Enhanced cross-platform conversion

Looking for App Development Solutions?
Take your brand up a notch with our custom mobile app development services.
Talk to an Expert

Type
Widely Used In
Advantages
Dynamic web apps
Social media
Healthcare
IT Industry
Logistics and transportations
Retail and ecommerce sectors
On-demand
Directly manage websites to update & change the information
Quick user management to protect servers & control all website users
Static web apps
Book publishing sectors
Works in offline mode
No 3rd party software installation required to access web apps
Single page apps
Email service
Communication sectors
Allows navigation & optimized routing experience
Keeps visual structure of web apps consistently through presentation logic
Multiple page apps
E-commerce sectors
Enterprise industries
Enables optimizing every page for the search engine
Allows users to access other pages
Animated web apps
Animation
Education
Gaming industries
Hold user attention for a very long time due to its attractive approach & unique design
Aspect ratios, landscape orientations, portrait, and viewing distances & different pixel densities are considered
Web apps with CMS
Blogging platforms
Sales & marketing platform
News portals
Easily organizes the web content Offers group & user functionality
Simple language support & integration
E-commerce web apps
E-commerce sectors
Allows sellers to sell products using a single platform
Helps you expand business globally & reach maximum audience
Progressive Web Apps
On-demand
Healthcare
Retail and e-commerce
Logistics and transportations
Social media
IT sectors
Responsive & Browser Compatibility Works in online & offline mode
Updates with no user interaction

Key Benefits of Web Apps
Web apps enable businesses to interact with their customers more efficiently. These applications can make it easy to track & measure data that are essential to keep business operations streamlined. Key advantages of web apps include:
Easily accessible through any kind of web browser
Runs on multiple platforms that make it cross-platform compatible
Minimizes the risk of compatibility issues
Requires less maintenance & support from the developer’s end
Helps to ease usability for the customers
Effectively eliminates hard drive space limitations
Apps can be maintained & updated without software reinstallation on several devices
Offers high scalability and flexibility
Simple to deploy, maintain, and update
The cost of routine maintenance is minimized as the data is stored on remote servers
What is a Cloud Based App?
These apps are online software programs with elements accessible via a local server and executed on the cloud environment. As internet-based software, cloud applications are stored in the remote data center & handled by cloud-service providers. These apps are used for file sharing & storage, order entry, word processing, inventory management, financial accounting, customer relationship management, data collection, etc.

According to the report, the global market size of cloud apps is projected to reach approx 168.6 billion USD by 2025. Cloud apps usually support several user requirements through customization and provide several services to meet storage, backup & security needs. Some major characteristics of cloud apps include:
Agile application
Microservices-oriented
API-backed
Continuously integrated & delivered
DevOps-enabled
Analytics-infused
User experience-centric
Types of Cloud-based Applications
Cloud apps are divided into three major cloud computing models – SaaS, PaaS, and IaaS. Each model also shows several parts of cloud computing stacks. Take a closer look at these types:
    . SaaS or Software as a Service
SaaS is one of the best cloud apps that enable users to easily access full-functioning software applications over the internet. These cloud applications are primarily designed for freelance services, large enterprises & SMBs. Some of the best examples of SaaS applications are HubSpot CRM, Wrike, MS Office 365, Sisense, Wix, etc.
    . PaaS or Platform as a Service
PaaS provides users with the infrastructure, computing platforms, and solutions to build their own applications. Platform as a Service is ideal for businesses that mainly engage in collaboration, testing, and development of cloud solutions. PaaS applications have a deployment environment including run-time system libraries, operating systems, and graphic UI. Some of the best examples of PaaS apps are Google App Engine, Microsoft Azure, Rackspace Cloud Sites, etc.
    . IaaS or Infrastructure as a Service
IaaS consists of basic building blocks that offer access to networking functionalities, features & data storage space. It enables users to outsource IT infrastructures like servers, processing, virtual machines, storage, networking & other resources. IaaS applications also offer a good level of management control and flexibility over IT resources. Some of the best examples of IaaS apps are Amazon WorkSpaces, IBM Cloud, Google Cloud, etc.
Benefits of Cloud Apps
Web based application in cloud computing boost productivity, accessibility, security, and data safety. They help businesses make the process of collaboration more effective and easier. Key benefits of cloud applications include:
Minimal service provider interaction & management effort
Provides large computing capabilities, online & offline
Provides access to information from any device or place
Offers fast access to important applications through cloud servers
The performance of the availability of cloud apps enhances profitability & streamlines workflows
Serves multiple consumers with virtual and physical needs
Provides high transparency to resource providers & consumers
Offers improved collaboration options
Web Apps Vs Cloud Apps – Key Differences
Web apps and cloud apps both come with a wide range of functionalities & have noticeable distinctions. Web-based applications usually are accessible via web browsers, whereas cloud app’s infrastructure and data aren’t only accessible through the web browser but also downloadable. So, all cloud apps are web apps with additional features. Other differences between web and cloud apps are listed below.

Parameters
Cloud apps
Web apps
Internet
Work partially or entirely without the internet connectivity
Work with the internet only
Security
Ensures high security measures for sensitive & confidential information
It can verify client info on authentic servers
Technology
It needs a back–end framework & a JavaScript-based structure like React Js, Angular, etc
It has inbuilt languages such as PHP, Python & Ruby, and databases like MySQL.
Access
It’s not dependent on the web browser
Accessed via the web browser only
Customization
Customization features improve functionalities.
Never provides customization and similar functionalities
Costs
Expensive as compared to web apps
Development cost is less than cloud apps
Types
SaaS, PaaS, IaaS, RaaS
Static web apps, dynamic web apps portal web apps, etc
Scalability
Inherently scalable
Limited scalability
Availability
High uptime
Limited uptime
Storage
Multiple replicated center
Single data center

Are You In Search of The Best App Development Company?
With top-notch development services, we develop the best software applications that meet your needs.
Book an Appointment
Final Words
Web apps and cloud apps both are continuing to deliver users as the most crucial touch point. Since they are packed with similarities and dissimilarities in terms of software architecture, storage, and other aspects, selecting the right application always depends on customer preferences, business needs, and operations. Are you planning to build a custom web application or looking for web app development services? Get in touch with our experts for complete assistance.

19357 views · 6 years ago
Creating a Virus with PHP

In his talk, “Writing Viruses for Fun, Not Profit,”Ben Dechrai (after making the viewer take a pledge to only use this knowledge for good and not evil) walks through how many viruses operate, and just how easy it is to build your own self-replicating virus in PHP.

The danger of many of these viruses according to Ben is that the most dangerous viruses often escape detection by not looking like a virus. Instead they encrypt their code to hide their true intent, while also constantly adapting and evolving.

Perhaps even more dangerously, they act like they’re benign and don’t actually do anything - often times laying dormant until called upon by the malicious actor.

Creating the Virus

What’s scary is just how simple it was for Ben to create such a virus, one that mutated ever so slightly as it infected every other file on the server. Opening up unlimited possibilities from scraping customer data, to DDOS attacks, to simply hijacking your domain.


But those attacks are just the start as Ben demonstrated how easy it is to write new files, delete files, eval() and execute foreign code - which could even be extended to accessing the underlying server itself if shell_exec() is enabled.

To add to the problem, Ben shares how challenging it can be to identify malicious code on your server as many of these attacks are far more sophisticated than the the virus he created in a matter of minutes - hiding themselves and often appearing as if they are part of the original source code.

Deploying the Virus

To drive his point home, Ben demonstrates how even seemingly secure systems can be vulnerable - as all it takes is one tiny misstep within your application.

He highlights this by building what should be a secure photo gallery - one that checks the extension and mime-type of the image - and even stores it outside of the public directory. He goes even farther by adding additional sanity checks with a PHP script that then renders the image.

After walking through the code and it’s security features, he then downloads a simple image from the internet. Opening his editor he quickly injects the virus (written in PHP) into the image and uploads it, passing all of the server checks.

Surely, since it passed these checks the system is secure, right? Ben loads the gallery to proudly show off the image - which is just that… an image, with nothing special or out of the ordinary.
Except that when he opens the image gallery files, each has been infected with the malicious code.

The culprit that allowed for Ben to hijack an entire system and execute foreign code, create new files, and even hijack the entire site? When displaying the image the file was included using PHP’s include() function, instead of pulling in the data using file_get_contents() and echoing it out.

Such a simple mistake provided Ben, if he was a malicious hacker, complete access to all of the files on the system.

Protecting Yourself

Security always exists in layers - and this could have been prevented by including a few more layers, such as using an open source library to rewrite the image, reviewing the image source before pulling it in, or again not giving it executable access by using the PHP include() function.

But what’s terrifying is how simple it is to hijack a site, how easy it is to get access to your system and private data, and how easy it is to overlook security vulnerabilities - especially with open source tooling and those that take plugins.

As Ben explains, sometimes the core code itself is really secure, but then you get two different plugins that when used together accidentally create a security vulnerability. That by itself is one of the most challenging as you can audit each plugin individually, and still not know you’re opening up your system to malicious actors.

This is why it's not just important to stay up to date on the latest security measures and best practices, but to be constantly thinking like a hacker and testing your code for vulnerabilities.

Learn More

You can watch thefull video to learn more how viruses operate, how to quickly build your own PHP virus (but you must promise to use it for good), and what to watch for in order to protect yourself, your customers, and your architecture.
12223 views · 4 years ago


It took me quite some time to settle on my first blog post in this series and I found myself thinking about the most requested functionality in my career – The good ‘ol Custom CMS – typically geared towards clients that want a straight forward, secure solution that can be expanded upon in a modular format and that’s their IP.

This will be our starting point. A blank slate to build something epic with clean code and even cleaner design. And in the spirit of building from scratch, I will refrain from using classes or a framework. The main reasoning behind this is to truly get everyone acquainted with and excited about PHP development.

Join me as I transform rudimentary code into something extraordinary that can be morphed into just about any Content, PHP, and MySQL driven project. So without further ado, let’s jump into it!

The bare necessities


If you’re just getting started with development, there’s a nifty bite sized server called UniformServer that will be your best friend throughout your coding career. PHPMyAdmin (an awesome visual db management tool) comes built in so if you’re looking for a work right out of the box solution, this is it.

Alternatively, you can opt for XAMPP or use an alternative server of your choice.

Now here’s where the exciting stuff begins, mapping things out.


I don’t see this done/encouraged often enough. Feel free to grab a piece of paper to logically map out your steps or produce a rough draft of where you’d like this project to go.

In this tutorial, I would like to achieve the following:


DB, DB, Set up your DB.


This requires a bit of planning but let’s start of with the basic structure we need to see this through.

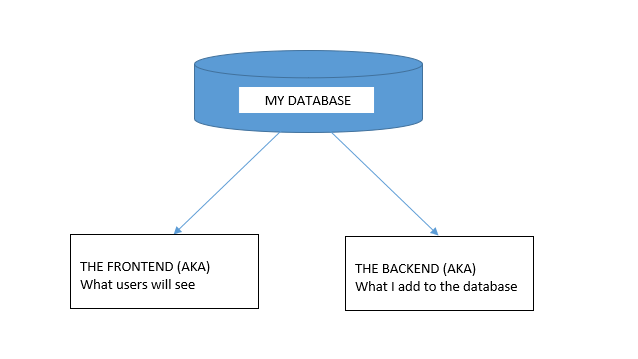
We are going to need a user table and a content table and are a few ways to tackle this.

If you’re using the PHPMyAdmin tool you can create your database, add user permissions (Click on Permissions after creating your database), and create a table with ease.


If you’re like me and prefer to look at good ‘ol SQL then writing an SQL statement is the preferred approach.


CREATE TABLE <code>mydbname</code>.<code>content</code> ( <code>ID</code> INT(11) NOT NULL AUTO_INCREMENT , <code>title</code> VARCHAR(100) NOT NULL , <code>content</code> LONGTEXT NOT NULL , <code>author</code> VARCHAR(50) NOT NULL , PRIMARY KEY (<code>ID</code>)) ENGINE = MyISAM COMMENT = 'content table';

Understanding the SQL statement

In a nutshell we are creating a table with important fields. Namely:

####

ID | Title | Content | Author

#######

The ID field is our unique identifier.Now we can move on to the file structure.

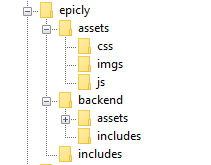
Everything has a place in the file structure game


You can use a structure that speaks to your coding style / memory.

I tend to use the following:


Choose a name for your CMS, which should be placed at the webroot of your localhost/server.

Replicate the folder structure as per the above example.

Next, we’re going to create a basic connection file.


You can create a conn.php file in your root/includes folder.

The connection file will provide crucial information to connect to the database.

Type the following into your conn.php file, remember to include your own database credentials.


<?php

$letsconnect = new mysqli("localhost","dbuser","dbpass","dbname");

?>


Let’s go to the homepage (index.php)


Create a file called index.php at the root of your CMS folder.

I will be adding comments in my code to help you understand what each line does.

Comments are a useful tool for developers to add important notes private to their code.

We need to pull information from the database so it’s imperative that we include our connection file.


<?php

include('includes/conn.php');

if ($letsconnect -> connect_errno) { echo "Error " . $letsconnect -> connect_error;

}else{

$getmydata=$letsconnect -> query("SELECT * FROM content");

foreach($getmydata as $mydata){ echo "Title: "; echo $mydata['title']; echo "<br/>"; echo "Content: "; echo $mydata['content']; echo "<br/>"; echo "Author: "; echo $mydata['author']; echo "<br/>"; echo "<br/>";

}

}

$letsconnect -> close();

?>


Let’s get a (very) basic backend up and running


Create a file called index.php in your backend folder.

We need to create a basic form to capture our data.

Let’s code some HTML!


<html>

<head><title>Backend - Capture Content</title></head>

<body>

<form action="<?php $_SERVER[‘PHP_SELF’];?>" method="post">

<input type="text" name="title" placeholder="Content Title here" required/>

<textarea name="content">Content Here</textarea>

<input type="text" name="author" placeholder="Author" required/>

<input type="submit" value="Save My Data" name="savedata"/>

</form>

</body>

</html>


Next, we need to process the form data.


Type the following just above the
<form> 
tag.


<?php

if(isset($_POST['savedata'])){

include('../includes/conn.php');

if ($letsconnect->connect_error) {

die("Your Connection failed: " . $letsconnect->connect_error);

}else{

$sql = "INSERT INTO content(title,content,author)VALUES ('".$_POST["title"]."', '".$_POST["content"]."', '".$_POST["author"]."')";

if (mysqli_query($letsconnect, $sql)) {

echo "Your data was saved successfully!";

} else { echo "Error: " . $sql . "" . mysqli_error($letsconnect);

} $letsconnect->close();

}

}

?>


Note, this is a basic MySQL query to insert data. However, before using this in production it's important to add proper escaping and security to prevent SQL injections. This will be covered in the next article.

Congrats you made it to the end of tutorial 1!


Test out your creation, modify your content, and play around.

Go to your sitename/index.php to see your frontend after capturing data via sitename/backend/index.php

Next Up:


codewithme Now With Security, Functionality, and Aesthetics in mind.


Conclusion


Coding doesn’t have to be daunting and it’s my aim to divide a complex system into bitesized tutorials so you can truly use the knowledge you’ve acquired in your own projects.
10566 views · 4 years ago


Welcome back!, if you’re new please be sure to read Part 1 here.


This tutorial will focus primarily on Security and will touch on how to plan functionality.

Planning out an application and seeing progress regularly is a good strategy as you are most likely to complete your tasks in a timely fashion with this approach.

Ready?, ok let’s jump into it!

DISCLAIMER


We highly recommend that you follow these tutorials on a localhost testing server like Uniserver. Read through Part 1 here to look at our recommendations. These tutorials follow a phased approach and it is highly recommended that you do not make snippets of code live prior to completing this tutorial series.
Where we left off – the serious stuff.


In the previous tutorial we saved variables to the database.

It’s important to note that further steps are needed to ensure that data transactions to / from the database are secure.

A great first step is to ensure that all POST data (data transmitted after a user clicks a form’s submit button) is sanitized.

What we’re trying to prevent


One of the most common exploits is SQL Injection, an attack most commonly used to insert SQL into db queries. POST data that’s not sanitized leaves a huge security hole for malicious exploits. In some cases SQL injection can be leveraged to rage an all out assault on a server’s operating system.

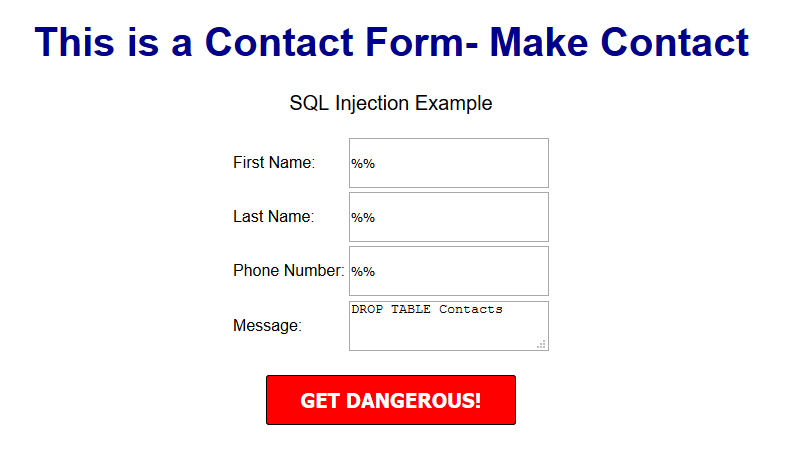
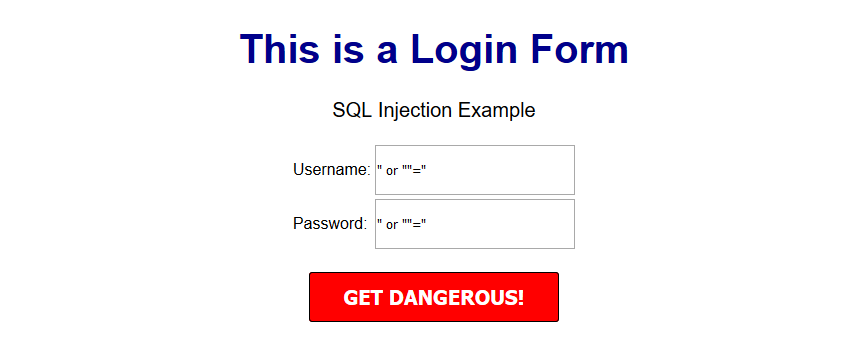
A few examples of a basic version of what this might look like can be seen below.


OUTCOME


This might delete your database table


OUTCOME


This might provide access to the entire user table and the password protected area/dashboard.


***Please note that there are various types of SQL injection techniques and I will delve into this during the course of this series.***


So what exactly is sanitization and what does it do?


When sanitizing POST data, we are essentially looking for any special characters that are often used in SQL injection attacks.

In many ways, this tiny piece of code is the unsung superhero of many database driven applications.

Let’s secure that POST data!


Navigate to your backend folder and open index.php

Locate the following line of code:

$sql = "INSERT INTO content(title,content,author)VALUES ('".$_POST["title"]."', '".$_POST["content"]."', '".$_POST["author"]."')";


Ok, let’s get to work.

Based on what I mentioned a few moments ago, it’s clear that our SQL statement is vulnerable so we need to sanitize the POST data pronto!

The method I will focus on first is $mysqli->real_escape_string. This will escape any special characters found in the POST data.

Add the following just above your $sql.

$title = $letsconnect -> real_escape_string($_POST['title']);

$content = $letsconnect -> real_escape_string($_POST['content']);

$author = $letsconnect -> real_escape_string($_POST['author']);


Did you notice the use of $letsconnect? This was used because of our db connection defined in conn.php.

Our new query will look like this:

$sql = "INSERT INTO content (title,content,author) VALUES ('".$title."', '".$content."', '".$author."')";


Go ahead and replace the old $sql.

Phew!, we can breathe easy now.

Next, let’s lighten things up a bit by focusing on functionality and aesthetics.


A phased approach is the best way to tackle projects of any size.

I tend to jot this down on paper before creating a more legible professional spec!.

Typically the phased approach lends itself to logical progression.

For example, over the next several days I will go over the following:

* Account Access
* The login process
* The registration process
* The password recovery process
* Frontend
* The look and feel
* Menus
* Sidebars
*Main Content
*Footer
* Backend
* Content Management
* Add/Edit/Delete
* Security

This will give us a good springboard to delve into more complex functionality.

The aesthetic I have in mind will be barebones at first with clean CSS practices (this will make life a whole lot easier when we have to make changes down the line!).

Challenge :


Plan out your own CMS, think about the user interface and design choices you’d like to implement, and create a phased approach.

Conclusion


I hope this tutorial encouraged you to think about security and understand one of the most common exploits. During the course of this series, you will receive the tools necessary to beef up security while maintaining your sanity!

Next up


CodeWithMe – Let’s go templating.

SPONSORS

PHP Tutorials and Videos