PHP & Web Development Blogs

Search Results For: building
Showing 1 to 5 of 17 blog articles.
21004 views · 5 years ago
Making Charts and Graphs using Laravel

Installing composer

Composer is a package management tool for PHP. Laravel requires composer for installation. We can download composer from https://getcomposer.org/download/

After installation that you can test whether composer installed or not by command
composer

Installing Laravel

The current stable version of laravel is laravel 5.6. We can install laravel package with three ways.

In command prompt or terminal by running composer global require "laravel/installer" and then Laravel new

or

We can create the project with Composer by running composer create-project --prefer-dist laravel/laravel

or

Directly clone from github
git clone https://github.com/laravel/laravel/tree/master and after that composer update

Laravel local development server

Run the below command in command prompt or terminal
PHP artisan serve


Above command will start to local development servehttp://localhost:8000 or if you want to change default port:

php artisan serve --port 


Generating charts and graphs

We are using consoletvs package for generating charts. So for installation we can first move inside to our project using command prompt or terminal. We are following the below steps to install

Step 1:

First we need to install ConsoleTVs/Charts composer package inside our laravel project.
composer require consoletvs/charts


Step 2:

After successfully installation of above package, open app/config.php and add service provider.
In config/app.php


'providers' => [
....
ConsoleTVs\Charts\ChartsServiceProvider::class,
],


After the service provider we need to add alias
'aliases' => [
....
'Charts' => ConsoleTVs\Charts\Facades\Charts::class,
]


Step 3

We need to configure of database for application. We can configure in either .env file or config/database.php file.


Step 4

We can migrate our default tables that is user. We can find the table in database/migration folder.

Step 5

We can generate dummy records for demo in users table. For creating dummy records, we need to run the below command in command prompt or terminal
php artisan tinker>>> factory(App\User::class, 20)->create();

the above command will create a set of 20 records.

If we need to add more records we need to run the above command or we can increase the count as much as we want. For example
php artisan tinker>>> factory(App\User::class, 2000)->create();


Step 6Creating controller

For creating controller we need to run below command in terminal or command prompt
php artisan make controller:<controller_name>


Step 7Adding the routes

We can add the routes for navigating our application. You can find routes file inside routes folder. Before 5.4 we can find routes.php file itself, now its web.php. If you are using laravel 5.2 routes.php will inside app/http folder.

So inside web.php:

Route::get('create-chart/{type}','ChartController@makeChart');


Here type will be the parameter we are passing and it will focus to makeChart() function inside chartcontroller

Step 8

Import charts to controller, for that in the namespace section add:

Use charts;


Step 9

We can put the below code into chartController

public function makeChart($type)
{
switch ($type) {
case 'bar':
$users = User::where(DB::raw("(DATE_FORMAT(created_at,'%Y'))"),date('Y'))
->get();
$chart = Charts::database($users, 'bar', 'highcharts')
->title("Monthly new Register Users")
->elementLabel("Total Users")
->dimensions(1000, 500)
->responsive(true)
->groupByMonth(date('Y'), true);
break;
case 'pie':
$chart = Charts::create('pie', 'highcharts')
->title('HDTuto.com Laravel Pie Chart')
->labels(['Codeigniter', 'Laravel', 'PHP'])
->values([5,10,20])
->dimensions(1000,500)
->responsive(true);
break;
case 'donut':
$chart = Charts::create('donut', 'highcharts')
->title('HDTuto.com Laravel Donut Chart')
->labels(['First', 'Second', 'Third'])
->values([5,10,20])
->dimensions(1000,500)
->responsive(true);
break;
case 'line':
$chart = Charts::create('line', 'highcharts')
->title('HDTuto.com Laravel Line Chart')
->elementLabel('HDTuto.com Laravel Line Chart Lable')
->labels(['First', 'Second', 'Third'])
->values([5,10,20])
->dimensions(1000,500)
->responsive(true);
break;
case 'area':
$chart = Charts::create('area', 'highcharts')
->title('HDTuto.com Laravel Area Chart')
->elementLabel('HDTuto.com Laravel Line Chart label')
->labels(['First', 'Second', 'Third'])
->values([5,10,20])
->dimensions(1000,500)
->responsive(true);
break;
case 'geo':
$chart = Charts::create('geo', 'highcharts')
->title('HDTuto.com Laravel GEO Chart')
->elementLabel('HDTuto.com Laravel GEO Chart label')
->labels(['ES', 'FR', 'RU'])
->colors(['#3D3D3D', '#985689'])
->values([5,10,20])
->dimensions(1000,500)
->responsive(true);
break;
default:
break;
}
return view('chart', compact('chart'));
}


Step 10

Create a blade file. Blade is the view file used inside the laravel. You can add new blade file with any name with an extension of .blade.php
Here we are creating chart.blade.php

<!DOCTYPE html>
<html lang="en">
<head>
<meta charset="utf-8">
<meta http-equiv="X-UA-Compatible" content="IE=edge">
<meta name="viewport" content="width=device-width, initial-scale=1">
<title>My Charts</title>
{!! Charts::styles() !!}
</head>
<body>

<div class="app">
<center>
{!! $chart->html() !!}
</center>
</div>

{!! Charts::scripts() !!}
{!! $chart->script() !!}
</body>
</html>


Step 11

We can run our laravel application in local development server by php artisan serve command:

http://localhost:8000/create-chart/bar
http://localhost:8000/create-chart/pie
http://localhost:8000/create-chart/donut
http://localhost:8000/create-chart/line
http://localhost:8000/create-chart/area
http://localhost:8000/create-chart/geo


In the above example we was creating line chart, geo chart, bar chart, pie chart, donut chart, line chart and area chart. We can also create gauge chart, progressbar chart, areaspline chart, scatter chart, percentage chart etc using consoletvs charts composer package.

There are a lot of jQuery libraries also available like amcharts, chartjs, highcharts, google, material, chartist, fusioncharts, morris, plottablejs etc. However, using this plugin we can easily create charts without having to use jQuery, another advantage to building it in with Laravel.
17916 views · 5 years ago
Creating a Virus with PHP

In his talk, “Writing Viruses for Fun, Not Profit,”Ben Dechrai (after making the viewer take a pledge to only use this knowledge for good and not evil) walks through how many viruses operate, and just how easy it is to build your own self-replicating virus in PHP.

The danger of many of these viruses according to Ben is that the most dangerous viruses often escape detection by not looking like a virus. Instead they encrypt their code to hide their true intent, while also constantly adapting and evolving.

Perhaps even more dangerously, they act like they’re benign and don’t actually do anything - often times laying dormant until called upon by the malicious actor.

Creating the Virus

What’s scary is just how simple it was for Ben to create such a virus, one that mutated ever so slightly as it infected every other file on the server. Opening up unlimited possibilities from scraping customer data, to DDOS attacks, to simply hijacking your domain.


But those attacks are just the start as Ben demonstrated how easy it is to write new files, delete files, 
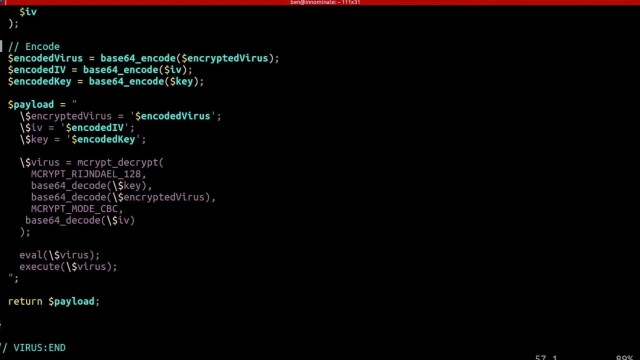
eval() and execute foreign code - which could even be extended to accessing the underlying server itself if shell_exec() is enabled.

To add to the problem, Ben shares how challenging it can be to identify malicious code on your server as many of these attacks are far more sophisticated than the the virus he created in a matter of minutes - hiding themselves and often appearing as if they are part of the original source code.

Deploying the Virus

To drive his point home, Ben demonstrates how even seemingly secure systems can be vulnerable - as all it takes is one tiny misstep within your application.

He highlights this by building what should be a secure photo gallery - one that checks the extension and mime-type of the image - and even stores it outside of the public directory. He goes even farther by adding additional sanity checks with a PHP script that then renders the image.

After walking through the code and it’s security features, he then downloads a simple image from the internet. Opening his editor he quickly injects the virus (written in PHP) into the image and uploads it, passing all of the server checks.

Surely, since it passed these checks the system is secure, right? Ben loads the gallery to proudly show off the image - which is just that… an image, with nothing special or out of the ordinary.
Except that when he opens the image gallery files, each has been infected with the malicious code.

The culprit that allowed for Ben to hijack an entire system and execute foreign code, create new files, and even hijack the entire site? When displaying the image the file was included using PHP’s include() function, instead of pulling in the data using file_get_contents() and echoing it out.

Such a simple mistake provided Ben, if he was a malicious hacker, complete access to all of the files on the system.

Protecting Yourself

Security always exists in layers - and this could have been prevented by including a few more layers, such as using an open source library to rewrite the image, reviewing the image source before pulling it in, or again not giving it executable access by using the PHP include() function.

But what’s terrifying is how simple it is to hijack a site, how easy it is to get access to your system and private data, and how easy it is to overlook security vulnerabilities - especially with open source tooling and those that take plugins.

As Ben explains, sometimes the core code itself is really secure, but then you get two different plugins that when used together accidentally create a security vulnerability. That by itself is one of the most challenging as you can audit each plugin individually, and still not know you’re opening up your system to malicious actors.

This is why it's not just important to stay up to date on the latest security measures and best practices, but to be constantly thinking like a hacker and testing your code for vulnerabilities.

Learn More

You can watch thefull video to learn more how viruses operate, how to quickly build your own PHP virus (but you must promise to use it for good), and what to watch for in order to protect yourself, your customers, and your architecture.
12894 views · 4 years ago
Why Cloudways is the Perfect Managed Hosting for PHP Applications

The following is a sponsored blogpost by Cloudways


Developing an application is not the sole thing you should bank on. You must strive to find the best hosting solution to deploy that application also. The application’s speed is dependent on the hosting provider, that is why I always advise you to go for the best hosting solution to get the ultimate app performance.

Now a days, it is a big challenge to choose any web hosting, as each hosting has its own pros and cons which you must know, before considering it finally for the deployment. I don’t recommend shared hosting for PHP/Laravel based applications, because you always get lot of server hassles like downtime, hacking, 500 errors, lousy support and other problems that are part and parcel of shared hosting.

For PHP applications, you must focus on more technical aspects like caching, configs, databases, etc. because these are essential performance points for any vanilla or framework-based PHP application. Additionally, if the app focuses on user engagement (for instance, ecommerce store), the hosting solution should be robust enough to handle spikes in traffic.

Here, I would like to introduce Cloudways PHP server hosting to you which provides easy, developer and designer friendly managed hosting platform. With Cloudways, you don't need to focus on PHP hosting, but must focus on building your application. You can easily launch cloud servers on five providers including DigitalOcean, Linode, Vultr, AWS and GCE.


Cloudways ThunderStack


Being a developer, you must be familiar with the concept of stack - an arrangement of technologies that form the underlying hosting solution.

To provide a blazing fast speed and a glitch-free performance, Cloudways has built a PHP stack, known as ThunderStack. This stack consists of technologies that offer maximum uptime and page load speed to all PHP applications. Check out the following visual representation of ThunderStack and the constituent technologies:


alt_text


As you can see, ThunderStack comprises of a mix of static and dynamic caches with two web servers, Nginx and Apache. This combination ensures the ultimate experience for the users and visitors of your application.


Frameworks and CMS


The strength and popularity of PHP lies in the variety of frameworks and CMS it offers to the developers. Realizing this diversity, Cloudways offers a hassle-free installation of major PHP frameworks including Symfony, Laravel, CakePHP, Zend, and Codeigniter. Similarly, popular CMS such as WordPress, Bolt, Craft, October, Couch, and Coaster CMS - you can install these with the 1-click option. The best part is that if you have a framework or CMS that is not on the list, you can easily install it through Composer.


1-Click PHP Server & Application Installation


Setting up a stack on an unmanaged VPS could take an entire day!

When you opt for Cloudways managed cloud hosting, the entire process of setting up the server, installation of core PHP files and then the setup of the required framework is over in a matter of minutes.

Just sign up at Cloudways, choose your desired cloud provider, and select the PHP stack application.


alt_text


As you can see, your LAMP stack is ready for business in minutes.

Many PHP applications fail because essential services are either turned off or not set up properly. Cloudways offers a centralized location where you can view and set the status of all essential services such as:


* Apache
* Elasticsearch
* Memcached
* MySQL
* PHP-FPM
* Nginx
* New Relic
* Redis
* Varnish


alt_text


Similarly, you can manage SMTP add-ons without any fuss.


Staging Environment


With Cloudways, you can test your web applications for possible bugs and errors before taking it live.

Using the staging feature, developers can first deploy their web sites on test domains where they can analyze the applications performance and potential problems. This helps site administrators to fix those issues timely and view the application performance in real-time.

A default sub domain comes pre-installed with the newly launched application, making it easy for the administrators to test the applications on those testing subdomains. Overall, it's a great feature which helps developers know about the possible errors that may arise during the live deployment.

alt_text

Pre-Installed Composer & Git


PHP development requires working with external libraries and packages. Suppose you are working with Laravel and you need to install an external package. Since Composer has become the standard way of installing packages, it comes preinstalled on the Cloudways platform. Just launch the application and start using Composer in your project.

Similarly, if you are familiar with Git and maintain your project on GitHub or BitBucket, you don’t need to worry about Git installation. Git also comes pre-configured on Cloudways. You can start running commands right after application launch.


Cloudways MySQL Manager


When you work with databases in PHP, you need a database manager. On the Cloudways platform, you will get a custom-built MySQL manager, in which you can perform all the tasks of a typical DB manager.

alt_text


However, if you wish to install and use another database manager like PHPMyAdmin, you can install it by following this simple guide on installing PHPMyadmin.


Server & Application Level SSH


If you use Linux, you typically use SSH for accessing the server(s) and individual applications. A third-party developer requires application and server level access as per the requirements of the client. Cloudways offers SSH access to fit the requirements of the client and users.

alt_text


PHP-FPM, Varnish & Cron Settings


Cloudways provides custom UI panel to set and maintain PHP-FPM and Varnish settings. Although the default configuration is already in place, you can easily change all the settings to suit your own, particular development related requirements. In Varnish settings, you can define URL that you want to exclude from caching. You can also set permissions in this panel.

alt_text


Cron job is a very commonly used component of PHP application development process. On Cloudways platform, you can easily set up Cron jobs in just a few clicks. Just declare the PHP script URL and the time when the script will run.

alt_text


Cloudways API & Personal Assistant Bot


Cloudways provides an internal API that offers all important aspects of the server and application management. Through Cloudways API, you can easily develop, integrate, automate, and manage your servers and web apps on Cloudways Platform using the RESTful API. Check out some of the use cases developed using Cloudways API. You just need your API key and email for authentication of the HTTP calls on API Playground and custom applications.

alt_text


Cloudways employs a smart assistant named CloudwaysBot to notify all users about server and application level issues. CloudwaysBot sends the notifications on pre-approved channels including email, Slack and popular task management tools such as Asana and Trello.


Run Your APIs on PHP Stack


Do you have your own API which you want to run on the PHP stack? No problem, because you can do that, too with Cloudways! You can also use REST API like Slim, Silex, Lumen, and others. You can use APIs to speed up performance and require fast servers with lots of resources. So, if you think that your API response time is getting slower due to the large number of requests, you can easily scale your server(s) with a click to address the situation.


Team Collaboration


When you work on a large number of applications with multiple developers, you need to assign them on any specific application. Cloudways provides an awesome feature of team collaboration through which you can assign developers to specific application and give access to them. You can use this tool to assign one developer to multiple applications. Through team feature, you can connect the team together and work on single platform. Access can be of different type; i.e. billing, support and console. You can either give the full access or a limited one by selecting the features in Team tab.

alt_text


Final Words


Managed cloud hosting ensures that you are not bothered by any hosting or server related issues. For practical purposes, this means that developers can concentrate on writing awesome code without worrying about underlying infrastructure and hosting related issues. Do sign up and check out Cloudways for the best and the most cost-effective cloud hosting solution for your next PHP project!
12041 views · 5 years ago
Welcome to PHP 7.1

In case you are living under a rock, the latest version of PHP released last week. PHP developers around the world began rebuilding their development containers with it so they can run their tests. Now it’s your turn. If you haven’t already installed it, you can download it here http://php.net/downloads.php Grab it, get it running in your development environment, and run those unit tests. If all goes well, you can begin planning your staged deployment to production.

If you need a quick start guide to get you going, our good friend Mr Colin O’Dell has just the thing for you “Installing PHP 7.1”. It’ll get you up and going quickly on PHP 7.1.

What’s the big deal about PHP 7.1? I am so glad you asked. Here are the major new features released in PHP 7.1.

* Nullable types
* Void return type
* Iterable pseudo-type
* Class constant visiblity modifiers
* Square bracket syntax for list() and the ability to specify keys in list()
* Catching multiple exceptions types

Now if you want a quick intro to several of these new features, check out our “RFCs of the Future” playlist on YouTube. In it, I talk about 4 of the new features.

Oh and while you are watching things download & compile, why not take the time to give a shoutout to all the core contributors, and a special thank you to Davey Shafik and Joe Watkins, the PHP 7.1 release managers.

Cheers!
=C=
11069 views · 3 years ago


It took me quite some time to settle on my first blog post in this series and I found myself thinking about the most requested functionality in my career – The good ‘ol Custom CMS – typically geared towards clients that want a straight forward, secure solution that can be expanded upon in a modular format and that’s their IP.

This will be our starting point. A blank slate to build something epic with clean code and even cleaner design. And in the spirit of building from scratch, I will refrain from using classes or a framework. The main reasoning behind this is to truly get everyone acquainted with and excited about PHP development.

Join me as I transform rudimentary code into something extraordinary that can be morphed into just about any Content, PHP, and MySQL driven project. So without further ado, let’s jump into it!

The bare necessities


If you’re just getting started with development, there’s a nifty bite sized server called UniformServer that will be your best friend throughout your coding career. PHPMyAdmin (an awesome visual db management tool) comes built in so if you’re looking for a work right out of the box solution, this is it.

Alternatively, you can opt for XAMPP or use an alternative server of your choice.

Now here’s where the exciting stuff begins, mapping things out.


I don’t see this done/encouraged often enough. Feel free to grab a piece of paper to logically map out your steps or produce a rough draft of where you’d like this project to go.

In this tutorial, I would like to achieve the following:


DB, DB, Set up your DB.


This requires a bit of planning but let’s start of with the basic structure we need to see this through.

We are going to need a user table and a content table and are a few ways to tackle this.

If you’re using the PHPMyAdmin tool you can create your database, add user permissions (Click on Permissions after creating your database), and create a table with ease.


If you’re like me and prefer to look at good ‘ol SQL then writing an SQL statement is the preferred approach.


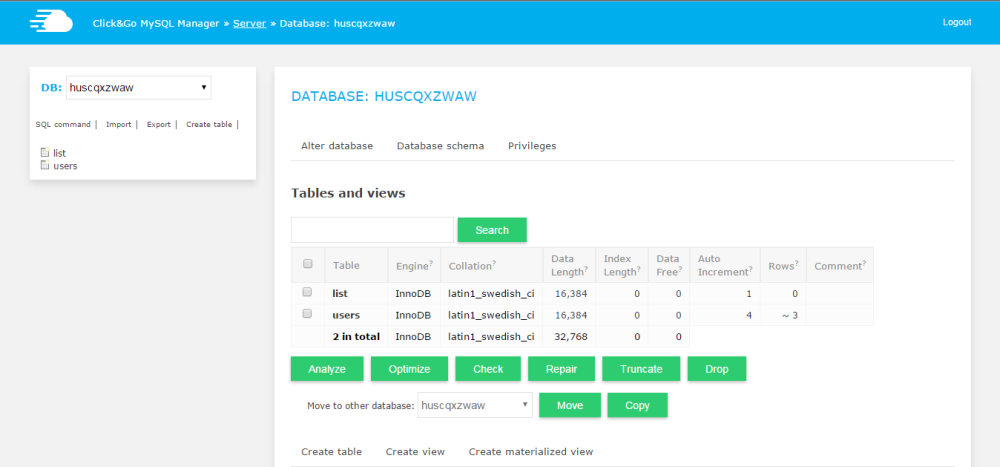
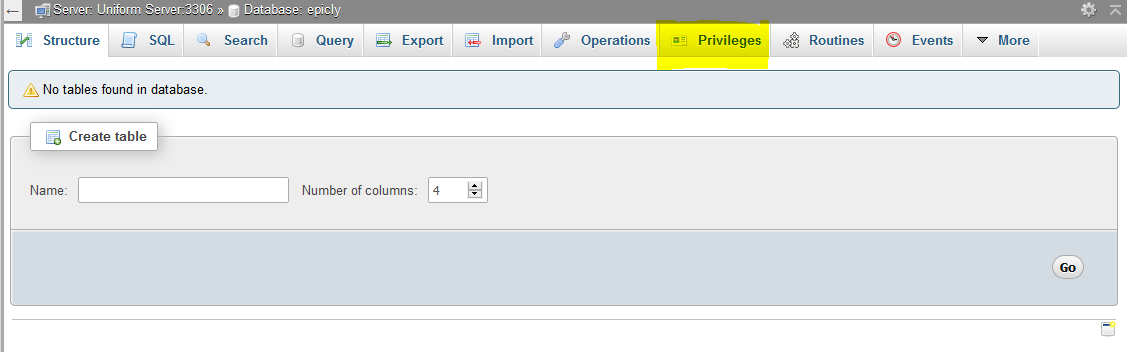
CREATE TABLE <code>mydbname</code>.<code>content</code> ( <code>ID</code> INT(11) NOT NULL AUTO_INCREMENT , <code>title</code> VARCHAR(100) NOT NULL , <code>content</code> LONGTEXT NOT NULL , <code>author</code> VARCHAR(50) NOT NULL , PRIMARY KEY (<code>ID</code>)) ENGINE = MyISAM COMMENT = 'content table';


Understanding the SQL statement

In a nutshell we are creating a table with important fields. Namely:

####

ID | Title | Content | Author

#######

The ID field is our unique identifier.Now we can move on to the file structure.

Everything has a place in the file structure game


You can use a structure that speaks to your coding style / memory.

I tend to use the following:


Choose a name for your CMS, which should be placed at the webroot of your localhost/server.

Replicate the folder structure as per the above example.

Next, we’re going to create a basic connection file.


You can create a 
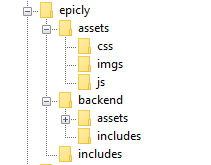
conn.php file in your root/includes folder.

The connection file will provide crucial information to connect to the database.

Type the following into your conn.php file, remember to include your own database credentials.


<?php

$letsconnect = new mysqli("localhost","dbuser","dbpass","dbname");

?>


Let’s go to the homepage (index.php)


Create a file called 
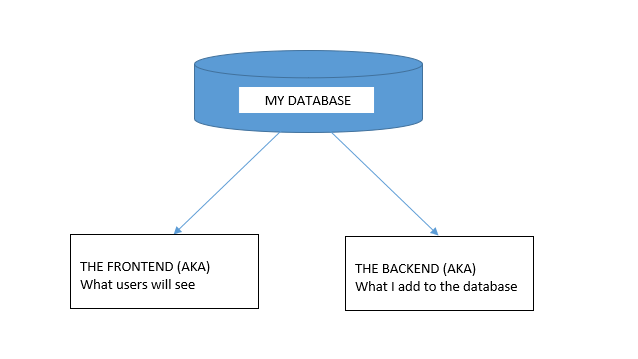
index.php at the root of your CMS folder.

I will be adding comments in my code to help you understand what each line does.

Comments are a useful tool for developers to add important notes private to their code.

We need to pull information from the database so it’s imperative that we include our connection file.


<?php

include('includes/conn.php');

if ($letsconnect -> connect_errno) { echo "Error " . $letsconnect -> connect_error;

}else{

$getmydata=$letsconnect -> query("SELECT * FROM content");

foreach($getmydata as $mydata){ echo "Title: "; echo $mydata['title']; echo "<br/>"; echo "Content: "; echo $mydata['content']; echo "<br/>"; echo "Author: "; echo $mydata['author']; echo "<br/>"; echo "<br/>";

}

}

$letsconnect -> close();

?>


Let’s get a (very) basic backend up and running


Create a file called index.php in your backend folder.

We need to create a basic form to capture our data.

Let’s code some HTML!


<html>

<head><title>Backend - Capture Content</title></head>

<body>

<form action="<?php $_SERVER[‘PHP_SELF’];?>" method="post">

<input type="text" name="title" placeholder="Content Title here" required/>

<textarea name="content">Content Here</textarea>

<input type="text" name="author" placeholder="Author" required/>

<input type="submit" value="Save My Data" name="savedata"/>

</form>

</body>

</html>


Next, we need to process the form data.


Type the following just above the
<form> 
tag.


<?php

if(isset($_POST['savedata'])){

include('../includes/conn.php');

if ($letsconnect->connect_error) {

die("Your Connection failed: " . $letsconnect->connect_error);

}else{

$sql = "INSERT INTO content(title,content,author)VALUES ('".$_POST["title"]."', '".$_POST["content"]."', '".$_POST["author"]."')";

if (mysqli_query($letsconnect, $sql)) {

echo "Your data was saved successfully!";

} else { echo "Error: " . $sql . "" . mysqli_error($letsconnect);

} $letsconnect->close();

}

}

?>


Note, this is a basic MySQL query to insert data. However, before using this in production it's important to add proper escaping and security to prevent SQL injections. This will be covered in the next article.


Congrats you made it to the end of tutorial 1!


Test out your creation, modify your content, and play around.

Go to your sitename/index.php to see your frontend after capturing data via sitename/backend/index.php

Next Up:


codewithme Now With Security, Functionality, and Aesthetics in mind.


Conclusion


Coding doesn’t have to be daunting and it’s my aim to divide a complex system into bitesized tutorials so you can truly use the knowledge you’ve acquired in your own projects.

SPONSORS

The Ultimate Managed Hosting Platform