PHP & Web Development Blogs

Search Results For: install
Showing 11 to 15 of 21 blog articles.
12910 views · 4 years ago
Why Cloudways is the Perfect Managed Hosting for PHP Applications

The following is a sponsored blogpost by Cloudways


Developing an application is not the sole thing you should bank on. You must strive to find the best hosting solution to deploy that application also. The application’s speed is dependent on the hosting provider, that is why I always advise you to go for the best hosting solution to get the ultimate app performance.

Now a days, it is a big challenge to choose any web hosting, as each hosting has its own pros and cons which you must know, before considering it finally for the deployment. I don’t recommend shared hosting for PHP/Laravel based applications, because you always get lot of server hassles like downtime, hacking, 500 errors, lousy support and other problems that are part and parcel of shared hosting.

For PHP applications, you must focus on more technical aspects like caching, configs, databases, etc. because these are essential performance points for any vanilla or framework-based PHP application. Additionally, if the app focuses on user engagement (for instance, ecommerce store), the hosting solution should be robust enough to handle spikes in traffic.

Here, I would like to introduce Cloudways PHP server hosting to you which provides easy, developer and designer friendly managed hosting platform. With Cloudways, you don't need to focus on PHP hosting, but must focus on building your application. You can easily launch cloud servers on five providers including DigitalOcean, Linode, Vultr, AWS and GCE.


Cloudways ThunderStack


Being a developer, you must be familiar with the concept of stack - an arrangement of technologies that form the underlying hosting solution.

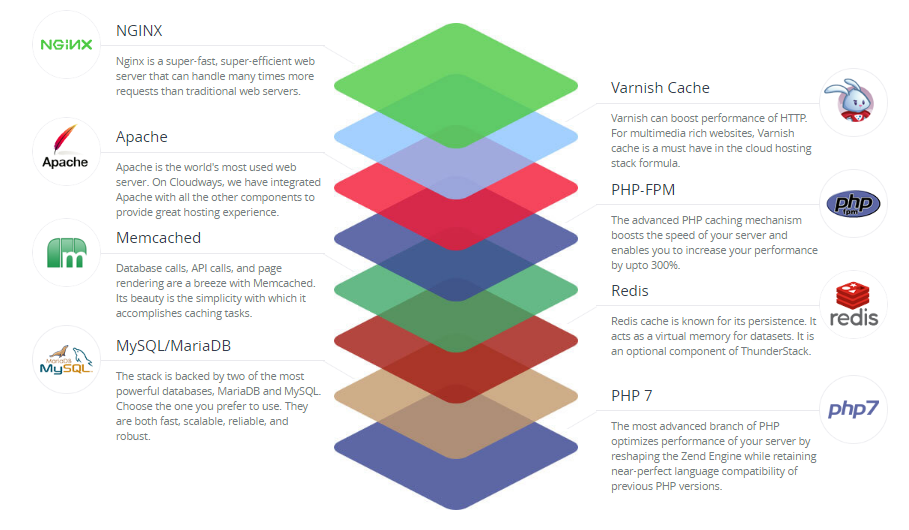
To provide a blazing fast speed and a glitch-free performance, Cloudways has built a PHP stack, known as ThunderStack. This stack consists of technologies that offer maximum uptime and page load speed to all PHP applications. Check out the following visual representation of ThunderStack and the constituent technologies:


alt_text


As you can see, ThunderStack comprises of a mix of static and dynamic caches with two web servers, Nginx and Apache. This combination ensures the ultimate experience for the users and visitors of your application.


Frameworks and CMS


The strength and popularity of PHP lies in the variety of frameworks and CMS it offers to the developers. Realizing this diversity, Cloudways offers a hassle-free installation of major PHP frameworks including Symfony, Laravel, CakePHP, Zend, and Codeigniter. Similarly, popular CMS such as WordPress, Bolt, Craft, October, Couch, and Coaster CMS - you can install these with the 1-click option. The best part is that if you have a framework or CMS that is not on the list, you can easily install it through Composer.


1-Click PHP Server & Application Installation


Setting up a stack on an unmanaged VPS could take an entire day!

When you opt for Cloudways managed cloud hosting, the entire process of setting up the server, installation of core PHP files and then the setup of the required framework is over in a matter of minutes.

Just sign up at Cloudways, choose your desired cloud provider, and select the PHP stack application.


alt_text


As you can see, your LAMP stack is ready for business in minutes.

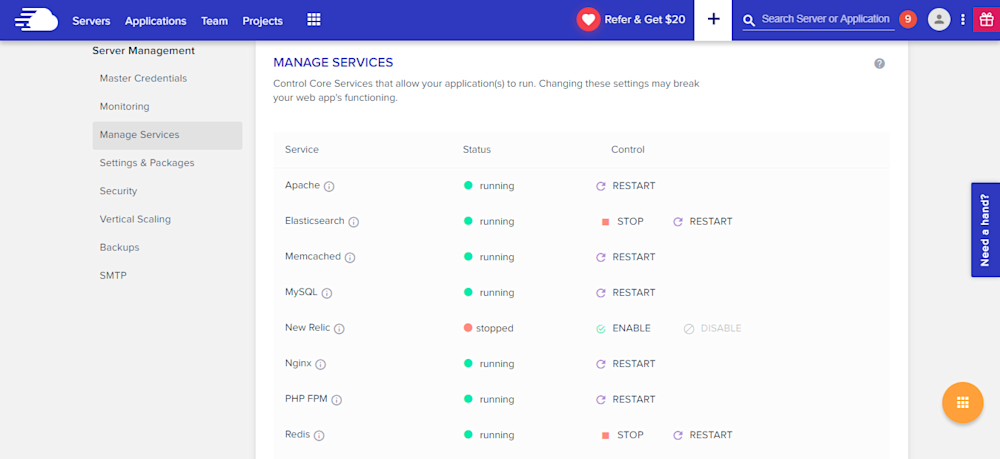
Many PHP applications fail because essential services are either turned off or not set up properly. Cloudways offers a centralized location where you can view and set the status of all essential services such as:


* Apache
* Elasticsearch
* Memcached
* MySQL
* PHP-FPM
* Nginx
* New Relic
* Redis
* Varnish


alt_text


Similarly, you can manage SMTP add-ons without any fuss.


Staging Environment


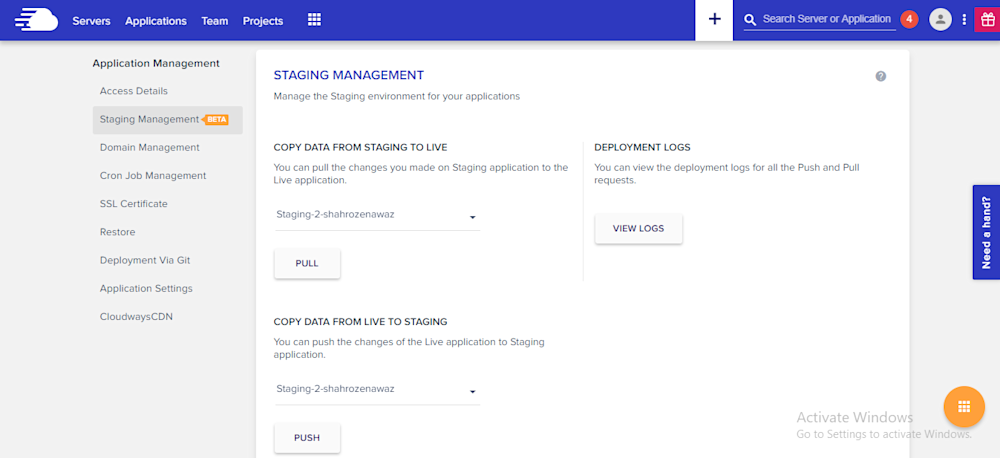
With Cloudways, you can test your web applications for possible bugs and errors before taking it live.

Using the staging feature, developers can first deploy their web sites on test domains where they can analyze the applications performance and potential problems. This helps site administrators to fix those issues timely and view the application performance in real-time.

A default sub domain comes pre-installed with the newly launched application, making it easy for the administrators to test the applications on those testing subdomains. Overall, it's a great feature which helps developers know about the possible errors that may arise during the live deployment.

alt_text

Pre-Installed Composer & Git


PHP development requires working with external libraries and packages. Suppose you are working with Laravel and you need to install an external package. Since Composer has become the standard way of installing packages, it comes preinstalled on the Cloudways platform. Just launch the application and start using Composer in your project.

Similarly, if you are familiar with Git and maintain your project on GitHub or BitBucket, you don’t need to worry about Git installation. Git also comes pre-configured on Cloudways. You can start running commands right after application launch.


Cloudways MySQL Manager


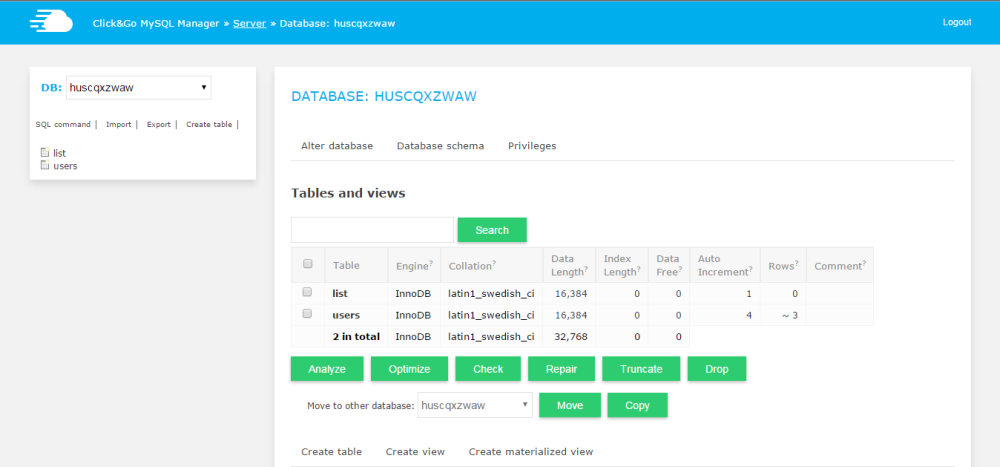
When you work with databases in PHP, you need a database manager. On the Cloudways platform, you will get a custom-built MySQL manager, in which you can perform all the tasks of a typical DB manager.

alt_text


However, if you wish to install and use another database manager like PHPMyAdmin, you can install it by following this simple guide on installing PHPMyadmin.


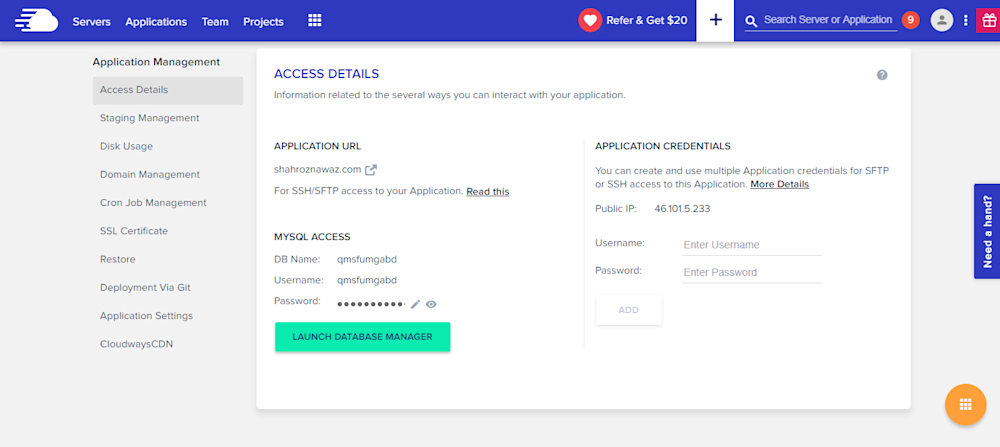
Server & Application Level SSH


If you use Linux, you typically use SSH for accessing the server(s) and individual applications. A third-party developer requires application and server level access as per the requirements of the client. Cloudways offers SSH access to fit the requirements of the client and users.

alt_text


PHP-FPM, Varnish & Cron Settings


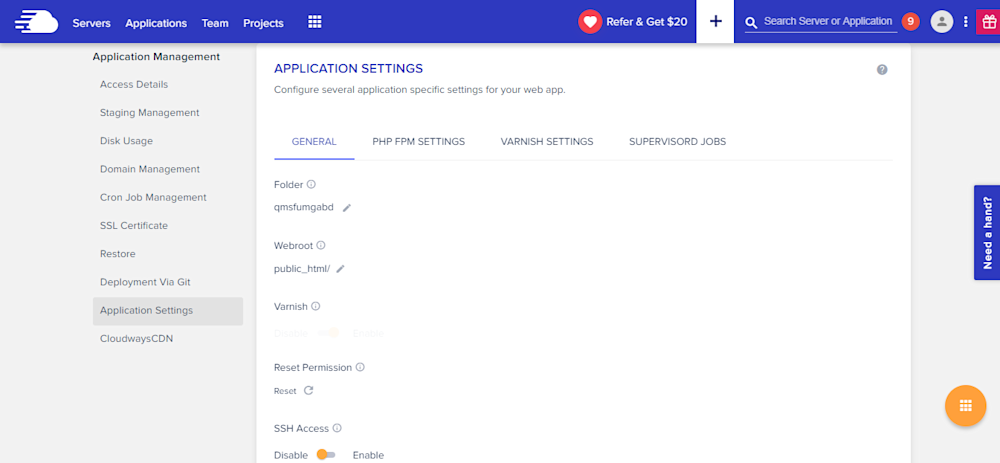
Cloudways provides custom UI panel to set and maintain PHP-FPM and Varnish settings. Although the default configuration is already in place, you can easily change all the settings to suit your own, particular development related requirements. In Varnish settings, you can define URL that you want to exclude from caching. You can also set permissions in this panel.

alt_text


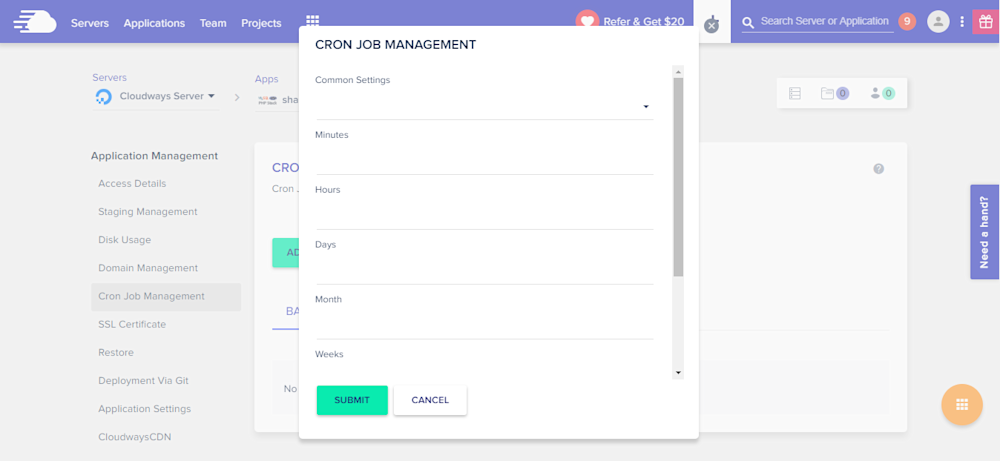
Cron job is a very commonly used component of PHP application development process. On Cloudways platform, you can easily set up Cron jobs in just a few clicks. Just declare the PHP script URL and the time when the script will run.

alt_text


Cloudways API & Personal Assistant Bot


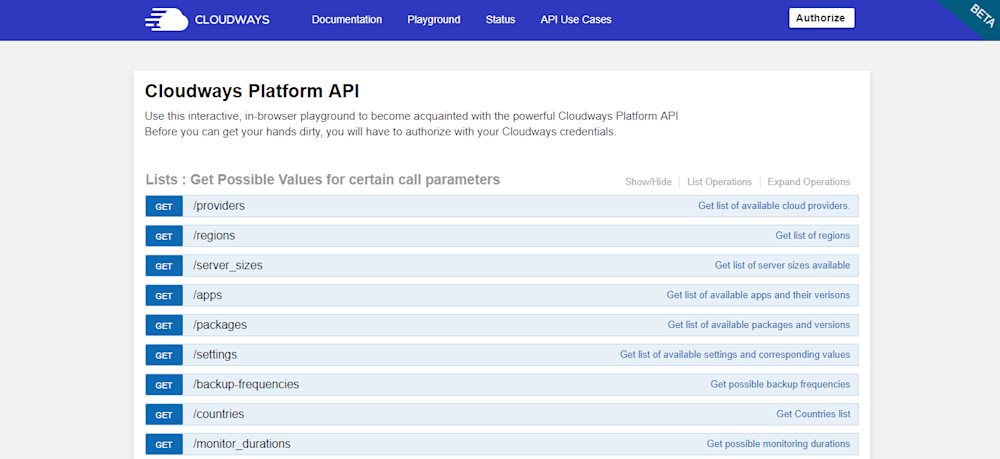
Cloudways provides an internal API that offers all important aspects of the server and application management. Through Cloudways API, you can easily develop, integrate, automate, and manage your servers and web apps on Cloudways Platform using the RESTful API. Check out some of the use cases developed using Cloudways API. You just need your API key and email for authentication of the HTTP calls on API Playground and custom applications.

alt_text


Cloudways employs a smart assistant named CloudwaysBot to notify all users about server and application level issues. CloudwaysBot sends the notifications on pre-approved channels including email, Slack and popular task management tools such as Asana and Trello.


Run Your APIs on PHP Stack


Do you have your own API which you want to run on the PHP stack? No problem, because you can do that, too with Cloudways! You can also use REST API like Slim, Silex, Lumen, and others. You can use APIs to speed up performance and require fast servers with lots of resources. So, if you think that your API response time is getting slower due to the large number of requests, you can easily scale your server(s) with a click to address the situation.


Team Collaboration


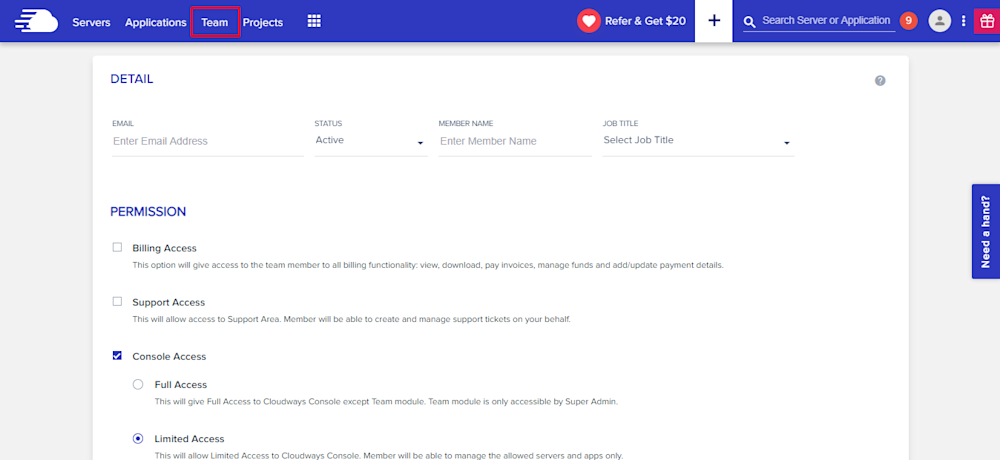
When you work on a large number of applications with multiple developers, you need to assign them on any specific application. Cloudways provides an awesome feature of team collaboration through which you can assign developers to specific application and give access to them. You can use this tool to assign one developer to multiple applications. Through team feature, you can connect the team together and work on single platform. Access can be of different type; i.e. billing, support and console. You can either give the full access or a limited one by selecting the features in Team tab.

alt_text


Final Words


Managed cloud hosting ensures that you are not bothered by any hosting or server related issues. For practical purposes, this means that developers can concentrate on writing awesome code without worrying about underlying infrastructure and hosting related issues. Do sign up and check out Cloudways for the best and the most cost-effective cloud hosting solution for your next PHP project!
11950 views · 5 years ago
Five Composer Tips Every PHP Developer Should Know

Composer is the way that that PHP developers manage libraries and their dependencies. Previously, developers mainly stuck to existing frameworks. If you were a Symfony developer, you used Symfony and libraries built around it. You didn’t dare cross the line to Zend Framework. These days however, developers focus less on frameworks, and more on the libraries they need to build the project they are working on. This decoupling of projects from frameworks is largely possible because of Composer and the ecosystem that has built up around it.

Like PHP, Composer is easy to get started in, but complex enough to take time and practice to master. The Composer manual does a great job of getting you up and running quickly, but some of the commands are involved enough so that many developers miss some of their power because they simply don’t understand.

I’ve picked out five commands that every user of Composer should master. In each section I give you a little insight into the command, how it is used, when it is used and why this one is important.

1: Require

Sample:

$ composer require monolog/monolog


Require is the most common command that most developers will use when using Composer. In addition to the vendor/package, you can also specify a version number to load along with modifiers. For instance, if you want version 1.18.0 of monolog specifically and never want the update command to update this, you would use this command.

$ composer require monolog/monolog:1.18.0


This command will not grab the current version of monolog (currently 1.18.2) but will instead install the specific version 1.18.0.

If you always want the most recent version of monolog greater than 1.8.0 you can use the > modifier as shown in this command.

$ composer require monolog/monolog:>1.18.0


If you want the latest in patch in your current version but don’t want any minor updates that may introduce new features, you can specify that using the tilde.

$ composer require monolog/monolog:~1.18.0


The command above will install the latest version of monolog v1.18. Updates will never update beyond the latest 1.18 version.

If you want to stay current on your major version but never want to go above it you can indicate that with the caret.

$ composer require monolog/monolog:^1.18.0


The command above will install the latest version of monolog 1. Updates continue to update beyond 1.18, but will never update to version 2.

There are other options and flags for require, you can find the complete documentation of the command here.

2: Install a package globally

The most common use of Composer is to install and manage a library within a given project. There are however, times when you want to install a given library globally so that all of your projects can use it without you having to specifically require it in each project. Composer is up to the challenge with a modifier to the require command we discussed above, global. The most common use of this is when you are using Composer to manage packages like PHPUnit.

$ composer global require "phpunit/phpunit:^5.3.*"


The command above would install PHPUnit globally. It would also allow it to be updated throughout the 5.0.0 version because we specified ~5.3.* as the version number. You should be careful in installing packages globally. As long as you do not need different versions for different projects you are ok. However, should you start a project and want to use PHPUnit 6.0.0 (when it releases) but PHPUnit 6 breaks backwards compatibility with the PHPUnit 5.* version, you would have trouble. Either you would have to stay with PHPUnit 5 for your new project, or you would have to test all your projects to make sure that your Unit Tests work after upgrading to PHPUnit 6.

Globally installed projects are something to be thought through carefully. When in doubt, install the project locally.

3: Update a single library with Composer

One of the great powers of Composer is that developers can now easily keep their dependencies up-to-date. Not only that, as we discussed in tip #1, each developer can define exactly what “up-to-date” means for them. With this simple command, Composer will check all of your dependencies in a project and download/install the latest applicable versions.

$ composer update


What about those times when you know that a new version of a specific package has released and you want it, but nothing else updated. Composer has you covered here too.

$ composer update monolog/monolog


This command will ignore everything else, and only update the monolog package and it’s dependencies.

It’s great that you can update everything, but there are times when you know that updating one or more of your packages is going to break things in a way that you aren’t ready to deal with. Composer allows you the freedom to cherry-pick the packages that you want to update, and leave the rest for a later time.

4: Don’t install dev dependencies

In a lot of projects I am working on, I want to make sure that the libraries I download and install are working before I start working with them. To this end, many packages will include things like Unit Tests and documentation. This way I can run the unit Tests on my own to validate the package first. This is all fine and good, except when I don’t want them. There are times when I know the package well enough, or have used it enough, to not have to bother with any of that.

Many packages create a distribution package that does not contain tests or docs. (The League of Extraordinary Packages does this by default on all their packages.) If you specify the --prefer-dist flag, Composer will look for a distribution file and use it instead of pulling directly from github. Of course if you want want to make sure you get the full source and all the artifacts, you can use the --prefer-src flag.

5: Optimize your autoload

Regardless of whether you --prefer-dist or --prefer-source, when your package is incorporated into your project with require, it just adds it to the end of your autoloader. This isn’t always the best solution. Therefore Composer gives us the option to optimize the autoloader with the --optimize switch. Optimizing your autoloader converts your entire autoloader into classmaps. Instead of the autoloader having to use file_exists() to locate a file, Composer creates an array of file locations for each class. This can speed up your application by as much as 30%.

$ composer dump-autoload --optimize


The command above can be issued at any time to optimize your autoloader. It’s a good idea to execute this before moving your application into production.

$ composer require monolog/monolog:~1.18.0 -o


You can also use the optimize flag with the require command. Doing this every time you require a new package will keep your autoloader up-to-date. That having said, it’s still a good idea to get in the habit of using the first command as a safety net when you roll to production, just to make sure.

BONUS: Commit your composer.lock

After you have installed your first package with composer, you now have two files in the root of your project, composer.json and composer.lock. Of the two, composer.lock is the most important one. It contains detailed information about every package and version installed. When you issue a composer install in a directory with a composer.lock file, composer will install the exact same packages and versions. Therefore, by pulling a git repo on a production server will replicate the exact same packages in production that were installed in development. Of course the corollary of this is that you never want to commit your vendor/ directory. Since you can recreate it exactly, there is no need to store all of that code in your repo.

It is recommended that also commit your composer.json. When you check out your repo into production and do an install, composer will use the composer.lock instead of the composer.json when present. This means that your production environment is setup exactly like your development environment.
37460 views · 5 years ago
Securing PHP RESTful APIs using Firebase JWT Library

Hello Guys,

In our Last Blog Post, we have created restful apis,But not worked on its security and authentication. Login api can be public but after login apis should be authenticate using any secure token. one of them is JWT, So i am providing the Steps for Create and use JWT Token in our already created API.


Now its time To Implement JWT Authentication IN our Api, So these are the steps to implement it in our already created Apis


Step 1:Install and include Firebase JWT(JSON WEB TOKEN) in our project with following composer command        


 composer require firebase/php-jwt 


include the composer installed packages
require_once('vendor/autoload.php');


use namespace using following:
 use \Firebase\JWT\JWT; 


Step 2: Create a JWT server side using Firebase Jwt Library's encode method in Login action , and return it to Client


Define a private variable named Secret_Key in Class like following:

 private {
$payload = array(
'iss' => $_SERVER['HOST_NAME'],
'exp' => time()+600, 'uId' => $UiD
);
try{
$jwt = JWT::encode($payload, $this->Secret_Key,'HS256'); $res=array("status"=>true,"Token"=>$jwt);
}catch (UnexpectedValueException $e) {
$res=array("status"=>false,"Error"=>$e->getMessage());
}
return $res;
}


In our login action , if the user has been logged in successfully then with the status,_data_ and message just replace the login success code with following code:

$return['status']=1;
$return['_data_']=$UserData[0];
$return['message']='User Logged in Successfully.';

$jwt=$obj->generateToken($UserData[0]['id']);
if($jwt['status']==true)
{
$return['JWT']=$jwt['Token'];
}
else{
unset($return['_data_']);
$return['status']=0;
$return['message']='Error:'.$jwt['Error'];
}


Step 3: Now with every request after login should have the JWT token in its Post(even we can receive it in get or authentication header also but here we are receiving it in post)


No afetr successfully login you will get the JWt Token in your response,Just add that Token with every post request of after login api calls. So we will do it using postman, Find the screenshot 1 for checking the JWT Token is coming in login api response

JWT DEMO LOGIN API RESPONSE


Step 4:After reciving the JWt in every after login api call, we need to check whether the token is fine using JWT decode method in After login Apis like
UserBlogs
is a After login Api, So for verify that we are creating Authencate method in class like following:


 public function Authenticate($JWT,$Curret_User_id)
{
try {
$decoded = JWT::decode($JWT,$this->Secret_Key, array('HS256'));
$payload = json_decode(json_encode($decoded),true);

if($payload['uId'] == $Curret_User_id) {
$res=array("status"=>true);
}else{
$res=array("status"=>false,"Error"=>"Invalid Token or Token Exipred, So Please login Again!");
}
}catch (UnexpectedValueException $e) {
$res=array("status"=>false,"Error"=>$e->getMessage());
}
return $res;

}


Step 5: Cross check the response returned by Authenticate method in
UserBlogs
Action of api , replace the
UserBlogs
Action inner content with following code:


 if(isset($_POST['Uid']))
{

$resp=$obj->Authenticate($_POST['JWT'],$_POST['Uid']);
if($resp['status']==false)
{
$return['status']=0;
$return['message']='Error:'.$resp['Error'];
}
else{
$blogs=$obj->get_all_blogs($_POST['Uid']);
if(count($blogs)>0)
{
$return['status']=1;
$return['_data_']=$blogs;
$return['message']='Success.';
}
else
{
$return['status']=0;
$return['message']='Error:Invalid UserId!';
}
}
}
else
{
$return['status']=0;
$return['message']='Error:User Id not provided!';
}


Ah great its time to check out the UserBlogs Api, please find the screenshoot for that, Remember we need to put the JWt Token in POST Parameter as we have already recived that Value in Login Api call.

JWT DEMO Authentication in userBlogs API Call

Now if you want to verify that token is expiring in given time(10 minutes after generation time/login time), i am just clicking the same api with same token after 10 minutes and you can see there will not return any data and it is returning status false with following message :


JWT DEMO Authentication in userBlogs API Call


Also if you want to eloborate it more then i suggest you to try with modify Uid value with same token , you will another authentication issue and also if you modify the JWT token also then also you will not get the desired result and get authentication Issue

Thanks for reading out if you want the complete code of this file then please find following:
<?php 
header("Content-Type: application/json; charset=UTF-8");
require_once('vendor/autoload.php');
use \Firebase\JWT\JWT;

class DBClass {

private $host = "localhost";
private $username = "root";
private $password = ""; private $database = "news";

public $connection;

private $Secret_Key="*$%43MVKJTKMN$#";
public function connect(){

$this->connection = null;

try{
$this->connection = new PDO("mysql:host=" . $this->host . ";dbname=" . $this->database, $this->username, $this->password);
$this->connection->exec("set names utf8");
}catch(PDOException $exception){
echo "Error: " . $exception->getMessage();
}

return $this->connection;
}

public function login($email,$password){

if($this->connection==null)
{
$this->connect();
}

$query = "SELECT id,name,email,createdAt,updatedAt from users where email= ? and password= ?";
$stmt = $this->connection->prepare($query);
$stmt->execute(array($email,md5($password)));
$ret= $stmt->fetchAll(PDO::FETCH_ASSOC);
return $ret;
}

public function get_all_blogs($Uid){

if($this->connection==null)
{
$this->connect();
}

$query = "SELECT b.*,u.id as Uid,u.email as Uemail,u.name as Uname from blogs b join users u on u.id=b.user_id where b.user_id= ?";
$stmt = $this->connection->prepare($query);
$stmt->execute(array($Uid));
$ret= $stmt->fetchAll(PDO::FETCH_ASSOC);
return $ret;
}

public function response($array)
{
echo json_encode($array);
exit;
}

public function generateToken($UiD)
{
$payload = array(
'iss' => $_SERVER['HOST_NAME'],
'exp' => time()+600, 'uId' => $UiD
);
try{
$jwt = JWT::encode($payload, $this->Secret_Key,'HS256'); $res=array("status"=>true,"Token"=>$jwt);
}catch (UnexpectedValueException $e) {
$res=array("status"=>false,"Error"=>$e->getMessage());
}
return $res;
}

public function Authenticate($JWT,$Current_User_id)
{
try {
$decoded = JWT::decode($JWT,$this->Secret_Key, array('HS256'));
$payload = json_decode(json_encode($decoded),true);

if($payload['uId'] == $Current_User_id) {
$res=array("status"=>true);
}else{
$res=array("status"=>false,"Error"=>"Invalid Token or Token Exipred, So Please login Again!");
}
}catch (UnexpectedValueException $e) {
$res=array("status"=>false,"Error"=>$e->getMessage());
}
return $res;

}
}

$return=array();
$obj = new DBClass();
if(isset($_GET['action']) && $_GET['action']!='')
{
if($_GET['action']=="login")
{
if(isset($_POST['email']) && isset($_POST['password']))
{
$UserData=$obj->login($_POST['email'],$_POST['password']);
if(count($UserData)>0)
{
$return['status']=1;
$return['_data_']=$UserData[0];
$return['message']='User Logged in Successfully.';

$jwt=$obj->generateToken($UserData[0]['id']);
if($jwt['status']==true)
{
$return['JWT']=$jwt['Token'];
}
else{
unset($return['_data_']);
$return['status']=0;
$return['message']='Error:'.$jwt['Error'];
}

}
else
{
$return['status']=0;
$return['message']='Error:Invalid Email or Password!';
}
}
else
{
$return['status']=0;
$return['message']='Error:Email or Password not provided!';
}
}
elseif($_GET['action']=="UserBlogs")
{
if(isset($_POST['Uid']))
{

$resp=$obj->Authenticate($_POST['JWT'],$_POST['Uid']);
if($resp['status']==false)
{
$return['status']=0;
$return['message']='Error:'.$resp['Error'];
}
else{
$blogs=$obj->get_all_blogs($_POST['Uid']);
if(count($blogs)>0)
{
$return['status']=1;
$return['_data_']=$blogs;
$return['message']='Success.';
}
else
{
$return['status']=0;
$return['message']='Error:Invalid UserId!';
}
}
}
else
{
$return['status']=0;
$return['message']='Error:User Id not provided!';
}
}
}
else
{
$return['status']=0;
$return['message']='Error:Action not provided!';
}
$obj->response($return);
$obj->connection=null;
?>

15368 views · 5 years ago
Create Alarm and Monitoring on Custom Memory and Disk Metrics for Amazon EC2

Today I am going write a blog on how to Monitor Memory and Disk custom metrics and creating alarm in Ubuntu.

To do this, we can use Amazon CloudWatch, which provides a flexible, scalable and reliable solution for monitoring our server.

Amazon Cloud Watch will allow us to collect the custom metrics from our applications that we will monitor to troubleshoot any issues, spot trends, and configure operational performance. CloudWatch functions display alarms, graphs, custom metrics data and including statistics.

Installing the Scripts


Before we start installing the scripts for monitoring, we should install all the dependent packages need to perform on Ubuntu.

First login to your AWS server, and from our terminal, install below packages

sudo apt-get update
sudo apt-get install unzip
sudo apt-get install libwww-perl libdatetime-perl


Now Install the Monitoring Scripts


Following are the steps to download and then unzip we need to configure the Cloud Watch Monitoring scripts on our server:
1. In the terminal, we need to change our directory and where we want to add our monitoring scripts.
2. Now run the below command and download the source:

curl https://aws-cloudwatch.s3.amazonaws.com/downloads/CloudWatchMonitoringScripts-1.2.2.zip -O

3. Now uncompress the currently downloaded sources using the following commands

unzip CloudWatchMonitoringScripts-1.2.2.zip && \

rm CloudWatchMonitoringScripts-1.2.2.zip && \

cd aws-scripts-mon


The directory will contain Perl scripts, because of the execution of these scripts only report memory run and disk space utilization metrics will run in our Ubuntu server.
Currently, our folder will contain the following files:
mon-get-instance-stats.pl - This Perl file is used to displaying the current utilization statistics reports for our AWS instance on which these file scripts will be executed.
mon-put-instance-data.pl - This Perl script file will be used for collecting the system metrics on our ubuntu server and which will send them to the Amazon Cloud Watch.
awscreds.template - This Perl script file will contain an example for AWS credentials keys and secret access key named with access key ID.
CloudWatchClient.pm - This Perl script file module will be used to simplify by calling Amazon Cloud Watch from using other scripts.
LICENSE.txt – This file contains the license details for Apache 2.0.
NOTICE.txt – This file contains will gives us information about Copyright notice.
4. For performing the Cloud Watch operations, we need to confirm that whether our scripts have corresponding permissions for the actions:

If we are associated with an IAM role with our EC2 Ubuntu instance, we need to verify that which will grant the permissions to perform the below-listed operations:

cloudwatch:GetMetricStatistics

cloudwatch:PutMetricData

ec2:DescribeTags

cloudwatch:ListMetrics


Now we need to copy the ‘awscreds.template’ file into ‘awscreds.conf’ by using the command below and which will update the file with details of the AWS credentials.

cp awscreds.template awscreds.conf

AWSAccessKeyId = my_access_key_id

AWSSecretKey = my_secret_access_key


Now we completed the configuration.

mon-put-instance-data.pl


This Perl script file will collect memory, disk space utilization data and swap the current system details and then it makes handling a remote call to Amazon Cloud Watch to reports details to the collected cloud watch data as a custom metrics.

We can perform a simple test run, by running the below without sending data to Amazon CloudWatch

./mon-put-instance-data.pl --mem-util --verify --verbose


Now we are going to set a cron for scheduling our metrics and we will send them to Amazon CloudWatch
1. Now we need to edit the crontab by using below command:

 crontab -e

2. Now we will update the file using the following query which will disk space utilization and report memory for particular paths to Amazon CloudWatch in every five minutes:

*/5 * * * * ~/STORAGE/cloudwatch/aws-scripts-mon/mon-put-instance-data.pl --mem-util --mem-avail --mem-used --disk-space-util --disk-space-avail --disk-space-used --disk-path=/ --disk-path=/STORAGE --from-cron


If there is an error, the scripts will write an error message in our system log.

Use of Options

--mem-used
The above command will collect the information about used memory and which will send the details of the reports in MBs into the MemoryUsed metrics. This will give us information about the metric counts memory allocated by applications and the OS as used.
--mem-util
The above command will collect the information about memory utilization in percentages and which will send the details of the Memory Utilization metrics and it will count the usage of the memory applications and the OS.
--disk-space-util
The above command will collect the information to collect the current utilized disk space and which will send the reports in percentages to the DiskSpaceUtilization for the metric and for the selected disks.
--mem-avail
The above command will collect the information about the available memory and which will send the reports in MBs to the MemoryAvailable metrics details. This is the metric counts memory allocated by the applications and the OS as used.
--disk-path=PATH
The above command will collect the information and will point out the which disk path to report disk space.
--disk-space-avail
The above command will collect the information about the available disk space and which will send the reports in GBs to the DiskSpaceAvailable metric for the selected disks.
--disk-space-used
The above command will collect the information about the disk space used and which will send the reports in GBs to the DiskSpaceUsed metric for the selected disks.

The PATH can specify to point or any of the files can be located on which are mounted point for the filesystem which needs to be reported.

If we want to points to the multiple disks, then specify both of the disks like below:

--disk-path=/ --disk-path=/home


Setting an Alarm for Custom Metrics


Before we are going to running our Perl Scripts, then we need to create an alarm that will be listed in our default metrics except for the custom metrics. You can see some default metrics are listed in below image:


Once we completed setting the cron, then the custom metrics will be located in Linux System Metrics.

Now we are going to creating the alarm for our custom metrics
1. We need to open the cloudwatch console panel at https://console.aws.amazon.com/cloudwatch/home
2. Now navigate to the navigation panel, we need to click on Alarm and we can Create Alarm.
3. This will open a popup which with the list of the CloudWatch metrics by category.
4. Now click on the Linux System Metrics . This will be listed out with custom metrics you can see in the below pictures


5. Now we need to select metric details and we need to click on the NEXT button. Now we need to navigate to Define Alarm step.


6. Now we need to define an Alarm with required fields

Now we need to enter the Alarm name for identifying them. Then we need to give a description of our alarm.

Next, we need to give the condition with the maximum limit of bytes count or percentage when it notifies the alarm. If the condition satisfies, then the alarm will start trigger.

We need to provide a piece of additional information about for our alarm.

We need to define what are the actions to be taken when our alarm changes it state.

We need to select or create a new topic with emails needed for sending notification about alarm state.
7. Finally, we need to choose the Create Alarm.

So its completed. Now the alarm is created for our selected custom metrics.

Finished!

Now the alarm will be listed out under the selected state in our AWS panel. Now we need to select an alarm from the list seen and we can see the details and history of our alarm.
19295 views · 5 years ago
Generate PDF from HTML in Laravel 5.7

Today, I will share with you how to create a PDF file from HTML blade file in Laravel 5.7. We will be using dompdf package for generating the PDF file.

In the below example, we will install barryvdh/laravel-dompdf using composer package and thereafter we will add new route url with controller. Then we will create a blade file. Then after we have to just run project with serve and we can check the PDF file is for download.

Download Laravel 5.7

Now I am going to explain the step by step from scratch with laravel installation for dompdf. To get started, we need to download fresh Laravel 5.7 application using command, so open our terminal and run the below command in the command prompt:

composer create-project --prefer-dist laravel/laravel blog


Install laravel-dompdf Package

Now we will install barryvdh/laravel-dompdf composer package by using the following composer command in ourLlaravel 5.7 application.

composer require barryvdh/laravel-dompdf


Then the package is successfully installed in our application, after that open config/app.php file and we need to add alias and service provider.
config/app.php

'providers' => [
....
Barryvdh\DomPDF\ServiceProvider::class,
],

'aliases' => [
....
'PDF' => Barryvdh\DomPDF\Facade::class,
]


Create Routes

Now we need to create routes for the items listing. so now open our "routes/web.php" file and we need to add following route.
routes/web.php

Route::get('demo-generate-pdf','HomeController@demoGeneratePDF');


Create Controller

Here,we need to create a new controllerHomeController (mostly it will be there, we can skip this step if we don't need to create a controller) that will manage our pdf generation using the generatePDF() method of route.
app/Http/Controllers/HomeController.php

<?php
namespace App\Http\Controllers;
use Illuminate\Http\Request;
use PDF;

class HomeController extends Controller
{
public function demoGeneratePDF()
{
$data = ['title' => 'Welcome to My Blog'];
$pdf = PDF::loadView('myPDF', $data);

return $pdf->download('demo.pdf');
}
}


Create Blade File

In the final step, let us create demoPDF.blade.php in the resources/views/demoPDF.blade.php for structure of pdf file and add the following code:
resources/views/demoPDF.blade.php

<!DOCTYPE html>
<html>
<head>
<title>Hi</title>
</head>
<body>
<h1>Welcome to My BLOG - {{ $title }}</h1>
<p>Lorem ipsum dolor sit amet, consectetur adipisicing elit, sed do eiusmod
tempor incididunt ut labore et dolore magna aliqua. Ut enim ad minim veniam,
quis nostrud exercitation ullamco laboris nisi ut aliquip ex ea commodo
consequat. Duis aute irure dolor in reprehenderit in voluptate velit esse
cillum dolore eu fugiat nulla pariatur. Excepteur sint occaecat cupidatat non
proident, sunt in culpa qui officia deserunt mollit anim id est laborum.</p>
</body>
</html>


Now run the below command for serve and test it:

php artisan serve

SPONSORS

PHP Tutorials and Videos