PHP & Web Development Blogs

Search Results For: sockets
Showing 1 to 3 of 3 blog articles.
10908 views · 4 years ago
Web Sockets in PHP

In his talk Websockets in PHP, John Fransler walks us through the use of WebSockets in PHP.

While discussing bi-directional real-time application development, John notes that PHP is often not invited to the table due to its lack of native support. Of all the possible attempts to bring in PHP on this stage of real-time development, Ratchet, a PHP WebSocket library, comes closest. "Ratchet is a loosely coupled PHP library providing developers with tools to create real-time, bi-directional applications between clients and servers over WebSockets."* Ahem!

Today's dynamic world


In today's dynamic content world of the internet, it is required to serve real-time bi-directional messages between clients and servers. WebSockets are simple, full-duplex, and persistent. They work over Http and are a standard today.

WebSockets have compatibility with 96.5% of clients globally

There's a very high chance your client has the necessary plumbing to access your content via WebSockets. WebSockets gives the ability to have real-time data on to your clients without the need for polling.

To understand WebSockets, John takes an example of a Javascript client and Ratchet Server. Javascript has everything built in to allow access to a socket. For example, you can use the send method on a WebSocket variable to send a message to the server, or if you want to respond to a message from the server, you use the OnConnection method.

While on the Server, John uses Ratchet, which is built on React PHP. A server script is then configured and set up to run and listen on a port for incoming HTTP requests. For messages, JSON is used, and to find public methods, a router is set up. He then goes on to instantiate the server-side script in Ratchet.

There are four functions of a Ratchets message component interface that are used in this example:

OnOpen gets called when a new connection is made.

OnClose gets called when a client quits. It's essential to keep an eye on memory management, and essential to keep tidying up as you move through the code.

OnError gets called when there is an exception faced by the user.

OnMessage gives the text of the JSON message, which is being exchanged with the client.

For Initialization, Jason continues to walk through the example. He shows how one can loop through the clients, both inside the server and outside the server. Outside the server, it’s a feature of React PHP. On database access, and with traditional standard synchronous MySQL in PHP, what usually happens is that it forces the code to wait for the query to return a result and do nothing — Fortunately, with Asynchronous MySQLi, that is not the case.

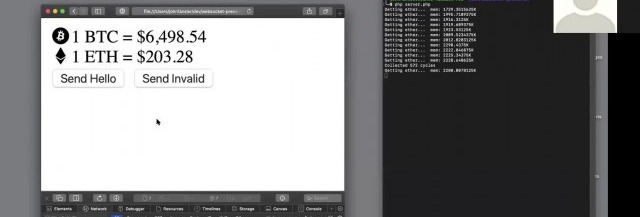
John gets into the details explaining Variables, References & Pointers. He also gives a demo where a central site has updated information on the Bitcoin and ether prices. A client terminal reflects the last values. Now the client doesn't have to poll the server for new values. When there is a change in the Bitcoin or ether values, the server pushes down the client's update. No polling helps with a lot of overheads and gets closer to real-time.

Using Supervisord


For Long-running applications - Jason recommends running a supervisord, use proxy to expose the port, and add a site certificate. Supervisord keeps an eye out for the server running the service; it can be used to restart the service and log any service issues. Recommended proxies are AWS load balancer, Nginx, and HA Proxy. For scalability, use multiple smaller WebSocket servers and a smaller number of clients per server used and load balancing. If one has to support a chat feature to allow clients to talk to each other in near real-time, it is recommended to use Redis. The Redis server proxies the messages between the server nodes.

The talk concludes with John summarizing best practices on error handling and takes QnA on various aspects of WebSockets such as handling load balancers and asynchronous calls to MSQLi.

The presentation for this video, along with the code, is hosted at John Curt's GitHub. More info about John's current areas of interest can be found on John's Blog.

Watch the video now


Related videos
5819 views · 4 years ago
Top 12 PHP Libraries to Leverage Your Web App Development


PHP, by all means, is an immensely powerful language!


We may fall short of words, but there won't come any end to its qualities. The endless functionalities and possibilities of this server-side scripting language have managed to get it a strong and supportive community of PHP programmers on a global level. At present, PHP powers more than half on websites and applications on the internet.


Do you know what makes PHP so praiseworthy?


It is the simplicity, easy programming structure, and developer-friendly web functionalities that are to be credited to turn PHP into one of the top programming languages. You can create highly interactive and dynamic websites and applications with desired results by making use of PHP.


However, coding often could be a tough and tedious task to accomplish. As a solution to this, you get built-in PHP libraries that optimize the process of coding for maximum productivity.


But what are these libraries?


That's exactly what you will find out as you move ahead in this article, a list of top 12 PHP libraries capable of leading the development process in an intended manner.


So, without waiting any further, let's move ahead to learn about PHP libraries in-depth.


PChart


PChart is a PHP library assisting with the generation of text data in the form of something more appealing to the eyes and known as visual charts.


You can use this library to represent data as bar charts, pie charts, and many more different formats. The PHP script here utilizes SQL queries to put data in the impressive charts or graphs form.


Mink


Another well-known in the list of PHP libraries is Mink. It allows you to keep an eye on if a proper interaction is happening between your web apps and the browser. Eliminating the API differences between the two types of browser emulators, Mink offers an authentic testing environment for you. It also supports PHPUnit, Behat, and Symfony2.


Monolog


Monolog is a PHP logging library that helps you with saving logs to the specified locations by sending them to set files, sockets, inboxes, databases, or other web services. The use of the PSR-3 interface permits to type-hint logs in counter to your libraries that maintain optimum interoperability.


Hoa


This modular, extensible, and structured set of PHP libraries we know as Hoa establishes a link between the research and the industry.


It recommends essential paradigms, mechanisms, and algorithms for building the reliability of a site. Many PHP developers in different parts of the world use Hoa for ideal PHP development.


Guzzle


Guzzle is an HTTP client library for PHP that enables you to send HTTP requests to combine with web services.


It offers a simple interface that makes the development of query strings, POST requests, HTTP cookies, and many other attributes possible. You can also use Guzzle to send synchronous and asynchronous requests from the similar interface.


Ratchet


If your need is to develop real-time, two-directional apps between clients and servers over WebSockets, Ratchet is the PHP library you need to do it effectively.


Creating event-driven apps with Ratchet is a rapid, simple, and easy job to do!


Geocoder


Geocoder is a library to create applications that are very well geo-aware.


With Geocoder, there is an abstraction layer that helps with geocoding manipulations.


It is further split into two parts, known as HttpAdapter and Provider.


ImageWorkshop


ImageWorkshop is an open-source PHP library letting you work over the manipulation of images with layers. You can crop, resize, add watermarks, create thumbnails, and so much more. You can also enhance the images on the sites.


PhpThumb


phpThumb is the library specialized at handling the work associated with creating thumbnails with minimal coding. Accepting every image source type and image formats, it makes you do a lot ranging from rotating or cropping to watermarking or defining the image quality.


Parody


This simple library we know as Parody is used to copy classes and objects. It also provides results for method calls, acquiring properties, instantiating objects, and more. Sequential method chaining is used by Parody to produce defining class structures.


Imagine


This object-oriented PHP library is meant for working with images along with manipulating them. The often adopted operations such as resizing, cropping, and applying filters happen instantly and relatively well with Imagine.


With Imagine, you get a color class that forms the RGB values of any given color. Draw shapes like arc, ellipse, line, etc. with the features available.


PhpFastCache


PhpFastCache is an open-source PHP library that makes caching feasible. Coming as a single-file, it can be integrated within a matter of minutes.


Caching methods supported by PhpFastCache involve apc, memcache, memcached, wincache, pdo, and mpdo.


The Bottom Line


It's not about what extra difference these libraries make; it's about what significant individual contributions these libraries make for a final desired PHP app or website.


A PHP programmer, too, agrees with these libraries' benefits.


It's your time now to try and believe!
26166 views · 5 years ago
PHP CHAT WITH SOCKETS

Hey Friends,

I am sharing a very interesting blog on how to create a chat system in php without using ajax. As we all know ajax based chat system in php is not a good solution
because itincreases the server load and redundant xhr calls on our server.

Instead, I am going to use sockets for incoming messages from and send messages to another user. So lets try them out using the following steps:


Step 1: Cross check in php.ini that sockets extension is enabled


;extension=sockets
extension=sockets


Step 2: Create server.php file


This file will handle the incoming and outgoing messages on sockets, Add following variables in top of the file:

$host = 'localhost';
$port = '9000';
$null = NULL; 


Step 3: After it add helper methods


The following code for handshake with new incoming connections and encrypt and decrypt messages incoming and outgoing over sockets:

function send_message($msg)
{
global $clients;
foreach($clients as $changed_socket)
{
@socket_write($changed_socket,$msg,strlen($msg));
}
return true;
}
function unmask($text) {
$length = ord($text[1]) & 127;
if($length == 126) {
$masks = substr($text, 4, 4);
$data = substr($text, 8);
}
elseif($length == 127) {
$masks = substr($text, 10, 4);
$data = substr($text, 14);
}
else {
$masks = substr($text, 2, 4);
$data = substr($text, 6);
}
$text = "";
for ($i = 0; $i < strlen($data); ++$i) {
$text .= $data[$i] ^ $masks[$i%4];
}
return $text;
}
function mask($text)
{
$b1 = 0x80 | (0x1 & 0x0f);
$length = strlen($text);

if($length <= 125)
$header = pack('CC', $b1, $length);
elseif($length > 125 && $length < 65536)
$header = pack('CCn', $b1, 126, $length);
elseif($length >= 65536)
$header = pack('CCNN', $b1, 127, $length);
return $header.$text;
}
function perform_handshaking($receved_header,$client_conn, $host, $port)
{
$headers = array();
$lines = preg_split("/

/", $receved_header);
foreach($lines as $line)
{
$line = chop($line);
if(preg_match('/\A(\S+): (.*)\z/', $line, $matches))
{
$headers[$matches[1]] = $matches[2];
}
}
$secKey = $headers['Sec-WebSocket-Key'];
$secAccept = base64_encode(pack('H*', sha1($secKey . '258EAFA5-E914-47DA-95CA-C5AB0DC85B11')));
$upgrade = "HTTP/1.1 101 Web Socket Protocol Handshake

" .
"Upgrade: websocket

" .
"Connection: Upgrade

" .
"WebSocket-Origin: $host

" .
"WebSocket-Location: ws://$host:$port/php-ws/chat-daemon.php

".
"Sec-WebSocket-Accept:$secAccept


";
socket_write($client_conn,$upgrade,strlen($upgrade));
}


Step 4: Now add following code to create bind and listen tcp/ip sockets:


$socket = socket_create(AF_INET, SOCK_STREAM, SOL_TCP);
socket_set_option($socket, SOL_SOCKET, SO_REUSEADDR, 1);
socket_bind($socket, 0, $port);
socket_listen($socket);
$clients = array($socket);


Ok now a endless loop that will use for handeling incominga nd send messages:

while (true) {
$changed = $clients;
socket_select($changed, $null, $null, 0, 10);

if (in_array($socket, $changed)) {
$socket_new = socket_accept($socket); $clients[] = $socket_new;
$header = socket_read($socket_new, 1024); perform_handshaking($header, $socket_new, $host, $port);
socket_getpeername($socket_new, $ip); $response = mask(json_encode(array('type'=>'system', 'message'=>$ip.' connected'))); send_message($response);
$found_socket = array_search($socket, $changed);
unset($changed[$found_socket]);
}

foreach ($changed as $changed_socket) {

while(socket_recv($changed_socket, $buf, 1024, 0) >= 1)
{
$received_text = unmask($buf); $tst_msg = json_decode($received_text, true); $user_name = $tst_msg['name']; $user_message = $tst_msg['message']; $user_color = $tst_msg['color'];
$response_text = mask(json_encode(array('type'=>'usermsg', 'name'=>$user_name, 'message'=>$user_message, 'color'=>$user_color)));
send_message($response_text); break 2; }

$buf = @socket_read($changed_socket, 1024, PHP_NORMAL_READ);
if ($buf === false) { $found_socket = array_search($changed_socket, $clients);
socket_getpeername($changed_socket, $ip);
unset($clients[$found_socket]);

$response = mask(json_encode(array('type'=>'system', 'message'=>$ip.' disconnected')));
send_message($response);
}
}
}
socket_close($socket);


So you are ready with server side socket program, Now its time to move on front side where we will implement w3c provided client side Web Socket Apis,

Step 5: create a file named index.php for frontend usage with following initial code


$host = 'localhost';
$port = '9000';
$subfolder = "php_ws/";
$colors = array('#007AFF','#FF7000','#FF7000','#15E25F','#CFC700','#CFC700','#CF1100','#CF00BE','#F00');
$color_pick = array_rand($colors);
<!DOCTYPE html>
<html>
<head>
<meta name="viewport" content="width=device-width, initial-scale=1">
</head>
<body>
<div class="chat-wrapper">
<div id="message-box"></div>
<div class="user-panel">
<input type="text" name="name" id="name" placeholder="Your Name" maxlength="15" />
<input type="text" name="message" id="message" placeholder="Type your message here..." maxlength="100" />
<button id="send-message">Send</button>
</div>
</div>
</body>
</html>


Now add some basic styling in the head section using following code:

<style type="text/css">
.chat-wrapper {
font: bold 11px/normal 'lucida grande', tahoma, verdana, arial, sans-serif;
background: #00a6bb;
padding: 20px;
margin: 20px auto;
box-shadow: 2px 2px 2px 0px #00000017;
max-width:700px;
min-width:500px;
}
#message-box {
width: 97%;
display: inline-block;
height: 300px;
background: #fff;
box-shadow: inset 0px 0px 2px #00000017;
overflow: auto;
padding: 10px;
}
.user-panel{
margin-top: 10px;
}
input[type=text]{
border: none;
padding: 5px 5px;
box-shadow: 2px 2px 2px #0000001c;
}
input[type=text]#name{
width:20%;
}
input[type=text]#message{
width:60%;
}
button#send-message {
border: none;
padding: 5px 15px;
background: #11e0fb;
box-shadow: 2px 2px 2px #0000001c;
}
</style>


Ok Style is all set now need to add a jquery script and create web socket object and handle all events on it as following code need to add before closing of bosy tag:

<script src="https://ajax.googleapis.com/ajax/libs/jquery/3.3.1/jquery.min.js"></script>
<script language="javascript" type="text/javascript">
var msgBox = $('#message-box');
var wsUri = "ws://".$host.":".$port."/php-ws/server.php";
websocket = new WebSocket(wsUri);

websocket.onopen = function(ev) { msgBox.append('<div class="system_msg" style="color:#bbbbbb">Welcome to my "Chat box"!</div>'); }
websocket.onmessage = function(ev) {
var response = JSON.parse(ev.data);
var res_type = response.type; var user_message = response.message; var user_name = response.name; var user_color = response.color; switch(res_type){
case 'usermsg':
msgBox.append('<div><span class="user_name" style="color:' + user_color + '">' + user_name + '</span> : <span class="user_message">' + user_message + '</span></div>');
break;
case 'system':
msgBox.append('<div style="color:#bbbbbb">' + user_message + '</div>');
break;
}
msgBox[0].scrollTop = msgBox[0].scrollHeight; };

websocket.onerror = function(ev){ msgBox.append('<div class="system_error">Error Occurred - ' + ev.data + '</div>'); };
websocket.onclose = function(ev){ msgBox.append('<div class="system_msg">Connection Closed</div>'); };
$('#send-message').click(function(){
send_message();
});

$( "#message" ).on( "keydown", function( event ) {
if(event.which==13){
send_message();
}
});

function send_message(){
var message_input = $('#message'); var name_input = $('#name');
if(message_input.val() == ""){ alert("Enter your Name please!");
return;
}
if(message_input.val() == ""){ alert("Enter Some message Please!");
return;
}
var msg = {
message: message_input.val(),
name: name_input.val(),
color : '<?php echo $colors[$color_pick]; ?>'
};
websocket.send(JSON.stringify(msg));
message_input.val(''); }
</script>


Ok All set, Now need to run the server.php file using following php-cli utility,make sure you have php cli utility installed in your system:

php -q c:\xampp\htdocs\php-ws\server.php


Now you may access the front index.php file via the browser url like following and see a chatbox and connection status, you may use the same url or different browser to check the chat system is working or not.

    SPONSORS