PHP & Web Development Blogs

Search Results For: developer
Showing 11 to 15 of 35 blog articles.
8799 views · 3 years ago


Welcome back! If you’re new to this series have a look at Part 1 here


Today’s focus is on templating, the aesthetic that will make or break your web application.

Having a clean design with well defined CSS that’s responsive and user friendly goes a long way.

Developers often stick to their lane but delving into templating will bode in your favor, you can indeed
create a functional and launch-worthy application all on your own!

Let’s jump into it!

Structured structure


Everything you tackle should be found with ease down the line. Therefore careful planning is fundamental to the success and sustainability of your project. You’ll also find that clearly defining your work lends itself to more productivity overall as you spend less that explaining your work during a handover / looking for a specific piece of code or resource. You’ll probably end up spending more time on actual work.
Finding your own unique pattern with file structure and CSS identifiers will also work in your favor as something unique to your process will most likely be easier to remember and form a tactile relationship with.

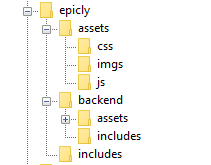
Our project’s current structure looks like this:


>If you need to backtrack, Part 1 is a great place to start!

In part 1, we created our index.php which displays info from our database.

Let’s take this a step further and create a header and a footer for our index.php

Create a file called header.php and save this to your includes folder.

Next, create a file called footer.php and save this to your includes folder.

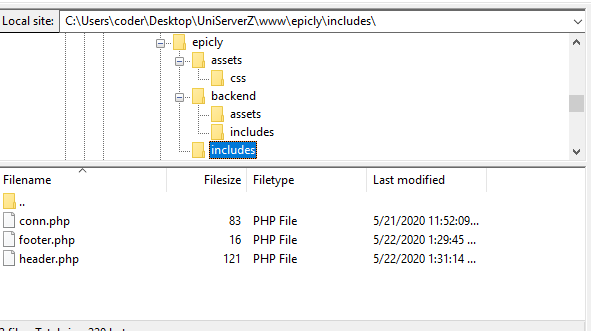
Your file structure should now look like this.


A header above all the rest


The header file will be a file we reuse throughout your web application. This file will contain important information that’s vital to the functionality and aesthetic of your website.
The type of info you’ll expect to see in a header.php file:
Script includes
Such as JQuery and important libraries
CSS includes
CSS files loaded from internal or external sources
Meta information
Contains important information that’s readable by search engines.
The basic structure of the beginning of your app, including your menu, and your logo.
For now, how header is going to have a basic layout.

Let’s get our HTML on!

<html>
<head>
<title>My Awesome CMS – Page Title</title>
</head>
<body>


A footer that sets the bar

Create a file called footer.php and save it to your includes folder (yourcms/includes/footer.php).

Add this code to your new file.

</body>
</html>


Next, let’s focus on the gravy… The CSS


CSS, when written beautifully, can truly set you apart.

You can tell your web application to load various styles to specific elements by defining unique identifiers.
Styles that are only used once are denoted with a # (a CSS “ID”) whereas styles that are reused multiple times are denoted with a . (a CSS “class”)

The best way to delve into the realm of CSS is to learn by experience.

Let’s create!


First, we need to create and load our CSS file. Remember our nifty new pal header.php? This created a convenient way to load our CSS file!

Add the following code to your header.php just above the </head> tag.

<link href=”../assets/css/style.css” type=”text/css” rel=”stylesheet”/> 


The ../ in the link to our stylesheet means we have to leave the current directory (the directory that header.php is in) and look for the assets/css/ directories.

Go ahead and create the css folder under your assets folder.

Next we’re going to create some simple CSS to test things out.

It’s time to add some style!


We are going to create two divs.
A div is a divider / section in HTML.
Add this to your index.php (located in your CMS’ root folder) above the <?php tag.

<div id="myfirstid"></div>
<div class="myfirstclass"></div>


Then, create a CSS file

Add this:

#myfirstid{
Background:lightblue;
Font-family:Arial;
Font-size:44px;
Font-weight: Bold;
}
.myfirstclass{
Font-size:15px;
Color: darkblue;
}


Save your newly created CSS to assets/css/ as style.css.

Pulling it all together, let’s see what we can do!


Let’s apply what we just learned to our index.php. But first, we should add our header.php and footer.php files.

Including everyone


Add this to the top of your index.php file:

include(‘includes/header.php’);


Remove the <divs> we used for practice earlier, we have something better in store!

Add this to the bottom of your index.php:

include(‘includes/footer.php’);


Next, let’s modify our code so we can add some style to the data we retrieve from our database.

Modify the following line:
foreach($getmydata as $mydata){ echo "Title: "; echo $mydata['title']; echo "<br/>"; echo "Content: "; echo $mydata['content']; echo "<br/>"; echo "Author: "; echo $mydata['author']; echo "<br/>"; echo "<br/>";


as follows:
?>

<div id=”myfirstid”>
<?php
foreach($getmydata as $mydata){
echo "<div class=”myfirstclass”>Title: ";
echo $mydata['title'];
echo "<br/>";
echo "Content: ";
echo $mydata['content'];
echo "<br/>";
echo "Author: ";
echo $mydata['author'];
echo "</div><br/><br/>";
}?>
</div>
<?php


Your full index.php should now look like this:

<?php
include('includes/header.php');
include('includes/conn.php');

if ($letsconnect -> connect_errno) { echo "Error " . $letsconnect -> connect_error;

}else{

$getmydata=$letsconnect -> query("SELECT * FROM content");

?>
<div id="myfirstid">
<?php
foreach($getmydata as $mydata){
echo "<div class=”myfirstclass”>Title: ";
echo $mydata['title'];
echo "<br/>";
echo "Content: ";
echo $mydata['content'];
echo "<br/>";
echo "Author: ";
echo $mydata['author'];
echo "</div><br/><br/>";
}
?>
</div>
<?php
}

$letsconnect -> close();
include('includes/footer.php');
?>

Go ahead, test it out!

There’s a lot to unpack and I will break things down a little more during our next tutorial!

Challenge


Study the final index.php and try to form a few theories about why closing a php tag is necessary before adding raw html.

Next Up: #CodeWithMe Part 4: Building A Good Base

8664 views · 3 years ago
Web Sockets in PHP

In his talk Websockets in PHP, John Fransler walks us through the use of WebSockets in PHP.

While discussing bi-directional real-time application development, John notes that PHP is often not invited to the table due to its lack of native support. Of all the possible attempts to bring in PHP on this stage of real-time development, Ratchet, a PHP WebSocket library, comes closest. "Ratchet is a loosely coupled PHP library providing developers with tools to create real-time, bi-directional applications between clients and servers over WebSockets."* Ahem!

Today's dynamic world


In today's dynamic content world of the internet, it is required to serve real-time bi-directional messages between clients and servers. WebSockets are simple, full-duplex, and persistent. They work over Http and are a standard today.

WebSockets have compatibility with 96.5% of clients globally

There's a very high chance your client has the necessary plumbing to access your content via WebSockets. WebSockets gives the ability to have real-time data on to your clients without the need for polling.

To understand WebSockets, John takes an example of a Javascript client and Ratchet Server. Javascript has everything built in to allow access to a socket. For example, you can use the send method on a WebSocket variable to send a message to the server, or if you want to respond to a message from the server, you use the OnConnection method.

While on the Server, John uses Ratchet, which is built on React PHP. A server script is then configured and set up to run and listen on a port for incoming HTTP requests. For messages, JSON is used, and to find public methods, a router is set up. He then goes on to instantiate the server-side script in Ratchet.

There are four functions of a Ratchets message component interface that are used in this example:

OnOpen gets called when a new connection is made.

OnClose gets called when a client quits. It's essential to keep an eye on memory management, and essential to keep tidying up as you move through the code.

OnError gets called when there is an exception faced by the user.

OnMessage gives the text of the JSON message, which is being exchanged with the client.

For Initialization, Jason continues to walk through the example. He shows how one can loop through the clients, both inside the server and outside the server. Outside the server, it’s a feature of React PHP. On database access, and with traditional standard synchronous MySQL in PHP, what usually happens is that it forces the code to wait for the query to return a result and do nothing — Fortunately, with Asynchronous MySQLi, that is not the case.

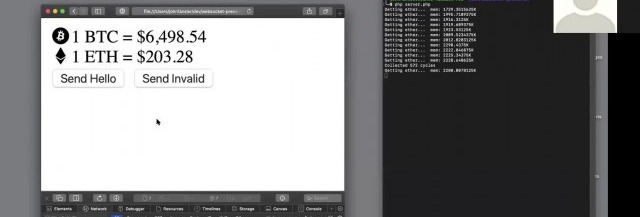
John gets into the details explaining Variables, References & Pointers. He also gives a demo where a central site has updated information on the Bitcoin and ether prices. A client terminal reflects the last values. Now the client doesn't have to poll the server for new values. When there is a change in the Bitcoin or ether values, the server pushes down the client's update. No polling helps with a lot of overheads and gets closer to real-time.

Using Supervisord


For Long-running applications - Jason recommends running a supervisord, use proxy to expose the port, and add a site certificate. Supervisord keeps an eye out for the server running the service; it can be used to restart the service and log any service issues. Recommended proxies are AWS load balancer, Nginx, and HA Proxy. For scalability, use multiple smaller WebSocket servers and a smaller number of clients per server used and load balancing. If one has to support a chat feature to allow clients to talk to each other in near real-time, it is recommended to use Redis. The Redis server proxies the messages between the server nodes.

The talk concludes with John summarizing best practices on error handling and takes QnA on various aspects of WebSockets such as handling load balancers and asynchronous calls to MSQLi.

The presentation for this video, along with the code, is hosted at John Curt's GitHub. More info about John's current areas of interest can be found on John's Blog.

Watch the video now


Related videos
8413 views · 3 years ago
Laravel Eloquent Relationship Part 2

As you all know, Laravel Eloquent Relationships are powerful and easy methods introduced by Laravel for helping developers to reduce the complexity when connecting with multiple tables. While connecting with multiple tables, this method is very easy for developers for creating the application

Here you can see the next three methods of the eloquent relationships:
   
. Has Many Through Relationship
    . One to Many Polymorphic
    . Many to many Polymorphic

HAS MANY THROUGH ELOQUENT RELATIONSHIP

Has many through is a little bit complicated while understanding. I will provide a shortcut method to provide access data of another mode relationship. We will create a user table, post table, and country table and they will be interconnected with each other.

Here we will see Many through relationship will use hasManyThrough() for the relation


Create Migrations


Users table

 Schema::create('users', function (Blueprint $table) {

$table->increments('id');

$table->string('name');

$table->string('email')->unique();

$table->string('password');

$table->integer('country_id')->unsigned();

$table->rememberToken();

$table->timestamps();

$table->foreign('country_id')->references('id')->on('countries')

->onDelete('cascade');

});


Posts table

Schema::create('posts', function (Blueprint $table) {

$table->increments('id');

$table->string("name");

$table->integer('user_id')->unsigned();

$table->timestamps();

$table->foreign('user_id')->references('id')->on('users')

->onDelete('cascade');

});


Countries table

Schema::create('countries', function (Blueprint $table) {

$table->increments('id');

$table->string('name');

$table->timestamps();

});


Create Models


Country Model

<?php


namespace App;

use Illuminate\Database\Eloquent\Model;


class Country extends Model

{

public function posts(){

return $this->hasManyThrough(

Post::class,

User::class,

'country_id',
'user_id',
'id',
'id'
);

}

}


Now we can retrieve records by

$country = Country::find(1); 

dd($country->posts);


ONE TO MANY POLYMORPHIC RELATIONSHIP

One to many polymorphic relationships used one model belongs to another model on a single file. For example, we will have tweets and blogs, both having the comment system. So we need to add the comments. Then we can manage both in a single table


Here we will use sync with a pivot table, create records, get all data, delete, update, and everything related to one too many relationships.

Now I will show one too many polymorphic will use morphMany() and morphTo() for relation.


Create Migrations

Posts table

Schema::create('posts', function (Blueprint $table) {

$table->increments('id');

$table->string("name");

$table->timestamps();

});

Videos Table

Schema::create('videos', function (Blueprint $table) {

$table->increments('id');

$table->string("name");

$table->timestamps();

});

Comments Table

Schema::create('comments', function (Blueprint $table) {

$table->increments('id');

$table->string("body");

$table->integer('commentable_id');

$table->string("commentable_type");

$table->timestamps();

});


Create Models

Post Model

<?php

namespace App;

use Illuminate\Database\Eloquent\Model;


class Post extends Model

{


public function comments(){

return $this->morphMany(Comment::class, 'commentable');

}

}

Video Model

<?php

namespace App;

use Illuminate\Database\Eloquent\Model;


class Video extends Model{


public function comments(){

return $this->morphMany(Comment::class, 'commentable');

}

}

Comment Model

<?php

namespace App;

use Illuminate\Database\Eloquent\Model;

class Comment extends Model{


public function commentable(){

return $this->morphTo();

}

}


Create Records


$post = Post::find(1); 

$comment = new Comment;

$comment->body = "Hi Harikrishnan";

$post->comments()->save($comment);


$video = Video::find(1);

$comment = new Comment;

$comment->body = "Hi Harikrishnan";

$video->comments()->save($comment);


Now we can retrieve records


$post = Post::find(1); 

dd($post->comments);


$video = Video::find(1);

dd($video->comments);


MANY TO MANY POLYMORPHIC RELATIONSHIPS

Many to many polymorphic is also a little bit complicated like above. If we have a tweet, video and tag table, we need to connect each table like every tweet and video will have multiple persons to tag. And for each and every tag there will be multiple tweet or videos.

Here we can understand the creating of many to many polymorphic relationships, with a foreign key schema of one to many relationships, use sync with a pivot table, create records, attach records, get all records, delete, update, where condition and etc..


Here morphToMany() and morphedByMany() will be used for many to many polymorphic relationships

Creating Migrations

Posts Table

Schema::create('posts', function (Blueprint $table) {

$table->increments('id');

$table->string("name");

$table->timestamps();

});

Videos Table

Schema::create('videos', function (Blueprint $table) {

$table->increments('id');

$table->string("name");

$table->timestamps();

});

Tags table

Schema::create('tags', function (Blueprint $table) {

$table->increments('id');

$table->string("name");

$table->timestamps();

});

Taggables table

Schema::create('taggables', function (Blueprint $table) {

$table->integer("tag_id");

$table->integer("taggable_id");

$table->string("taggable_type");

});


Creating ModelsPost Model


<?php

namespace App;

use Illuminate\Database\Eloquent\Model;

class Post extends Model

{


public function tags(){

return $this->morphToMany(Tag::class, 'taggable');

}

}


Video Model

<?php

namespace App;

use Illuminate\Database\Eloquent\Model;

class Video extends Model

{


public function tags(){

return $this->morphToMany(Tag::class, 'taggable');

}

}

Tag Model

<?php

namespace App;

use Illuminate\Database\Eloquent\Model;

class Tag extends Model

{


public function posts(){

return $this->morphedByMany(Post::class, 'taggable');

}


public function videos(){

return $this->morphedByMany(Video::class, 'taggable');

}

}

Creating Records

$post = Post::find(1); 
$tag = new Tag;
$tag->name = "Hi Harikrishnan";
$post->tags()->save($tag);


$video = Video::find(1);
$tag = new Tag;
$tag->name = "Vishnu";
$video->tags()->save($tag);


$post = Post::find(1);
$tag1 = new Tag;
$tag1->name = "Kerala Blasters";
$tag2 = new Tag;
$tag2->name = "Manajapadda";
$post->tags()->saveMany([$tag1, $tag2]);


$video = Video::find(1);
$tag1 = new Tag;
$tag1->name = "Kerala Blasters";
$tag2 = new Tag;
$tag2->name = "Manajappada";
$video->tags()->saveMany([$tag1, $tag2]);


$post = Post::find(1);
$tag1 = Tag::find(3);
$tag2 = Tag::find(4);
$post->tags()->attach([$tag1->id, $tag2->id]);


$video = Video::find(1);
$tag1 = Tag::find(3);
$tag2 = Tag::find(4);
$video->tags()->attach([$tag1->id, $tag2->id]);


$post = Post::find(1);
$tag1 = Tag::find(3);
$tag2 = Tag::find(4);
$post->tags()->sync([$tag1->id, $tag2->id]);


$video = Video::find(1);
$tag1 = Tag::find(3);
$tag2 = Tag::find(4);
$video->tags()->sync([$tag1->id, $tag2->id]);


Now we can retrieve records

$post = Post::find(1); 
dd($post->tags);


$video = Video::find(1);
dd($video->tags)


$tag = Tag::find(1);
dd($tag->posts);


$tag = Tag::find(1);
dd($tag->videos);


Hence we completed all the relationships. In the above blog how has many through relationship, one to many polymorphic relationships and many to many polymorphic are working. This feature is introduced from Laravel 5.0 onwards and till the current version. Without the model, we can’t able to do this relationship. If we are using an eloquent relationship it will be very useful while developing an application.
7687 views · 5 years ago
Iterator in PHP

Every time I see this
$users = [new User(), new User()];

I see a lost opportunity to use Iterator.

Why Iterators?

Collections are an awesome way to organize your previously no-named array. There is a couple of reasons why you should use iterators. One of reason stays for behavior, you can specify exact behavior on standard calls such as next, current, valid etc. Other reason could be that you want to ensure that collection contains an only specific type of an object.

Understand a suffer from using an array of unknown value types.
Very common in the PHP world arrays are used to store all kind of data, in many dimensions in many nested forms. Arrays introduced infinite flexibility to the developer, but because of that, they become very evil.

Example:

- Your function (getUsers) returns an array of User objects.
- Another function (setUsersToActiveState) using getUsers output array and set all users active status to true.
- setUsersToActiveState loop through the array and expect to call a specific method on array item. For example, the method name is getActiveStatus.
- If given array is an array of desired objects which have a callable method getActiveStatus, all fine. But if not exception will be thrown.
- How we can ensure that given array is always an array of objects of a specific type?

public function getUsers(): array
{

return $userArray;
}

public function setUsersToActiveState()
{
$users = $this->getUsers();

foreach ($users as $user) {
if(!$user->getActiveStatus()) {
$user->setActiveStatus(true);
}
}
}

There immediately two problems occurred.
    . One is the problem of type. Our IDE doesn't know what's inside array of $users, so because of that IDE can't suggest us how to use $user element. (I put this comment block above foreach, it works for phpStorm and I guess for some other IDEs)
    . Your colleagues! How they possibly know what's inside array if there is no any hint.
    . Bonus problem, getUsers can return literally any array and there won't be warning in the system.

Solution


class UsersCollection implements \IteratorAggregate
{

private $users = [];

public function getIterator() : UserIterator
{
return new UserIterator($this);
}

public function getUser($position)
{
if (isset($this->users[$position])) {
return $this->users[$position];
}

return null;
}

public function count() : int
{
return count($this->users);
}

public function addUser(User $users)
{
$this->users[] = $users;
}
}

class UserIterator implements \Iterator
{

private $position = 0;


private $userCollection;

public function __construct(UsersCollection $userCollection)
{
$this->userCollection = $userCollection;
}

public function current() : User
{
return $this->userCollection->getUser($this->position);
}

public function next()
{
$this->position++;
}

public function key() : int
{
return $this->position;
}

public function valid() : bool
{
return !is_null($this->userCollection->getUser($this->position));
}

public function rewind()
{
$this->position = 0;
}
}

Tests

Off course there is the tests to ensure that our Collection and Iterator works like a charm. For this example I using syntax for PHPUnit framework.

class UsersCollectionTest extends TestCase
{

public function testUsersCollectionShouldReturnNullForNotExistingUserPosition()
{
$usersCollection = new UsersCollection();

$this->assertEquals(null, $usersCollection->getUser(1));
}


public function testEmptyUsersCollection()
{
$usersCollection = new UsersCollection();

$this->assertEquals(new UserIterator($usersCollection), $usersCollection->getIterator());

$this->assertEquals(0, $usersCollection->count());
}


public function testUsersCollectionWithUserElements()
{
$usersCollection = new UsersCollection();
$usersCollection->addUser($this->getUserMock());

$this->assertEquals(new UserIterator($usersCollection), $usersCollection->getIterator());
$this->assertEquals($this->getUserMock(), $usersCollection->getUser(1));
$this->assertEquals(2, $usersCollection->count());
}

private function getUserMock()
{
}
}


class UserIteratorTest extends MockClass
{

public function testCurrent()
{
$iterator = $this->getIterator();
$current = $iterator->current();

$this->assertEquals($this->getUserMock(), $current);
}


public function testNext()
{
$iterator = $this->getIterator();
$iterator->next();

$this->assertEquals(1, $iterator->key());
}


public function testKey()
{
$iterator = $this->getIterator();

$iterator->next();
$iterator->next();

$this->assertEquals(2, $iterator->key());
}


public function testValidIfItemInvalid()
{
$iterator = $this->getIterator();

$iterator->next();
$iterator->next();
$iterator->next();

$this->assertEquals(false, $iterator->valid());
}


public function testValidIfItemIsValid()
{
$iterator = $this->getIterator();

$iterator->next();

$this->assertEquals(true, $iterator->valid());
}


public function testRewind()
{
$iterator = $this->getIterator();

$iterator->rewind();

$this->assertEquals(0, $iterator->key());
}

private function getIterator() : UserIterator
{
return new UserIterator($this->getCollection());
}

private function getCollection() : UsersCollection
{
$userItems[] = $this->getUserMock();

$usersCollection = new UsersCollection();

foreach ($userItems as $user) {
$usersCollection->addUser($user);
}

return $usersCollection;
}

private function getUserMock()
{
}
}


Usage


public function getUsers(): UsersCollection
{
$userCollection = new UsersCollection();

foreach ($whatIGetFromDatabase as $user) {
$userCollection->addUser($user);
}
return $userCollection;
}

public fucntion setUsersToActiveState()
{
$users = $this->getUsers();

foreach ($users as $user) {
if(!$user->getActiveStatus()) {
$user->setActiveStatus(true);
}
}
}

As you can see setUsersToActiveState remains the same, we only do not need to specify for our IDE or collagues what type $users variable is.

Extending functionalities

Believe or not you can reuse this two objects and just change names of variables to fit most of the needs. But if you want any more complex functionality, than feel free to add it in iterator or collection.

Example 1


For example, let's say that userCollection accepts only users with age more than 18. Implementation will happen in UsersCollection class in the method addUser.

 public function addUser(User $users)
{
if ($user->getAge() > 18) {
$this->users[] = $users;
}
}

Example 2

You need to add bulk users. Then you can expand your userCollection with additional method addUsers and it might look like this.

public function addUsers(array $users)
{
foreach($users as $user) {
$this->addUser(User $users);
}
}

7616 views · 4 years ago
Midwest PHP and Nomad PHP Join Forces!


Interested in sponsoring? Check out the prospectus


A little history

Several years ago I had the distinct privilege of founding Midwest PHP with Jonathan Sundquist. The goal was simple, to bring an affordable PHP conference to Minnesota and the midwest region.

Midwest PHP was created for one simple reason - there weren't a lot of alternatives, especially affordable ones. At the time, your choices were ZendCon in Silicon Valley, php[tek] in Chicago, or Northeast PHP in Boston. While Northeast PHP formed the blueprint of a community conference - it still required a flight and a costly hotel in Boston. I wanted something where local attendees, college students, and those just beginning in their PHP careers could go to learn, network, and become part of the PHP community.

Shortly after Midwest PHP was formed (originally we were using the name PHPFreeze - until Sundquist told me what a horrible idea it was), Adam Culp launched Sunshine PHP which has become one of the top community focused PHP conferences (but still requires that flight and hotel in Miami). Sundquist and I knew that any reasonable developer would still prefer to attend a conference in a blizzard than enjoy the beautiful Floridian weather (ok, that might not be it, but we still understood the need that existed).

After moving to California for my new job, Jonathan Sundquist continued to run Midwest PHP as more community conferences appeared. With his efforts, and the torch being passed to Mike Willbanks, Midwest PHP celebrated it's seventh consecutive year, becoming the longest continuously running PHP conference (if you go by formed date, if you go by actual conference date Sunshine PHP beats us out by a month).


A renewed focus


Developers at Midwest PHP

Because of the incredible work Jonathan and Mike have done, Midwest PHP has stood the test of time - and the peaks and valleys that come with any conference. With the shifts in the PHP community and the sad loss of several community conferences - we realized the need for Midwest PHP is more now than ever, and to meet that need we needed to reimagine the way the conference operated.

We also realized that the best way to make Midwest PHP accessible was to combine forces, creating a seamless partnership between Nomad PHP and Midwest PHP. Through this partnership we're not only able to stream the event to make it more accessible ($19.95/mo), but also expand the conference.

This year, taking place onApril 2-4, 2020 - Midwest PHP will bring together over 800 developers both in-person and virtually! Making this year truly unique, however, and staying with our purpose of helping new developers be part of the PHP community is abrand new, FREE, beginner track. I'm excited to say we will be giving away 200 tickets to those wishing to attend our Beginner or Learn PHP track!!!

We will also work to keep prices as low as possible as we offer our standard PHP tracks (Everyday PHP and PHP Performance & Security) starting at $250/ person, anda brand new enterprise track geared at developers facing challenges at unprecedented scale starting at $450/ person.

Last but not least, it is our goal with the help of our sponsors to include the workshop day as part of your ticket price - allowing you to get one day of in-depth training, and two more full days of sessions. On top of this, we're also excited to make the Nomad PHP and Nomad JS video libraries available for Standard and Enterprise attendees, providing over 220 additional virtual sessions on demand!


For sponsors

Sponsoring a conference is hard. We understand the challenge of gauging ROI, planning travel, and coordinating outreach. With the combined forces of Midwest PHP and Nomad PHP, we're able to offer sponsors unique plans that maximize their investment - while ensuring the funds go back into the event to create an amazing experience for our attendees.

Beyond Midwest PHP's goal to be the largest PHP conference this year - the included Nomad PHP advertising will help you reach a much larger and broader audience, allowing for follow up advertisements and consistent engagement with the PHP community.


Interested in sponsoring? Check out the prospectus


Next steps

For more information, please visit the Midwest PHP website. The venue, call for papers, and additional information will all be posted there soon.

SPONSORS