PHP & Web Development Blogs

Search Results For: help
Showing 6 to 10 of 26 blog articles.
11102 views · 4 years ago


It took me quite some time to settle on my first blog post in this series and I found myself thinking about the most requested functionality in my career – The good ‘ol Custom CMS – typically geared towards clients that want a straight forward, secure solution that can be expanded upon in a modular format and that’s their IP.

This will be our starting point. A blank slate to build something epic with clean code and even cleaner design. And in the spirit of building from scratch, I will refrain from using classes or a framework. The main reasoning behind this is to truly get everyone acquainted with and excited about PHP development.

Join me as I transform rudimentary code into something extraordinary that can be morphed into just about any Content, PHP, and MySQL driven project. So without further ado, let’s jump into it!

The bare necessities


If you’re just getting started with development, there’s a nifty bite sized server called UniformServer that will be your best friend throughout your coding career. PHPMyAdmin (an awesome visual db management tool) comes built in so if you’re looking for a work right out of the box solution, this is it.

Alternatively, you can opt for XAMPP or use an alternative server of your choice.

Now here’s where the exciting stuff begins, mapping things out.


I don’t see this done/encouraged often enough. Feel free to grab a piece of paper to logically map out your steps or produce a rough draft of where you’d like this project to go.

In this tutorial, I would like to achieve the following:


DB, DB, Set up your DB.


This requires a bit of planning but let’s start of with the basic structure we need to see this through.

We are going to need a user table and a content table and are a few ways to tackle this.

If you’re using the PHPMyAdmin tool you can create your database, add user permissions (Click on Permissions after creating your database), and create a table with ease.


If you’re like me and prefer to look at good ‘ol SQL then writing an SQL statement is the preferred approach.


CREATE TABLE <code>mydbname</code>.<code>content</code> ( <code>ID</code> INT(11) NOT NULL AUTO_INCREMENT , <code>title</code> VARCHAR(100) NOT NULL , <code>content</code> LONGTEXT NOT NULL , <code>author</code> VARCHAR(50) NOT NULL , PRIMARY KEY (<code>ID</code>)) ENGINE = MyISAM COMMENT = 'content table';


Understanding the SQL statement

In a nutshell we are creating a table with important fields. Namely:

####

ID | Title | Content | Author

#######

The ID field is our unique identifier.Now we can move on to the file structure.

Everything has a place in the file structure game


You can use a structure that speaks to your coding style / memory.

I tend to use the following:


Choose a name for your CMS, which should be placed at the webroot of your localhost/server.

Replicate the folder structure as per the above example.

Next, we’re going to create a basic connection file.


You can create a 
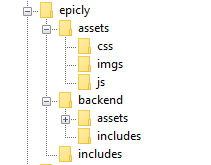
conn.php file in your root/includes folder.

The connection file will provide crucial information to connect to the database.

Type the following into your conn.php file, remember to include your own database credentials.


<?php

$letsconnect = new mysqli("localhost","dbuser","dbpass","dbname");

?>


Let’s go to the homepage (index.php)


Create a file called 
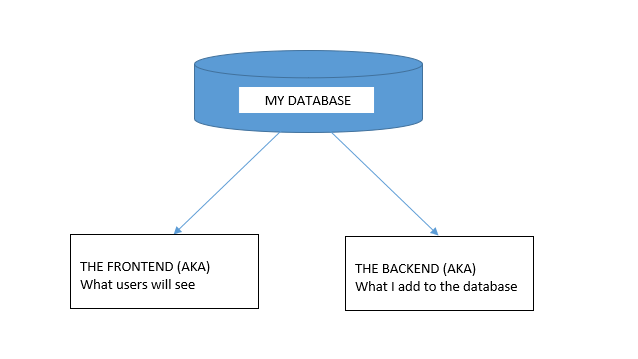
index.php at the root of your CMS folder.

I will be adding comments in my code to help you understand what each line does.

Comments are a useful tool for developers to add important notes private to their code.

We need to pull information from the database so it’s imperative that we include our connection file.


<?php

include('includes/conn.php');

if ($letsconnect -> connect_errno) { echo "Error " . $letsconnect -> connect_error;

}else{

$getmydata=$letsconnect -> query("SELECT * FROM content");

foreach($getmydata as $mydata){ echo "Title: "; echo $mydata['title']; echo "<br/>"; echo "Content: "; echo $mydata['content']; echo "<br/>"; echo "Author: "; echo $mydata['author']; echo "<br/>"; echo "<br/>";

}

}

$letsconnect -> close();

?>


Let’s get a (very) basic backend up and running


Create a file called index.php in your backend folder.

We need to create a basic form to capture our data.

Let’s code some HTML!


<html>

<head><title>Backend - Capture Content</title></head>

<body>

<form action="<?php $_SERVER[‘PHP_SELF’];?>" method="post">

<input type="text" name="title" placeholder="Content Title here" required/>

<textarea name="content">Content Here</textarea>

<input type="text" name="author" placeholder="Author" required/>

<input type="submit" value="Save My Data" name="savedata"/>

</form>

</body>

</html>


Next, we need to process the form data.


Type the following just above the
<form> 
tag.


<?php

if(isset($_POST['savedata'])){

include('../includes/conn.php');

if ($letsconnect->connect_error) {

die("Your Connection failed: " . $letsconnect->connect_error);

}else{

$sql = "INSERT INTO content(title,content,author)VALUES ('".$_POST["title"]."', '".$_POST["content"]."', '".$_POST["author"]."')";

if (mysqli_query($letsconnect, $sql)) {

echo "Your data was saved successfully!";

} else { echo "Error: " . $sql . "" . mysqli_error($letsconnect);

} $letsconnect->close();

}

}

?>


Note, this is a basic MySQL query to insert data. However, before using this in production it's important to add proper escaping and security to prevent SQL injections. This will be covered in the next article.


Congrats you made it to the end of tutorial 1!


Test out your creation, modify your content, and play around.

Go to your sitename/index.php to see your frontend after capturing data via sitename/backend/index.php

Next Up:


codewithme Now With Security, Functionality, and Aesthetics in mind.


Conclusion


Coding doesn’t have to be daunting and it’s my aim to divide a complex system into bitesized tutorials so you can truly use the knowledge you’ve acquired in your own projects.
8947 views · 3 years ago
Web Sockets in PHP

In his talk Websockets in PHP, John Fransler walks us through the use of WebSockets in PHP.

While discussing bi-directional real-time application development, John notes that PHP is often not invited to the table due to its lack of native support. Of all the possible attempts to bring in PHP on this stage of real-time development, Ratchet, a PHP WebSocket library, comes closest. "Ratchet is a loosely coupled PHP library providing developers with tools to create real-time, bi-directional applications between clients and servers over WebSockets."* Ahem!

Today's dynamic world


In today's dynamic content world of the internet, it is required to serve real-time bi-directional messages between clients and servers. WebSockets are simple, full-duplex, and persistent. They work over Http and are a standard today.

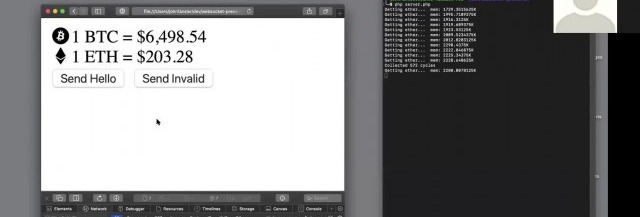
WebSockets have compatibility with 96.5% of clients globally

There's a very high chance your client has the necessary plumbing to access your content via WebSockets. WebSockets gives the ability to have real-time data on to your clients without the need for polling.

To understand WebSockets, John takes an example of a Javascript client and Ratchet Server. Javascript has everything built in to allow access to a socket. For example, you can use the send method on a WebSocket variable to send a message to the server, or if you want to respond to a message from the server, you use the OnConnection method.

While on the Server, John uses Ratchet, which is built on React PHP. A server script is then configured and set up to run and listen on a port for incoming HTTP requests. For messages, JSON is used, and to find public methods, a router is set up. He then goes on to instantiate the server-side script in Ratchet.

There are four functions of a Ratchets message component interface that are used in this example:

OnOpen gets called when a new connection is made.

OnClose gets called when a client quits. It's essential to keep an eye on memory management, and essential to keep tidying up as you move through the code.

OnError gets called when there is an exception faced by the user.

OnMessage gives the text of the JSON message, which is being exchanged with the client.

For Initialization, Jason continues to walk through the example. He shows how one can loop through the clients, both inside the server and outside the server. Outside the server, it’s a feature of React PHP. On database access, and with traditional standard synchronous MySQL in PHP, what usually happens is that it forces the code to wait for the query to return a result and do nothing — Fortunately, with Asynchronous MySQLi, that is not the case.

John gets into the details explaining Variables, References & Pointers. He also gives a demo where a central site has updated information on the Bitcoin and ether prices. A client terminal reflects the last values. Now the client doesn't have to poll the server for new values. When there is a change in the Bitcoin or ether values, the server pushes down the client's update. No polling helps with a lot of overheads and gets closer to real-time.

Using Supervisord


For Long-running applications - Jason recommends running a supervisord, use proxy to expose the port, and add a site certificate. Supervisord keeps an eye out for the server running the service; it can be used to restart the service and log any service issues. Recommended proxies are AWS load balancer, Nginx, and HA Proxy. For scalability, use multiple smaller WebSocket servers and a smaller number of clients per server used and load balancing. If one has to support a chat feature to allow clients to talk to each other in near real-time, it is recommended to use Redis. The Redis server proxies the messages between the server nodes.

The talk concludes with John summarizing best practices on error handling and takes QnA on various aspects of WebSockets such as handling load balancers and asynchronous calls to MSQLi.

The presentation for this video, along with the code, is hosted at John Curt's GitHub. More info about John's current areas of interest can be found on John's Blog.

Watch the video now


Related videos
8617 views · 5 years ago
Underclocking a Website

For those of you not familiar with the concept of underclocking: it's the opposite of overclocking, that is, you don't speed up CPU but instead slow it down..

What for?

Ask the underclockers, I'm totally not sure. Actually, hanging around the Web these days leaves a feeling that nearly every website out there must have been underclocked, but most of the time it's about tons of unnecessary images, megabytes of javascript (of which hardly a hundred kilobytes gets actually executed), and all that. In this post I will, however, tell you about a server-side approach to underclocking, with a help of our good old friend - the MySQL Database Server.

Today I had a nice chat in my client's development telegram channel. The two other devs, R** and V**, were making a switch of the old image API app to a new MySQL server. A couple of days before that, we have discussed a plan, it was as dumb as possible, just as I like it. Super-simple clear steps that a five-year-old can make. Switch to readonly mode (stop uploads), dump DB, restore the dump on the new server, update database connection details, turn off readonly mode. What could possibly go wrong?

Nothing. Except that it did go wrong. The app that I'm talking about, is a really ancient piece of what is gently called "legacy". Once the app was back to normal again, we noticed a significant slowdown on every page that made use of images. Before that point, I never got to that app and/or its database. I logged in to the MySQL console, and started investigating, at the same point chatting with colleagues.

Me: Is that really important that the tables are MyISAM? It's 2018, you know.. There are dozens of queries in queue waiting for table-level locks.

R**: Are they MyISAM? Really?

Me: Yes.. Any objection against converting them to InnoDB? With the current state of the website, with all those tons of Gateway Timeouts, it's not going to make it worse if I do it right now..


    . minutes later:

Me: Nah, it didn't help a lot.. But, looking at the SHOW PROCESSLIST output, I see something weird. What, do you think, this query does? SELECT LAST_INSERT_ID() FROM images? 

R**: ehh... Gets you the last AUTO_INCREMENT id from images table?

Me: Let's play another good news bad news joke.. Good news: you're right, it gets you the last AUTO_INCREMENT id. Bad news: it's not for table, it's for the session. Worse news: this query gets you the last AUTO_INCREMENT id and does it exactly as many times as there are rows in the images table. how many are there?

R**: about 8mln. #@%&! It's sending 8mln rows on every image upload, through the network!

Me: Bingo! 8mln rows, with one and the same integer value in all of them.

R**: Ouch... Aaaand... Before today, it was not an issue. Because the database was on the same server as the application..

Me: Exactly, it used the loopback interface, and now it's using ehternet, which, apparently, doesn't have a super good bandwidth. We don't have a gigabit channel between servers, do we?

R**: No, it's 100 Mbit

Me: Are you fixing the query, BTW?

R**: yeah, man, deploying it...


Another 10 minutes later, problem is gone, performance is back to normal.

What conclusions can one make from this story?

I can think of two at least:
First: never underestimate legacy code. The ways it can move to bite you in the ass, are mysterious.
Second: if you're working with MySQL or another RDBMS, learn SQL, learn the specific SQL dialect you're using and learn how to trouble shoot issues. In this case, I did not need to look in the PHP code at all in order to help my fellow colleagues out. You can also generalize this principle as "you have to know the tools you're using".

Happy optimizing, folks! Comments appreciated!
8416 views · 3 years ago
Laravel Eloquent Relationship Part 2

As you all know, Laravel Eloquent Relationships are powerful and easy methods introduced by Laravel for helping developers to reduce the complexity when connecting with multiple tables. While connecting with multiple tables, this method is very easy for developers for creating the application

Here you can see the next three methods of the eloquent relationships:
   
. Has Many Through Relationship
    . One to Many Polymorphic
    . Many to many Polymorphic

HAS MANY THROUGH ELOQUENT RELATIONSHIP

Has many through is a little bit complicated while understanding. I will provide a shortcut method to provide access data of another mode relationship. We will create a user table, post table, and country table and they will be interconnected with each other.

Here we will see Many through relationship will use hasManyThrough() for the relation


Create Migrations


Users table

 Schema::create('users', function (Blueprint $table) {

$table->increments('id');

$table->string('name');

$table->string('email')->unique();

$table->string('password');

$table->integer('country_id')->unsigned();

$table->rememberToken();

$table->timestamps();

$table->foreign('country_id')->references('id')->on('countries')

->onDelete('cascade');

});


Posts table

Schema::create('posts', function (Blueprint $table) {

$table->increments('id');

$table->string("name");

$table->integer('user_id')->unsigned();

$table->timestamps();

$table->foreign('user_id')->references('id')->on('users')

->onDelete('cascade');

});


Countries table

Schema::create('countries', function (Blueprint $table) {

$table->increments('id');

$table->string('name');

$table->timestamps();

});


Create Models


Country Model

<?php


namespace App;

use Illuminate\Database\Eloquent\Model;


class Country extends Model

{

public function posts(){

return $this->hasManyThrough(

Post::class,

User::class,

'country_id',
'user_id',
'id',
'id'
);

}

}


Now we can retrieve records by

$country = Country::find(1); 

dd($country->posts);


ONE TO MANY POLYMORPHIC RELATIONSHIP

One to many polymorphic relationships used one model belongs to another model on a single file. For example, we will have tweets and blogs, both having the comment system. So we need to add the comments. Then we can manage both in a single table


Here we will use sync with a pivot table, create records, get all data, delete, update, and everything related to one too many relationships.

Now I will show one too many polymorphic will use morphMany() and morphTo() for relation.


Create Migrations

Posts table

Schema::create('posts', function (Blueprint $table) {

$table->increments('id');

$table->string("name");

$table->timestamps();

});

Videos Table

Schema::create('videos', function (Blueprint $table) {

$table->increments('id');

$table->string("name");

$table->timestamps();

});

Comments Table

Schema::create('comments', function (Blueprint $table) {

$table->increments('id');

$table->string("body");

$table->integer('commentable_id');

$table->string("commentable_type");

$table->timestamps();

});


Create Models

Post Model

<?php

namespace App;

use Illuminate\Database\Eloquent\Model;


class Post extends Model

{


public function comments(){

return $this->morphMany(Comment::class, 'commentable');

}

}

Video Model

<?php

namespace App;

use Illuminate\Database\Eloquent\Model;


class Video extends Model{


public function comments(){

return $this->morphMany(Comment::class, 'commentable');

}

}

Comment Model

<?php

namespace App;

use Illuminate\Database\Eloquent\Model;

class Comment extends Model{


public function commentable(){

return $this->morphTo();

}

}


Create Records


$post = Post::find(1); 

$comment = new Comment;

$comment->body = "Hi Harikrishnan";

$post->comments()->save($comment);


$video = Video::find(1);

$comment = new Comment;

$comment->body = "Hi Harikrishnan";

$video->comments()->save($comment);


Now we can retrieve records


$post = Post::find(1); 

dd($post->comments);


$video = Video::find(1);

dd($video->comments);


MANY TO MANY POLYMORPHIC RELATIONSHIPS

Many to many polymorphic is also a little bit complicated like above. If we have a tweet, video and tag table, we need to connect each table like every tweet and video will have multiple persons to tag. And for each and every tag there will be multiple tweet or videos.

Here we can understand the creating of many to many polymorphic relationships, with a foreign key schema of one to many relationships, use sync with a pivot table, create records, attach records, get all records, delete, update, where condition and etc..


Here morphToMany() and morphedByMany() will be used for many to many polymorphic relationships

Creating Migrations

Posts Table

Schema::create('posts', function (Blueprint $table) {

$table->increments('id');

$table->string("name");

$table->timestamps();

});

Videos Table

Schema::create('videos', function (Blueprint $table) {

$table->increments('id');

$table->string("name");

$table->timestamps();

});

Tags table

Schema::create('tags', function (Blueprint $table) {

$table->increments('id');

$table->string("name");

$table->timestamps();

});

Taggables table

Schema::create('taggables', function (Blueprint $table) {

$table->integer("tag_id");

$table->integer("taggable_id");

$table->string("taggable_type");

});


Creating ModelsPost Model


<?php

namespace App;

use Illuminate\Database\Eloquent\Model;

class Post extends Model

{


public function tags(){

return $this->morphToMany(Tag::class, 'taggable');

}

}


Video Model

<?php

namespace App;

use Illuminate\Database\Eloquent\Model;

class Video extends Model

{


public function tags(){

return $this->morphToMany(Tag::class, 'taggable');

}

}

Tag Model

<?php

namespace App;

use Illuminate\Database\Eloquent\Model;

class Tag extends Model

{


public function posts(){

return $this->morphedByMany(Post::class, 'taggable');

}


public function videos(){

return $this->morphedByMany(Video::class, 'taggable');

}

}

Creating Records

$post = Post::find(1); 
$tag = new Tag;
$tag->name = "Hi Harikrishnan";
$post->tags()->save($tag);


$video = Video::find(1);
$tag = new Tag;
$tag->name = "Vishnu";
$video->tags()->save($tag);


$post = Post::find(1);
$tag1 = new Tag;
$tag1->name = "Kerala Blasters";
$tag2 = new Tag;
$tag2->name = "Manajapadda";
$post->tags()->saveMany([$tag1, $tag2]);


$video = Video::find(1);
$tag1 = new Tag;
$tag1->name = "Kerala Blasters";
$tag2 = new Tag;
$tag2->name = "Manajappada";
$video->tags()->saveMany([$tag1, $tag2]);


$post = Post::find(1);
$tag1 = Tag::find(3);
$tag2 = Tag::find(4);
$post->tags()->attach([$tag1->id, $tag2->id]);


$video = Video::find(1);
$tag1 = Tag::find(3);
$tag2 = Tag::find(4);
$video->tags()->attach([$tag1->id, $tag2->id]);


$post = Post::find(1);
$tag1 = Tag::find(3);
$tag2 = Tag::find(4);
$post->tags()->sync([$tag1->id, $tag2->id]);


$video = Video::find(1);
$tag1 = Tag::find(3);
$tag2 = Tag::find(4);
$video->tags()->sync([$tag1->id, $tag2->id]);


Now we can retrieve records

$post = Post::find(1); 
dd($post->tags);


$video = Video::find(1);
dd($video->tags)


$tag = Tag::find(1);
dd($tag->posts);


$tag = Tag::find(1);
dd($tag->videos);


Hence we completed all the relationships. In the above blog how has many through relationship, one to many polymorphic relationships and many to many polymorphic are working. This feature is introduced from Laravel 5.0 onwards and till the current version. Without the model, we can’t able to do this relationship. If we are using an eloquent relationship it will be very useful while developing an application.
7622 views · 4 years ago
Midwest PHP and Nomad PHP Join Forces!


Interested in sponsoring? Check out the prospectus


A little history

Several years ago I had the distinct privilege of founding Midwest PHP with Jonathan Sundquist. The goal was simple, to bring an affordable PHP conference to Minnesota and the midwest region.

Midwest PHP was created for one simple reason - there weren't a lot of alternatives, especially affordable ones. At the time, your choices were ZendCon in Silicon Valley, php[tek] in Chicago, or Northeast PHP in Boston. While Northeast PHP formed the blueprint of a community conference - it still required a flight and a costly hotel in Boston. I wanted something where local attendees, college students, and those just beginning in their PHP careers could go to learn, network, and become part of the PHP community.

Shortly after Midwest PHP was formed (originally we were using the name PHPFreeze - until Sundquist told me what a horrible idea it was), Adam Culp launched Sunshine PHP which has become one of the top community focused PHP conferences (but still requires that flight and hotel in Miami). Sundquist and I knew that any reasonable developer would still prefer to attend a conference in a blizzard than enjoy the beautiful Floridian weather (ok, that might not be it, but we still understood the need that existed).

After moving to California for my new job, Jonathan Sundquist continued to run Midwest PHP as more community conferences appeared. With his efforts, and the torch being passed to Mike Willbanks, Midwest PHP celebrated it's seventh consecutive year, becoming the longest continuously running PHP conference (if you go by formed date, if you go by actual conference date Sunshine PHP beats us out by a month).


A renewed focus


Developers at Midwest PHP

Because of the incredible work Jonathan and Mike have done, Midwest PHP has stood the test of time - and the peaks and valleys that come with any conference. With the shifts in the PHP community and the sad loss of several community conferences - we realized the need for Midwest PHP is more now than ever, and to meet that need we needed to reimagine the way the conference operated.

We also realized that the best way to make Midwest PHP accessible was to combine forces, creating a seamless partnership between Nomad PHP and Midwest PHP. Through this partnership we're not only able to stream the event to make it more accessible ($19.95/mo), but also expand the conference.

This year, taking place onApril 2-4, 2020 - Midwest PHP will bring together over 800 developers both in-person and virtually! Making this year truly unique, however, and staying with our purpose of helping new developers be part of the PHP community is abrand new, FREE, beginner track. I'm excited to say we will be giving away 200 tickets to those wishing to attend our Beginner or Learn PHP track!!!

We will also work to keep prices as low as possible as we offer our standard PHP tracks (Everyday PHP and PHP Performance & Security) starting at $250/ person, anda brand new enterprise track geared at developers facing challenges at unprecedented scale starting at $450/ person.

Last but not least, it is our goal with the help of our sponsors to include the workshop day as part of your ticket price - allowing you to get one day of in-depth training, and two more full days of sessions. On top of this, we're also excited to make the Nomad PHP and Nomad JS video libraries available for Standard and Enterprise attendees, providing over 220 additional virtual sessions on demand!


For sponsors

Sponsoring a conference is hard. We understand the challenge of gauging ROI, planning travel, and coordinating outreach. With the combined forces of Midwest PHP and Nomad PHP, we're able to offer sponsors unique plans that maximize their investment - while ensuring the funds go back into the event to create an amazing experience for our attendees.

Beyond Midwest PHP's goal to be the largest PHP conference this year - the included Nomad PHP advertising will help you reach a much larger and broader audience, allowing for follow up advertisements and consistent engagement with the PHP community.


Interested in sponsoring? Check out the prospectus


Next steps

For more information, please visit the Midwest PHP website. The venue, call for papers, and additional information will all be posted there soon.

SPONSORS