Learn from your fellow PHP developers with our PHP blogs, or help share the knowledge you've gained by writing your own.
WebSockets have compatibility with 96.5% of clients globally
OnConnection method.OnOpen gets called when a new connection is made.OnClose gets called when a client quits. It's essential to keep an eye on memory management, and essential to keep tidying up as you move through the code.OnError gets called when there is an exception faced by the user.OnMessage gives the text of the JSON message, which is being exchanged with the client.

;extension=sockets
extension=sockets
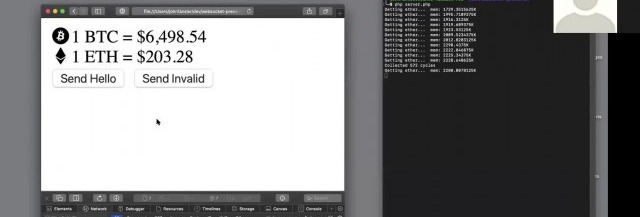
server.php file$host = 'localhost';
$port = '9000';
$null = NULL; function send_message($msg)
{
global $clients;
foreach($clients as $changed_socket)
{
@socket_write($changed_socket,$msg,strlen($msg));
}
return true;
}
function unmask($text) {
$length = ord($text[1]) & 127;
if($length == 126) {
$masks = substr($text, 4, 4);
$data = substr($text, 8);
}
elseif($length == 127) {
$masks = substr($text, 10, 4);
$data = substr($text, 14);
}
else {
$masks = substr($text, 2, 4);
$data = substr($text, 6);
}
$text = "";
for ($i = 0; $i < strlen($data); ++$i) {
$text .= $data[$i] ^ $masks[$i%4];
}
return $text;
}
function mask($text)
{
$b1 = 0x80 | (0x1 & 0x0f);
$length = strlen($text);
if($length <= 125)
$header = pack('CC', $b1, $length);
elseif($length > 125 && $length < 65536)
$header = pack('CCn', $b1, 126, $length);
elseif($length >= 65536)
$header = pack('CCNN', $b1, 127, $length);
return $header.$text;
}
function perform_handshaking($receved_header,$client_conn, $host, $port)
{
$headers = array();
$lines = preg_split("/
/", $receved_header);
foreach($lines as $line)
{
$line = chop($line);
if(preg_match('/\A(\S+): (.*)\z/', $line, $matches))
{
$headers[$matches[1]] = $matches[2];
}
}
$secKey = $headers['Sec-WebSocket-Key'];
$secAccept = base64_encode(pack('H*', sha1($secKey . '258EAFA5-E914-47DA-95CA-C5AB0DC85B11')));
$upgrade = "HTTP/1.1 101 Web Socket Protocol Handshake
" .
"Upgrade: websocket
" .
"Connection: Upgrade
" .
"WebSocket-Origin: $host
" .
"WebSocket-Location: ws://$host:$port/php-ws/chat-daemon.php
".
"Sec-WebSocket-Accept:$secAccept
";
socket_write($client_conn,$upgrade,strlen($upgrade));
}
$socket = socket_create(AF_INET, SOCK_STREAM, SOL_TCP);
socket_set_option($socket, SOL_SOCKET, SO_REUSEADDR, 1);
socket_bind($socket, 0, $port);
socket_listen($socket);
$clients = array($socket);
while (true) {
$changed = $clients;
socket_select($changed, $null, $null, 0, 10);

if (in_array($socket, $changed)) {
$socket_new = socket_accept($socket);	$clients[] = $socket_new;
$header = socket_read($socket_new, 1024);	perform_handshaking($header, $socket_new, $host, $port);
socket_getpeername($socket_new, $ip);	$response = mask(json_encode(array('type'=>'system', 'message'=>$ip.' connected')));	send_message($response);
$found_socket = array_search($socket, $changed);
unset($changed[$found_socket]);
}

foreach ($changed as $changed_socket) {

while(socket_recv($changed_socket, $buf, 1024, 0) >= 1)
{
$received_text = unmask($buf);	$tst_msg = json_decode($received_text, true);	$user_name = $tst_msg['name'];	$user_message = $tst_msg['message'];	$user_color = $tst_msg['color'];
$response_text = mask(json_encode(array('type'=>'usermsg', 'name'=>$user_name, 'message'=>$user_message, 'color'=>$user_color)));
send_message($response_text);	break 2;	}

$buf = @socket_read($changed_socket, 1024, PHP_NORMAL_READ);
if ($buf === false) {	$found_socket = array_search($changed_socket, $clients);
socket_getpeername($changed_socket, $ip);
unset($clients[$found_socket]);

$response = mask(json_encode(array('type'=>'system', 'message'=>$ip.' disconnected')));
send_message($response);
}
}
}
socket_close($socket);
$host = 'localhost';
$port = '9000';
$subfolder = "php_ws/";
$colors = array('#007AFF','#FF7000','#FF7000','#15E25F','#CFC700','#CFC700','#CF1100','#CF00BE','#F00');
$color_pick = array_rand($colors);
<!DOCTYPE html>
<html>
<head>
<meta name="viewport" content="width=device-width, initial-scale=1">
</head>
<body>
<div class="chat-wrapper">
<div id="message-box"></div>
<div class="user-panel">
<input type="text" name="name" id="name" placeholder="Your Name" maxlength="15" />
<input type="text" name="message" id="message" placeholder="Type your message here..." maxlength="100" />
<button id="send-message">Send</button>
</div>
</div>
</body>
</html>
<style type="text/css">
.chat-wrapper {
font: bold 11px/normal 'lucida grande', tahoma, verdana, arial, sans-serif;
 background: #00a6bb;
 padding: 20px;
 margin: 20px auto;
 box-shadow: 2px 2px 2px 0px #00000017;
max-width:700px;
min-width:500px;
}
#message-box {
 width: 97%;
 display: inline-block;
 height: 300px;
 background: #fff;
 box-shadow: inset 0px 0px 2px #00000017;
 overflow: auto;
 padding: 10px;
}
.user-panel{
 margin-top: 10px;
}
input[type=text]{
 border: none;
 padding: 5px 5px;
 box-shadow: 2px 2px 2px #0000001c;
}
input[type=text]#name{
 width:20%;
}
input[type=text]#message{
 width:60%;
}
button#send-message {
 border: none;
 padding: 5px 15px;
 background: #11e0fb;
 box-shadow: 2px 2px 2px #0000001c;
}
</style>
<script src="https://ajax.googleapis.com/ajax/libs/jquery/3.3.1/jquery.min.js"></script>
<script language="javascript" type="text/javascript">
var msgBox = $('#message-box');
var wsUri = "ws://".$host.":".$port."/php-ws/server.php";
websocket = new WebSocket(wsUri);

websocket.onopen = function(ev) {	msgBox.append('<div class="system_msg" style="color:#bbbbbb">Welcome to my "Chat box"!</div>');	}
websocket.onmessage = function(ev) {
var response	= JSON.parse(ev.data);
var res_type	= response.type;	var user_message	= response.message;	var user_name	= response.name;	var user_color	= response.color;	switch(res_type){
case 'usermsg':
msgBox.append('<div><span class="user_name" style="color:' + user_color + '">' + user_name + '</span> : <span class="user_message">' + user_message + '</span></div>');
break;
case 'system':
msgBox.append('<div style="color:#bbbbbb">' + user_message + '</div>');
break;
}
msgBox[0].scrollTop = msgBox[0].scrollHeight;	};

websocket.onerror	= function(ev){ msgBox.append('<div class="system_error">Error Occurred - ' + ev.data + '</div>'); };
websocket.onclose	= function(ev){ msgBox.append('<div class="system_msg">Connection Closed</div>'); };
$('#send-message').click(function(){
send_message();
});

$( "#message" ).on( "keydown", function( event ) {
 if(event.which==13){
 send_message();
 }
});

function send_message(){
var message_input = $('#message');	var name_input = $('#name');
if(message_input.val() == ""){	alert("Enter your Name please!");
return;
}
if(message_input.val() == ""){	alert("Enter Some message Please!");
return;
}
var msg = {
message: message_input.val(),
name: name_input.val(),
color : '<?php echo $colors[$color_pick]; ?>'
};
websocket.send(JSON.stringify(msg));
message_input.val('');	}
</script>
php -q c:\xampp\htdocs\php-ws\server.php
 g10dra 141,076
  mike 96,804
  crocodile2u 94,350
  harikrishnanr 73,622
  calevans 58,525
  christiemarie 47,704
  MindNovae 43,473
  dmamontov 39,476
  HowTos 22,595
  tanja
tanja SPONSORS

SPONSORS