Learn from your fellow PHP developers with our PHP blogs, or help share the knowledge you've gained by writing your own.

hasManyThrough() for the relation Schema::create('users', function (Blueprint $table) {
$table->increments('id');
$table->string('name');
$table->string('email')->unique();
$table->string('password');
$table->integer('country_id')->unsigned();
$table->rememberToken();
$table->timestamps();
$table->foreign('country_id')->references('id')->on('countries')
->onDelete('cascade');
});
Schema::create('posts', function (Blueprint $table) {

 $table->increments('id');

 $table->string("name");

 $table->integer('user_id')->unsigned();

 $table->timestamps();

 $table->foreign('user_id')->references('id')->on('users')

 ->onDelete('cascade');

});
Schema::create('countries', function (Blueprint $table) {

 $table->increments('id');

 $table->string('name');

 $table->timestamps();

});
<?php


namespace App;

use Illuminate\Database\Eloquent\Model;


class Country extends Model

{

 public function posts(){

 return $this->hasManyThrough(

 Post::class,

 User::class,

 'country_id',
 'user_id',
 'id',
 'id'
 );

 }

}
$country = Country::find(1);

dd($country->posts);
morphMany() and morphTo() for relation.Schema::create('posts', function (Blueprint $table) {
$table->increments('id');
$table->string("name");
$table->timestamps();
});
Schema::create('videos', function (Blueprint $table) {

 $table->increments('id');

 $table->string("name");

 $table->timestamps();

});
Schema::create('comments', function (Blueprint $table) {

 $table->increments('id');

 $table->string("body");

 $table->integer('commentable_id');

 $table->string("commentable_type");

 $table->timestamps();

});
<?php

namespace App;

use Illuminate\Database\Eloquent\Model;


class Post extends Model

{


 public function comments(){

 return $this->morphMany(Comment::class, 'commentable');

 }

}
<?php

namespace App;

use Illuminate\Database\Eloquent\Model;


class Video extends Model{


 public function comments(){

 return $this->morphMany(Comment::class, 'commentable');

 }

}
<?php

namespace App;

use Illuminate\Database\Eloquent\Model;

class Comment extends Model{


 public function commentable(){

 return $this->morphTo();

 }

}
$post = Post::find(1);

$comment = new Comment;

$comment->body = "Hi Harikrishnan";

$post->comments()->save($comment);


$video = Video::find(1);

$comment = new Comment;

$comment->body = "Hi Harikrishnan";

$video->comments()->save($comment);
$post = Post::find(1);

dd($post->comments);


$video = Video::find(1);

dd($video->comments);
morphToMany() and morphedByMany() will be used for many to many polymorphic relationshipsSchema::create('posts', function (Blueprint $table) {
$table->increments('id');
$table->string("name");
$table->timestamps();
});
Schema::create('videos', function (Blueprint $table) {

 $table->increments('id');

 $table->string("name");

 $table->timestamps();

});
Schema::create('tags', function (Blueprint $table) {

 $table->increments('id');

 $table->string("name");

 $table->timestamps();

});
Schema::create('taggables', function (Blueprint $table) {

 $table->integer("tag_id");

 $table->integer("taggable_id");

 $table->string("taggable_type");

});
<?php

namespace App;

use Illuminate\Database\Eloquent\Model;

class Post extends Model

{


 public function tags(){

 return $this->morphToMany(Tag::class, 'taggable');

 }

}
<?php

namespace App;

use Illuminate\Database\Eloquent\Model;

class Video extends Model

{


 public function tags(){

 return $this->morphToMany(Tag::class, 'taggable');

 }

}
<?php

namespace App;

use Illuminate\Database\Eloquent\Model;

class Tag extends Model

{


 public function posts(){

 return $this->morphedByMany(Post::class, 'taggable');

 }


 public function videos(){

 return $this->morphedByMany(Video::class, 'taggable');

 }

}
$post = Post::find(1);
$tag = new Tag;
$tag->name = "Hi Harikrishnan";
$post->tags()->save($tag);


$video = Video::find(1);
$tag = new Tag;
$tag->name = "Vishnu";
$video->tags()->save($tag);


$post = Post::find(1);
$tag1 = new Tag;
$tag1->name = "Kerala Blasters";
$tag2 = new Tag;
$tag2->name = "Manajapadda";
$post->tags()->saveMany([$tag1, $tag2]);


$video = Video::find(1);
$tag1 = new Tag;
$tag1->name = "Kerala Blasters";
$tag2 = new Tag;
$tag2->name = "Manajappada";
$video->tags()->saveMany([$tag1, $tag2]);


$post = Post::find(1);
$tag1 = Tag::find(3);
$tag2 = Tag::find(4);
$post->tags()->attach([$tag1->id, $tag2->id]);


$video = Video::find(1);
$tag1 = Tag::find(3);
$tag2 = Tag::find(4);
$video->tags()->attach([$tag1->id, $tag2->id]);


$post = Post::find(1);
$tag1 = Tag::find(3);
$tag2 = Tag::find(4);
$post->tags()->sync([$tag1->id, $tag2->id]);


$video = Video::find(1);
$tag1 = Tag::find(3);
$tag2 = Tag::find(4);
$video->tags()->sync([$tag1->id, $tag2->id]);
$post = Post::find(1);
dd($post->tags);


$video = Video::find(1);
dd($video->tags)


$tag = Tag::find(1);
dd($tag->posts);


$tag = Tag::find(1);
dd($tag->videos);

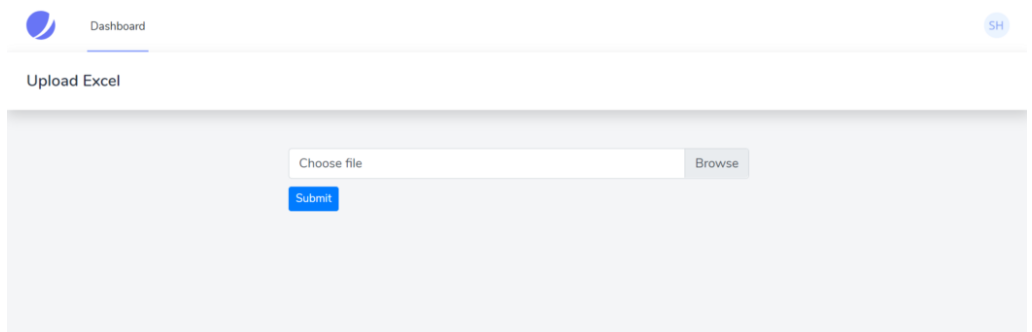
<form method="post" enctype="multipart/form-data"> @csrf <div class="custom-file"> <input type="file" accept=".csv" name="excel" class="custom-file-input" id="customFile" /> <label class="custom-file-label" for="customFile">Choose file</label	> </div> <div> <button type="submit" class="btn btn-primary btn-sm" style="margin-top: 10px"	>Submit> </div>

</form>
php artisan make:controller UploadController
Route::post('/upload', [UploadController::class, 'upload'])->name('upload')->middleware('auth');
<form method="post" action="{{route('upload')}}" enctype="multipart/form-data">
$file = $request->file('excel');
if (($handle = fopen($file, "r")) !== FALSE) { while (($data = fgetcsv($handle, 1000, ",")) !== FALSE) { ..... }

}
{ "name": "test", "job": "test"

}
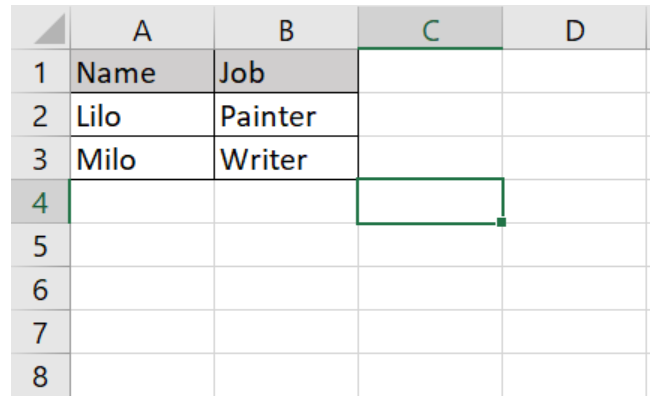
if (($handle = fopen($file, "r")) !== FALSE) { while (($data = fgetcsv($handle, 1000, ",")) !== FALSE) { Http::post('https://reqres.in/api/users', [ 'name' => $data[0], 'job' => $data[1], ]); }

}
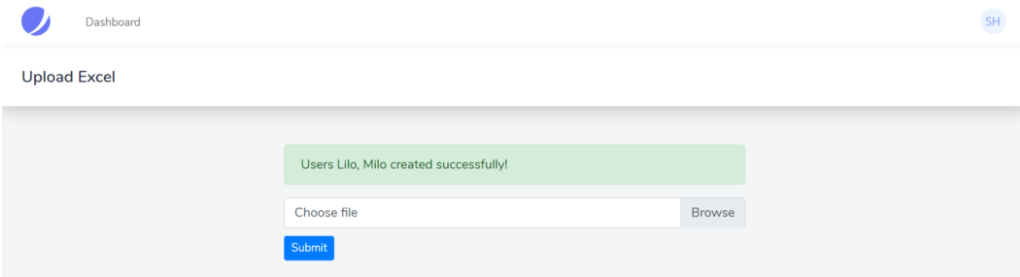
public function upload(Request $request){ $file = $request->file('excel'); if($file){ $row = 1; $array = []; if (($handle = fopen($file, "r")) !== FALSE) { while (($data = fgetcsv($handle, 1000, ",")) !== FALSE) { if($row > 1){ Http::post('https://reqres.in/api/users', [ 'name' => $data[0], 'job' => $data[1], ]); array_push($array,$data[0]); } $request->session()->flash('status', 'Users '.implode($array,", ").' created successfully!'); $row++; } } }else{ $request->session()->flash('error', 'Please choose a file to submit.'); } return view('dashboard');

}
<div class="container max-w-7xl mx-auto sm:px-6 lg:px-8" style="width: 50%"> @if (session('status')) <div class="alert alert-success"> {{ session('status') }} </div> @endif @if (session('error')) <div class="alert alert-error"> {{ session('error') }} </div> @endif <form action="{{route('upload')}}" method="post" enctype="multipart/form-data"> @csrf <div class="custom-file"> <input type="file" accept=".csv" name="excel" class="custom-file-input" id="customFile" /> <label class="custom-file-label" for="customFile">Choose file</label> </div> <div> <button type="submit" class="btn btn-primary btn-sm" style="margin-top: 10px">Submit</button> </div> </form>

</div>

CREATE TABLE 'mydbname'.'menus' ( 'ID' INT(11) NOT NULL AUTO_INCREMENT , 'menuname' VARCHAR(100) NOT NULL , 'item' VARCHAR(50) NOT NULL , 'itemlink' VARCHAR(100) NOT NULL , PRIMARY KEY ('ID')) ENGINE = MyISAM COMMENT = 'menu table';
CREATE TABLE 'mydbname'.'users' ( 'ID' INT(11) NOT NULL AUTO_INCREMENT , 'username' VARCHAR(100) NOT NULL , 'password' VARCHAR(50) NOT NULL , 'email' VARCHAR(100) NOT NULL , PRIMARY KEY ('ID')) ENGINE = MyISAM COMMENT = 'user table';
ALTER TABLE 'mydbname'.'content' ADD content_type VARCHAR(50);
<form method="post" action="<?php $_SERVER['PHP_SELF'];?>"/>

<input type="text" name="menuname" class="mytextbox" placeholder="Menu Name" required />

<input type="text" name="item" class="mytextbox" placeholder="Item" required />

<input type="text" name="itemlink" class="mytextbox" placeholder="Item Link" required />

<input type="submit" value="Save Menu Item" name="savemenu" class="mybutton"/>

</form>
<form> tag.<?php
if(isset($_POST['savemenu'])){
include('../includes/conn.php');
if ($letsconnect->connect_error) {
die("Your Connection failed: " . $letsconnect->connect_error);
}else{
$menuname = $letsconnect ->real_escape_string($_POST['menuname']);
$item = $letsconnect -> real_escape_string($_POST['item']);
$itemlink = $letsconnect->real_escape_string($_POST['itemlink']);
$sql = "INSERT INTO menus(menuname,item,itemlink) VALUES ('".$menuname."', '".$item."', '".$itemlink."')";
if (mysqli_query($letsconnect, $sql)) {
echo "Your data was saved successfully!";
} else { echo "Error: " . $sql . "" . mysqli_error($letsconnect);
} $letsconnect->close();
}
}
?>
<form method="post" action="<?php $_SERVER['PHP_SELF'];?>"/>

<input type="text" name="username" class="mytextbox" placeholder="Username" required/>

<input type="password" name="password" class="mytextbox" placeholder="Password" required />

<input type="email" name="email" class="mytextbox" placeholder="Email" required />

<input type="submit" value="Save Menu Item" name="saveuser" class="mybutton"/>

</form>
<form> tag.<?php
if(isset($_POST[‘saveuser])){
include('../includes/conn.php');
if ($letsconnect->connect_error) {
die("Your Connection failed: " . $letsconnect->connect_error);
}else{
$menuname = $letsconnect -> real_escape_string($_POST[‘username']);
$item = $letsconnect -> real_escape_string($_POST[‘password']);
$itemlink = $letsconnect -> real_escape_string($_POST[‘email']);
$sql = "INSERT INTO menus(username,password,email) VALUES ('".$username."', '".$password."', '".$email."')";
if (mysqli_query($letsconnect, $sql)) {
echo "Your data was saved successfully!";
} else { echo "Error: " . $sql . "" . mysqli_error($letsconnect);
} $letsconnect->close();
}
}
?>
Please note that I will be covering Password security in the tutorials that follow.
<html>

<head><title>Backend - Capture Content</title></head>

<body>

<?php

if(isset($_POST['savedata'])){

include('../includes/conn.php');

if ($letsconnect->connect_error) {

die("Your Connection failed: " . $letsconnect->connect_error);

}else{

$title = $letsconnect -> real_escape_string($_POST['title']);

$content = $letsconnect -> real_escape_string($_POST['content']);

$author = $letsconnect -> real_escape_string($_POST['author']);

$sql = "INSERT INTO content (title,content,author) VALUES ('".$title."', '".$content."', '".$author."')";

if (mysqli_query($letsconnect, $sql)) {

echo "Your data was saved successfully!";

} else { echo "Error: " . $sql . "" . mysqli_error($letsconnect);

} $letsconnect->close();

}

}

?>

<form action="<?php $_SERVER[‘PHP_SELF'];?>" method="post">

<input type="text" name="title" placeholder="Content Title here" required/>

<textarea name="content">Content Here</textarea>

<input type="text" name="author" placeholder="Author" required/>

<input type="submit" value="Save My Data" name="savedata"/>

</form>

</body>

</html>
<form> above the submit button.<input type="text" name="content_type" placeholder="Content Type" required/>;
$content_type = $letsconnect->real_escape_string($_POST['content_type']);
$sql = "INSERT INTO content (title,content,author,content_type) VALUES ('".$title."', '".$content."', '".$author."', '".$content_type."')";

require 'PhpKart.class.php';
$obj1 = new PhpKart("MainCart");
Maincart is the keyname in which $obj1 insert/modify/delete the data$obj1->add_to_cart($product_id=123,$quantity=2,$product_information=array("product_name"=>"Tomato","Price"=>20));
$obj1->add_to_cart($product_id=123,$quantity=5);
$obj1->add_to_cart($product_id=145,$quantity=3,$product_information=array("product_name"=>"Potato","Price"=>30));
$already_exists=$obj1->AlreadyExists($product_id=145);
if($already_exists !== false )
{
print_r($already_exists);
}
$obj1->remove_from_cart($product_id=145);
print_r( $obj1->getAllItems() );
echo $obj1->getTotalItems();
echo $obj1->getCartTotalAmount($priceKeyName='Price')
$obj1->clear_cart();
$obj2=new PhpKart("MyWishlist");
$obj2->add_to_cart($product_id=159,$quantity=8,$product_information=array("product_name"=>"Baby Toy","Price"=>100));
echo $obj2->getCartTotalAmount("Price");
<?php
if(!session_id()){
 @session_start();
}


class PhpKart{

private $cart_key;

public function __construct($CartkeyName)
{
$this->cart_key=$CartkeyName;
}
public function add_to_cart($product_id,$quantity='1',$product_information=array())
{
$_SESSION[$this->cart_key][$product_id]['product_id']=$product_id;
$_SESSION[$this->cart_key][$product_id]['quantity']=$quantity;
if(!isset($_SESSION[$this->cart_key][$product_id]['product_information']) && !empty($product_information)){
$_SESSION[$this->cart_key][$product_id]['product_information']=$product_information;
}
}
public function remove_from_cart($product_id)
{
unset($_SESSION[$this->cart_key][$product_id]);
}
public function clear_cart()
{
unset($_SESSION[$this->cart_key]);
}
public function getTotalItems()
{
return count($_SESSION[$this->cart_key]);
}
public function getCartTotalAmount($price_key_name)
{
$total=0;
foreach($_SESSION[$this->cart_key] as $row)
{
$total += ($row['product_information'][$price_key_name]*$row['quantity']);
}

return $total;
}
public function AlreadyExists($product_id)
{
 if (isset($_SESSION[$this->cart_key][$product_id]))
 {
	return $_SESSION[$this->cart_key][$product_id];
 }
 else
 {
	return false;
 }
}
public function getAllItems()
{
return $_SESSION[$this->cart_key];
}


}

?>

$users = [new User(), new User()];
public function getUsers(): array
{

 return $userArray;
}

public function setUsersToActiveState()
{
 $users = $this->getUsers();

 foreach ($users as $user) {
 if(!$user->getActiveStatus()) {
 $user->setActiveStatus(true);
 }
 }
}
class UsersCollection implements \IteratorAggregate
{

 private $users = [];

 public function getIterator() : UserIterator
 {
 return new UserIterator($this);
 }

 public function getUser($position)
 {
 if (isset($this->users[$position])) {
 return $this->users[$position];
 }

 return null;
 }

 public function count() : int
 {
 return count($this->users);
 }

 public function addUser(User $users)
 {
 $this->users[] = $users;
 }
}

class UserIterator implements \Iterator
{

 private $position = 0;


 private $userCollection;

 public function __construct(UsersCollection $userCollection)
 {
 $this->userCollection = $userCollection;
 }

 public function current() : User
 {
 return $this->userCollection->getUser($this->position);
 }

 public function next()
 {
 $this->position++;
 }

 public function key() : int
 {
 return $this->position;
 }

 public function valid() : bool
 {
 return !is_null($this->userCollection->getUser($this->position));
 }

 public function rewind()
 {
 $this->position = 0;
 }
}
class UsersCollectionTest extends TestCase
{

 public function testUsersCollectionShouldReturnNullForNotExistingUserPosition()
 {
 $usersCollection = new UsersCollection();

 $this->assertEquals(null, $usersCollection->getUser(1));
 }


 public function testEmptyUsersCollection()
 {
 $usersCollection = new UsersCollection();

 $this->assertEquals(new UserIterator($usersCollection), $usersCollection->getIterator());

 $this->assertEquals(0, $usersCollection->count());
 }


 public function testUsersCollectionWithUserElements()
 {
 $usersCollection = new UsersCollection();
 $usersCollection->addUser($this->getUserMock());
 $usersCollection->addUser($this->getUserMock());

 $this->assertEquals(new UserIterator($usersCollection), $usersCollection->getIterator());
 $this->assertEquals($this->getUserMock(), $usersCollection->getUser(1));
 $this->assertEquals(2, $usersCollection->count());
 }

 private function getUserMock()
 {
 }
}


class UserIteratorTest extends MockClass
{

 public function testCurrent()
 {
 $iterator = $this->getIterator();
 $current = $iterator->current();

 $this->assertEquals($this->getUserMock(), $current);
 }


 public function testNext()
 {
 $iterator = $this->getIterator();
 $iterator->next();

 $this->assertEquals(1, $iterator->key());
 }


 public function testKey()
 {
 $iterator = $this->getIterator();

 $iterator->next();
 $iterator->next();

 $this->assertEquals(2, $iterator->key());
 }


 public function testValidIfItemInvalid()
 {
 $iterator = $this->getIterator();

 $iterator->next();
 $iterator->next();
 $iterator->next();

 $this->assertEquals(false, $iterator->valid());
 }


 public function testValidIfItemIsValid()
 {
 $iterator = $this->getIterator();

 $iterator->next();

 $this->assertEquals(true, $iterator->valid());
 }


 public function testRewind()
 {
 $iterator = $this->getIterator();

 $iterator->rewind();

 $this->assertEquals(0, $iterator->key());
 }

 private function getIterator() : UserIterator
 {
 return new UserIterator($this->getCollection());
 }

 private function getCollection() : UsersCollection
 {
 $userItems[] = $this->getUserMock();
 $userItems[] = $this->getUserMock();

 $usersCollection = new UsersCollection();

 foreach ($userItems as $user) {
 $usersCollection->addUser($user);
 }

 return $usersCollection;
 }

 private function getUserMock()
 {
 }
}
public function getUsers(): UsersCollection
{
 $userCollection = new UsersCollection();

 foreach ($whatIGetFromDatabase as $user) {
 $userCollection->addUser($user);
 }
 return $userCollection;
}

public fucntion setUsersToActiveState()
{
 $users = $this->getUsers();

 foreach ($users as $user) {
 if(!$user->getActiveStatus()) {
 $user->setActiveStatus(true);
 }
 }
}
 public function addUser(User $users)
 {
 if ($user->getAge() > 18) {
 $this->users[] = $users;
 }
 }
 public function addUsers(array $users)
 {
 foreach($users as $user) {
 $this->addUser(User $users);
 }
 }
 g10dra 115,920
  mike 79,228
  crocodile2u 78,014
  harikrishnanr 62,288
  calevans 37,813
  MindNovae 28,767
  dmamontov 19,371
  tanja 16,711
  damnjan 13,135
  ahmedkhan
 SPONSORS

SPONSORS