Learn from your fellow PHP developers with our PHP blogs, or help share the knowledge you've gained by writing your own.

WebSockets have compatibility with 96.5% of clients globally
OnConnection method.OnOpen gets called when a new connection is made.OnClose gets called when a client quits. It's essential to keep an eye on memory management, and essential to keep tidying up as you move through the code.OnError gets called when there is an exception faced by the user.OnMessage gives the text of the JSON message, which is being exchanged with the client.

CREATE TABLE 'mydbname'.'menus' ( 'ID' INT(11) NOT NULL AUTO_INCREMENT , 'menuname' VARCHAR(100) NOT NULL , 'item' VARCHAR(50) NOT NULL , 'itemlink' VARCHAR(100) NOT NULL , PRIMARY KEY ('ID')) ENGINE = MyISAM COMMENT = 'menu table';
CREATE TABLE 'mydbname'.'users' ( 'ID' INT(11) NOT NULL AUTO_INCREMENT , 'username' VARCHAR(100) NOT NULL , 'password' VARCHAR(50) NOT NULL , 'email' VARCHAR(100) NOT NULL , PRIMARY KEY ('ID')) ENGINE = MyISAM COMMENT = 'user table';
ALTER TABLE 'mydbname'.'content' ADD content_type VARCHAR(50);
<form method="post" action="<?php $_SERVER['PHP_SELF'];?>"/>

<input type="text" name="menuname" class="mytextbox" placeholder="Menu Name" required />

<input type="text" name="item" class="mytextbox" placeholder="Item" required />

<input type="text" name="itemlink" class="mytextbox" placeholder="Item Link" required />

<input type="submit" value="Save Menu Item" name="savemenu" class="mybutton"/>

</form>
<form> tag.<?php
if(isset($_POST['savemenu'])){
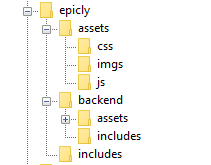
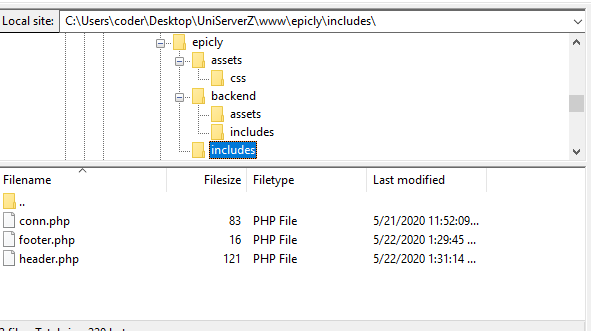
include('../includes/conn.php');
if ($letsconnect->connect_error) {
die("Your Connection failed: " . $letsconnect->connect_error);
}else{
$menuname = $letsconnect ->real_escape_string($_POST['menuname']);
$item = $letsconnect -> real_escape_string($_POST['item']);
$itemlink = $letsconnect->real_escape_string($_POST['itemlink']);
$sql = "INSERT INTO menus(menuname,item,itemlink) VALUES ('".$menuname."', '".$item."', '".$itemlink."')";
if (mysqli_query($letsconnect, $sql)) {
echo "Your data was saved successfully!";
} else { echo "Error: " . $sql . "" . mysqli_error($letsconnect);
} $letsconnect->close();
}
}
?>
<form method="post" action="<?php $_SERVER['PHP_SELF'];?>"/>

<input type="text" name="username" class="mytextbox" placeholder="Username" required/>

<input type="password" name="password" class="mytextbox" placeholder="Password" required />

<input type="email" name="email" class="mytextbox" placeholder="Email" required />

<input type="submit" value="Save Menu Item" name="saveuser" class="mybutton"/>

</form>
<form> tag.<?php
if(isset($_POST[‘saveuser])){
include('../includes/conn.php');
if ($letsconnect->connect_error) {
die("Your Connection failed: " . $letsconnect->connect_error);
}else{
$menuname = $letsconnect -> real_escape_string($_POST[‘username']);
$item = $letsconnect -> real_escape_string($_POST[‘password']);
$itemlink = $letsconnect -> real_escape_string($_POST[‘email']);
$sql = "INSERT INTO menus(username,password,email) VALUES ('".$username."', '".$password."', '".$email."')";
if (mysqli_query($letsconnect, $sql)) {
echo "Your data was saved successfully!";
} else { echo "Error: " . $sql . "" . mysqli_error($letsconnect);
} $letsconnect->close();
}
}
?>
Please note that I will be covering Password security in the tutorials that follow.
<html>

<head><title>Backend - Capture Content</title></head>

<body>

<?php

if(isset($_POST['savedata'])){

include('../includes/conn.php');

if ($letsconnect->connect_error) {

die("Your Connection failed: " . $letsconnect->connect_error);

}else{

$title = $letsconnect -> real_escape_string($_POST['title']);

$content = $letsconnect -> real_escape_string($_POST['content']);

$author = $letsconnect -> real_escape_string($_POST['author']);

$sql = "INSERT INTO content (title,content,author) VALUES ('".$title."', '".$content."', '".$author."')";

if (mysqli_query($letsconnect, $sql)) {

echo "Your data was saved successfully!";

} else { echo "Error: " . $sql . "" . mysqli_error($letsconnect);

} $letsconnect->close();

}

}

?>

<form action="<?php $_SERVER[‘PHP_SELF'];?>" method="post">

<input type="text" name="title" placeholder="Content Title here" required/>

<textarea name="content">Content Here</textarea>

<input type="text" name="author" placeholder="Author" required/>

<input type="submit" value="Save My Data" name="savedata"/>

</form>

</body>

</html>
<form> above the submit button.<input type="text" name="content_type" placeholder="Content Type" required/>;
$content_type = $letsconnect->real_escape_string($_POST['content_type']);
$sql = "INSERT INTO content (title,content,author,content_type) VALUES ('".$title."', '".$content."', '".$author."', '".$content_type."')";

<html>
<head>
<title>My Awesome CMS – Page Title</title>
</head>
<body>
</body>
</html>
</head> tag. <link href=”../assets/css/style.css” type=”text/css” rel=”stylesheet”/>
<?php tag. <div id="myfirstid"></div>
<div class="myfirstclass"></div>
<div class="myfirstclass"></div>
<div class="myfirstclass"></div>
<div class="myfirstclass"></div>
<div class="myfirstclass"></div>
#myfirstid{
Background:lightblue;
Font-family:Arial;
Font-size:44px;
Font-weight: Bold;
}
.myfirstclass{
Font-size:15px;
Color: darkblue;
}
include(‘includes/header.php’);
<divs> we used for practice earlier, we have something better in store! include(‘includes/footer.php’);
foreach($getmydata as $mydata){ echo "Title: "; echo $mydata['title']; echo "<br/>"; echo "Content: "; echo $mydata['content']; echo "<br/>"; echo "Author: "; echo $mydata['author']; echo "<br/>"; echo "<br/>";
?>

<div id=”myfirstid”>
<?php
foreach($getmydata as $mydata){
echo "<div class=”myfirstclass”>Title: ";
echo $mydata['title'];
echo "<br/>";
echo "Content: ";
echo $mydata['content'];
echo "<br/>";
echo "Author: ";
echo $mydata['author'];
echo "</div><br/><br/>";
}?>
</div>
<?php
<?php
include('includes/header.php');
include('includes/conn.php');

if ($letsconnect -> connect_errno) { echo "Error " . $letsconnect -> connect_error;

}else{

$getmydata=$letsconnect -> query("SELECT * FROM content");

?>
<div id="myfirstid">
<?php
foreach($getmydata as $mydata){
echo "<div class=”myfirstclass”>Title: ";
echo $mydata['title'];
echo "<br/>";
echo "Content: ";
echo $mydata['content'];
echo "<br/>";
echo "Author: ";
echo $mydata['author'];
echo "</div><br/><br/>";
}
?>
</div>
<?php
}

$letsconnect -> close();
include('includes/footer.php');
?>

We highly recommend that you follow these tutorials on a localhost testing server like Uniserver. Read through Part 1 here to look at our recommendations. These tutorials follow a phased approach and it is highly recommended that you do not make snippets of code live prior to completing this tutorial series.
$sql = "INSERT INTO content(title,content,author)VALUES ('".$_POST["title"]."', '".$_POST["content"]."', '".$_POST["author"]."')";
$title = $letsconnect -> real_escape_string($_POST['title']);

$content = $letsconnect -> real_escape_string($_POST['content']);

$author = $letsconnect -> real_escape_string($_POST['author']);
$letsconnect? This was used because of our db connection defined in conn.php.$sql = "INSERT INTO content (title,content,author) VALUES ('".$title."', '".$content."', '".$author."')";
$sql. g10dra 117,798
  mike 79,757
  crocodile2u 78,307
  harikrishnanr 62,360
  calevans 37,904
  MindNovae 28,860
  dmamontov 19,412
  tanja 16,746
  damnjan 13,186
  ahmedkhan
 SPONSORS

SPONSORS