PHP & Web Development Blogs

Search Results For: development
Showing 11 to 15 of 27 blog articles.
9719 views · 3 years ago


Welcome back!, if you’re new please be sure to read Part 1 here.


This tutorial will focus primarily on Security and will touch on how to plan functionality.

Planning out an application and seeing progress regularly is a good strategy as you are most likely to complete your tasks in a timely fashion with this approach.

Ready?, ok let’s jump into it!

DISCLAIMER


We highly recommend that you follow these tutorials on a localhost testing server like Uniserver. Read through Part 1 here to look at our recommendations. These tutorials follow a phased approach and it is highly recommended that you do not make snippets of code live prior to completing this tutorial series.
Where we left off – the serious stuff.


In the previous tutorial we saved variables to the database.

It’s important to note that further steps are needed to ensure that data transactions to / from the database are secure.

A great first step is to ensure that all POST data (data transmitted after a user clicks a form’s submit button) is sanitized.

What we’re trying to prevent


One of the most common exploits is SQL Injection, an attack most commonly used to insert SQL into db queries. POST data that’s not sanitized leaves a huge security hole for malicious exploits. In some cases SQL injection can be leveraged to rage an all out assault on a server’s operating system.

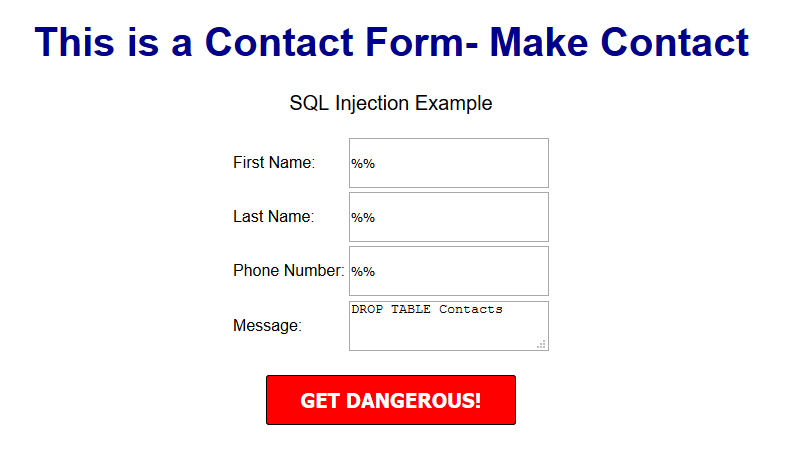
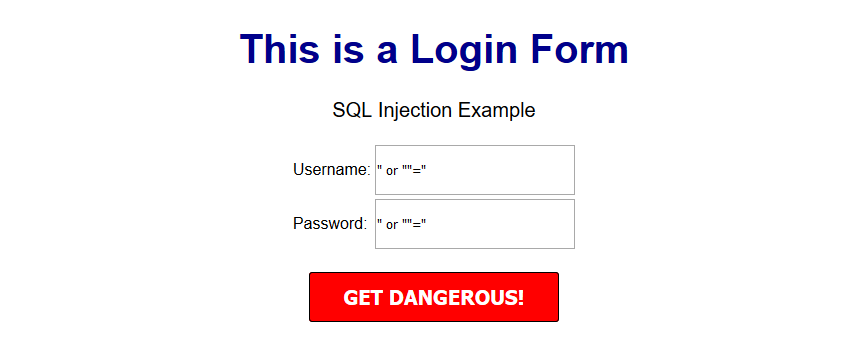
A few examples of a basic version of what this might look like can be seen below.


OUTCOME


This might delete your database table


OUTCOME


This might provide access to the entire user table and the password protected area/dashboard.


***Please note that there are various types of SQL injection techniques and I will delve into this during the course of this series.***


So what exactly is sanitization and what does it do?


When sanitizing POST data, we are essentially looking for any special characters that are often used in SQL injection attacks.

In many ways, this tiny piece of code is the unsung superhero of many database driven applications.

Let’s secure that POST data!


Navigate to your backend folder and open index.php

Locate the following line of code:

$sql = "INSERT INTO content(title,content,author)VALUES ('".$_POST["title"]."', '".$_POST["content"]."', '".$_POST["author"]."')";


Ok, let’s get to work.

Based on what I mentioned a few moments ago, it’s clear that our SQL statement is vulnerable so we need to sanitize the POST data pronto!

The method I will focus on first is $mysqli->real_escape_string. This will escape any special characters found in the POST data.

Add the following just above your $sql.

$title = $letsconnect -> real_escape_string($_POST['title']);

$content = $letsconnect -> real_escape_string($_POST['content']);

$author = $letsconnect -> real_escape_string($_POST['author']);


Did you notice the use of $letsconnect? This was used because of our db connection defined in conn.php.

Our new query will look like this:

$sql = "INSERT INTO content (title,content,author) VALUES ('".$title."', '".$content."', '".$author."')";


Go ahead and replace the old $sql.

Phew!, we can breathe easy now.

Next, let’s lighten things up a bit by focusing on functionality and aesthetics.


A phased approach is the best way to tackle projects of any size.

I tend to jot this down on paper before creating a more legible professional spec!.

Typically the phased approach lends itself to logical progression.

For example, over the next several days I will go over the following:

* Account Access
* The login process
* The registration process
* The password recovery process
* Frontend
* The look and feel
* Menus
* Sidebars
*Main Content
*Footer
* Backend
* Content Management
* Add/Edit/Delete
* Security

This will give us a good springboard to delve into more complex functionality.

The aesthetic I have in mind will be barebones at first with clean CSS practices (this will make life a whole lot easier when we have to make changes down the line!).

Challenge :


Plan out your own CMS, think about the user interface and design choices you’d like to implement, and create a phased approach.

Conclusion


I hope this tutorial encouraged you to think about security and understand one of the most common exploits. During the course of this series, you will receive the tools necessary to beef up security while maintaining your sanity!

Next up


CodeWithMe – Let’s go templating.
9662 views · 5 years ago
Conferences are always looking for speakers - it can be hard to keep track of them all and the requirements they have. I wanted to put together this quick guide to make it easy for you to apply. Make sure to apply because as Wayne Gretzky said “You miss 100% of the shots you don’t take”!!!

phpDay 2019

First we have phpDay 2019 which will take place on May 10 & 11 at Hotel San Marco in Verona, Italy. Some facts about this call for papers:
*Submission deadline: February 4, 2019
*Submit via: https://cfp.phpday.it/
* For more info on the conference: https://2019.phpday.it/
* Twitter: (@phpday)
* Speaker package includes: Full conference pass (jsDay + phpDay), speaker dinner the first night, lunch, reception and activities included in regular conference.
* For speakers remote to the Area: A refund of up to €200 for travel costs (or €500 from US or extra-EU), 2 complimentary hotel nights (+1 hotel night for speakers presenting multiple talks or US/extra-EU) and Taxi fare from/to the airport.
*In Submission: make sure your talk title and abstract define the exact topic you want to talk about and what you hope people will learn from the session.
*Talk Ideas: APIs (REST, SOAP, etc.), Architectures, Continuous Delivery, Databases, Development, Devops, Frameworks, Internals, PHP 7.x / PHP 8, Security, Testing and UI/UX.

ScotlandPHP

Next we have ScotlandPHP which will take place on November 8 & 9 at Edinburgh International Conference Centre in Edinburgh, Scotland.
*Submission deadline: April 22, 2019
*Submit via: https://cfs.scotlandphp.co.uk/
* For more info on the conference: https://conference.scotlandphp.co.uk/
* Twitter: (@scotlandphp)
* Speaker package: Full conference pass, lunch, receptions and activities included in regular conference.
* For speakers remote to the Area: Complimentary airfare/travel, 2 complimentary hotel nights and we'll pick you up and drop you off to/from the airport so you don't have to worry about it.
* Speakers will be provided with a projector, a wireless lapel microphone and a screen for their presentation (size depends on the room). Speakers should bring any equipment they need to connect to projectors (VGA). It is also suggested that you reduce your dependency on the in-house internet connection as possible. We will however provide HDMI and Mini Display Port connections for all speakers on request. If you need something different or your selected talk needs audio equipment just let us know. We'll work it out.
* Looking for talks and workshops (November 8th).
*Talk Ideas: Virtualization and environments, Javascript, Alternate PHP run-times, PHP internals, Development principles, Security, Mobile-first design, Testing (unit, functional, etc.), Version control, User Experience/Usability, Building APIs (REST, SOAP, whatever), Continuous Integration, Framework-related topics, and Professional development.

Global diversity CFP day

In 2019 there will be numerous workshops hosted around the globe encouraging and advising newbie speakers to put together your very first talk proposal and share your own individual perspective on any subject of interest to people in tech.
* Twitter: (@gdcfpday)
*Save the Date: March 2, 2019
*Register here: https://www.globaldiversitycfpday.com/?utm_source=scotphp

CoderCruise

Then there is CoderCruise which will take place on August 19-23. It's a cruise that takes off from Port Canaveral, Florida and goes to the Bahamas.
* Twitter: (@codercruise)
*Submission deadline: March 3, 2019
*Submit via: https://www.papercall.io/codercruise-2019
* For more info on the conference: https://www.codercruise.com/
* This is a polyglot conference so looking for speakers on a wide variety of languages (PHP, JavaScript, Java, Python, etc.) and on various tech topics.

PHP Conference Asia 2019

There is also PHP Conference Asia 2019, which will take place on June 24-25 at Microsot Singapore.
*Submission deadline: March 8, 2019
*Submit via: https://cfp.phpconf.asia/
* For more info on the conference: https://2019.phpconf.asia/
* Twitter: (@PHPConfAsia)
* Speaker package includes: Speaker package: Full conference pass, lunch, receptions and activities included in regular conference. We'll pick you up and drop you off to/from the airport so you don't have to worry about it. Speakers' dinner on the first evening of the conference (24th June 2019). Transport to and from the conference venue will be included
* For speakers remote to the Area: 2 complimentary hotel nights and
we can consider providing grants to partially cover the air-fare for speakers who might have financial difficulties. This is on a case-by-case basis.
* Speakers will be provided with a projector, a wireless hand-held microphone and a screen for their presentation. Speakers should prepare their slides in 4x3 aspect ratio. Speakers should bring any equipment they need to connect to projectors (HDMI). It is also suggested that you reduce your dependency on the in-house internet connection as possible.
*In Submission: Make sure your talk title and abstract define the exact topic you want to talk about and what you hope people will learn from the session.
*Talk Ideas: Virtualization and environments, Javascript, Alternate PHP run-times, PHP internals, Development principles, Security, Mobile-first design, Testing (unit, functional, etc.), Version control, User Experience/Usability, Building APIs (REST, SOAP, whatever), Continuous Integration, Framework-related topics, and Professional development.

Cascadia PHP

Another conference to apply to is Cascadia PHP, which will take place on September 19-21 at University Place Hotel & Conference Center in Portland, Oregon.
*Submission deadline: April 15, 2019
*Submit via: https://cfp.cascadiaphp.com/
* For more info on the conference: https://www.cascadiaphp.com/venue
* Twitter: (@CascadiaPHP)
* Speaker package includes: Speaker package: Full conference pass, lunch, receptions and activities included in regular conference. For speakers remote to the Area: Complimentary airfare/travel, 2 complimentary hotel nights and we'll pick you up and drop you off to/from the airport so you don't have to worry about it.
Speakers will be provided with a projector, a wireless lapel microphone and a screen for their presentation (size depends on the room). Speakers should bring any equipment they need to connect to projectors (VGA). It is also suggested that you reduce your dependency on the in-house internet connection as possible.
*In Submission: make sure your talk title and abstract define the exact topic you want to talk about and what you hope people will learn from the session.
*Talk Ideas: PHP internals, Version control, Framework-related topics, Building APIs (REST, SOAP, whatever), Mobile-first design, Professional development, Testing (unit, functional, etc.), Alternate PHP run-times, Development principles, Continuous Integration, Getting involved in the PHP community, User Experience/Usability, Technology at large, Security, Connecting to Different APIs, Development Tools, Virtualization and environments, Javascript, Modern hosting practices, Language Features, Databases, Refactoring legacy applications, Running/contributing to open source projects, AI and AR, and User Groups.

Nomad PHP

Last but not least - this is an ongoing call for papers. This is perfect if you want to present from the comfort of your office, home or really wherever you are. It’s via RingCentral meetings and will be live and recorded. This is for none other than Nomad PHP.
* Twitter: (@nomadphp)
* Deadline: Anytime :D
* Talk length: 45 - 60 minutes.
* Talks should be unique to Nomad PHP and not available in video format online.
* Talk should not be recorded or made available elsewhere online for at least 3 months following your talk.
* The talk will be featured on our page and promoted via social media.
* Speakers will receive a financial stipend.
* Upon being selected we will reach out with further details.
*Talk ideas: AI & Machine Learning, APIs, Containerization, Databases, DevOps, Documentation, Frameworks, Performance, Security, Serverless, Testing, Tools, Upgrading/ Modernization, and more.
*Submit here: https://www.papercall.io/nomadphp
Now that you have some information - make sure to apply to all of these options! Can't wait to see all of your awesome talks you present :D!
8792 views · 3 years ago


Welcome back! If you’re new to this series have a look at Part 1 here


Today’s focus is on templating, the aesthetic that will make or break your web application.

Having a clean design with well defined CSS that’s responsive and user friendly goes a long way.

Developers often stick to their lane but delving into templating will bode in your favor, you can indeed
create a functional and launch-worthy application all on your own!

Let’s jump into it!

Structured structure


Everything you tackle should be found with ease down the line. Therefore careful planning is fundamental to the success and sustainability of your project. You’ll also find that clearly defining your work lends itself to more productivity overall as you spend less that explaining your work during a handover / looking for a specific piece of code or resource. You’ll probably end up spending more time on actual work.
Finding your own unique pattern with file structure and CSS identifiers will also work in your favor as something unique to your process will most likely be easier to remember and form a tactile relationship with.

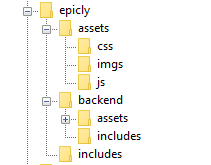
Our project’s current structure looks like this:


>If you need to backtrack, Part 1 is a great place to start!

In part 1, we created our index.php which displays info from our database.

Let’s take this a step further and create a header and a footer for our index.php

Create a file called header.php and save this to your includes folder.

Next, create a file called footer.php and save this to your includes folder.

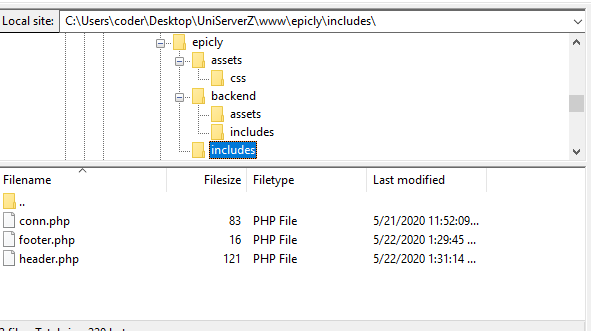
Your file structure should now look like this.


A header above all the rest


The header file will be a file we reuse throughout your web application. This file will contain important information that’s vital to the functionality and aesthetic of your website.
The type of info you’ll expect to see in a header.php file:
Script includes
Such as JQuery and important libraries
CSS includes
CSS files loaded from internal or external sources
Meta information
Contains important information that’s readable by search engines.
The basic structure of the beginning of your app, including your menu, and your logo.
For now, how header is going to have a basic layout.

Let’s get our HTML on!

<html>
<head>
<title>My Awesome CMS – Page Title</title>
</head>
<body>


A footer that sets the bar

Create a file called footer.php and save it to your includes folder (yourcms/includes/footer.php).

Add this code to your new file.

</body>
</html>


Next, let’s focus on the gravy… The CSS


CSS, when written beautifully, can truly set you apart.

You can tell your web application to load various styles to specific elements by defining unique identifiers.
Styles that are only used once are denoted with a # (a CSS “ID”) whereas styles that are reused multiple times are denoted with a . (a CSS “class”)

The best way to delve into the realm of CSS is to learn by experience.

Let’s create!


First, we need to create and load our CSS file. Remember our nifty new pal header.php? This created a convenient way to load our CSS file!

Add the following code to your header.php just above the </head> tag.

<link href=”../assets/css/style.css” type=”text/css” rel=”stylesheet”/> 


The ../ in the link to our stylesheet means we have to leave the current directory (the directory that header.php is in) and look for the assets/css/ directories.

Go ahead and create the css folder under your assets folder.

Next we’re going to create some simple CSS to test things out.

It’s time to add some style!


We are going to create two divs.
A div is a divider / section in HTML.
Add this to your index.php (located in your CMS’ root folder) above the <?php tag.

<div id="myfirstid"></div>
<div class="myfirstclass"></div>


Then, create a CSS file

Add this:

#myfirstid{
Background:lightblue;
Font-family:Arial;
Font-size:44px;
Font-weight: Bold;
}
.myfirstclass{
Font-size:15px;
Color: darkblue;
}


Save your newly created CSS to assets/css/ as style.css.

Pulling it all together, let’s see what we can do!


Let’s apply what we just learned to our index.php. But first, we should add our header.php and footer.php files.

Including everyone


Add this to the top of your index.php file:

include(‘includes/header.php’);


Remove the <divs> we used for practice earlier, we have something better in store!

Add this to the bottom of your index.php:

include(‘includes/footer.php’);


Next, let’s modify our code so we can add some style to the data we retrieve from our database.

Modify the following line:
foreach($getmydata as $mydata){ echo "Title: "; echo $mydata['title']; echo "<br/>"; echo "Content: "; echo $mydata['content']; echo "<br/>"; echo "Author: "; echo $mydata['author']; echo "<br/>"; echo "<br/>";


as follows:
?>

<div id=”myfirstid”>
<?php
foreach($getmydata as $mydata){
echo "<div class=”myfirstclass”>Title: ";
echo $mydata['title'];
echo "<br/>";
echo "Content: ";
echo $mydata['content'];
echo "<br/>";
echo "Author: ";
echo $mydata['author'];
echo "</div><br/><br/>";
}?>
</div>
<?php


Your full index.php should now look like this:

<?php
include('includes/header.php');
include('includes/conn.php');

if ($letsconnect -> connect_errno) { echo "Error " . $letsconnect -> connect_error;

}else{

$getmydata=$letsconnect -> query("SELECT * FROM content");

?>
<div id="myfirstid">
<?php
foreach($getmydata as $mydata){
echo "<div class=”myfirstclass”>Title: ";
echo $mydata['title'];
echo "<br/>";
echo "Content: ";
echo $mydata['content'];
echo "<br/>";
echo "Author: ";
echo $mydata['author'];
echo "</div><br/><br/>";
}
?>
</div>
<?php
}

$letsconnect -> close();
include('includes/footer.php');
?>


Go ahead, test it out!

There’s a lot to unpack and I will break things down a little more during our next tutorial!

Challenge


Study the final index.php and try to form a few theories about why closing a php tag is necessary before adding raw html.

Next Up: #CodeWithMe Part 4: Building A Good Base

8609 views · 5 years ago
Underclocking a Website

For those of you not familiar with the concept of underclocking: it's the opposite of overclocking, that is, you don't speed up CPU but instead slow it down..

What for?

Ask the underclockers, I'm totally not sure. Actually, hanging around the Web these days leaves a feeling that nearly every website out there must have been underclocked, but most of the time it's about tons of unnecessary images, megabytes of javascript (of which hardly a hundred kilobytes gets actually executed), and all that. In this post I will, however, tell you about a server-side approach to underclocking, with a help of our good old friend - the MySQL Database Server.

Today I had a nice chat in my client's development telegram channel. The two other devs, R** and V**, were making a switch of the old image API app to a new MySQL server. A couple of days before that, we have discussed a plan, it was as dumb as possible, just as I like it. Super-simple clear steps that a five-year-old can make. Switch to readonly mode (stop uploads), dump DB, restore the dump on the new server, update database connection details, turn off readonly mode. What could possibly go wrong?

Nothing. Except that it did go wrong. The app that I'm talking about, is a really ancient piece of what is gently called "legacy". Once the app was back to normal again, we noticed a significant slowdown on every page that made use of images. Before that point, I never got to that app and/or its database. I logged in to the MySQL console, and started investigating, at the same point chatting with colleagues.

Me: Is that really important that the tables are MyISAM? It's 2018, you know.. There are dozens of queries in queue waiting for table-level locks.

R**: Are they MyISAM? Really?

Me: Yes.. Any objection against converting them to InnoDB? With the current state of the website, with all those tons of Gateway Timeouts, it's not going to make it worse if I do it right now..


    . minutes later:

Me: Nah, it didn't help a lot.. But, looking at the SHOW PROCESSLIST output, I see something weird. What, do you think, this query does? SELECT LAST_INSERT_ID() FROM images? 

R**: ehh... Gets you the last AUTO_INCREMENT id from images table?

Me: Let's play another good news bad news joke.. Good news: you're right, it gets you the last AUTO_INCREMENT id. Bad news: it's not for table, it's for the session. Worse news: this query gets you the last AUTO_INCREMENT id and does it exactly as many times as there are rows in the images table. how many are there?

R**: about 8mln. #@%&! It's sending 8mln rows on every image upload, through the network!

Me: Bingo! 8mln rows, with one and the same integer value in all of them.

R**: Ouch... Aaaand... Before today, it was not an issue. Because the database was on the same server as the application..

Me: Exactly, it used the loopback interface, and now it's using ehternet, which, apparently, doesn't have a super good bandwidth. We don't have a gigabit channel between servers, do we?

R**: No, it's 100 Mbit

Me: Are you fixing the query, BTW?

R**: yeah, man, deploying it...

Another 10 minutes later, problem is gone, performance is back to normal.

What conclusions can one make from this story?

I can think of two at least:
First: never underestimate legacy code. The ways it can move to bite you in the ass, are mysterious.
Second: if you're working with MySQL or another RDBMS, learn SQL, learn the specific SQL dialect you're using and learn how to trouble shoot issues. In this case, I did not need to look in the PHP code at all in order to help my fellow colleagues out. You can also generalize this principle as "you have to know the tools you're using".

Happy optimizing, folks! Comments appreciated!
8305 views · 3 years ago
Web Sockets in PHP

In his talk Websockets in PHP, John Fransler walks us through the use of WebSockets in PHP.

While discussing bi-directional real-time application development, John notes that PHP is often not invited to the table due to its lack of native support. Of all the possible attempts to bring in PHP on this stage of real-time development, Ratchet, a PHP WebSocket library, comes closest. "Ratchet is a loosely coupled PHP library providing developers with tools to create real-time, bi-directional applications between clients and servers over WebSockets."* Ahem!

Today's dynamic world


In today's dynamic content world of the internet, it is required to serve real-time bi-directional messages between clients and servers. WebSockets are simple, full-duplex, and persistent. They work over Http and are a standard today.

WebSockets have compatibility with 96.5% of clients globally

There's a very high chance your client has the necessary plumbing to access your content via WebSockets. WebSockets gives the ability to have real-time data on to your clients without the need for polling.

To understand WebSockets, John takes an example of a Javascript client and Ratchet Server. Javascript has everything built in to allow access to a socket. For example, you can use the send method on a WebSocket variable to send a message to the server, or if you want to respond to a message from the server, you use the OnConnection method.

While on the Server, John uses Ratchet, which is built on React PHP. A server script is then configured and set up to run and listen on a port for incoming HTTP requests. For messages, JSON is used, and to find public methods, a router is set up. He then goes on to instantiate the server-side script in Ratchet.

There are four functions of a Ratchets message component interface that are used in this example:

OnOpen gets called when a new connection is made.

OnClose gets called when a client quits. It's essential to keep an eye on memory management, and essential to keep tidying up as you move through the code.

OnError gets called when there is an exception faced by the user.

OnMessage gives the text of the JSON message, which is being exchanged with the client.

For Initialization, Jason continues to walk through the example. He shows how one can loop through the clients, both inside the server and outside the server. Outside the server, it’s a feature of React PHP. On database access, and with traditional standard synchronous MySQL in PHP, what usually happens is that it forces the code to wait for the query to return a result and do nothing — Fortunately, with Asynchronous MySQLi, that is not the case.

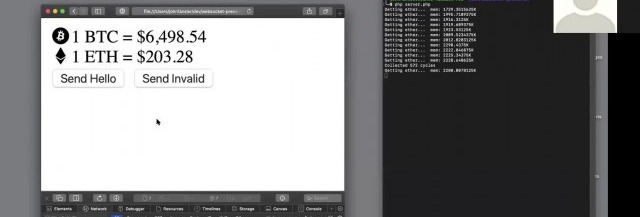
John gets into the details explaining Variables, References & Pointers. He also gives a demo where a central site has updated information on the Bitcoin and ether prices. A client terminal reflects the last values. Now the client doesn't have to poll the server for new values. When there is a change in the Bitcoin or ether values, the server pushes down the client's update. No polling helps with a lot of overheads and gets closer to real-time.

Using Supervisord


For Long-running applications - Jason recommends running a supervisord, use proxy to expose the port, and add a site certificate. Supervisord keeps an eye out for the server running the service; it can be used to restart the service and log any service issues. Recommended proxies are AWS load balancer, Nginx, and HA Proxy. For scalability, use multiple smaller WebSocket servers and a smaller number of clients per server used and load balancing. If one has to support a chat feature to allow clients to talk to each other in near real-time, it is recommended to use Redis. The Redis server proxies the messages between the server nodes.

The talk concludes with John summarizing best practices on error handling and takes QnA on various aspects of WebSockets such as handling load balancers and asynchronous calls to MSQLi.

The presentation for this video, along with the code, is hosted at John Curt's GitHub. More info about John's current areas of interest can be found on John's Blog.

Watch the video now


Related videos

SPONSORS